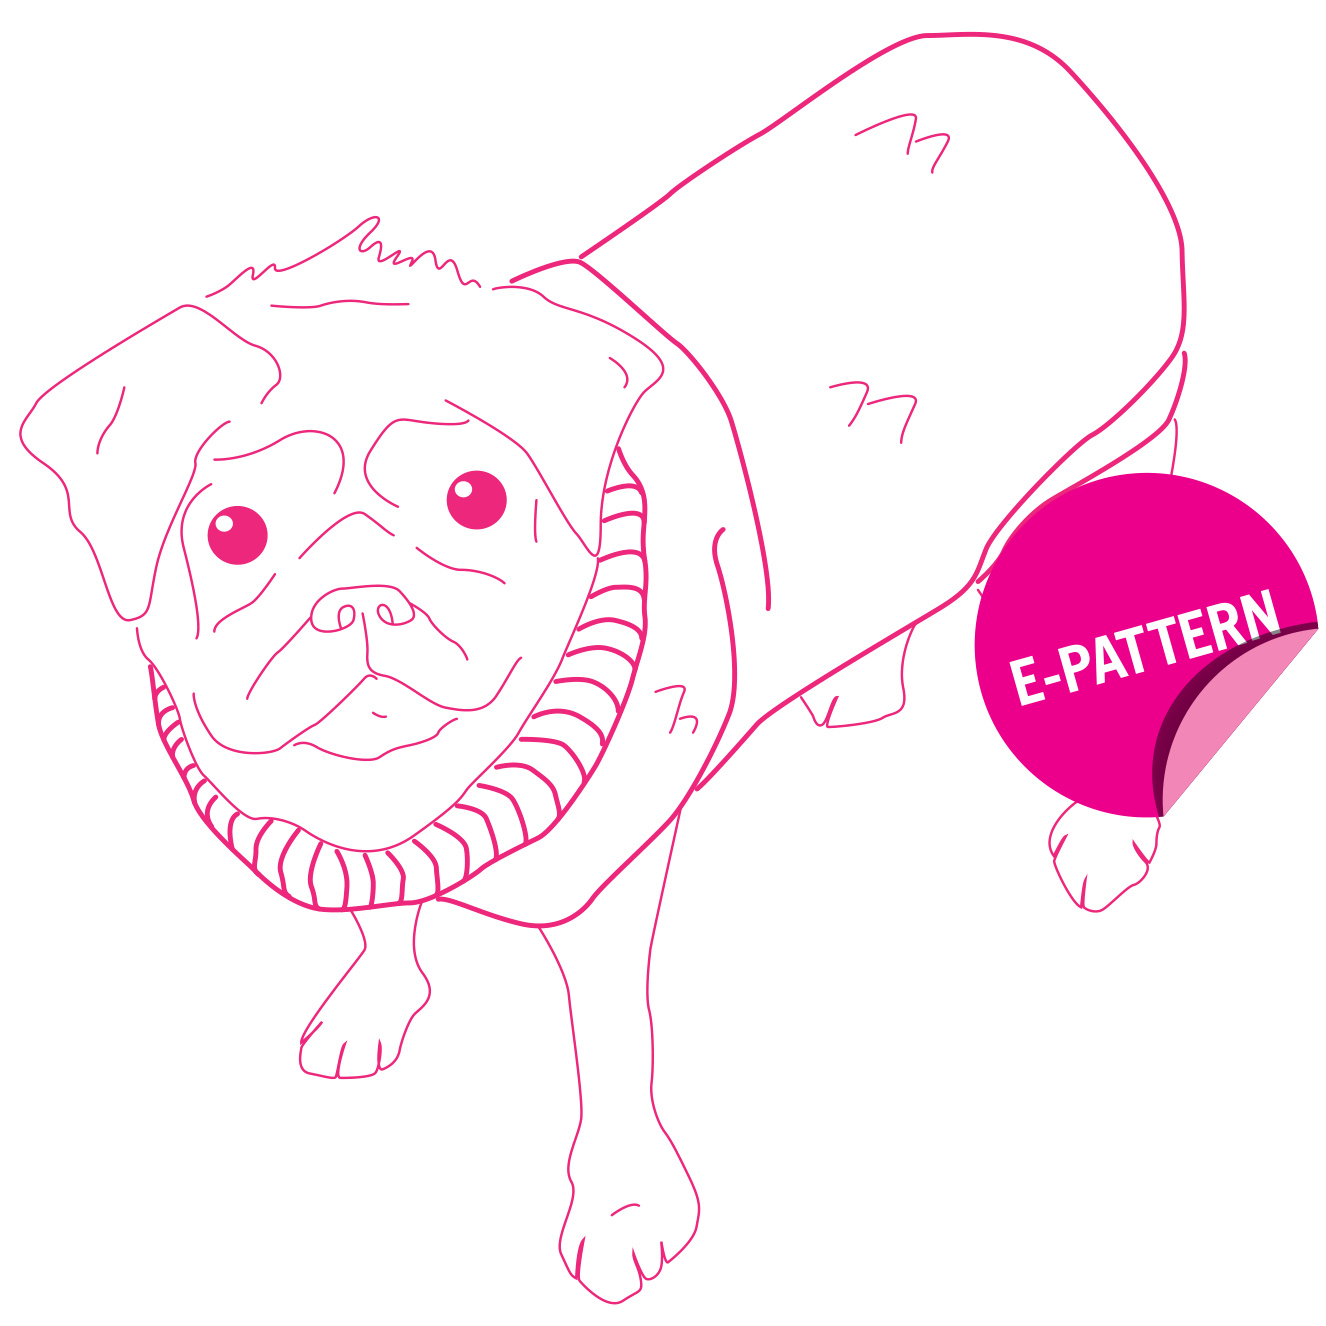
HOT DAWG
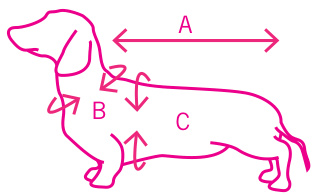
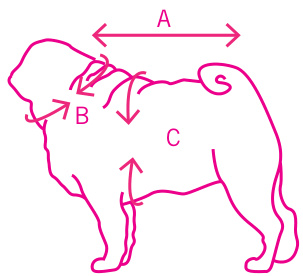
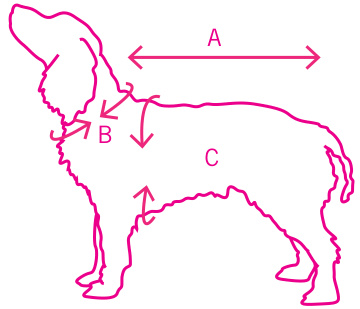
Teeny tiny dawg A: 33 cm/13" B:25cm/10" C:35cm/14" Pug dawg A: 38cm/ 15" B:38cm/15" C:50cm/20" Mid dawg A: 42 cm/16.5" B:36cm/14" C:54cm/21" Who let the dogs out! Like pet, like owner... Our darling pooches need to be stepping out in style as much as we do. Keep your pooch warm in our Hot Dawg coat tobrave the coldest of days.
TOOLKIT
1 [2] 2 balls of WATG's Crazy Sexy Wool 10mm (15US) knitting needles yarnneedle THE TECHNIQUES Casting on 1x1 Rib stitch Stocking stitch Increasing Decreasing Casting off
FINISHEDGARMENTMEASUREMENTS:
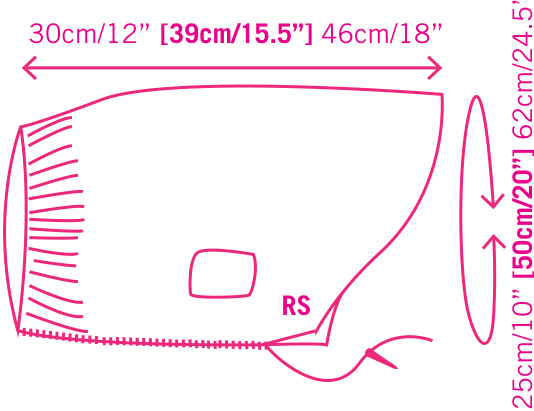
Teeny tiny dawg Chest: 24.5 cm/10" Length: 30 cm/12" Pug dawg Chest: 50 cm/20" Length: 39 cm/15.5" Mid dawg Chest: 62 cm/24.5" Length: 46 cm/18"
TENSION
To ensure your knitting has the same measurements as the pattern, it is a good idea to make a tension swatch before you start knitting your project. A tension swatch is a small sample of your knitting where you count the stitches and rows and check them against the tension given in the pattern. If you get MORE stitches/rows than the pattern's tension, it means your knitting is tighter. If you get FEWER stitches/rows than the pattern, your knitting is looser. Sometimes, it works to knit tighter or looser to compensate. When you make your swatch, make sure it is large enough for you to measure 10 cm/4" without including the stitches/rows closest to the edges (as these often have a slightly different tension). When you're done swatching, simply unravel and re-use the yarn to start knitting your Hot Dawg.
Stocking stitch
10 cm/4" = 9 stitches 10 cm/4"= 12 rows
HOWTOKNITYOURHOTDAWG
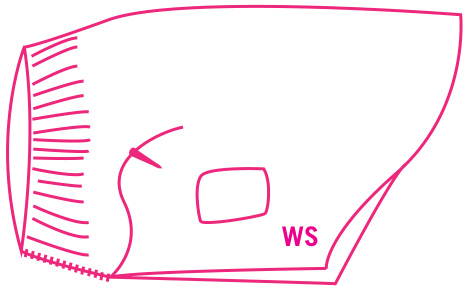
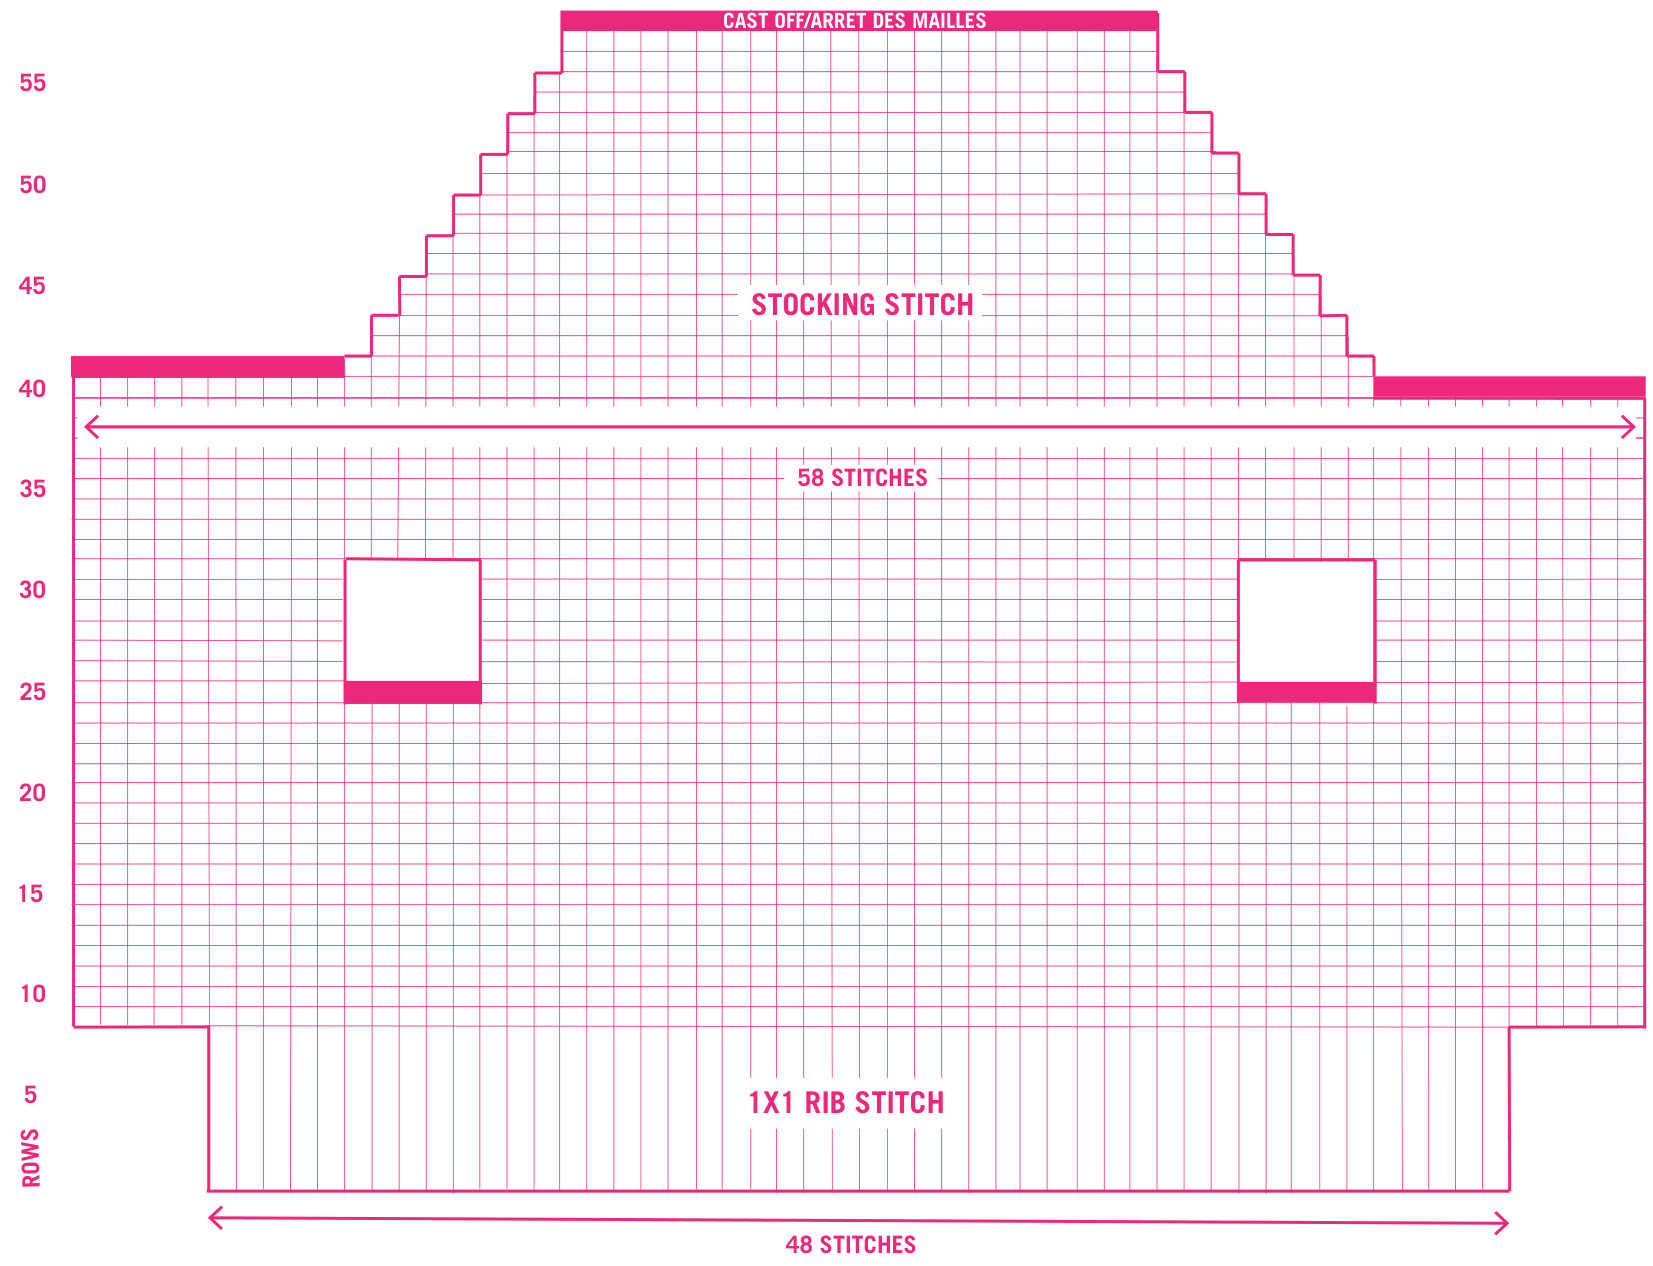
This sweater can be made in three sizes. When the instructions differ between sizes, information is given for the smallest size first, then for the medium size in square brackets and finally the largest size (example: Teeny tiny dawg [Pug dawg] Mid dawg). Cast on 20[42] 48 stitches using the longtail cast on. 2 Work in 1xl rib stitch for 4 rows. 3 Knit 1 [1] O row - this will form the fold in the rollneck. (Note: the largest size does not have a rollneck, which is why you don't need this folding row!) Work 4 rows in 1x1 rib stitch. 5 Small size only: ★Purl 4 stitches, make a new stitch.★ Repeat the section inside the little stars(★)another 3 times,then purl the last 4 stitches. You now have 24 stitches. Medium size: ★Purl 6 stitches, make a new stitch.★ Repeat the section inside the little stars(★) another 5 times,then purl the last 6 stitches. You now have 48 stitches. Larger size only: ★Purl 4 stitches, make a new stitch, purl 5 stitches, make a new stitch, purl 4 stitches, make a new stitch★.Repeat the section inside the little stars (★) one more time. Purl 5 stitches, make a new stitch, purl 4 stitches, make a new stitch, purl 4 stitches, make a new stitch, purl 5 stitches, make a new stitch, purl 4 stitches. You now have 58 stitches. 6 Work in stocking stitch until your piece measures 10 cm/4"[13.5cm/5.5"] 22 cm/9" from the cast on edge, ending with a purl row. This will be approximately 12 [16] 24 rows in total. You will now work the leg holes: Knit4[8]10stitches,thenleave the remaining stitches on the needle without knitting them for now - you will come back to them later. Turn your knitting around, ready to work back across the stitches you just worked. 8 Working across these 4 [8] 10 stitches only, purl 1 row, then work 1 [5] 5 rows in stocking stitch (ending with a knit row). Leave the stitches you just worked on the needle, and cut the yarn. Turn the work around, so that the needle with the 4 [8] 10 stitches you just worked is in your right hand, and the needle with all the rest of the stitches is in your left hand. To continue working, you now need to join the ball of yarn to the lst stitch on the needle - do this by inserting the right needle into the stitch as if to work a knit stitch, wrap the yarn from the ball around the needle tipin the usual way (leaving a yarn tail of about 15 cm/6"), and complete the stitch. (lf this first stitch feels a little loose on the next row as you work back across it, simply tug on the yarn tail to tighten it back up.) 9 Join the yarn to the lst stitch on the left needle and cast off the first 3 [4] 5 stitches - this will form the first leg hole. Knit 9 [23] 27 stitches. You now have 10 [24] 28 stitches on the right needle, after the cast off section. Turn your work, ready to work back across these stitches Only. 10 Purl 1 row, then work 1 [5] 5 rows in stocking stitch across the 10 [24] 28 stitches. (The last row will be a knit row.) Leave these stitches on the needle for now, and cut the yarn. 11 Rejoin the yarn as before, next to the last section you worked across. Cast off 3 [4] 5 stitches (for the second leg hole), then knit 3 [7] 9 stitches. Turn you work - you will now work across thelast 4 [8] 10 stitches only. 12 Purl 1 row, then work 1 [5] 5 rows in stocking stitch. Now start working across the whole piece again, casting on new stitches to close up the leg holes: 13 Purl 4 [8] 10 stitches, then cast on 3 [4] 5 stitches using the cable cast on technique, purl 10 [24] 28 stitches, cast on 3 [4] 5 new stitches as before, then purl the last 4 [8] 10 stitches. You now have 24 [48] 58 stitches again. 14 Work in stocking stitch across all the stitches until your piece measures 17 cm/7"[26.5cm/10.5"]30cm/12"from the cast on edge, ending with a purl row. This will be approximately 21 [32] 39 rows in total. 15 Cast off the first 2 [7] 10 stitches, then knit to the end of the row. 16 Cast off the first 2 [7] 10 stitches, then purl to the end of the row.(20 [34] 38 stitches left.) 17 Knit the 1st stitch, make a left-leaning decrease, knit until you have 3 stitches left of your row, then knit the next 2 stitches together. Knit the last stitch. (18 [32] 36 stitches left.) 18 Purl l row. 19 Repeat steps 17 and 18 a further 5 [6] 7 times. You now have 8 [20] 22 stitches left. 20 Cast off.
ASSEMBLYANDFINISHING
Small and medium size only:
Fold your knitted piece in half, with the wrong side facing out, so that the side edges meet. Thread your knitter's sewing needle with a length of yarn and use the vertical invisible seam technique to sew the sides of the rollneck together, from the cast to the end of the ribbed section.
All sizes:
Fold the sweater in half so that the right side of the fabric is facing out, and use the vertical invisible seam technique to sew the edges together - for the two smaller sizes, continue sewing where you left off before, and for the large size, start at the cast on edge. Sew all the way to the point where you started casting off stitches. (Small/medium: The reason for doing the seam in this way is that when you fold down the rollneck, the untidy side of the seam won't be on display!)
Weave in the loose yarn ends, taking extra care to secure them around the leg holes.
KNITTING TECHNIQUES
Work! Work! Work!
There are two main ways to ‘work' stitches: they can be knitted or purled. When the pattern asks you to‘work' a number of stitches/rows/cm, it will always specify which stitch pattern to work in.
Cable cast on
Create a slip knot on the left hand needle. Knit on one stitch, creating two stitches on the left hand needle. Now insert the right needle between the two stitches, wrap and bring through. Transfer the newly created stitch onto the left hand needle. Repeat until you have cast on the number of stitches indicated in the pattern. You normally cast on at the beginning of your knitting project, but you can also cast on stitches in the middle of a row. This is done in exactly the same way - simply cast on the new stitches next to the stitches you have just worked.
Longtail cast on
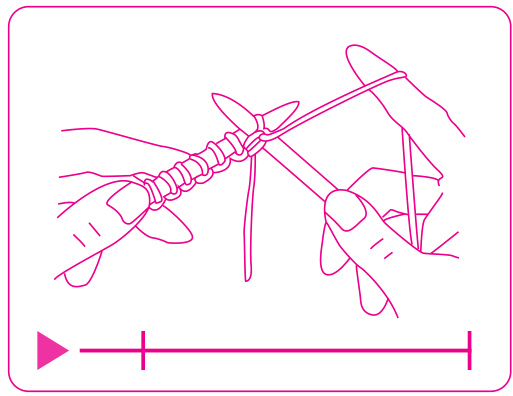
This cast on technique is suitable when you need stretchiness, for example at ribbed edges. To make sure that the edge isn't too tight, you can cast on over two knitting needles held together. 1 Start by making a slipknot - the ‘yarn tail' needs to be quite long for this cast on, hence the name! Place the slipknot on your knitting needle, and hold the needle in your right hand, with the yarn hanging straight down. 2 Now insert the thumb and index finger of your left hand between the two strands of yarn hanging from the needle, and then close your ring finger and little finger around the yarn to trap it. Stretch out your thumb and index finger as far from each other as possible, stretching the yarn taut.
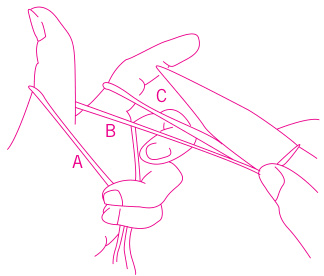
3 There are three strands of yarn you'll be using:
A: the strand which sits closest to you, in front of the thumb B: the strand that goes from the thumb to the slipknot on the needle C: the strand that goes from the needle to your index finger
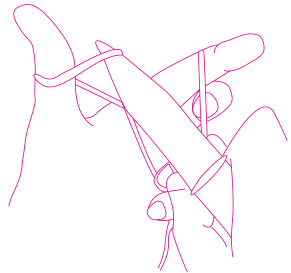
4 Place the needle in front of A, then bring it under A and letit come upbetween A and B. 5 Now bring the needle over and behind C, and scoop the yarn (C) up with the tip of your needle.
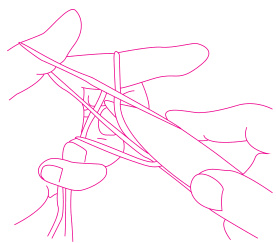
6 Bring the needle tip with the yarn back between A and B (the same way you came before), so that it ends up in front of A. Now pull your thumb out from the yarn that's looped around it. Tug on the yarn to tighten up the new loop on your knitting needle, then insert your thumb again between the two yarn strands hanging down from the newly formed loop on yourneedle. 7 Repeat steps 4-6 to continue casting on stitches.
1x1 Ribstitch
Knit one stitch, purl the next stitch. Continue in this way, alternating between knit and purl stitches to the end of the row. When working across an even number of stitches, repeat this for every row, so that the knit and purl stitches line up.
Stocking stitch
A basic stitch pattern where all the stitches of the first row are knitted, and on the second row they are purled. These two rows are repeated to make the pattern. The‘right' side of the fabric looks like a series of “Vs' and the ‘wrong' side of the fabric looks like a series of 'waves'.
Increasing
Make a new stitch by inserting the left needle from front to back under the strand of yarn between the last stitch worked and the next stitch to be worked, and lifting this loop onto the needle. Now insert the right needle into this loop from right to left, then wrap the yarn and pull through as for a knit stitch.
Adding a new ball of yarn
When your ball of yarn runs out, or when you need to change the colour, tie a loose knot on to the tail with the new ball of yarn and slide it up to the needle. Tighten the knot. Continue knitting with the new yarn.
Re-joining yarn to your knitting
Sometimes, you need to join in new yarn in the middle of your knitting. Join the ball of yarn to the first stitch on the left needle - do this by inserting the right needle into the stitch as if to work a knit stitch, wrap the new yarn from the ball around the needle tip in the usual way (leaving a yarn tail of about 15 cm/6"), and complete the stitch. If this first stitch feels a little loose on the next row as you work back across it, simply tug on the yarn tail to tighten it back up.
Decreasing
Instead of knitting only one stitch at a time, knit two stitches together. Insert the front of your right needle through the first two stitches of the left needle then knit them together as a single stitch.
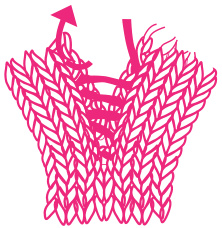
Left-leaning decrease
Insert the right needle into the next stitch on the left needle knit-wise (from left to right) and slip the stitch onto the right needle without knitting it. Slip the next stitch in the same way. Now insert the left needle through both these stitches, in front of the right needle, from left to right. Wrap the yarn as for a normal knit stitch and pull the yarn through both loops at once. If you look at the stitch you just made, you can see that it leans toward the left - hence the name.
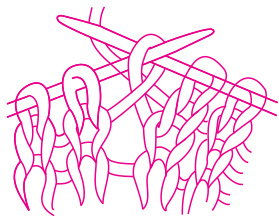
Casting off
When you complete your project, you need to cast off your last row of stitches in order to make an edge that won't unravel. For your final row, knit the first two stitches. Using the tip of the left needle, lift the first stitch up and over the second stitch and then slip it off the right needle. Now you have only one stitch on your right needle. Knit the next stitch from the left needle, then lift the previous stitch over it and off the needle as before. Do this with each stitch until there are no stitches on the left needle and just one stitch on the right needle. Cut the yarn, leaving a 15 cm/6' end. With your fingers, gently pull the tail through the last stitch and pull the yarn tight to secure. You can also cast off stitches in the middle of a row, for instance to create leg openings. To do this, simply work to the point where you want to cast off stitches, and use the same technique for casting off the required number of stitches. When you are done casting off, simply continue knitting the remaining stitches.
FINISHING TECHNIQUES
Vertical invisible seam
This technique is used for joining the side edges of two pieces. Place the two knitted pieces side by side with the right sides up. Insert your yarn needle under the first horizontal bar between the first two stitches on the edge you want to join. Pull the yarn through and insert the needle through the opposite horizontal bar on the other piece. Sew back and forth through the horizontal bars along the edge. To tighten the stitches, pull the yarn gently - and they will disappear.
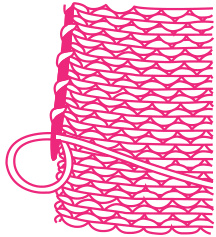
Weaving in the ends
Weave the ends of your yarn into your knitting to finish it off and stop it from unravelling. Thread the tail onto the yarn needle. Weave the yarn along the edge of your knitting as shown in the picture.Where you have started a new ball, weave one tail in one direction and the other tail in the opposite direction. Once you have woven in approximately 10cm/4", cut the yarn.
CUSTOMISEIT!
Make sure your pooch stands out in a crowd by customising the Hot Dawg to reflect your puppy's personality- embroider a motif using duplicate stitch, monogram it with chain stitch, or cast off in using our Jersey Be Good yarn in a contrast colour. Check out our Wool School for tutorials!
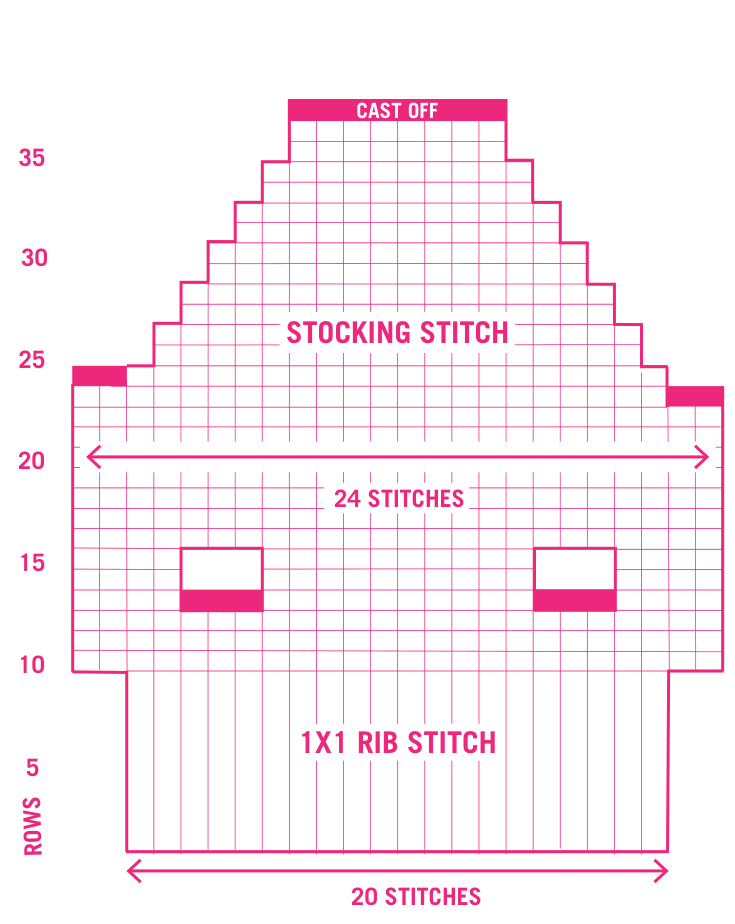
TEENYTINYDAWG
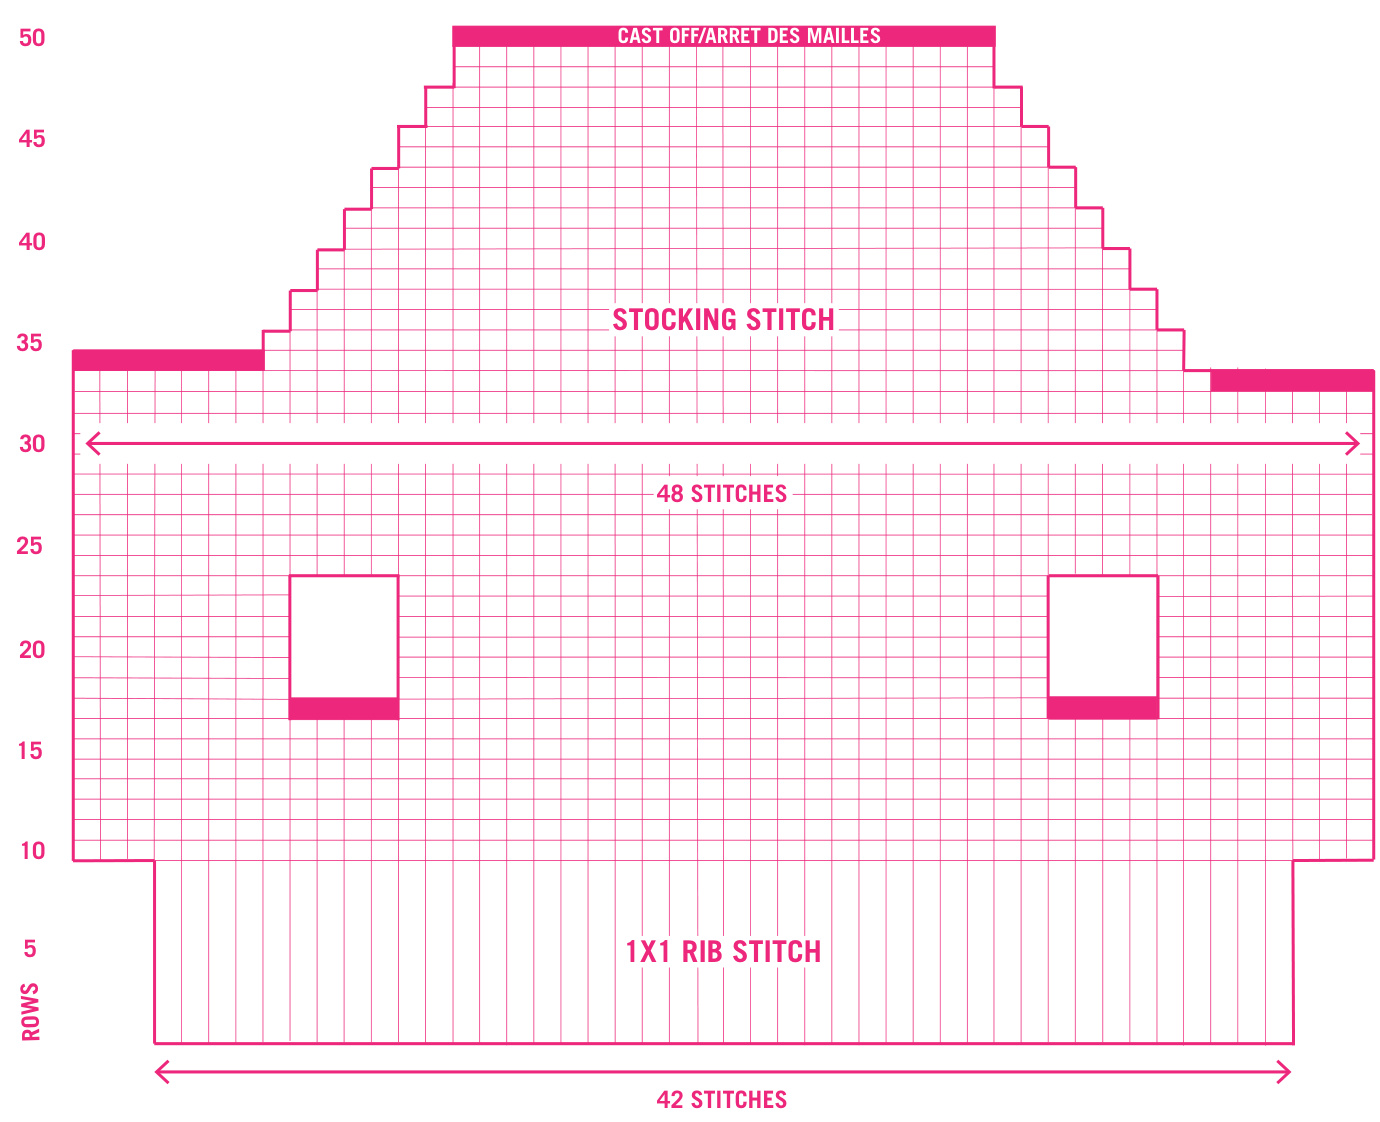
PUG DAWG
GET READY FORYOUR NEXTKNIT!
ORDERADO-IT-YOURSELFKIT ANDGETYOURKNITON! PURCHASEKNITTINGSUPPLIES: EXCLUSIVEPERUVIANWOOL,BABYALPACA, PIMACOTTONANDNEEDLES.


