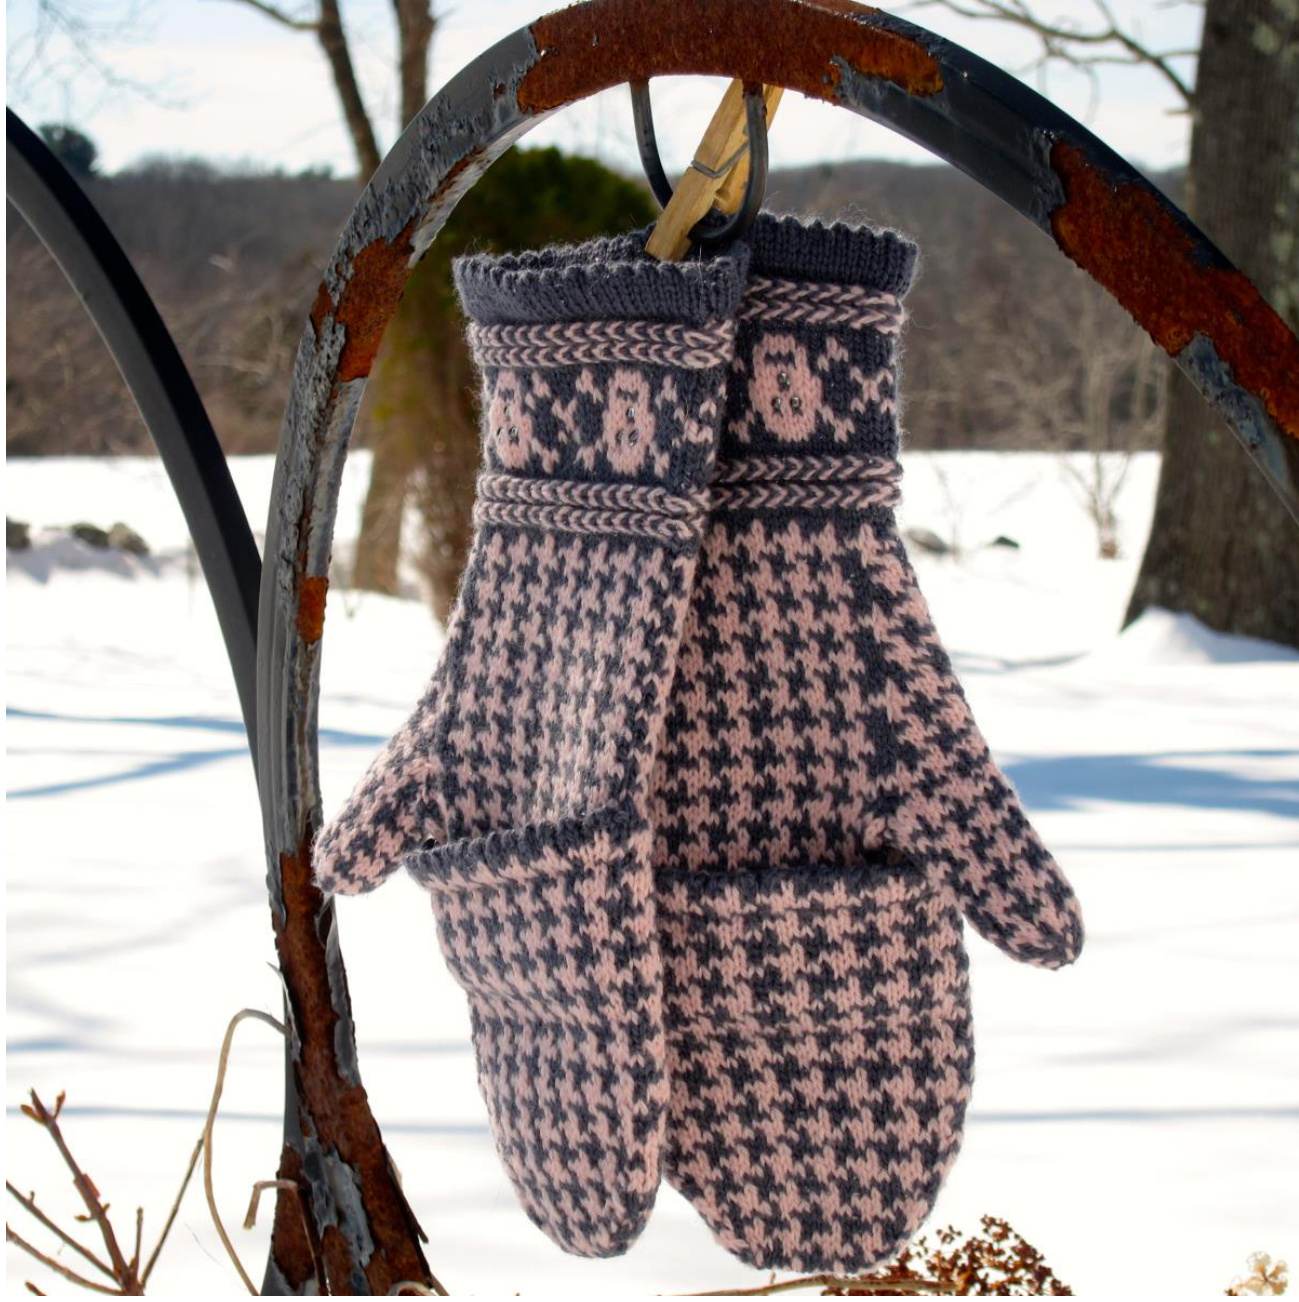
Skullduggery by Kate Grenier The American Heritage Dictionary of the English Language defines skullduggery as: "n. Crafty deception or trickery or an instance of it." And what could be more crafty (pun intended) and tricksy than these functional and funky mitts? Like many knitters, they're demure and feminine to the casual observer but a closer look will reveal a touch of whimsy. Like knitters, there's more to these mitts than meets the eye. I dislike having my wrists exposed in the cold weather with the inevitable gap between sleeves and mittens, so these mitts were designed with an extra-long cuff. Worn under a coat or sweater sleeve, the decorative border will be your secret, leaving just a flash of a wee skull peeping out of the thumb gussets to show off your fun-loving and quirky side. The flip-tops make these mitts practical as well as pretty, and with the top up or down, they can be worn from the late fall through the early spring. SIZE Women's medium
MATERIALS
icks Palette [100% wool; 231yds per 50g skein]; color: A 1 set of 5, 2.5 mm double-point needles 1 set of 5, 3.0 mm double-point needles 30 6/o glass E-beads (optional) Stitch markers Tapestry needle
GAUGE
32 sts/40 rounds = 4" in stockinette stitch with smaller needles 34 sts/42 rounds = 4" in pattern stitch [over chart B] with smaller needles
PATTERN NOTES
Cuff Picot Edge: With 2.5 mm needles and 1 strand each of MC and CC, use two-color German Twisted (or other stretchy method) to CO 16 stitches on each of four needles [64 stitches total]. Drop (but do not cut) the CC strand. With MC, join in the round being careful not to twist stitches. With MC k 6 rnds. \*YO, ssk. Rep \* to end of rnd (this is the fold line for the Picot edge). With MC k 6 rnds. eh st of MC, pick up and k tog with a corresponding st from the CO edg Left Lateral Braid: \*K1 MC, k1 CC. Rep \* to end of rnd. Bring both strands to front of work and \*p1 MC, p1 CC (carrying each strand in front of the previous strand for each p st). Rep \* to end of rnd. Note: with each stitch a twist will be added to the working strands. This is OK and you do not need to untwist as you go, just be sure to pull approx. 1 yard free from each skein and let strands hang loosely prior to beginning this rnd. \*P1 MC, p1 CC (carrying each strand behind the previous strand for each p st). Rep \* to end of rnd. Return both strands to back of work. Note: with each stitch a twist will be released from the working strands! Right Lateral Braid: \*K1 MC, k1 CC. Rep \* to end of rnd. Bring both strands to front of work and \*p1 MC, p1 CC (bringing each strand behind the previous strand with each p st). Rep to end of rnd. \*P1 MC, p1 CC (bringing each strand in front of the previous strand with each p st). Rep \* to end of rnd. Return both strands to back of work.
DIRECTIONS
LEFT HAND
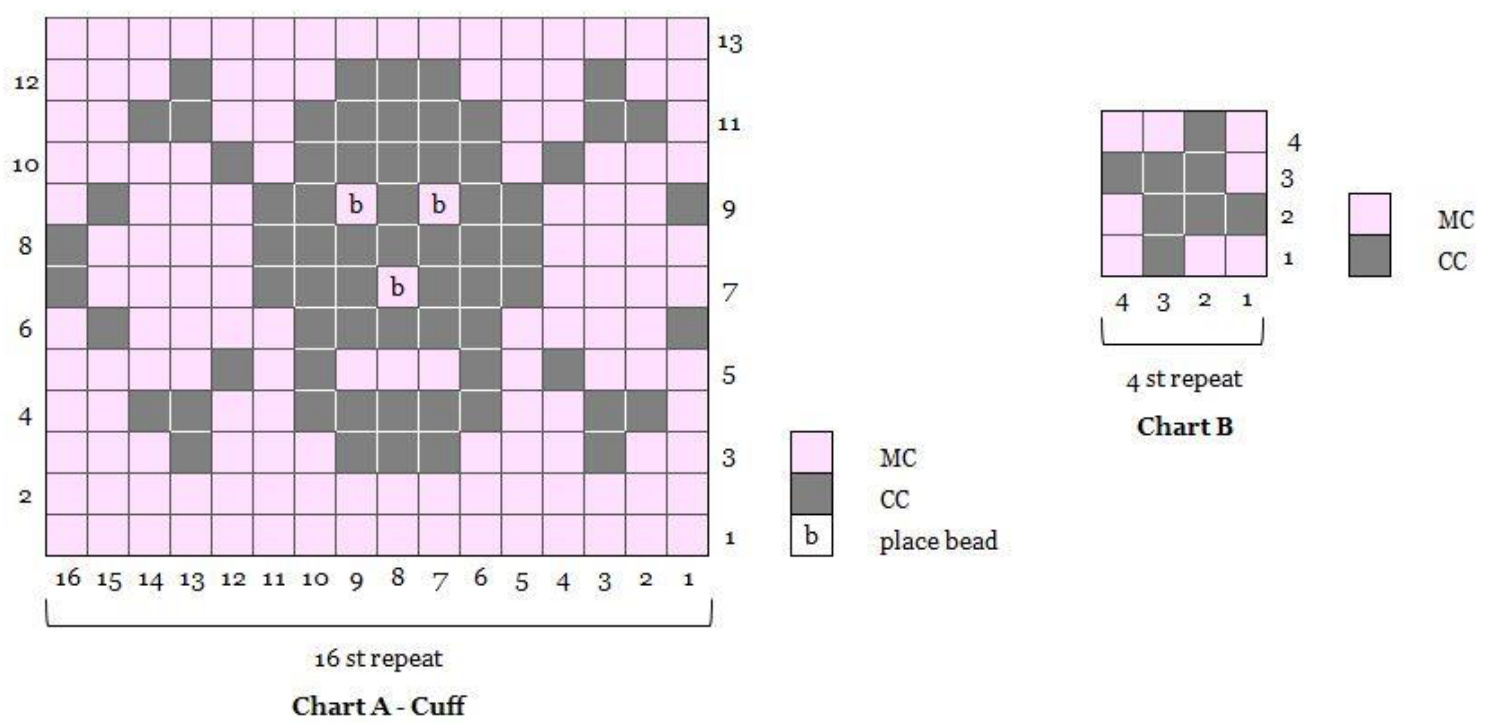
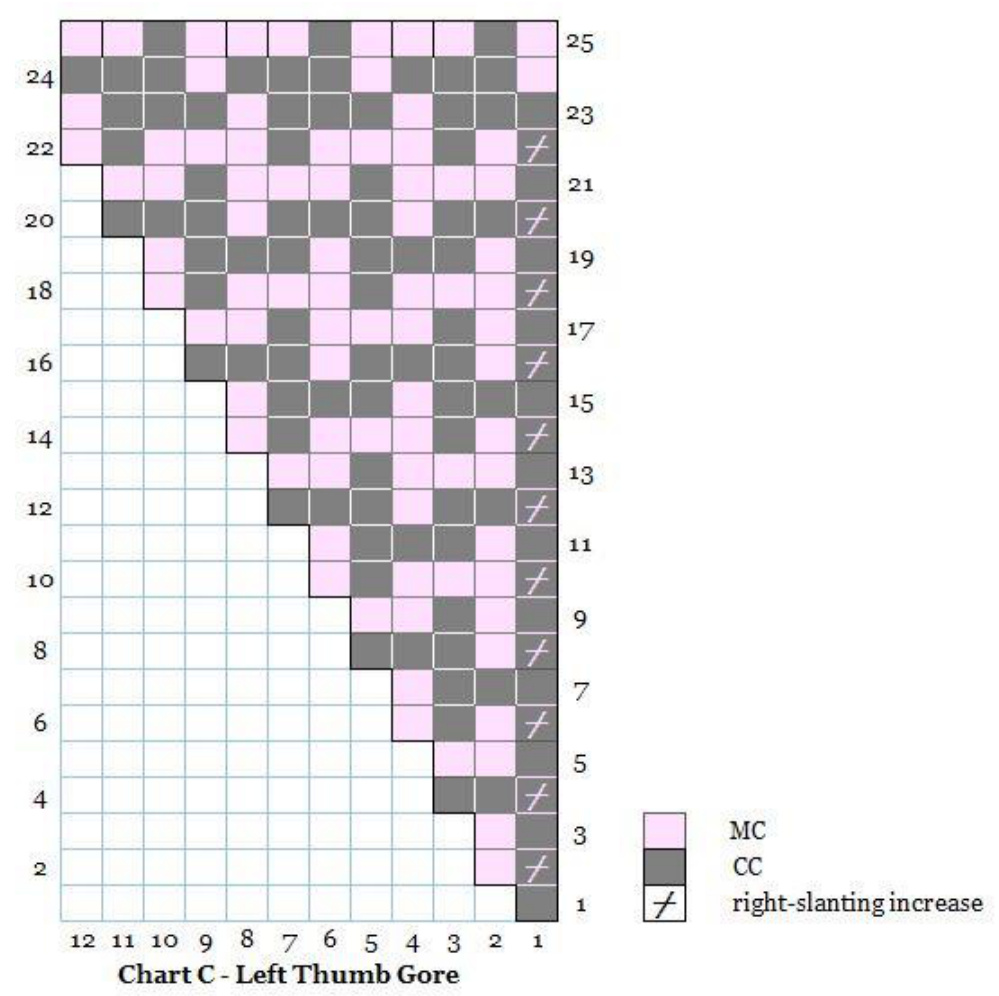
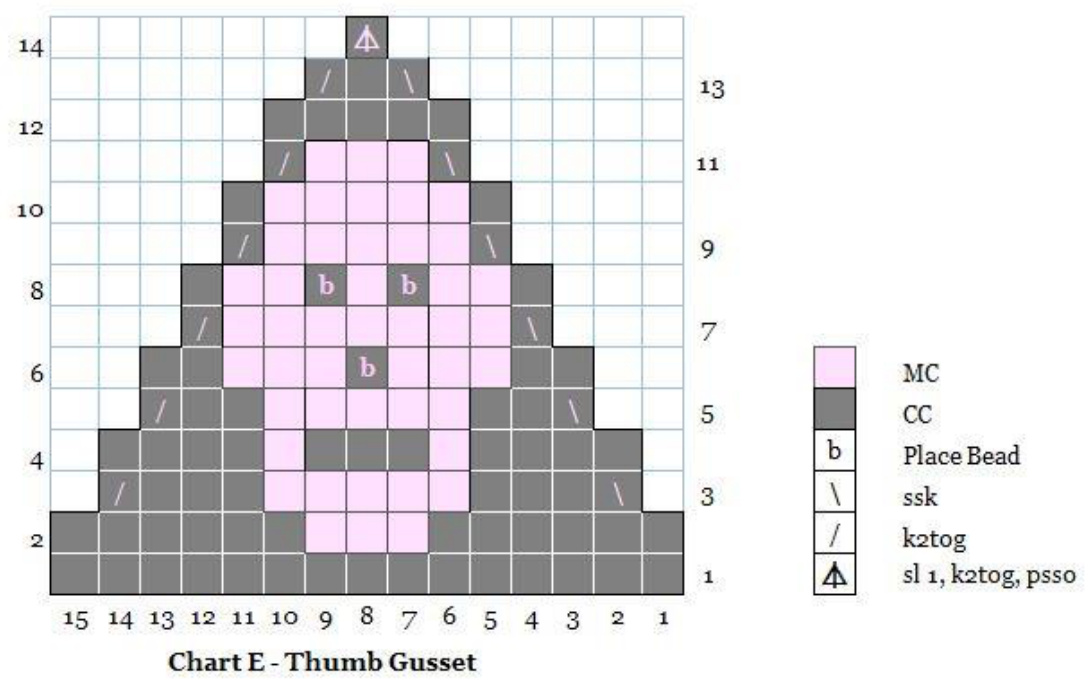
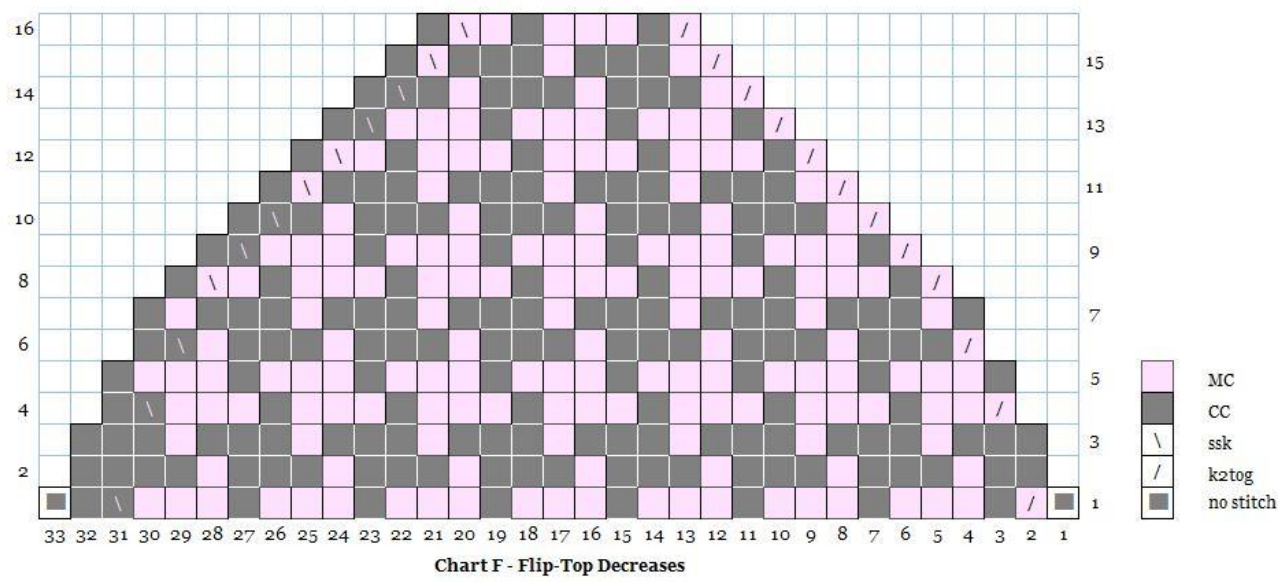
CUFF Work cuff picot edge. \*[With MC k 1 rnd. Work left lateral braid]. Note: pick up and resume working with CC from the CO edge when starting braid. Rep \* 1 time (2 braids total). Repeat 16 sts of chart A across rnd (4 reps). Continue working chart A until all 14 rows are complete. Optional: Place 6/o glass e-beads as indicated for nose and eyes. \*[With MC k 1 rnd. Work left lateral braid]. Rep \* 1 time (2 braids total). With MC k 1 rnd. Repeat 4 sts of chart B across rnd (16 reps). On row 2 of chart B, pattern to last st on needle 2. With CC, left-slanting inc in next st. (65 sts total). Continue chart B, working extra st in CC. On rnd 4 of chart B, begin the left thumb gore (chart C) working increases as shown, starting with the first st on needle 3. Continue pattern as set until row 25 of chart C and row 4 of chart B have been worked (12 sts inc, 76 sts total). On next rnd, work pattern until the final 12 sts on needle 2. Place these 12 sts onto waste yarn. With MC and CC, use 2-color method to CO 15 sts across the gap for the thumb gusset. (79 sts total). Kfb in pattern across sts on needles 3 and 4. Note: If the next stitch in the pattern is MC, then use CC to knit into back of stitch. If the next stitch in the pattern is CC, then use MC to knit into back of stitch. Be sure to carry the the knit-front (kf) strand in front of the knit-back (kb) strand. The kf stitches will become the base of the flip-top portion of the mitt. This method creates an almost invisible join. Place all kf sts from needles 3 and 4 onto waste yarn. On next rnd, work pattern until the 15 CO thumb gusset sts on needle 2. Alternating MC and CC, kfb across remaining sts on needle 2. Note: use MC to knit into the front of each stitch and CC to knit into back of each stitch. Be sure to carry the knit-front (kf) strand in front of the knit-back (kb) strand. The kf stitches will form the base of the thumb. This method creates a tidy and attractivethumb join. Place 15 kf sts for thumb onto waste yarn. Work pattern until end of rnd. On the next rnd, pattern over sts on needles 1 and 2 until thumb gusset. Work chart E beg with rnd 2 over 15 thumb gusset sts. Continue until rnd 14 of chart E has been worked. 1 gusset st remains (65 sts total). Optional: Place 6/o glass e-beads as indicated for nose and eyes Continue in pattern over chart B (work remaining gusset st in CC) until entire work measures 7.25 in (18.5 cm) or just below the base of the little finger, ending with rnd 4 of chart B. With MC k 1 rnd and at the same time, decrease 13 sts evenly across. (52 sts total). With CC k 1 rnd. With MC k 5 rnds. VO sskRen to end ofrnd (tbis is the fold line for the Picot edge Yo,ssk.Reptoehdorrhu(tnlslsthetoldnhelorthePicote With MC k 5 rnds. With a spare needle, pick up 1 st below each CC purl bump on the inside of the hand and graft using Kitchener st to each corresponding live stitch in the rnd. This creates a nice flat join and prevents the picot edge from curling out. FLIP-TOP With larger needles and MC, CO 34 sts using German Twisted or other stretchy method. On 2 needles, St st for 5 rows, starting with a knit row. P 1, \*yo, p2tog. Rep \* to last st. P 1. (This is the fold line for the picot border). K 1 row. P 1 row. Attach CC. K 1 CC, work 8 reps of row 1 of chart B, k 1 CC. Distribute sts on 2 needles (17 sts ea on needles 1 and 2). Slide the 32 sts from waste yarn on back of hand to 2 needles (16 sts ea on needles 3 and 4). Join sts on needle 2 to needle 3. Work row 2 of chart B across needles 3 and 4. K 1 CC to join back of hand sts to needle 1. Work row 2 of chart B across needles 1 and 2, k 1 CC. Needle 3 is now beg of rnd. Note: The first st of needle 1 and last st of needle 2 are worked in CC. This will help to make the flip-top decreases tidier. Work as established being sure to k the first st of needle 1 and last st of needle 2 in CC until row 3 of chart B is complete. On next rnd, fold hem inward at the picot fold line, and for each st on needles 1 and 2, pick up and k tog with a corresponding st from the CO edge. Work pattern as set until flip-top measures 4 in (1o cm) or just above the tip of the little finger ending on row 4 of chart B. Slip first st from needle 1 to needle 4. Needles 1 and 3 each have 16 sts, needles 2 and 4 each have 17 sts. Repeat row 1 of chart F to end of rnd. Continue chart F until row 16 (18 sts rem). Graft remaining sts to close tip of flip-top.
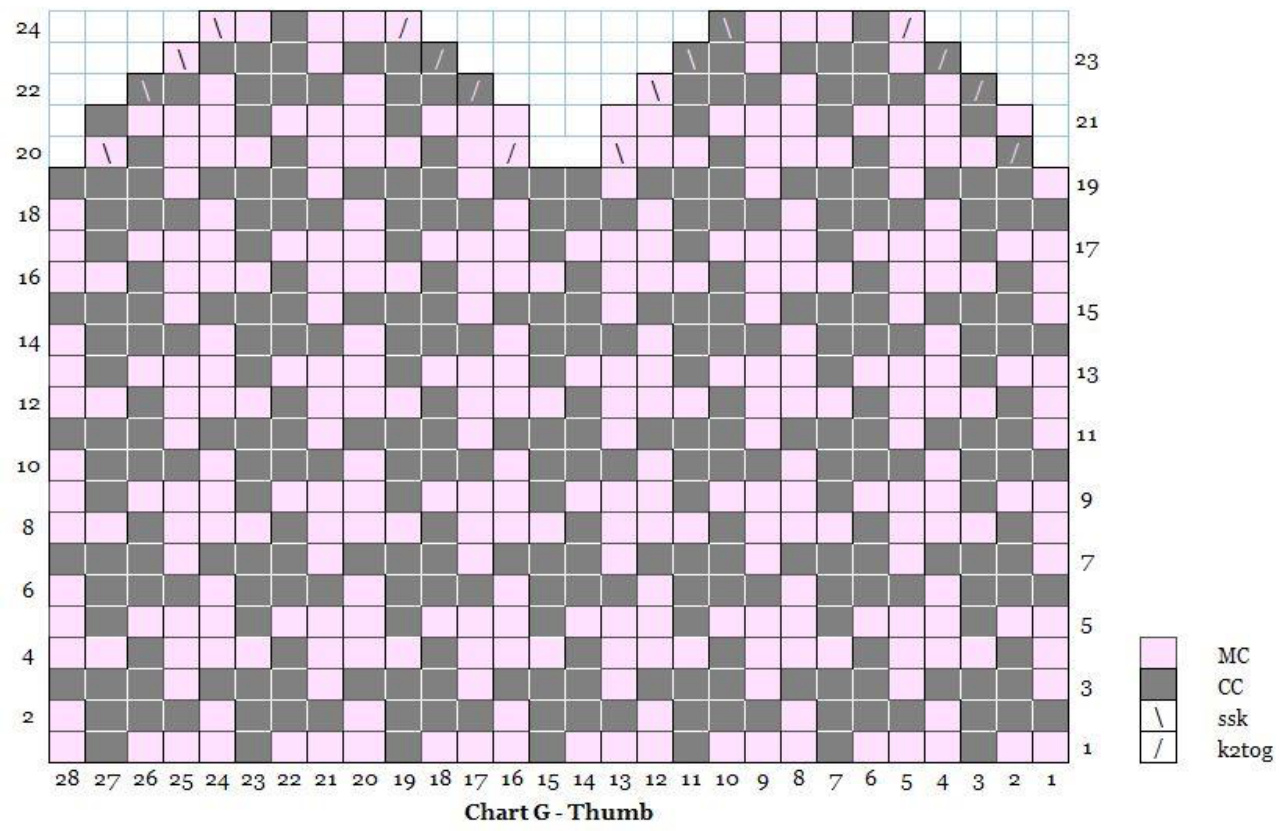
THUMB
Switch to smaller needles. Slip 12 sts of thumb gore from the waste yarn. Place 7 sts on needle 1 and 5 sts on needle 2. Slip 15 sts of thumb gusset from the waste yarn and place 2 sts on needle 2. Place 7 sts on needle 3 and 6 sts on needle 4. Pick up 1 st on needle 4 to close the gap. (28 sts total - 7 sts on each needle). Attach MC and CC and begin working chart G. Continue chart G until row 24 has been worked (12 sts rem). Graft remaining sts to close tip of thumb.
RIGHT HAND
CUFF Work cuff picot edge. \*[With MC k 1 rnd. Work right lateral braid]. Note: pick up and resume working with CC from the CO edge when starting braid. Rep \* 1 time (2 braids total). Repeat 16 sts of chart A across rnd (4 reps). Optional: Place 6/0 glass e-beads as indicated for nose and eyes. \*[With MC k 1 rnd. Work right lateral braid]. Rep \* 1 time (2 braids total). With MC k 1 rnd. HAND Repeat 4 sts of chart B across rnd (16 reps). On row 2 of chart B, pattern to first st on needle 3. With CC, right-slanting inc in next st. (65 sts total). Continue chart B, working extra st in CC. On rnd 4 of chart B, begin the right thumb gore (chart D) working increases as shown, starting with the first st on needle 3. Continue pattern as set until row 25 of chart D and row 4 of chart B have been worked (12 sts inc, 76 sts total). Kfb in pattern across sts on needles 1 and 2. Note: If the next stitch in the pattern is MC, then use CC to knit into back of stitch. If the next stitch in the pattern is CC, then use MC to knit into back of stitch. Be sure to carry the the knit-front (kf) strand in front of the knit-back (kb) strand. The kf stitches will become the base of the flip-top portion of the mitt. This method creates an almost invisible join. Place all kf sts from needles 1 and 2 onto waste yarn. Place the first 12 sts from needle 3 onto waste yarn. With MC and CC, use 2- color method to CO 15 sts across the gap for the thumb gusset. (79 sts total). On next rnd, work pattern until the 15 CO thumb gusset sts on needle 3. Alternating MC and CC, kfb across thumb gusset sts. Note: use MC to knit into the front of each stitch and CC to knit into back of each stitch. Be sure to carry the knit-front (kf) strand in front of the knit-back (kb) strand. The kf stitches will form the base of the thumb. This method creates a tidy and attractive thumb join. Place 15 kf sts for thumb onto waste yarn. Work pattern until end of rnd. On the next rnd, pattern over sts on needles 1 and 2 until thumb gusset. Work chart E beg with rnd 2 over 15 thumb gusset sts. Optional: Place 6/o glass ebeads as indicated for nose and eyes. Continue until rnd 13 of chart E has been worked. 1 gusset st remains (65 sts total). Continue in pattern over chart B (work remaining gusset st in CC) until entire work measures 7.25 in (18.5 cm) or just below the base of the little finger. With MC k 1 rnd and at the same time, decrease 13 sts evenly across. (52 sts total). With CC k 1 rnd. With MC k 5 rnds. \*YO, SSK. Rep to end of rnd (this is the fold line for the Picot edge). With MC k 5 rnds. With a spare needle, pick up 1 st below each CC purl bump on the inside of the hand and graft to each corresponding live stitch in the rnd. This creates a nice flat join and prevents the picot edge from curling out. With larger needles and MC, CO 34 sts using German Twisted or other stretchy method. On 2 needles, St st for 5 rows, starting with a knit row. p2tog. Rep \* to last 2 sts. P 2. (This is the fold line for the picot borde: K 1 row. P 1 row. Attach CC. K 1 CC, work 8 reps of row 1 of chart B, k 1 CC. Distribute sts on 2 needles (17 sts ea on needles 1 and 2). Slide the 32 sts from waste yarn on back of hand to 2 needles (16 sts ea on needles 3 and 4). Join sts on needle 2 to needle 3. Work row 2 of chart B across needles 3 and 4. K 1 CC to join back of hand sts to needle 1. Work row 2 of chart B across needles 1 and 2, k 1 CC. Needle 3 is now beg of rnd. Note: The first st of needle 1 and last st of needle 2 are worked in CC. This will help to make the flip-top decreases tidier. Work as established being sure to k the first st of needle 1 and last st of needle 2 in CC until row 3 of chart B is complete. On next rnd, fold hem inward at the picot fold line, and for each st on needles 1 and 2, pick up and k tog with a corresponding st from the CO edge. Work pattern as set until flip-top measures 4 in (10 cm) or just above the tip of the little finger ending on row 4 of chart B. Slip first st from needle 1 to needle 4. Needles 1 and 3 each have 16 sts, needles 2 and 4 each have 17 sts. Repeat row 1 of chart F to end of rnd. Continue chart F until row 16 (18 sts rem). Graft remaining sts to close tip of flip-top. THUMB Work thumb as for left mitt.
FINISHING
Weave in ends and block as desired. Add a snap, or a crochet loop and button to the wrist and flip-top, to hold the flap secure when it's not in use.