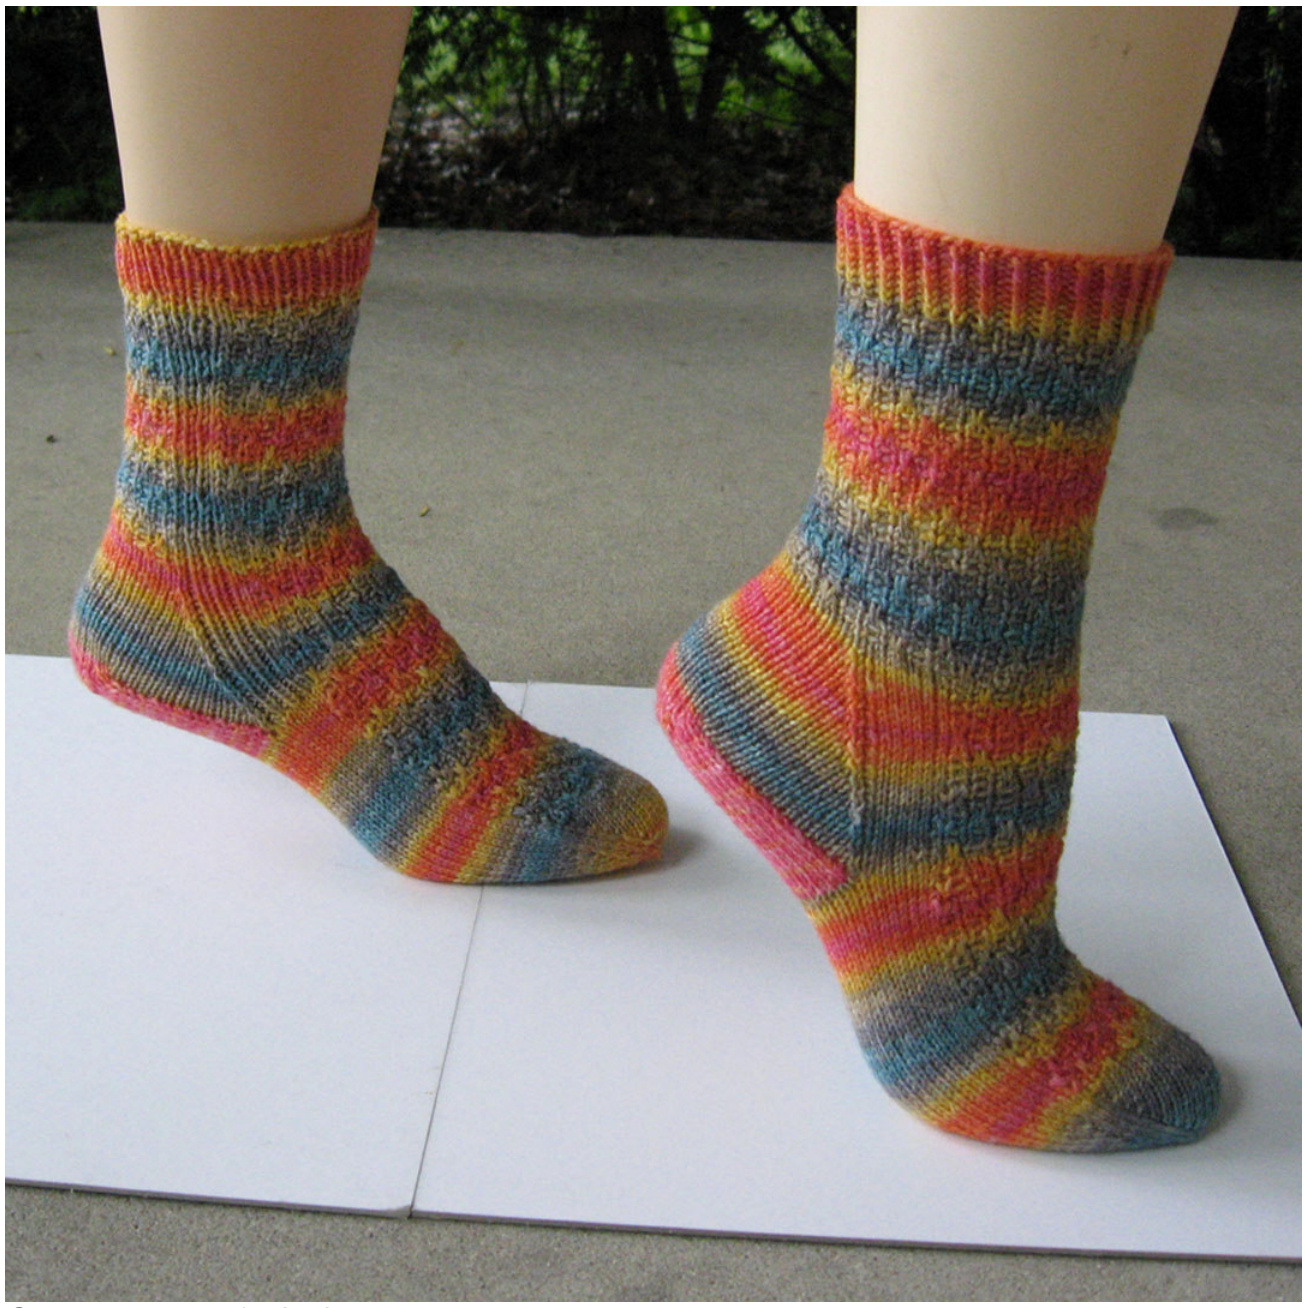
Gauge: 32 sts / 4 inches Needles: US 1.5, $2.5\;\mathsf{m m}$ Yarn: Twisted Fiber Art Kabam! Size: Women's Small (foot around 8 inches in diameter)
Notes
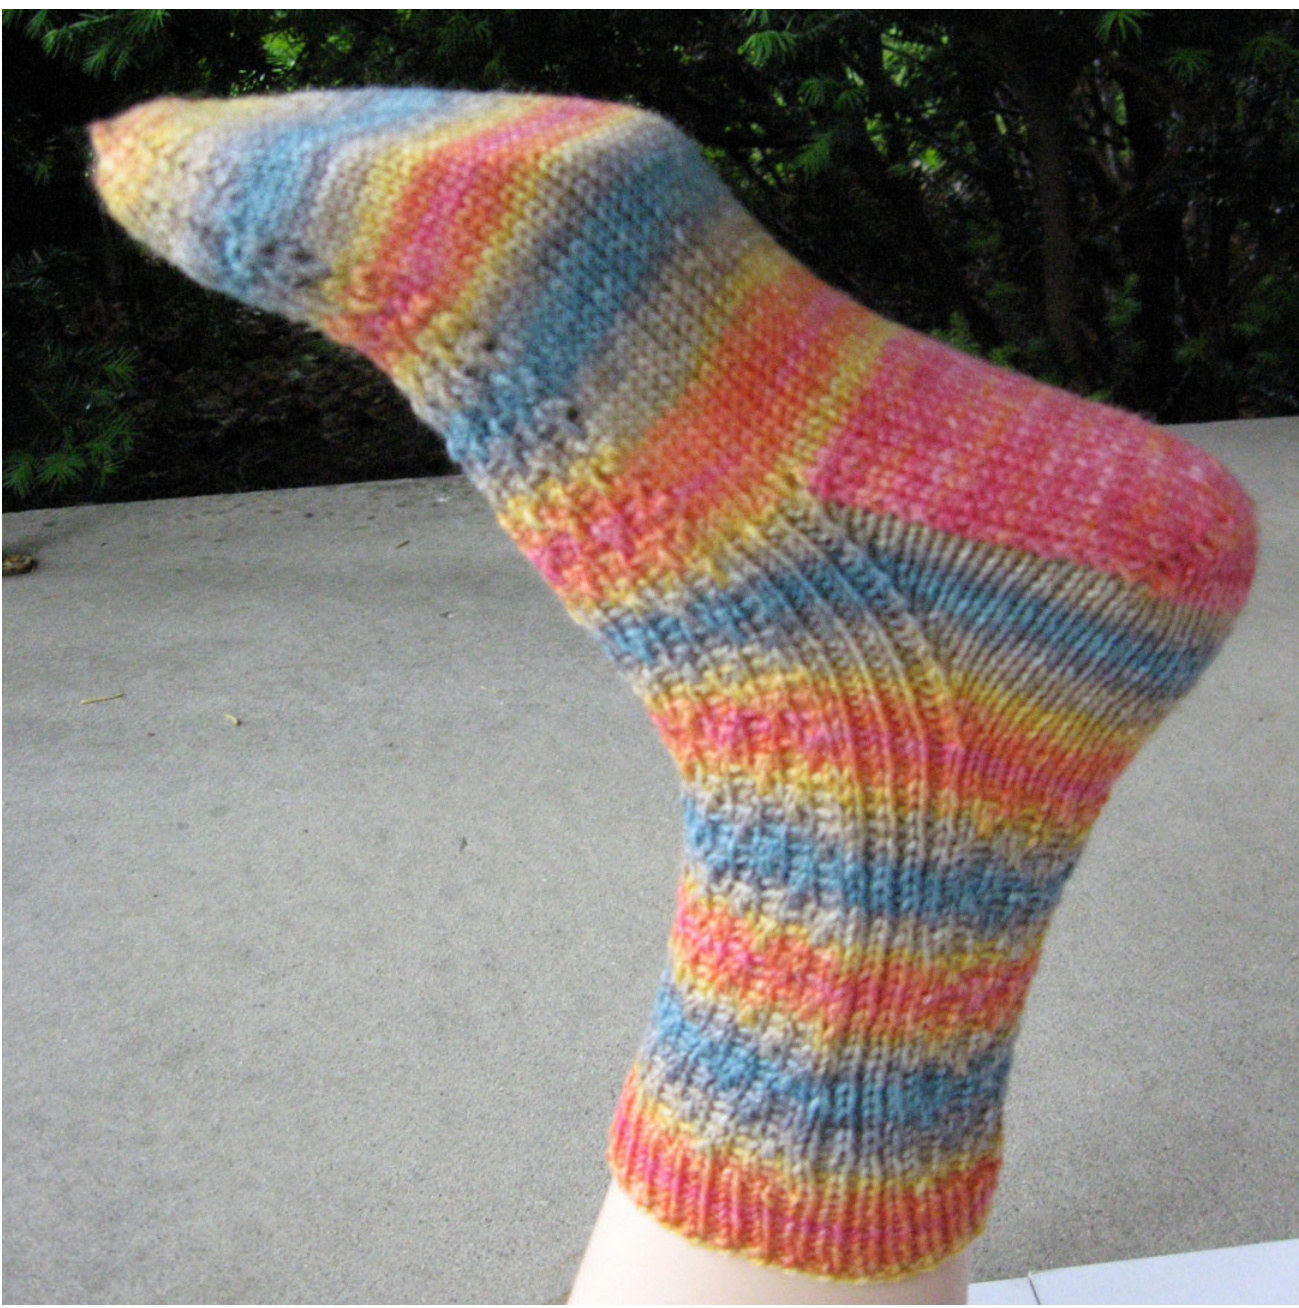
This sock features a texture stitch that I “unvented" to try to mix up the colors on selfstriping yarns. It involves stitches slipped with the yarn either in front or in back, hence the name. This pattern stitch makes a leg which can be harder than usual to pull on. If you would like to deal with this (and in case you like the look!) a variant has been supplied which involves a panel of ribbing on each side of the leg. See Variant below the main pattern if you are interested in this version.
Fore & Aft Textured Socks
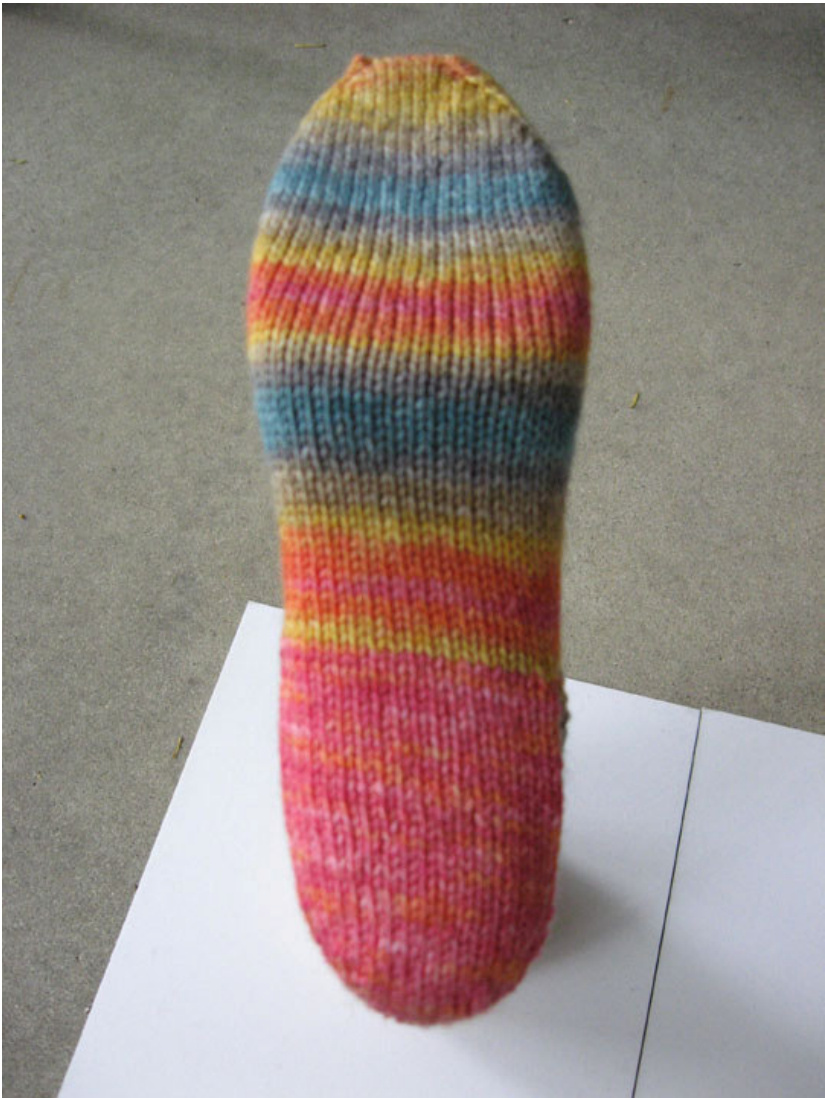
Because of the slipped stitches, the pattern stitch “pulls up" and requires significantly more rows than stockinette for the same vertical length. Because of this, a decision must be made about how to handle the foot. I could think of three choices: ? Use stockinette entirely for the top and bottom of the foot. ? Use the texture stitch for both top and bottom of the foot. Work the top of the foot in texture stitch and the bottom in stockinette, using a short-row technique to allow for the difference in row gauge. I have chosen to use the last of these methods. You can substitute either of the others if you prefer. I also chose to use the Toe-up Gusseted Heel described by Maia Discoe. See http://maiaspins.typepad.com/maiaspins/2007/05/toeup gusseted .html for a complete discussion. Directions are written for two circular needles.
Sock Toe
Cast on 8 sts each needle using Magic Cast On. See http://www.knitty.com/ISSUEspring06/FEATmagiccaston.html for a description. Knit one round even. Round 2: on first needle, \* K1, M1R, K each stitch to within one stitch of the end of the needle, M1L, K1. Go on to second needle and repeat from \*. (See Basic Instructions for M1R and M1L, or use your own preferred increases.) Round 3: K all stitches on both needles (no increases). Repeat rounds 2 and 3 until there are 30 stitches on each needle. Once you have reached 30 stitches (which occurs on a round 2), use the K1, M1R technique at the beginning of the following row on the first needle only. You will have 31 stitches on needle 1 and 30 on needle 2.
Sock Foot
On needle 1 only, knit 1 stitch each row, and work the remaining 30 stitches in the Fore & Aft Pattern Stitch (see below). Needle 2 remains in stockinette stitch. Here is how the short rows are handled. Each time you complete round 3, 7 or 11, hold the sock up and see whether the. front or the back of your work is longer. If the back is longer, then you need to do a short row. I use the yarnover style of short row rather than the wrap method. To do a short row, turn the work. Slip the first stitch purlwise with the yarn in front, then wrap the yarn around the needle and purl back across the row (this row is given as all knit in the pattern stitch.) Turn again. Slip the first stitch of the row purlwise with yarn in front. The next stitch is the first stitch in a pattern repeat. If you are on row 1, just move the yarn to the back and slip as usual. For row 5 or 9, you need to slip with yarn in front, so wrap the yarn all the way around the needle and then slip the stitch. At the end of needle 1, you will encounter the stitch with the accompanying YO. Be sure to knit the two together. The next time you get to the start of needle 1, you will encounter another stitch / YO pair which must be knit together. Proceed as normal through the pattern until you have completed the next round 3, 7 or 11 and check again. For my sock, I am finding that I need to do the short row about 2 out of 3 times that I check.
Fore & Aft Textured Socks
Continue in this manner until you get to $65\%$ of the foot length you want, ending with a wrong side row. In this case, the foot is to be 9 inches, so I went with just under 6 inches.
Note: This is where you want to start using the contrast color heel yarn if you're going to. You are going to use the center two-thirds of the stitches for the heel, so here we want to work 5 stitches of the right-side row using your regular yarn and put these on a safety pin. Slip 1 stitch and knit 19 (20 stitches on the right-hand needle) and put the next 5 stitches on another safety pin. Attach your contrast color yarn here so your original ball will be waiting for you when you've finished the heel. Work in stockinette stitch on the 20 center stitches, slipping the first stitch of each row, until you are to 90 - $95\%$ of the foot length, ending with a right-side row. I went with 8.5 inches. At this point, start turning the heel, as follows: Slip 1 stitch purlwise and purl until there are 2 stitches on the left-hand needle. Turn. Slip 1 stitch knitwise and knit until there are 2 stitches on the left-hand needle. Turn. Slip 1 stitch purlwise and purl until there are 4 stitches on the left-hand needle. Turn. Slip 1 stitch knitwise and knit until there are 4stitches on the left-hand needle. Turn. Slip 1 stitch purlwise and purl until there are 6 stitches on the left-hand needle. Turn. ? Slip 1 stitch knitwise and knit until there are 6 stitches on the left-hand needle. Turn. You have just worked 8 stitches on a right-side row. Now work in the 12 stitches at the ends of the row as follows: Slip 1 stitch purlwise, purl 6 stitches, SSP (see Basic Instructions below), Purl 1. Turn. Slip 1 stitch knitwise, knit 7 stitches, K2tog, Knit 1. Turn. · Slip 1 stitch purlwise, purl 8 stitches, SSP, Purl 1. Turn. Slip 1 stitch knitwise, knit 9 stitches, K2tog, Knit 1. Turn. · Slip 1 stitch purlwise, purl 10 stitches, SSP, Purl 1. Turn. · Slip 1 stitch knitwise, knit 11 stitches, K2tog, Knit 1. There are no more stitches left to be incorporated. Now pick up 1 stitch in each slipped stitch along the side of the heel bottom you have created. Switch here to the original ball of yarn waiting here. Pick up one more stitch in the gap. Slip the 5 stitches from the safety pin onto a convenient double pointed needle and knit them onto the needle with the sole stitches. Now resume kniting the instep at the place the pattern left off. Transfer the next 5 stitches from the second safety pin to a spare dp needle and knit them on the right end of the needle with the sole stitches on it. Pick up one stitch in the gap and one in each slipped stitch along the side of the heel. Knit to the end of the instep stitches on this round, then work pattern on instep stitches. If you want to try the panel of ribbed stitches on each side of the leg, go to Variant now. Decrease the gusset stitches as follows. Round 1: On sole needle, knit 6 stitches. SSK. Knit until 8 stitches remain on the sole needle. K2 tog. K6. Work instep stitches in pattern. Round 2: Knit across sole stitches. Work instep stitches in pattern. Continue decreasing until you have 30 stitches on the sole needle. Work even on these sole stitches until the next time you come to an all knit round in your pattern (round 4, 8 or 12 of the pattern stitch), work as follows: Instep: K2 tog, knit to end of round (this gets rid of the extra stitch that was added to the instep at the very beginning of the foot). From this point on, work all the leg stitches (60 stitches) in the pattern stitch, continuing from the point of the pattern on the instep. Continue in this manner until the total height of the leg is $7~\%$ inches, or as desired, ending with round 4, 8 or 12 of the pattern stitch. Work 1 inch, or as desired, in K1tbl, P1 ribing. Bind offlosely.
Variant
For the variant, we are going to star the ribbed panel during the gusset. For this variant, decrease the gusset stitches as follows: Round 1: On sole needle, (K1, P1) 3 times. SSK. Knit until 8 stitches remain on the sole needle. K2 tog. (P1, K1) three times. Work instep stitches in pattern. Round 2: (K1, P1) 3 times. Knit across sole stitches until 6 stitches remain. (P1, K1) three times. Work instep stitches in pattern. Repeat these two rows until there are 20 stitches between the groups of six stitches of ribbing at the two ends. Once you are at the desired number of stitches, continue to repeat Round 2 until the pattern on the instep stitches comes to the start of a new clump of four rounds - the next Round 1, 5 or 9. After the instep stitches on this round, work as follows: (Slip 1, P1) 3 times, Slip 1, work 18 stitches in the pattern stitch, K1, (P1, Slip 1) 3 times. Next round: Knit the slipped stitches from the previous round. Continue in this manner until the total height of the leg is $7~\%$ inches, or as desired, ending with round 4, 8 or 12 of the pattern stitch.
Fore & Aft Textured Socks
Next round: P1, K1 across front needle. (K1, P1) until 8 stitches remain, K2 tog, (P1, K1) for remainder of round. Note that the ribbing on the sides of the back should continue as established. Work in ribbing as established for 1”" or as desired. Bind off loosely.
Basic Instructions.
For increases, I prefer to use the techniques recommended by Cat Bordhi in New Pathways for Sock Knitting. These are: M1R - With your right needle, pick up the right-hand leg of the stitch directly below the next stitch you are planning to knit (the “mother" of that stitch) and place it on the left needle. Knit it. M1L - With your left needle, pick up the left-hand leg of the stitch two below the stitch you just knit (the “grandmother" of that stitch). Knit it. i have trouble with right and left, so I don't bother trying to remember whether I want the right-leaning or left-leaning increase. For knitting a toe, I just remember that at the beginning of a row, I'm looking forward, while at the end of a row, I'm looking back. SSP - slip, slip, purl. Slip 1 knitwise, slip 1 knitwise, place both stitches back on the left needle, purl the two stitches together through back of loops. This will involve putting the needle through the second stitch first.
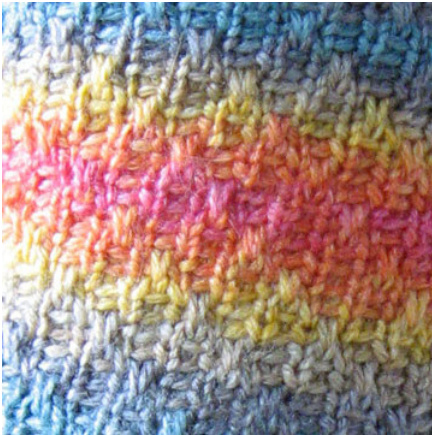
Fore & Aft Pattern Stitch - 6 stitch repeat.
Round 1 -Slip 1 purlwise with yarn in back, K1,(Slip1 purwise with yarn infront, K1) twice. Round 2 - Slip 1 purlwise with yarn in back, K5. Round 3 - Repeat round 1. Round 4 - Knit. Round 5 - Slip 1 purlwise with yarn in front, K1, Slip 1 purlwise with yarn in back, K1, Round 6 - K2, Slip i purlwise with yarn in back, K3. Round 7 - Repeat round 5. Round 8 - Knit. Round 9-(Slip1 purwise with yarn infront, K1) twice, Slip1 purlwise with yarn in back, K1. Round 10 - K4, Slip 1 purlwise with yarn in back, K1. Round 11 - Repeat round 9. Round 12 - Knit.


