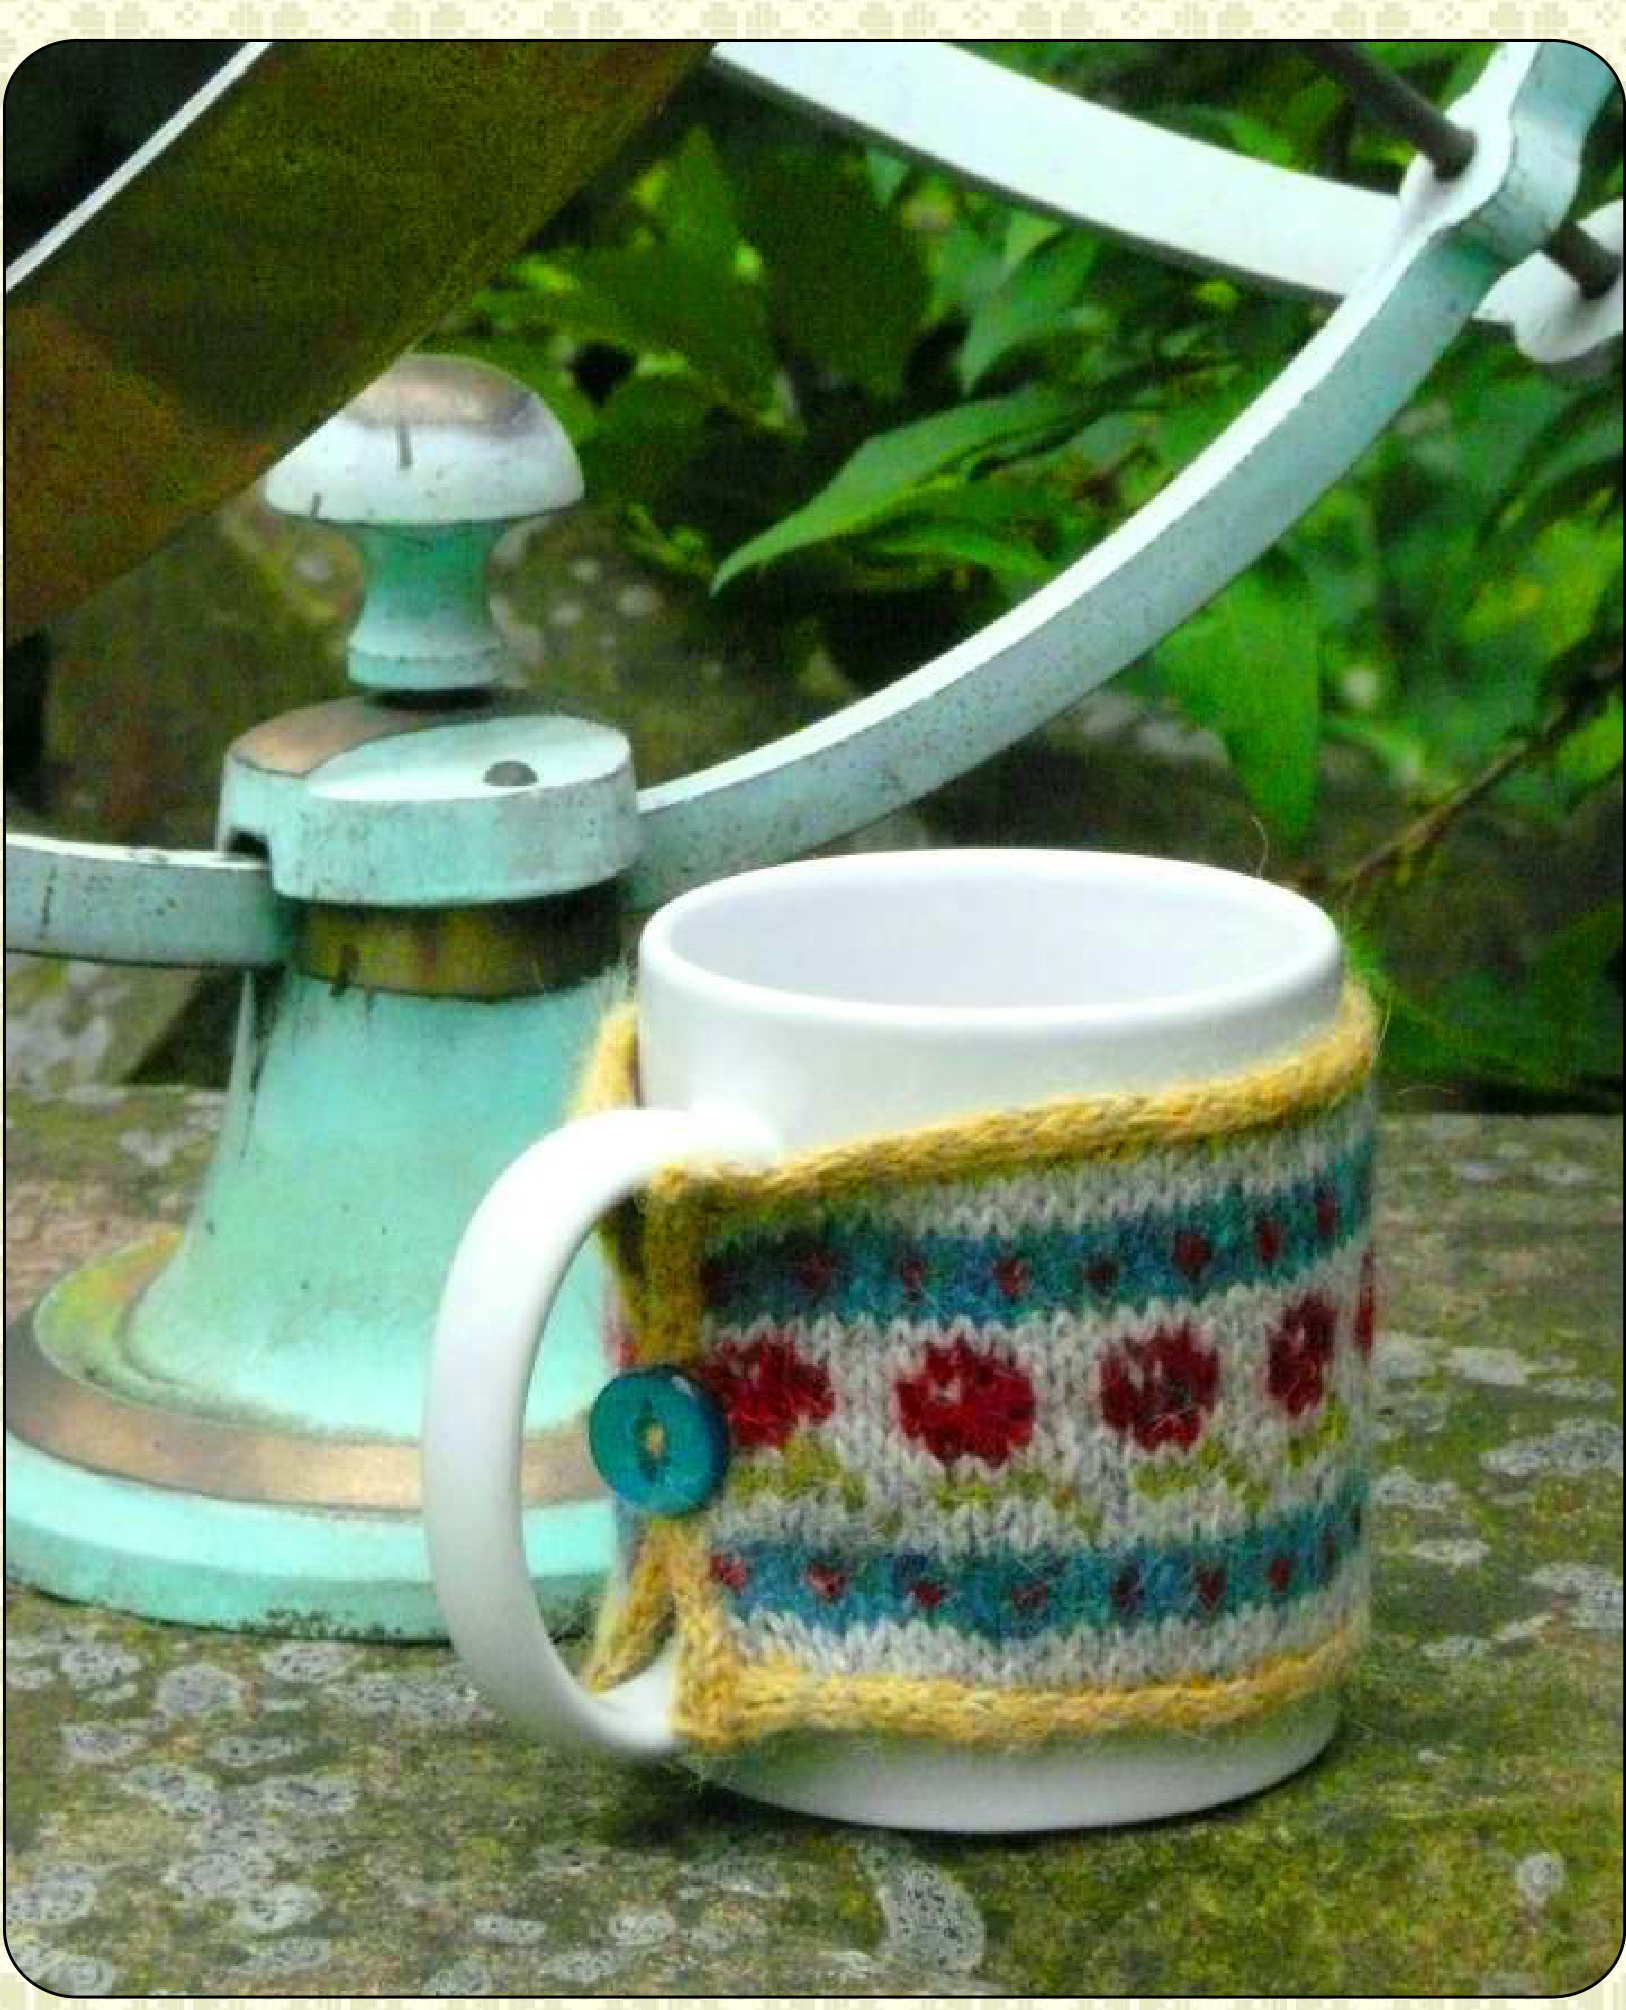
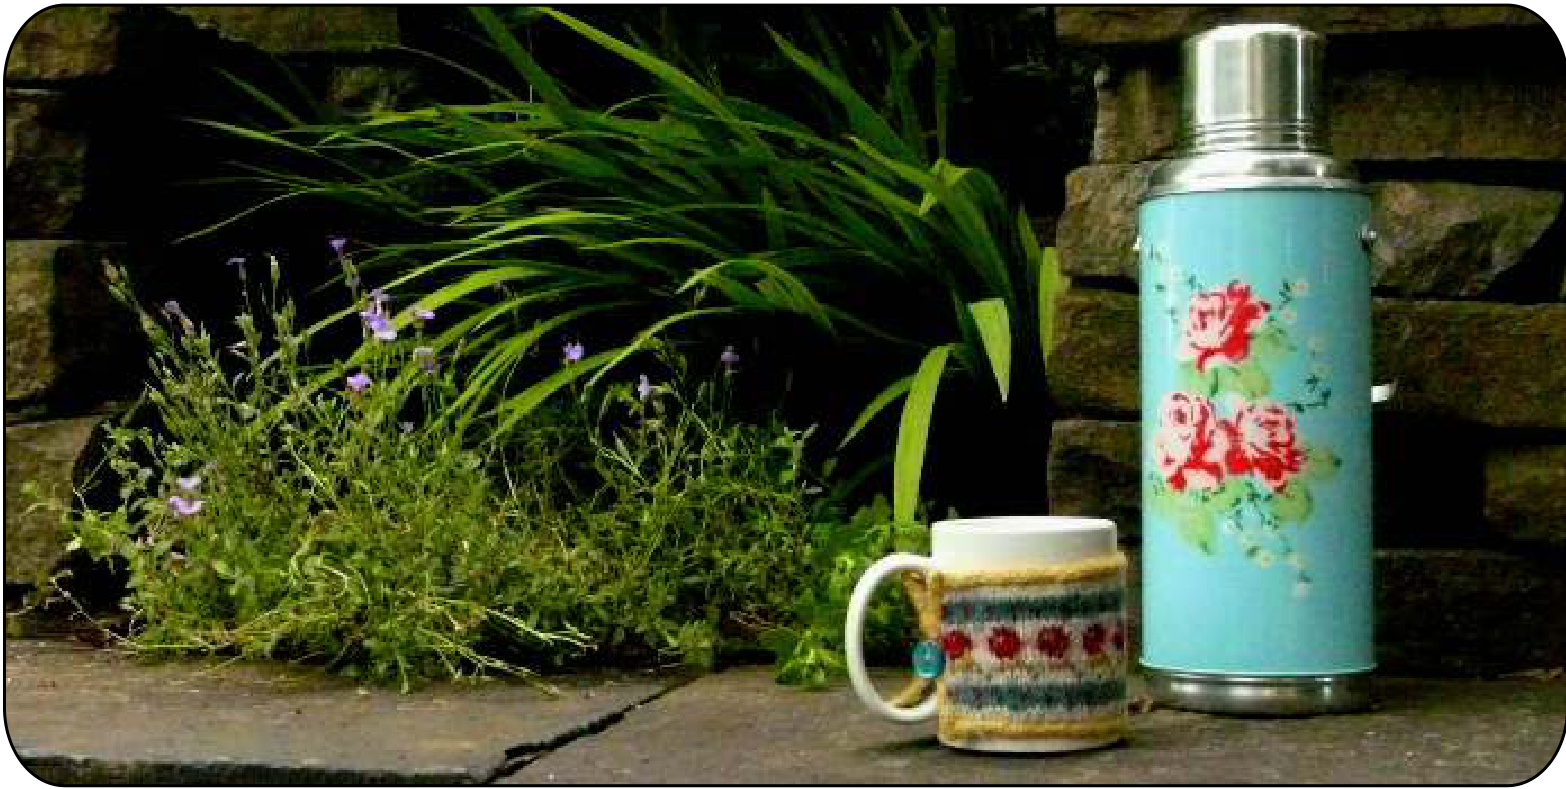
Mary Rose
SIZE
After blocking the unfastened cosy measures 7%2cm /3" high by 23cm/9" long. It will fit a standard mug. For mugs with a very large diameter it is possible to add extra repeats of the stranded pattern. Each pattern repeat is 2cm /3%" wide.
MATERIALS
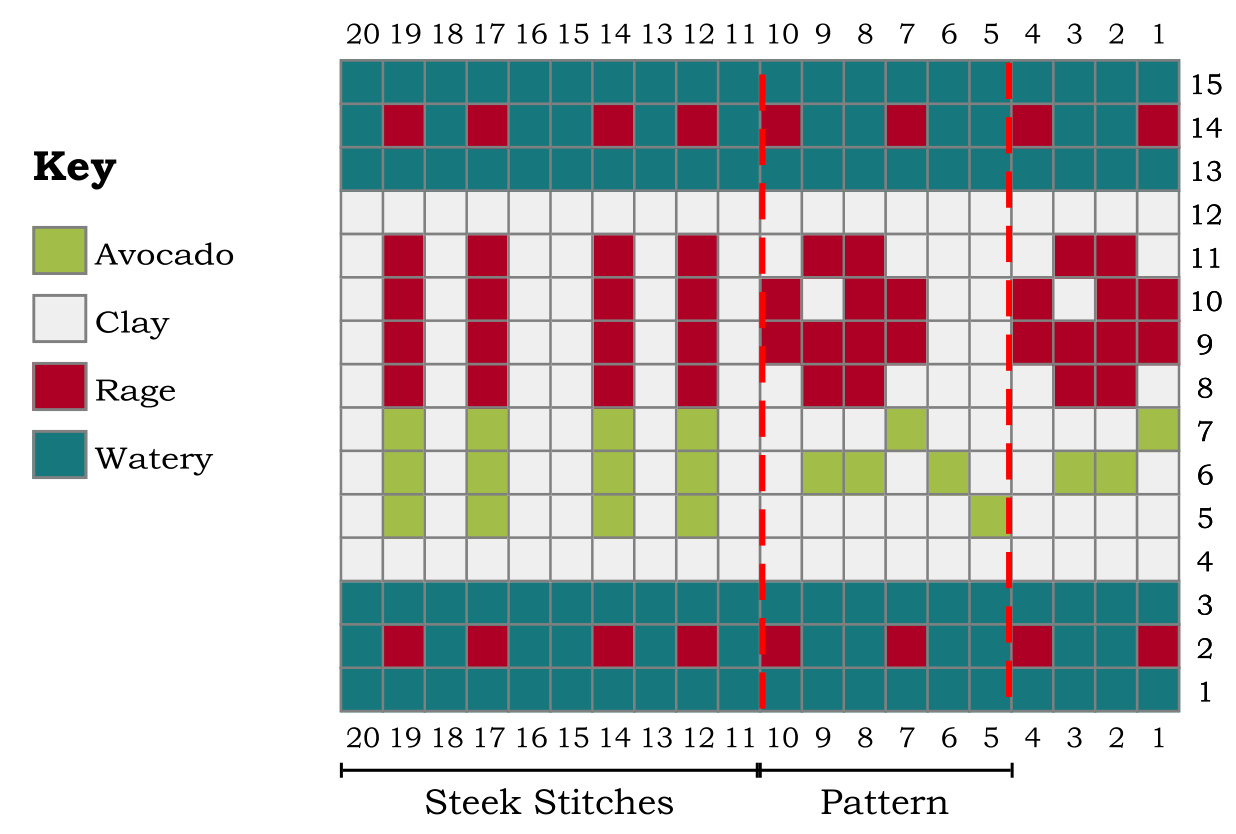
Small amounts of 5 colours of a light DK/sportweight yarn with approximately 350 metres/382 yards per 100g (175 metres/191 yards per 50g). The pictured sample was knitted with Rowan ‘Felted Tweed DK'in Avocado #161, Clay #, 177, Mineral #181, Rage #150, and Watery #152.
NEEDLES AND NOTIONS
3.25mm/US 3 needle(s) for small diameter circular knitting. Adjust needle size as necessary to achieve correct tension. 3.25mm/Us E crochet hook for a crochet provisional cast-on. 2 stitchmarkers. A 16mm/%" button.
TENSION/GAUGE
29 sts and 31 rows/rounds per 10cm/4" in stranded pattern after blocking.
ABBREVIATIONS
See page 4.
Instructions
Starting with a crochet provisional cast-on, you will knit the cosy from the bottom up in rounds. Each round includes the pattern stitches and 10 steek stitches. After completing the main body of the cosy you will leave the final round on waste yarn while you cut and reinforce the steek. Then you will apply i-cord all around the cosy, incorporating an i-cord buttonhole along one of the steek edges.
MAIN BODY
Using waste yarn and crochet provisional method (see page 5), cast on 64 stitches. Work one row with Yellow, placing stitchmarkers as follows: Set-up Row: knit 64 sts in Yellow, pm, cast on 10 sts in Yellow, pm. Join for working in the round and knit 2 rounds in White, slipping both markers as you reach them. Then knit 15 rounds of charted pattern as follows, using a spitsplice (see page 6) to join in new colours except when introducing the first motif colour at the beginning of line 2 of the chart: Pattern Round: start at column 1 and work the pattern repeat in stitch columns 5-10 a total of 10 times, sm. Then work the steek pattern in stitch columns 11-20, sm. After completing all 15 rounds of the chart work 2 more rounds in White. Finally work 1 round in Yellow as follows: Final Round: knit to marker in Yellow, rm, cast off the 10 steek sts, removing the end of round marker when you reach it.
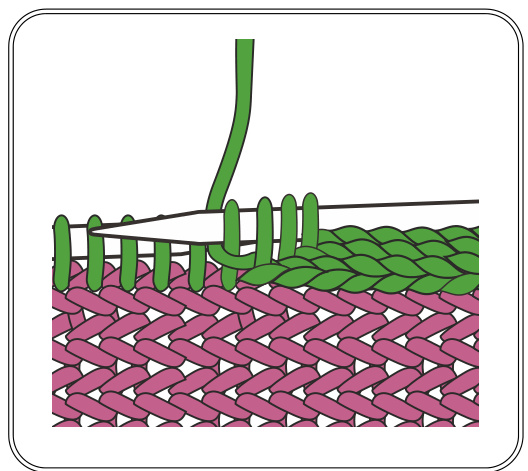
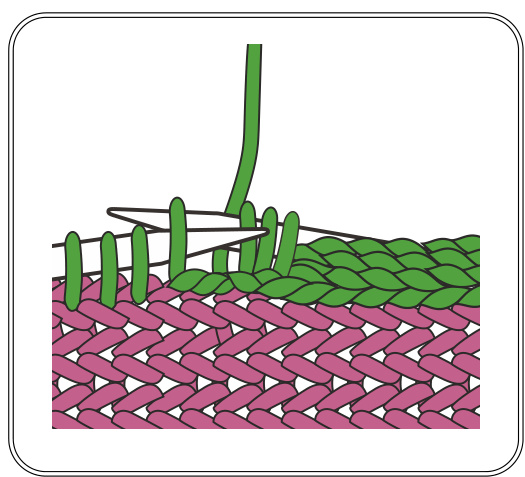
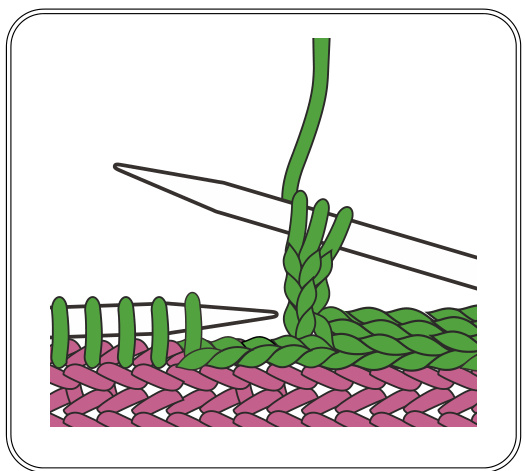
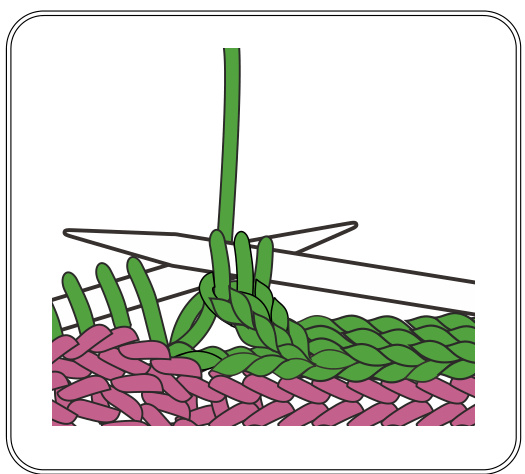
STEEK ANDI-CORD
Break off the yarn, leaving a short tail for weaving in later, and place the remaining sts onto waste yarn. Then cut and reinforce the steek (see page 7). Place the sts from the final round back onto your needle(s). Then, working from the RS with Yellow, apply i-cord to the replaced sts as follows: I-cord: Cast on 3 sts, pass these 3 sts to the passive needle. Then \*k2, sl1 knitwise, k1, psso, return 3 sts to the passive needle; rep from \* until all the sts on the passive needle have been cast/bound off. Then cast off the 3 i-cord sts. Now place the sts from the provisional cast-on onto your needle(s). Working from the RS with Yellow apply i-cord as before to all the provisional stitches. Then, with the RS facing you, pick up sts along one short edge of the cosy using Yellow as follows: Pick-up Row: Pick up and knit 2 sts from the end of the i-cord nearest to your working needle. Next pick up sts in every row next to the steek. Then pick up and knit 2 sts from the adjacent end of i-cord. Break off the yarn leaving a short tail for weaving in later. Slide the sts to the other end of your needle so that you can apply i-cord to them from the RS. Using Yellow apply i-cord to the first 10 sts, then work a 3-row i-cord buttonhole (see page 8). Then apply i-cord to the remaining sts in the row. Repeat the Pick-up Row on the other short edge of the cosy, then apply i-cord to these sts from the RS using Yellow.
FINISHING
ABBREVIATIONS
Weave in all ends, then trim the steek and whipstitch it into place.. Press the finished cup cosy with an iron on the lowest setting that provide steam. Then sew your button on halfway along the short edge that doesn't have a buttonhole. k = knit pm = place marker psso = pass slipped st(s) over rep = repeat RS = right side sl = slip st(s) either knitwise or purlwise as instructed. sm = slip marker (pass it from the passive to the working needle)
STEEK PATTERN
In rounds with two colours, work the light and dark yarns across the 10 steek stitches as follows: \*[k1 light, k1 dark] x2, k1 light; repeat from \* for the second half of the steek. This will form vertical stripes. st(s) = stitch(es)
Chart
Crochet Provisional Cast-on
WORKING THE CAST-ON
This cast-on forms a row of stitches in waste yarn. These can be removed later to pick up the stitches above them. You will need a knitting needle, waste yarn, and a crochet hook to work the cast-on.
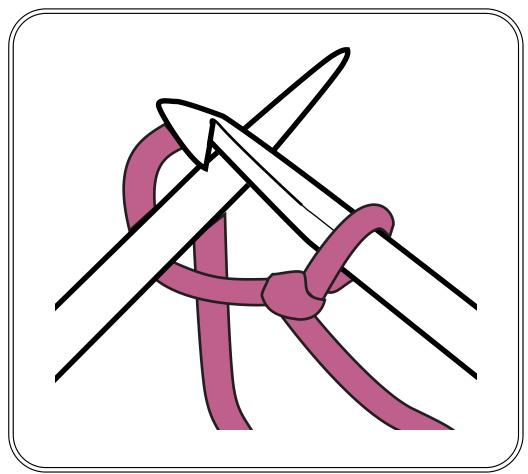
1) Make a slipknot and place it on the crochet hook.
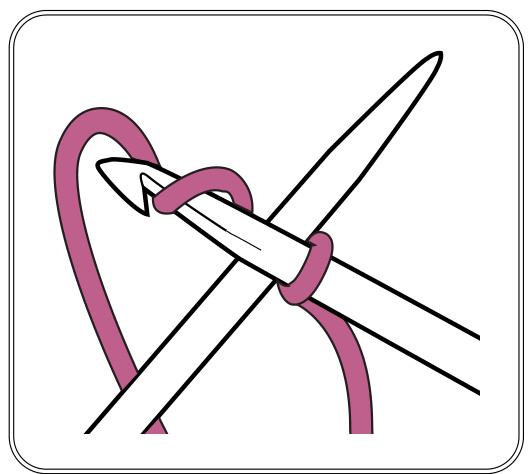
2) Holding the hook in front of the needle, take the yarn behind the needle and wrap it around the crochet hook as shown.
3) Use the hook to pull the wrapped yarn through the loop on the hook.
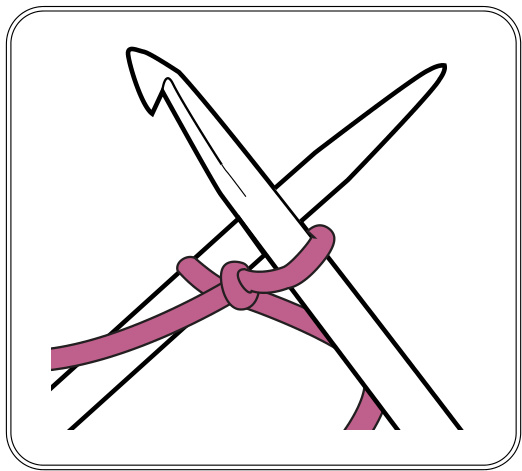
4) Repeat steps 2-3 until you have cast on the desired number of stitches. 5) Break off the yarn leaving a short tail. Pull the tail through the loop on the hook and proceed according to the pattern.
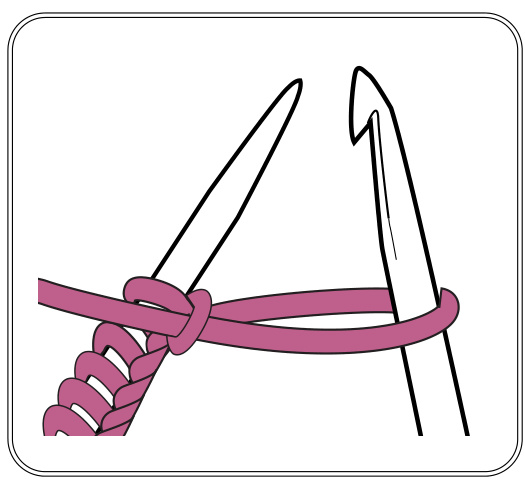
REMOVING THE CAST-ON
Carefully pull the tail of yarn out of the loop it was pulled through in step 5. Then slowly pull out each loop in the cast-on chain, placing each stitch it secured onto your needle as you do so.
Spit-Splicing In Colourwork
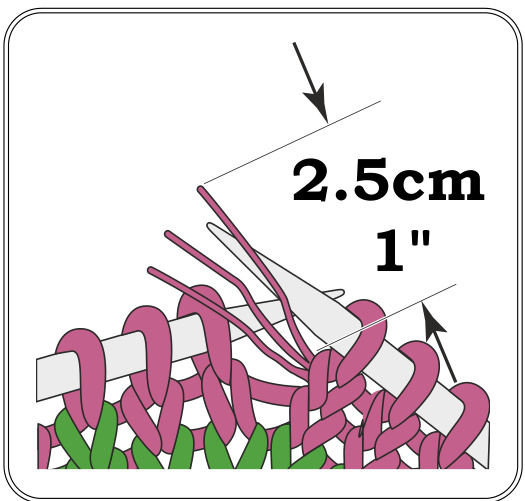
1) Knit in pattern to the point where the colour change is to take place. Cut the old yarn colour 2.5cm/1" away from the needle, then separate the plies.
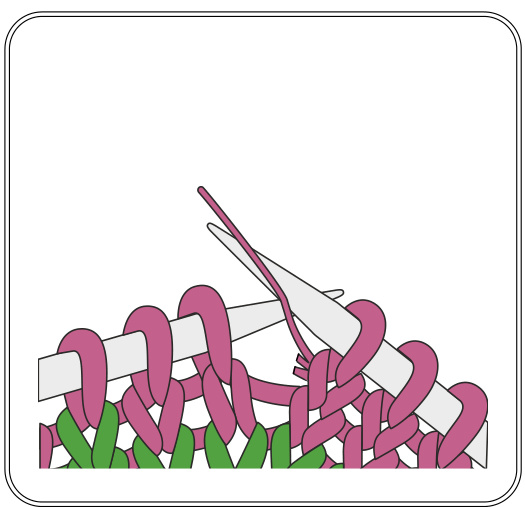
2) Cut at least half of the plies away as close to the needle as you can without cutting any stitches. Then unknit ('tink) a few stitches to give you some yarn length to play with. 3) Prepare the new yarn colour: separate the plies for 2.5cm/1" from the end then cut at least half of them away.
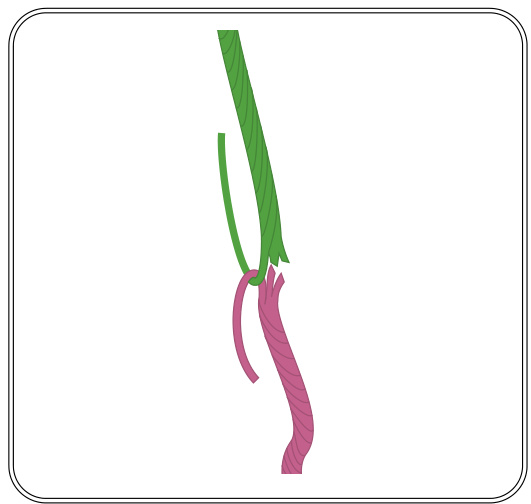
4) Wet the old and the new yarn ends. Many knitters use spit for this wetting (hence spit-splicing). Then cross the yarn ends at the point where the plies were cut away. Fold each yarn end around the other yarn and back onto the full thickness of the yarn. The two yarns should end up hooked around each other at the point where the plies were cut.
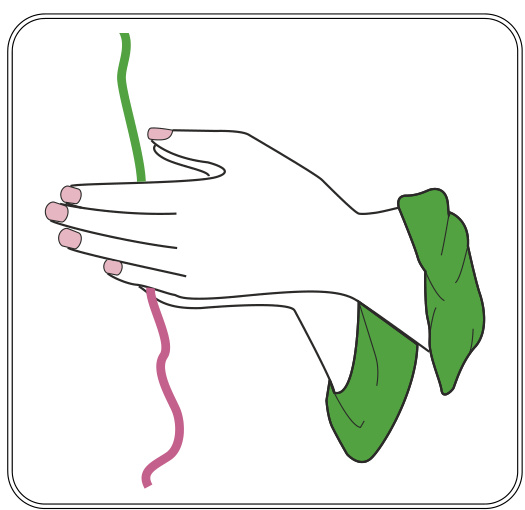
5) Vigorously rub the join in your hands to felt it. Then continue knitting. The yarn will change colour at the correct point.
Slip-Stitch Crochet Reinforcement
You must cut the steek before applying this reinforcement. First set the steek by lightly pressing it with a steam iron on the coolest setting that will make steam. Then cut it between the two centre stitch columns. After this work the reinforcement as follows along both edges of the steek. To set up make a slipknot with some spare yarn and place it on a crochet hook. The yarn and hook should be roughly equivalent in weight and size to the yarn and needles that you made the garment with. Hold the yarn behind the steek throughout the remainder of the instructions. You will work the crochet in the second stitch column of the steek, ie one and a half stitch columns away from the main fabric.
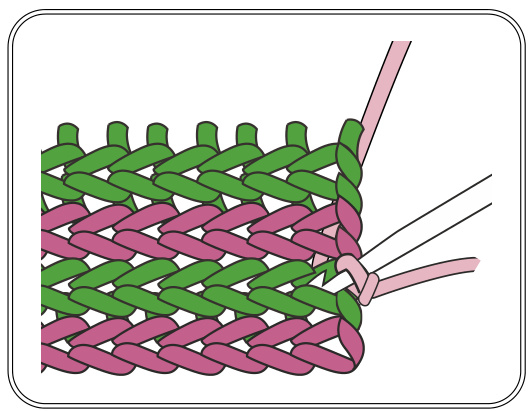
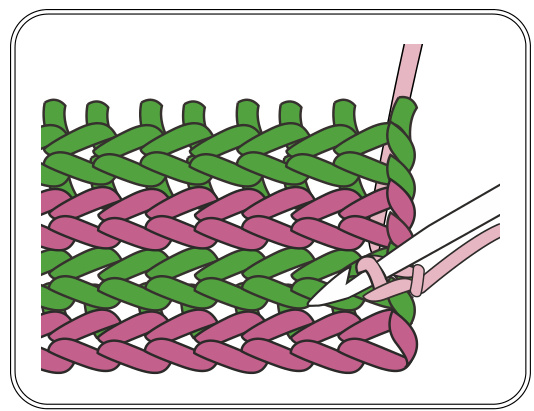
1) From the RS insert the hook through the centre of the first stitch in the column.
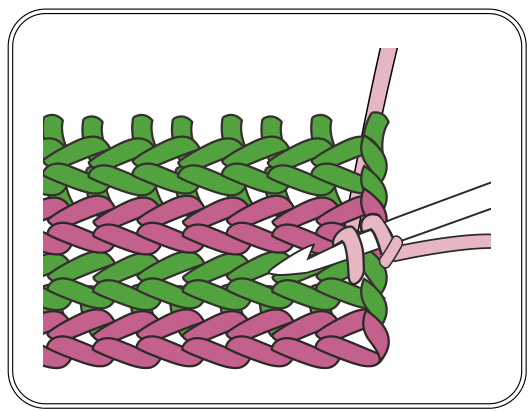
3) Pull the new loop through the first loop, then pull things tight.
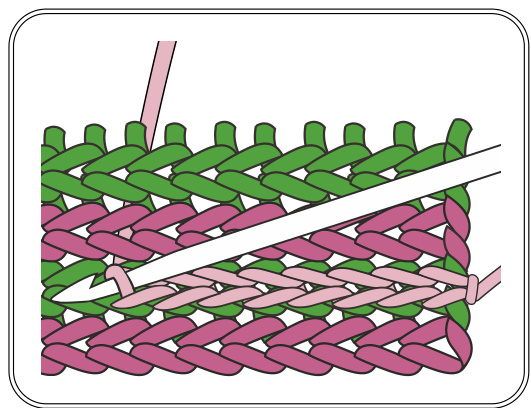
2) Use the hook to pull a loop of the working yarn through to the RS. You now have two loops on the hook. 4) Working in the next stitch in the column, repeat steps 1-3 until you have worked crochet along the whole length of the steek.
I-cord Buttonole
1) Work applied i-cord to the point where the buttonhole should start. With the applied i-cord stitches on the working needle, bring the yarn forward. Slip the next picked up stitch purlwise. Then take the yarn back again.
2) Slip the next stitch purlwise. Then take the previous slipped stitch over it. Repeat until you have cast off all stitches for the desired buttonhole length. Then return the final slipped stitch to the passive needle as shown above.
3) Return the 3 i-cord stitches to the passive needle also. Then work unattached i-cord for as many rows as the number of stitches you cast/bound off in steps 2-3. To work a row of unattached i-cord simply knit the 3 i-cord stitches from the passive needle, then return them to the passive needle ready to work the next i-cord row.
4) Now knit 2 i-cord stitches, then slip the third i-cord stitch knitwise. Knit the next picked up stitch, then pass the slipped i-cord stitch over it. This completes the buttonhole.


