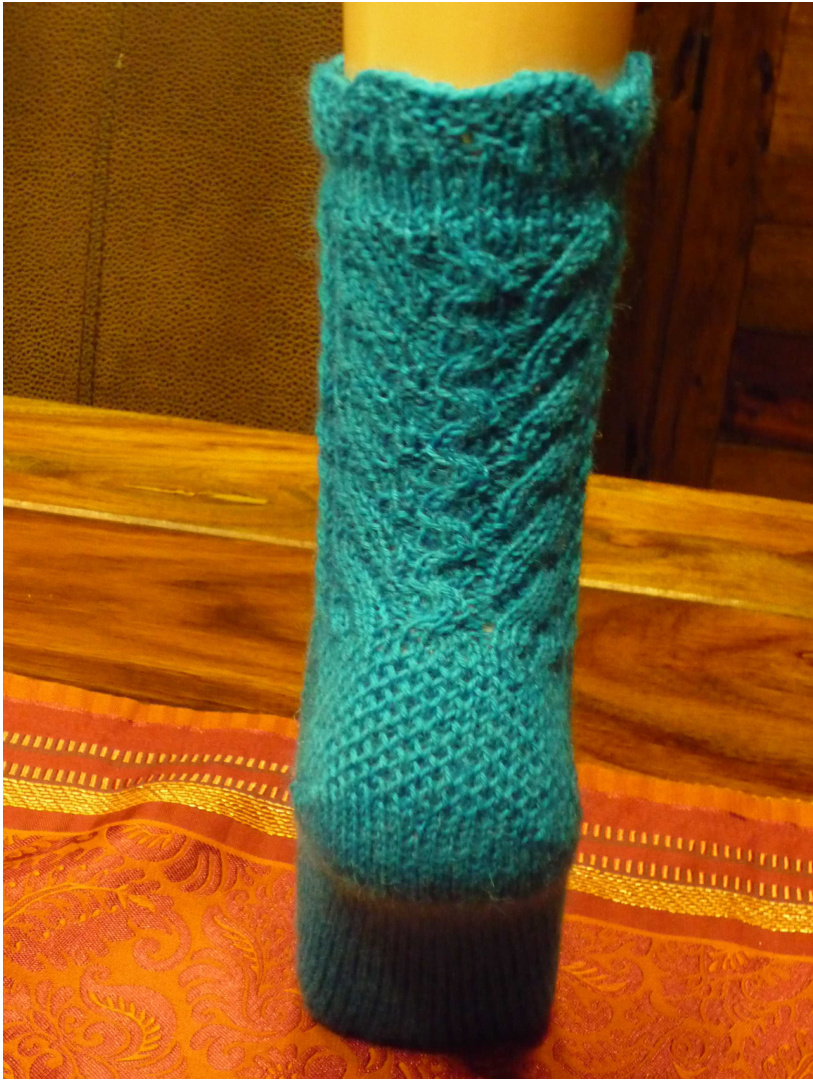
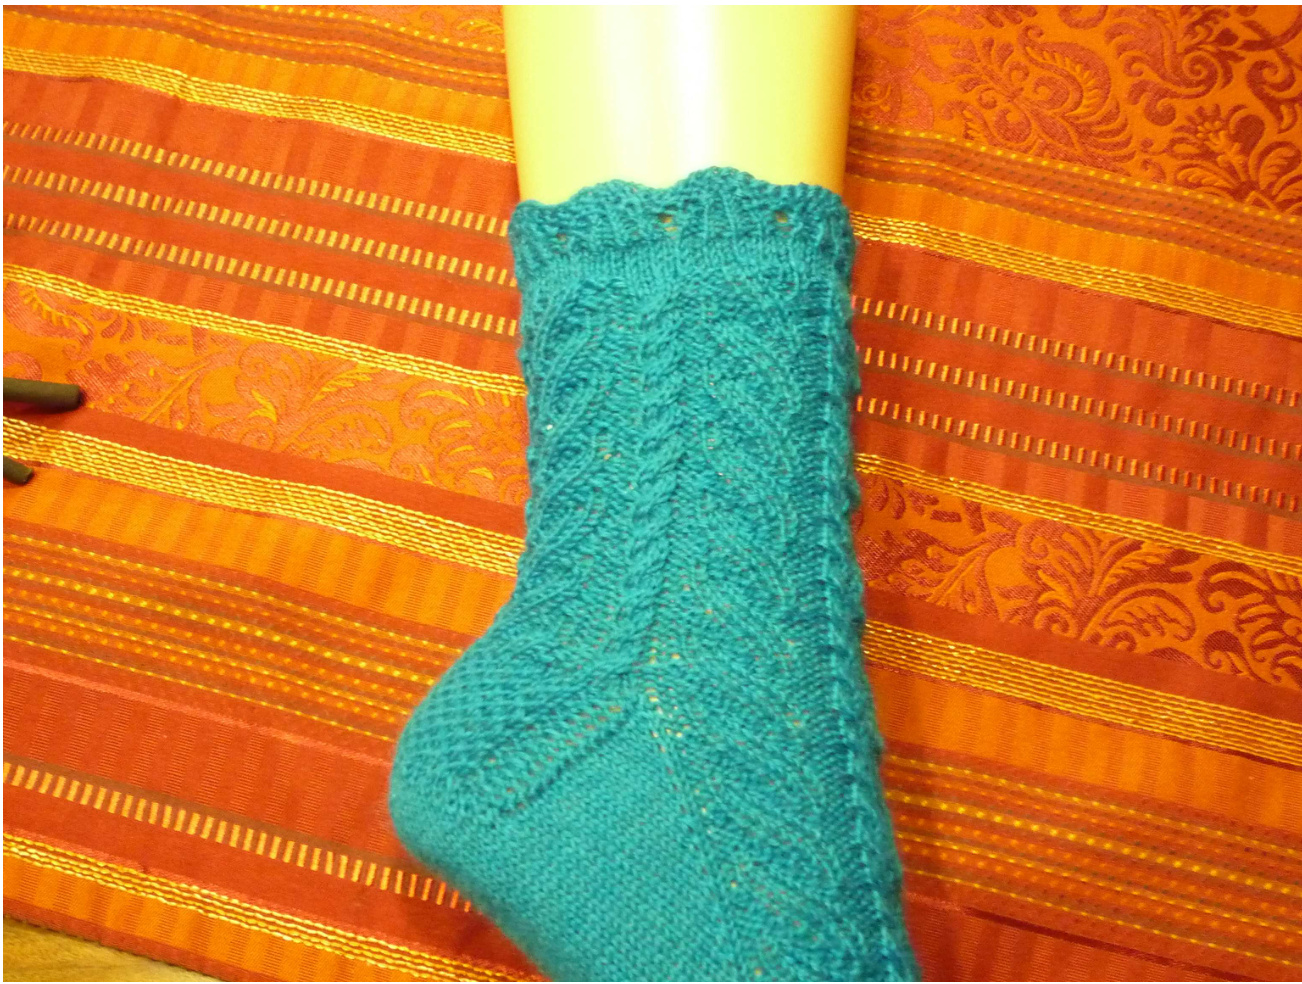
Rumpelstilzchen

Rumpelstiltskin danced round the fire and the messenger had to pass a lot of different ways to get to know the name. These two aspects have been important for this design. Those campfires in the mid of the front part of the sock and the cables represent all the ways. If you want to read the whole fairytale here it comes: http://www.grimmstories.com/de/grimm maerchen/rumpelstilzchen You will need 100g of fingering weight sock yarn. 2 circular needles 2.5mm or DPNs. Though casting on is easier with circular needles The pattern is written for German sizes 38/39 and in parenthesis for 36/37, 40/41 and 42/43. These socks are knitted toe-up. You should be comfortable with working from a chart and knitting doublestitches. If you have any questions, just ask, I will try to help as soon as possible. You also might have a look at Youtube, where you will find all the techniques used in this pattern. You can download a step-by-step-explanation how to do doublestitches on my ravelry designer page. At the end of the pattern you will find all the charts sorted by sizes. Please read the pattern before you start knitting
Cast-on:
Using Judy's Magic Cast-On cast on 16 stitches (all sizes), 8 stitches on each needle. (\*1) Needle 1 knits the upper foot with the pattern and needle 2 the sole foot in Stockinette Stitch. Work chart A (take the correct size!). The increases are worked on both needles, needle 2 only knitted increases. Now you have 64 (64, 68, 68) stitches altogether. Knit in pattern until you reach 13cm ( 12cm, 14cm, 15cm). Needle 2: stockinette stitch 3.Row: Needle 1: Pattern. Needle 2: k1 , make one right, k32 (32, 34, 34), make one right, k1 Needle 2: stockinette stitch Continue in this manner until 14 (13, 15, 15) increases have been worked. The gusset is finished knitting the last increase. Now you have 60 (58, 64, 64) stitches on needle 2. Needle 1 knits the pattern. The heel turn will start and needle 1 is left alone until the complete heel is finished. For the heel turn you will need doublestitches (\*2) and short rows. Needle 2: knit 46 (45, 49, 49) stitches as they appear. Turn work The first stitch is a doublestitch, now p31 (31, 33, 33) turn your work. Doublestitch, k30 (30, 32, 32) (=knit to doublestitch of previous row); turn work. Doublestitch, p29 (29, 31, 31) (=purl to doublestitch of previous row); turn work. Doublestitch, k28 (28, 30, 30) ... Continue until you have worked 8 (7, 8, 9) doublestitches on each side. Continue in stockinette stitch and knit across all 8 (7, 8, 9) doublestitches, but don't go any further. Make sure to knit both strands of the stitches. (!) Turn your work, slip first stitch, purl until and across all 8 (7, 8, 9) doublestitches making sure to work both strands of the stitches. Turn work.
Now the slipped stitch heel starts.
1.Row: Sl1, k2, \*sl1, k1\*, repeat until there are only 2 stitches before the gap, k1, purl together the last stitch before the gap and the first stitch after the gap. Turn your work. 2.Row: Slip the first stitch, k2, purl all stitches until 3 stitches before the gap, k2, knit together the last stitch before the gap and the first stitch after the gap. Turn your work. 3.Row: Slip the first stitch, k3, \*sl1, k1\* repeat until there are only 3 stitches before the gap, k2, purl together the last stitch before the gap and the first stitch after the gap. Turn your work. Just like row 2. Repeat those 4 rows until there is only one stitch left after the gap! (On both sides!) Knit the right side row just as the first row: purl the last stitch before the gap and the stitch first after the gaptogether. Don't turn your work! Now we are knitting in rounds again. To prevent little holes between needle 1 and needle 2 (upper foot and sole foot) pick up the yarn between the needles and proceed as follows: Before starting to work the stitches on needle 1 pick up the thread between needle 2 and 1, twist thread (as for the backwards loop cast-on) and place it on the left needle. Knit together the first two stitches on needle 1 (i.e. the picked up thread and the previous first stitch of needle 1). Continue in pattern (chart B).
Needle 2:
Before starting to work the stitches on needle 2 pick up the thread between needle 1 and 2, twist thread (as for the backwards loop cast-on) and place it on the needle. Knit together the first three stitches on needle 2 (i.e. the picked up thread and the previous first and second stitch of needle 1), knit to the end of the round. Now you have 32 (32, 34, 34) stitches on needle 1 on needle 2.
Leg:
Continue knitting the pattern (Chart A) on needle 1, needle 2 knits Chart B. Here you synchronize the two charts such as needle 1 knits round 4 of the pattern repeat so you knit round 4 from the pattern repeat of Chart B. Dieses Muster ist ausschlieBlich fur den privaten Gebrauch zu verwenden! Das Muster darfin keiner Weise kommerziell verwendet werden. The cuff is framed green in the charts, work those two rounds 4 times (8 rounds). After that \*p1, k1tbl\* repeat this until the end of this round. The next round is knitted in small sections. Size 36-39: 8 stitches as they appear, turn work, work 1 doublestitch, 7 stitches as they appear, turn work, work 1 doublestitch, 6 stitches as they appear, turn work, work 1 doublestitch, 5 stitches as they appear, turn work, work 1 doublestitch, 4 stitches as they appear, turn work, work 1 doublestitch, 3 stitches as they appear, turn work, work 1 doublestitch, 2 stitches as they appear, work the next 3 doublestitches (Make sure to knit both strands of the stitches) Work this sequence 7 more times ( 8 times altogether)
Size 40-43:
9 stitches as they appear, turn work, work 1 doublestitch, 8 stitches as they appear, turn work, work 1 doublestitch, 7 stitches as they appear, turn work, work 1 doublestitch, 6 stitches as they appear, turn work, work 1 doublestitch, 5 stitches as they appear, turn work, work 1 doublestitch, 4 stitches as they appear, turn work, work 1 doublestitch, 3 stitches as they appear, work the next 3 doublestitches (make sure to knit both strands of the stitches) After that work the sequence with 8 stitches. Work these two sequences 3 more times (altogether 8 sequences: 9, 8, 9, 8, 9, 8, 9, 8) After that: purl one round (make sure to knit both strands of the stitches), knit one round, purl one round, bind of loosely as if there are knitted stitches. t turns out exceptionally loose using Jeny's surprisingly stretchy bind-off. (\* Here is another very loose possibility: K2, put both stitches back on the left needle and knit those 2 together. \*Now you have one stitch on the right needle, k1, slip both stitches back onto the left needle and k2tog\* Repeat this until you have only one stitch on the right needle and none on the left needle. Cut of the yarn and pull it through the last stitch. Weave in ends and you are finished. Have fun knitting and wearing these socks! @ Seite4von10 Pattern and Photos for personal use only. Not to be reknit or reproduced for profit. Information concerning cast-on and doublestitches: \*1: On youtube there is a wonderful Video from Cat Bordhi. http://www.youtube.com/watch?v=lhBISoAhhQY If you prefer a different cast-on feel free to use it. I love this one and even beginners are able to use it \*2: On youtube there is a video explaining doublestitches. Since we mainly use the doublestitches for short row heels in Germany, this video is about a short row heel. However, doublestitches are explained very well (doublestitches start at2:30min) http://www.youtube.com/watch?v=pnt 6Vq 0o0 You can download a step-by-step-explanation how to do doublestitches on my ravelry designer page. \*3: Here you can find another video focusing on the doublestitches from Cat Bordhi: http://www.youtube.com/watch?v=abBhe-JYmgl&feature=player detailpage
legend
| right side: knit one wrong side: purl one | |
| right side: purl one wrong side: knit one | |
| purl two together | |
| M | purled increase: pick up the strand between the right-hand-needle and the left-hand-needle with the |
| MR | tip of the left-hand-needle from back to front and purl it knitted increase: pick up the strand between the right-hand-needle and the left-hand-needle with the |
| tip of the left-hand-needle from back to front and knit it yarn over | |
| B | knit through backloop |
| 又 | purl through backloop |
| no stitch, placeholder | |
| V | slip one stitch |
| slip 2 stitches to cable-needle, hold in back, knit 2, knit 2 from cable-needle | |
| slip 2 stitches to cable-needle, hold in front, knit 2, knit 2 from cable-needle |
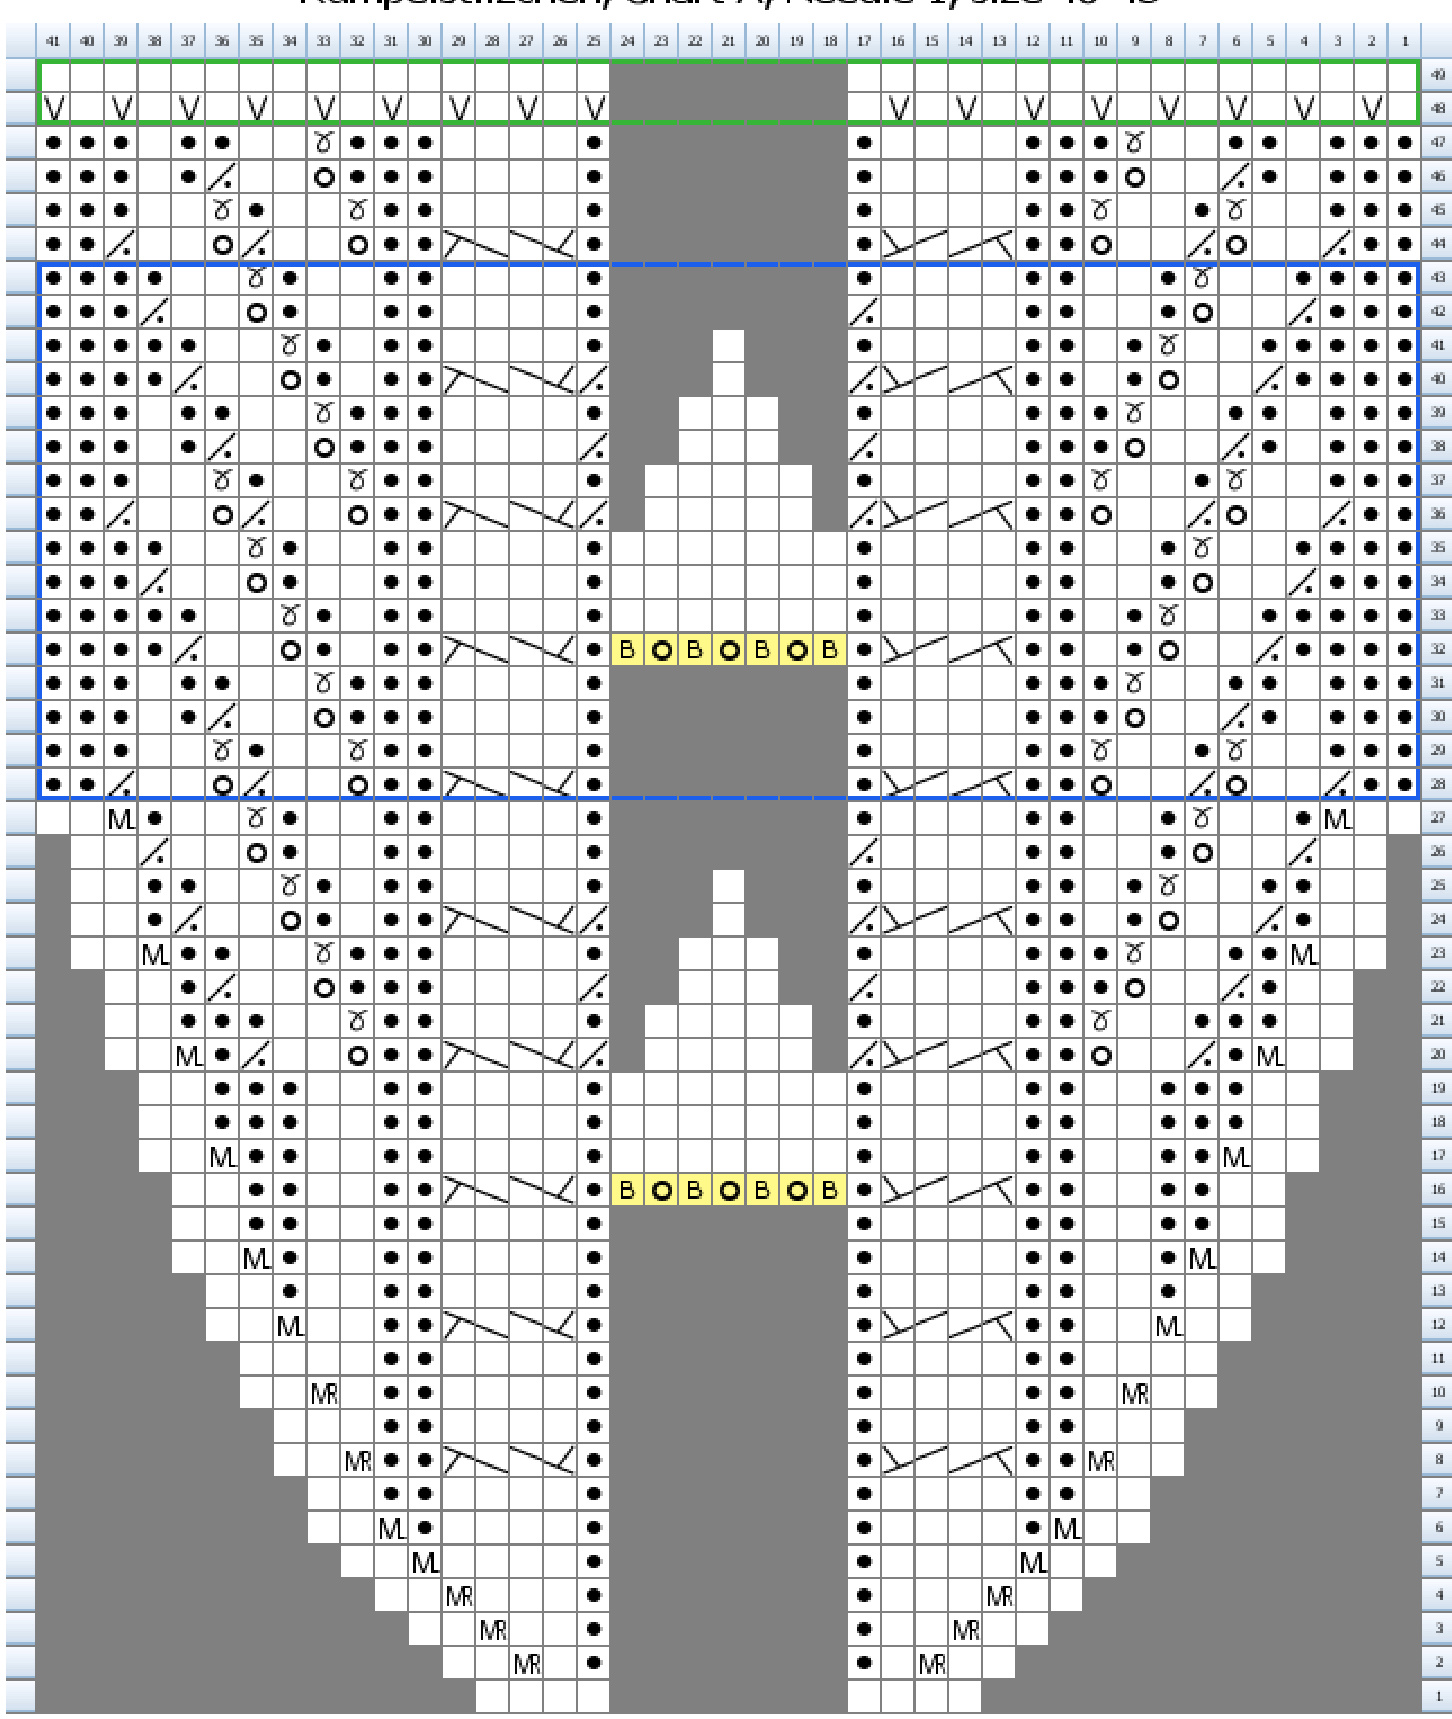
Rumpelstilzchen, Chart A, Needlle 1, size 36-39
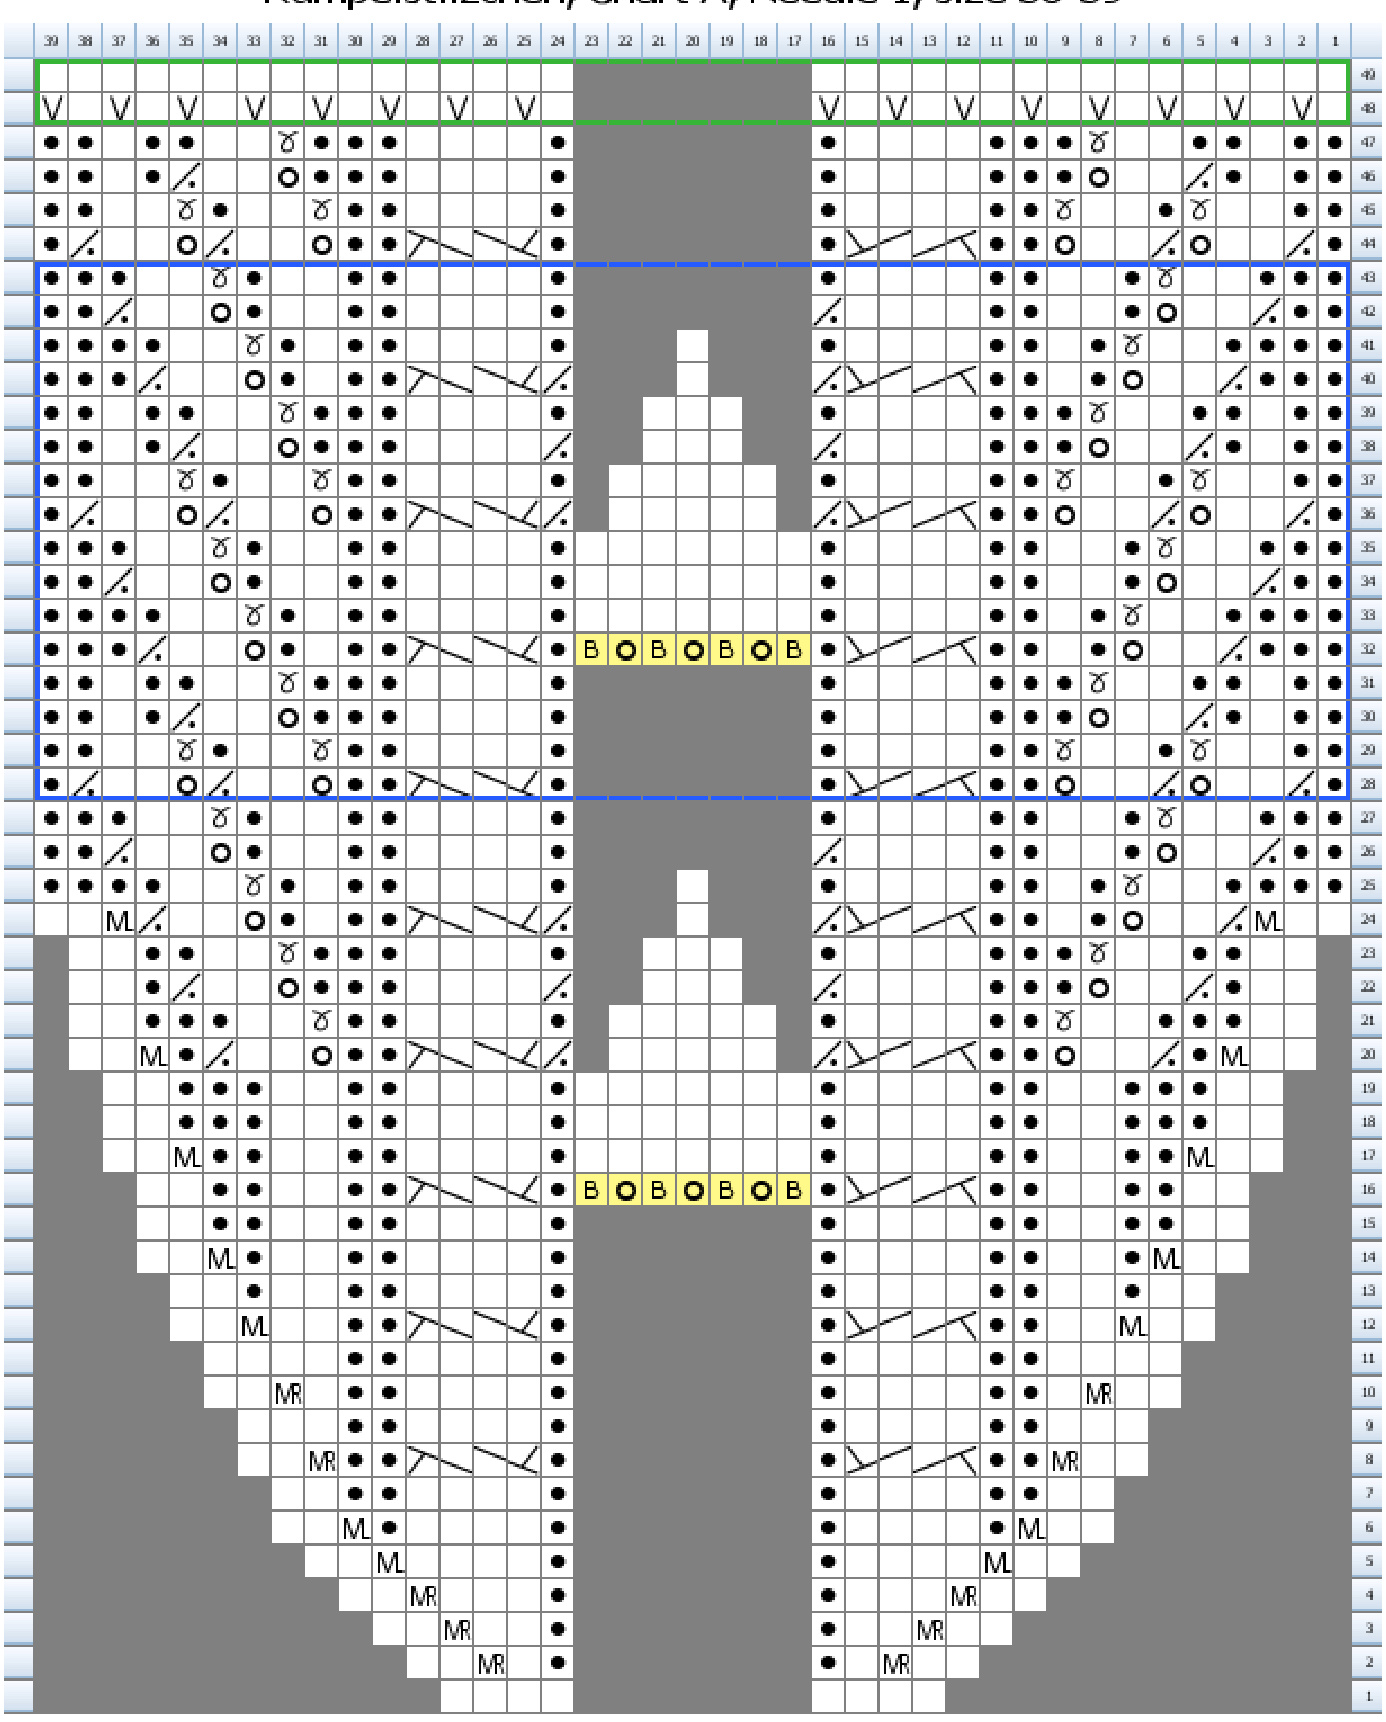
Gudrun Neumann-Mack
Notes:
Framed blue: pattern repeat framed green: part of the cuff: repeat these 2 rounds 4 times marked yellow: Pick up the strand between the 2 purled stitches wit the tip of the left-hand needle From front to back and knit all the yellow stibches as described in the chart. The pick-uped str and stays on the left needle until the last stibch is knitted through the backoop, then you let it slide From the needle. Seite 7 von 10
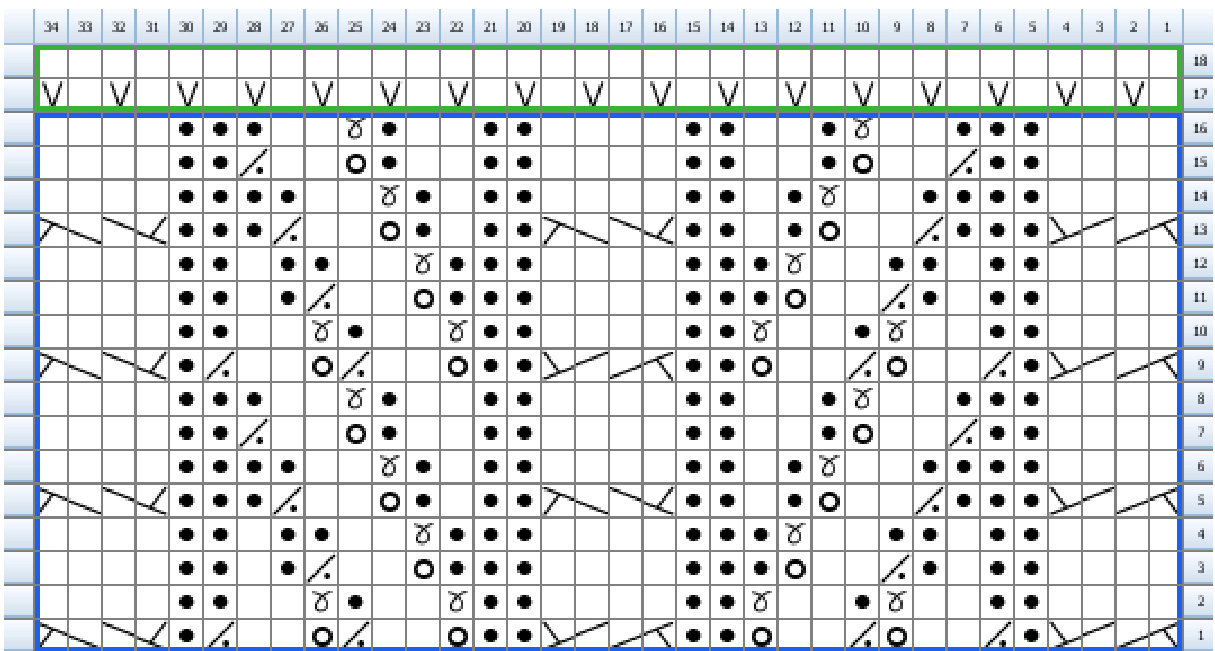
Rumpelstilzchen, Chart B, Needlle 2, size 36-39
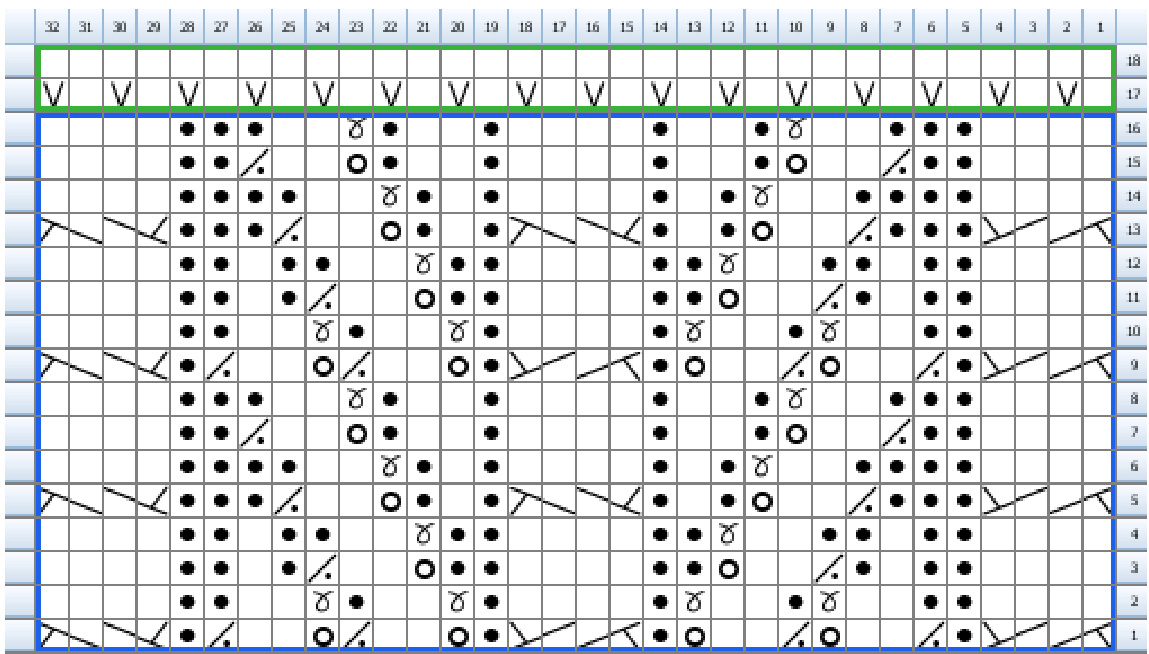
Gudrun Meumann-Mack
Notes:
Framed blue: pattern repeat Framed green: part of the cuff: repeat these 2 rounds 4 times
Rumpelstilzchen, Chart A, Needlle 1, size 40-43
Notes:
Framed blue: pattern repeat Framed green: part of the cuff: repeat these 2 rounds 4 times marked yellow: Pick up the strand between the 2 purled stitches wit the tip of the left-hand needle from front to back and knit all the yellow stitches as described in the chart. The pick-uped strand stays on the left needle until the last stitch is knitted through the backoop, then you let it slide From the needle. Seite 9von 10 Pattern and Photos for personal use only. Not to be reknit or reproduced for profit.
Rumpelstilzchen, Chart B, Needle 2, size 40-43
Gudrun Neumann-Mack
Notes:
Framed blue: pattern repeat Framed green: part of the cuff: repeat these 2 rounds 4 times