The Cushion Conglomeration Caper (CCC)
CCC was originally a project for, and by, the members of the Woolly Thoughts Yahoo group, as an introduction to using the Woolly Thoughts methods. The plan was for a different member ofthe group to add each new shape so that there was no predetermined pattern. Some might refer to this as freeform but this was all using very precise geometric shapes. The only angles allowed in the shapes were 45, 90 and 135 degrees. The original plan broke down as some members wanted to work more quickly than others. I added the remaining shapes myself so that everyone could work at their own speed. The basic instructions for a new shape were revealed every two days but all help and advice files had to be accessed separately so as not to spoil the fun for those working more slowly. This file attempts to reproduce those original conditions. In pages 2 - 5 ofthis document, shapes 1 and 2 are described in detail; shapes 3 -22 are listed just as they were given to members. The rest of the document contains detailed help and diagrams for each shape. If you want to make the cushion without help, print only pages 2 - 5. There are currently January 2008 two photographs on the Ravelry project page, on of which is a crochet interpretation of the design. Woolhelmina (Pat Ashforth & Steve Plummer) www.woollythoughts.com
The Cushion Conglomeration Caper (CCC)
General instructions
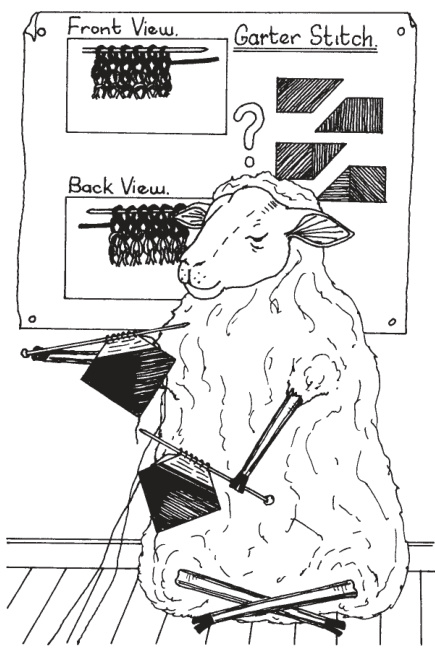
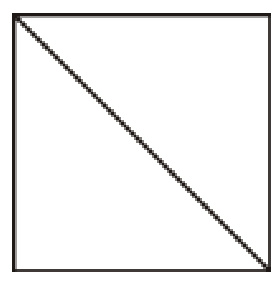
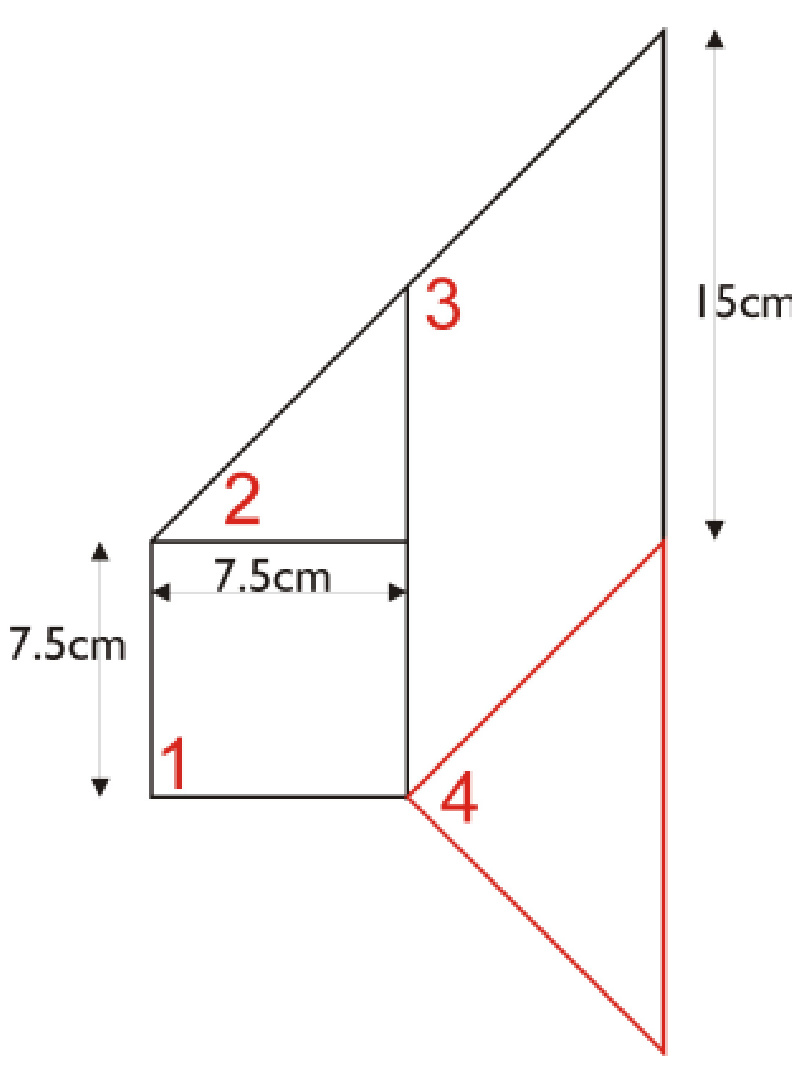
Choose any ya and needles. Use approximately the same thicknessof yarn throughout. Gage is unimortant. Work in garter stitch. The finished cushion willbe $45\;\mathrm{cm}$ square (approximately 18") If you find yourself doing something different from the crowd, it will be your decision whether you rip or improvise. The Caper is meant to be fun!! Shape 1 - Starting Square Draw a $7.5\ \mathrm{cm}$ square. Draw the diagonal. Time spent drawing is saved later as it is so much quicker to measure with this template. Cast on nestith andinreaseuntil yourtriangle fits thetemlatuptothediagonalline; therease atth same rate. The Woolly Thoughts way is to knit twice into the last titch of the rw, when you are increaing, and to knit two together at the end of every row when you are decreasing. That's the easy way to teach the method but if you prefer to do the increases and decreases some other way, that's fine.) Important note: Remember how many stitches you had on the needle, at the widest point, when you reached the diagonal.
Shape 2
Instructions: Pick upthe stitches along anyonedge of your square and knit a triangle with the right hand-side vertical(ie.forming a continuous straight line with one side ofthe square) and the other side sloping inwards at 45 degrees. These rows will be parallel to the side of your square. You are creating shape 2.
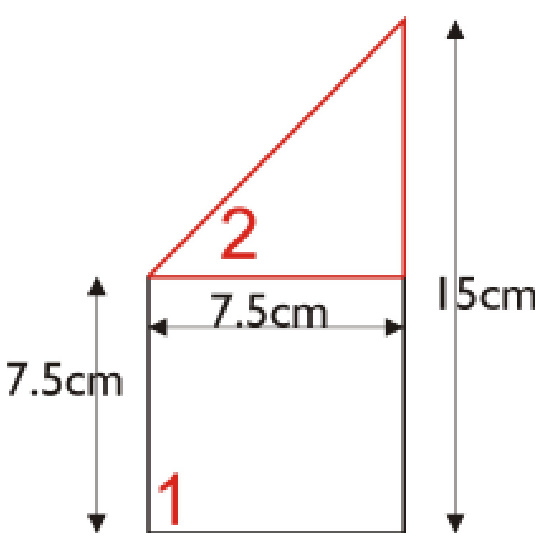
(Shape numbers are in red; measurements are black) The number of stitches on the diagonal of the square must be divided by 1.4 to give the number of stitches to pick up along the edge of the square. (This works because of Pythagoras Theorem). Round to the nearest whole number.
Examples
Stitches on diagonal Divide by 1.4 Stitches to pick up 14 18 20 25 Knit straight on wrong side row; knit two together at the end of each right (public) side row. Continue until all stitches are worked off. The new triangle should be the same height as the first square.
Helpful note
When picking up stitches from diagonal ridges (e.g. the stitches along the edge of the square for shape 2) you are basically picking up 7 stitches from every 5 ridges. It helps to have a system. Here's one that works well: ridge ridge furrow ridge ridge furrow ridge Shape 3 (Cynthia's shape) A parallelogram attached tothe long sideofthe square and triangle.t should continue the slope ofthe triangle (so that's a left-sloping parallelogram) . It should be the same height as the square.
The new shape is to be attached to the sloping side on the right of the parallogram you just made. It is a triangle with a 90 degree angle at the corer whereitjust meets the starting square. The other two angles are 45 degres.
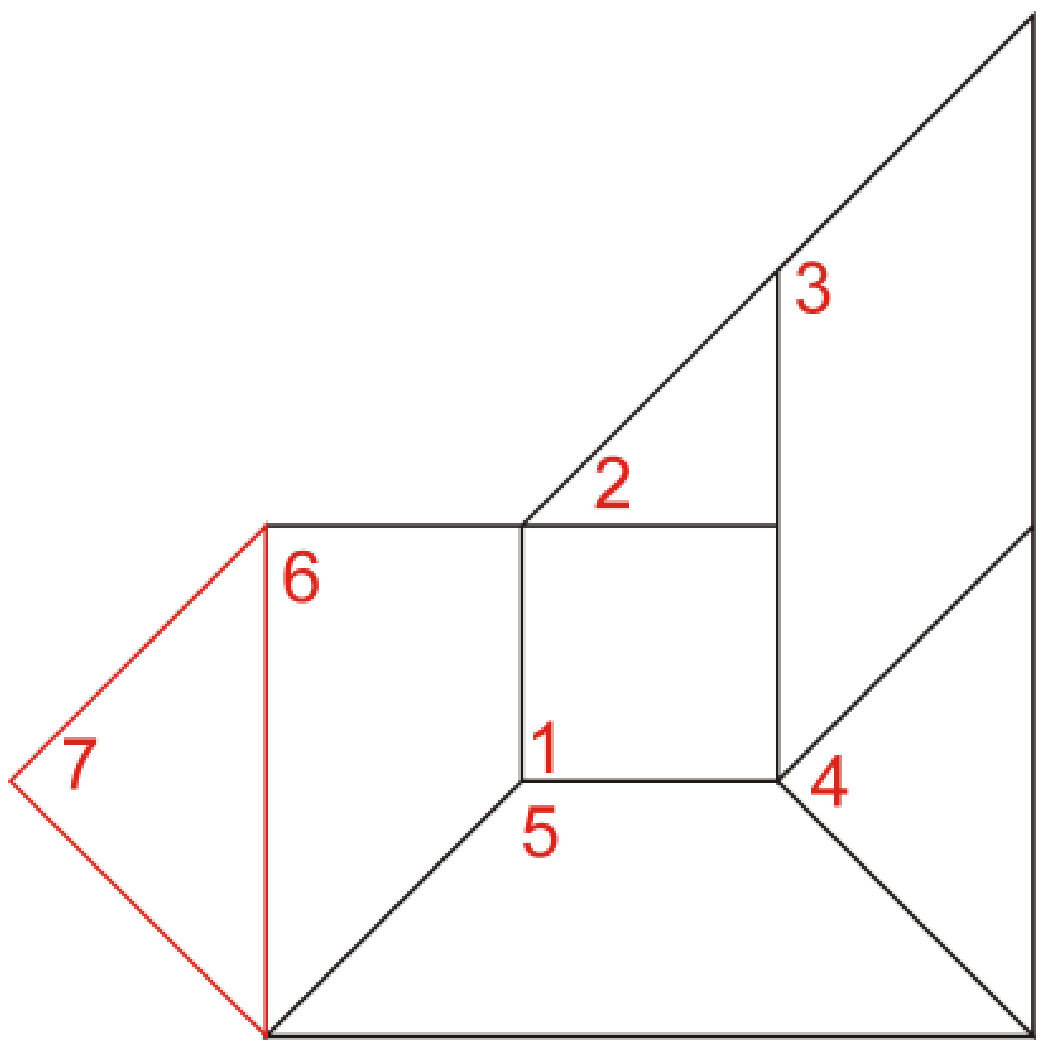
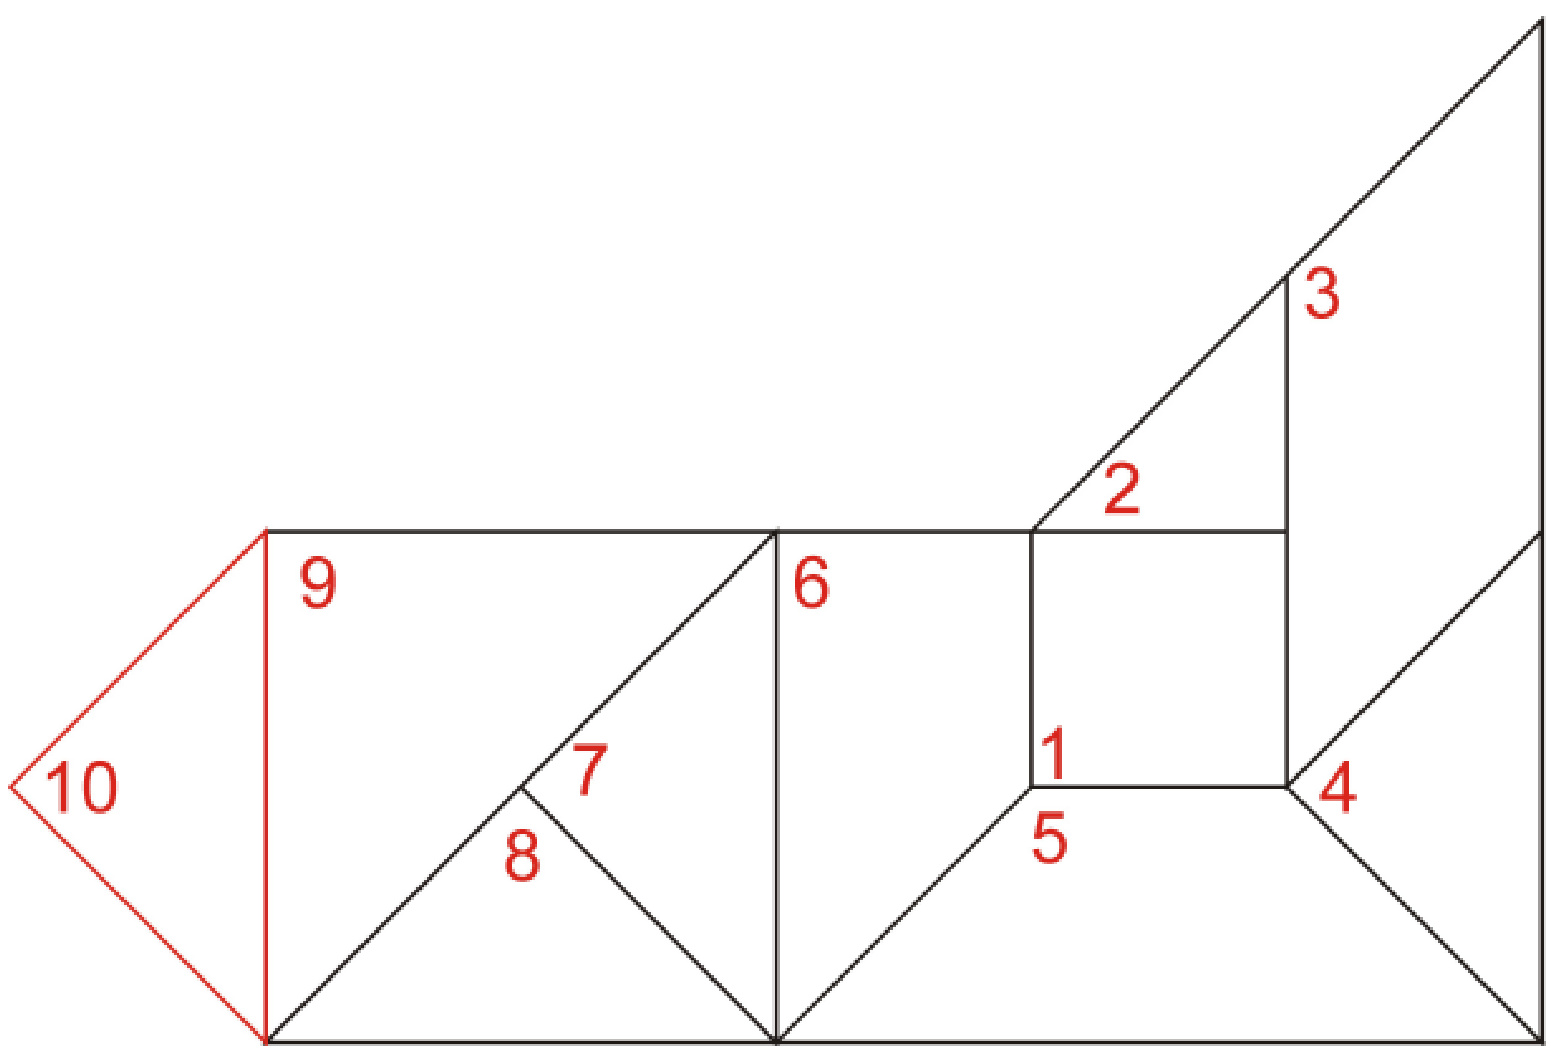
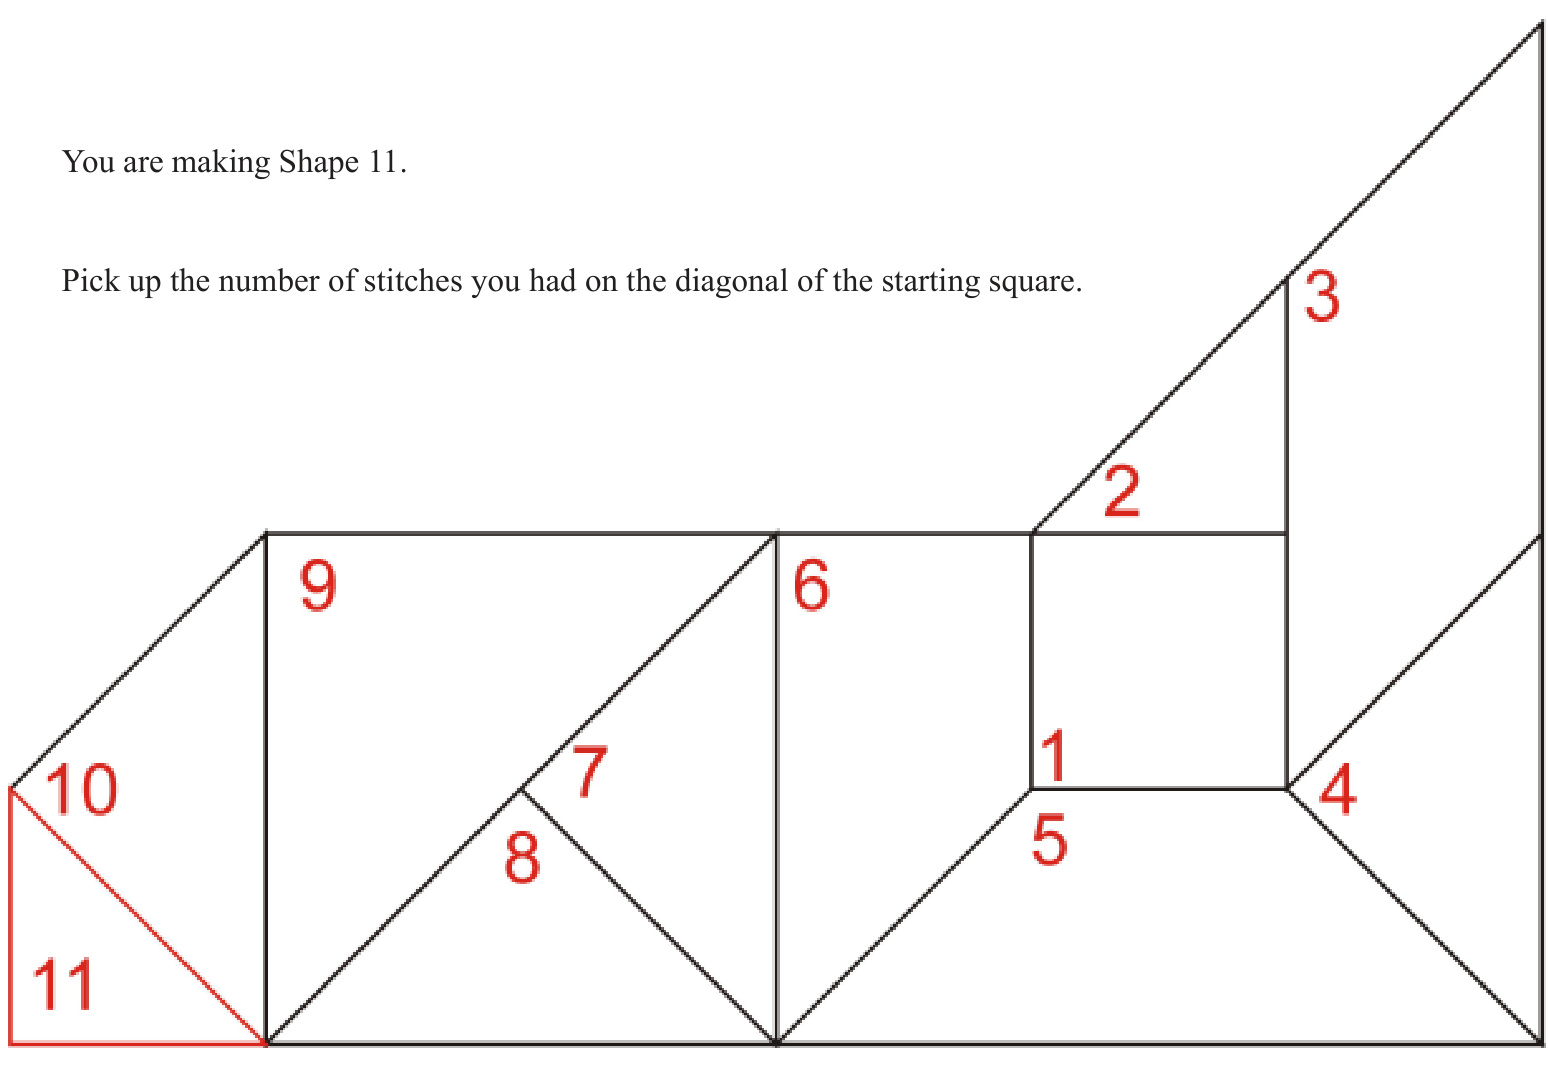
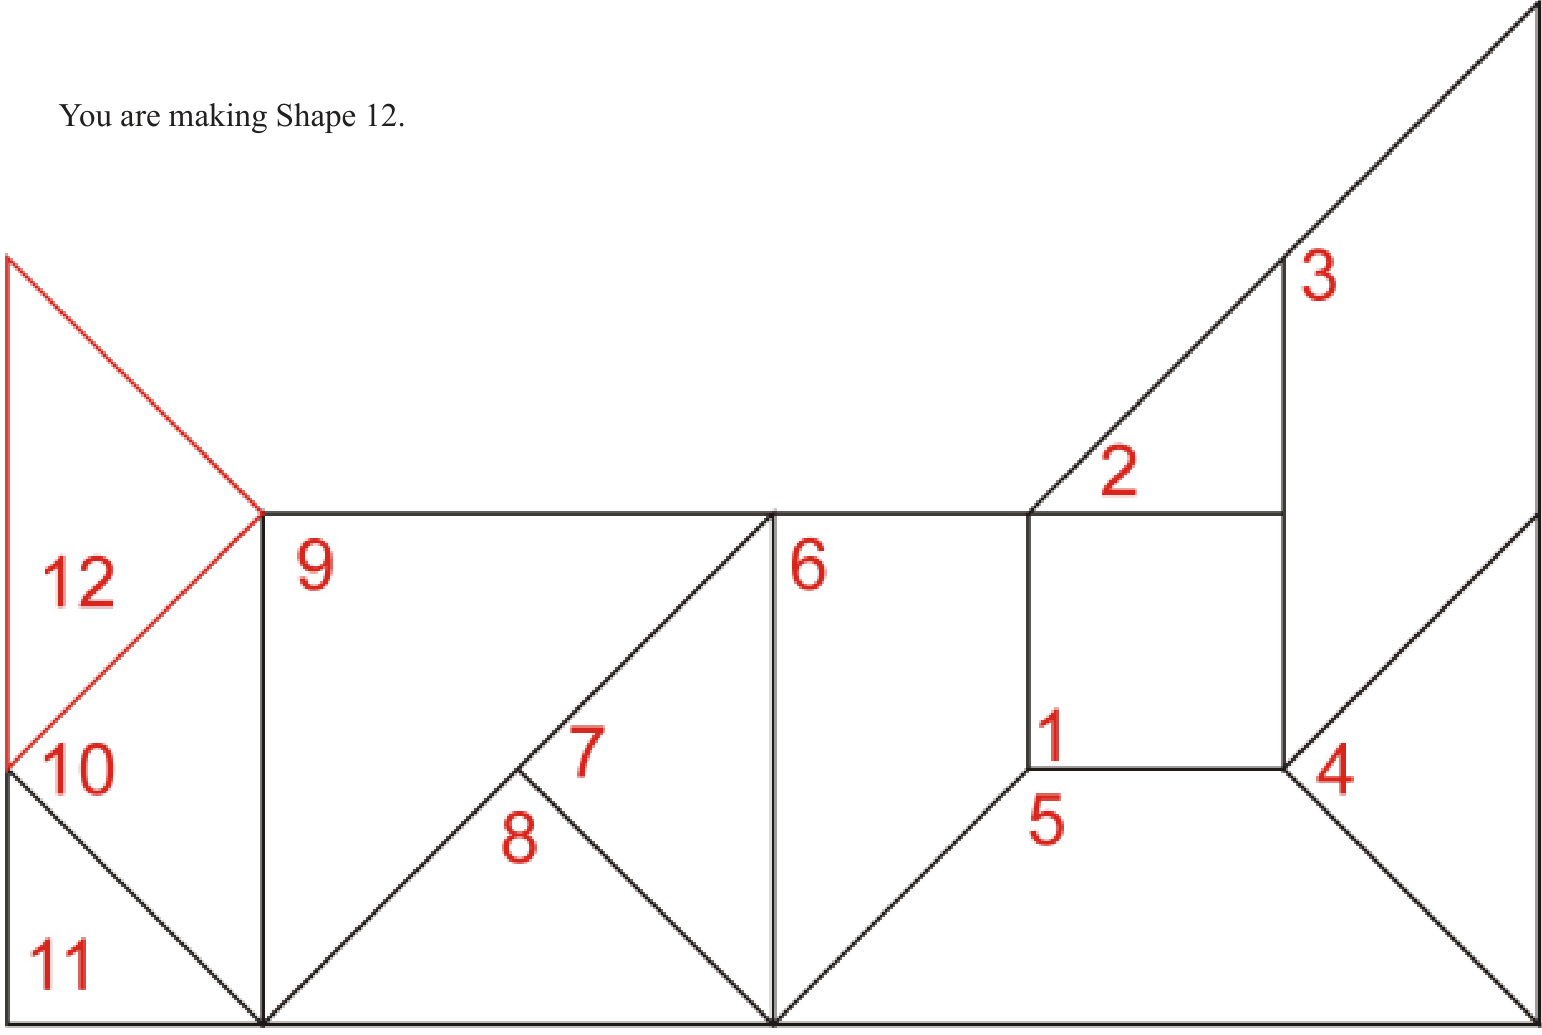
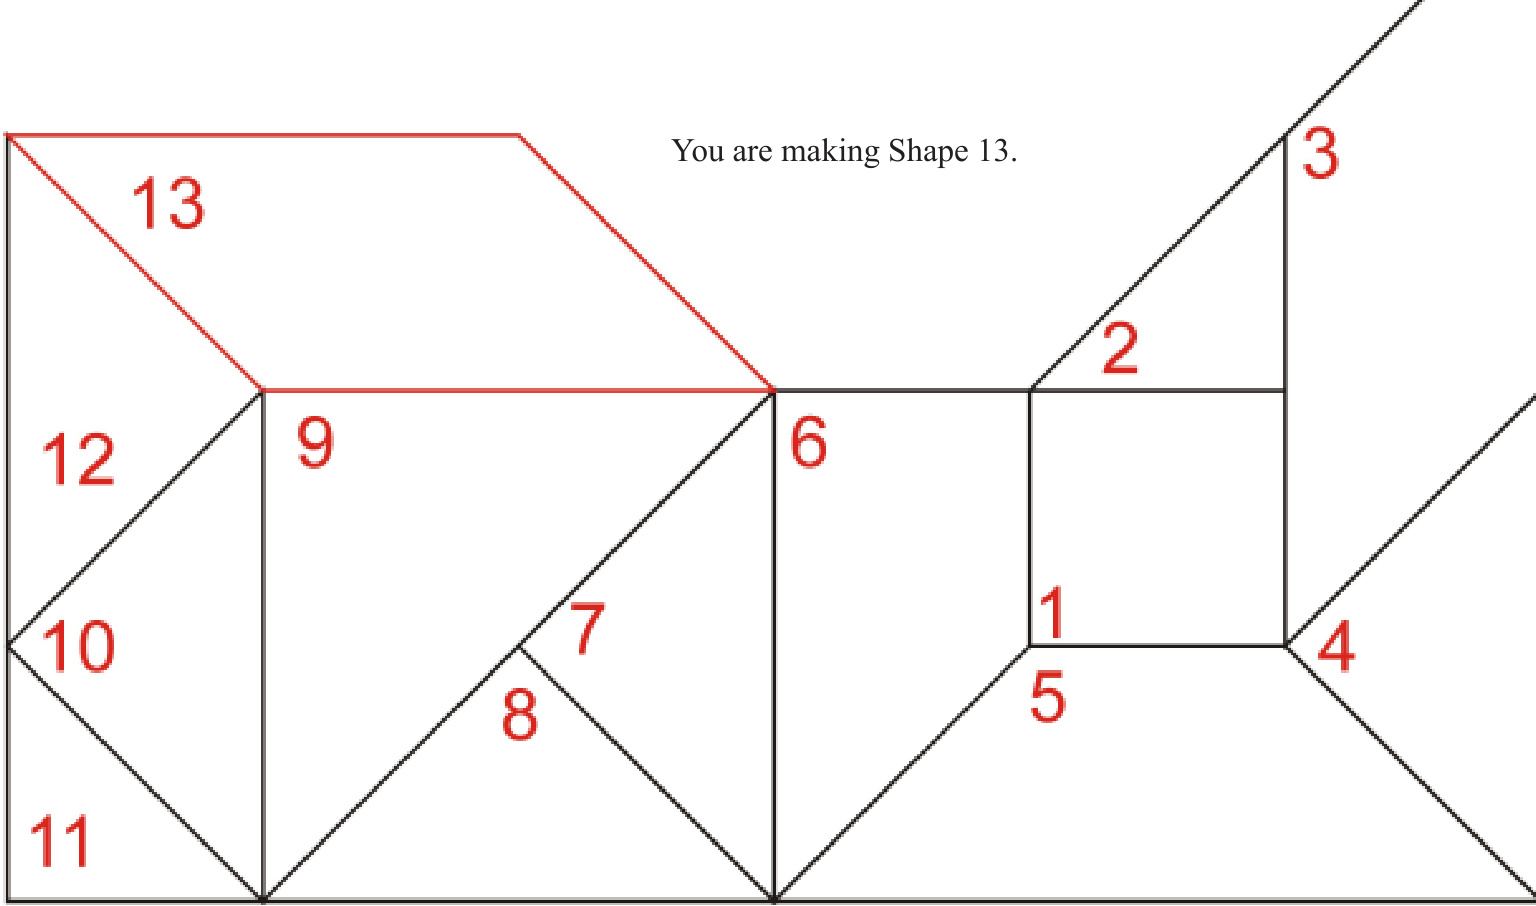
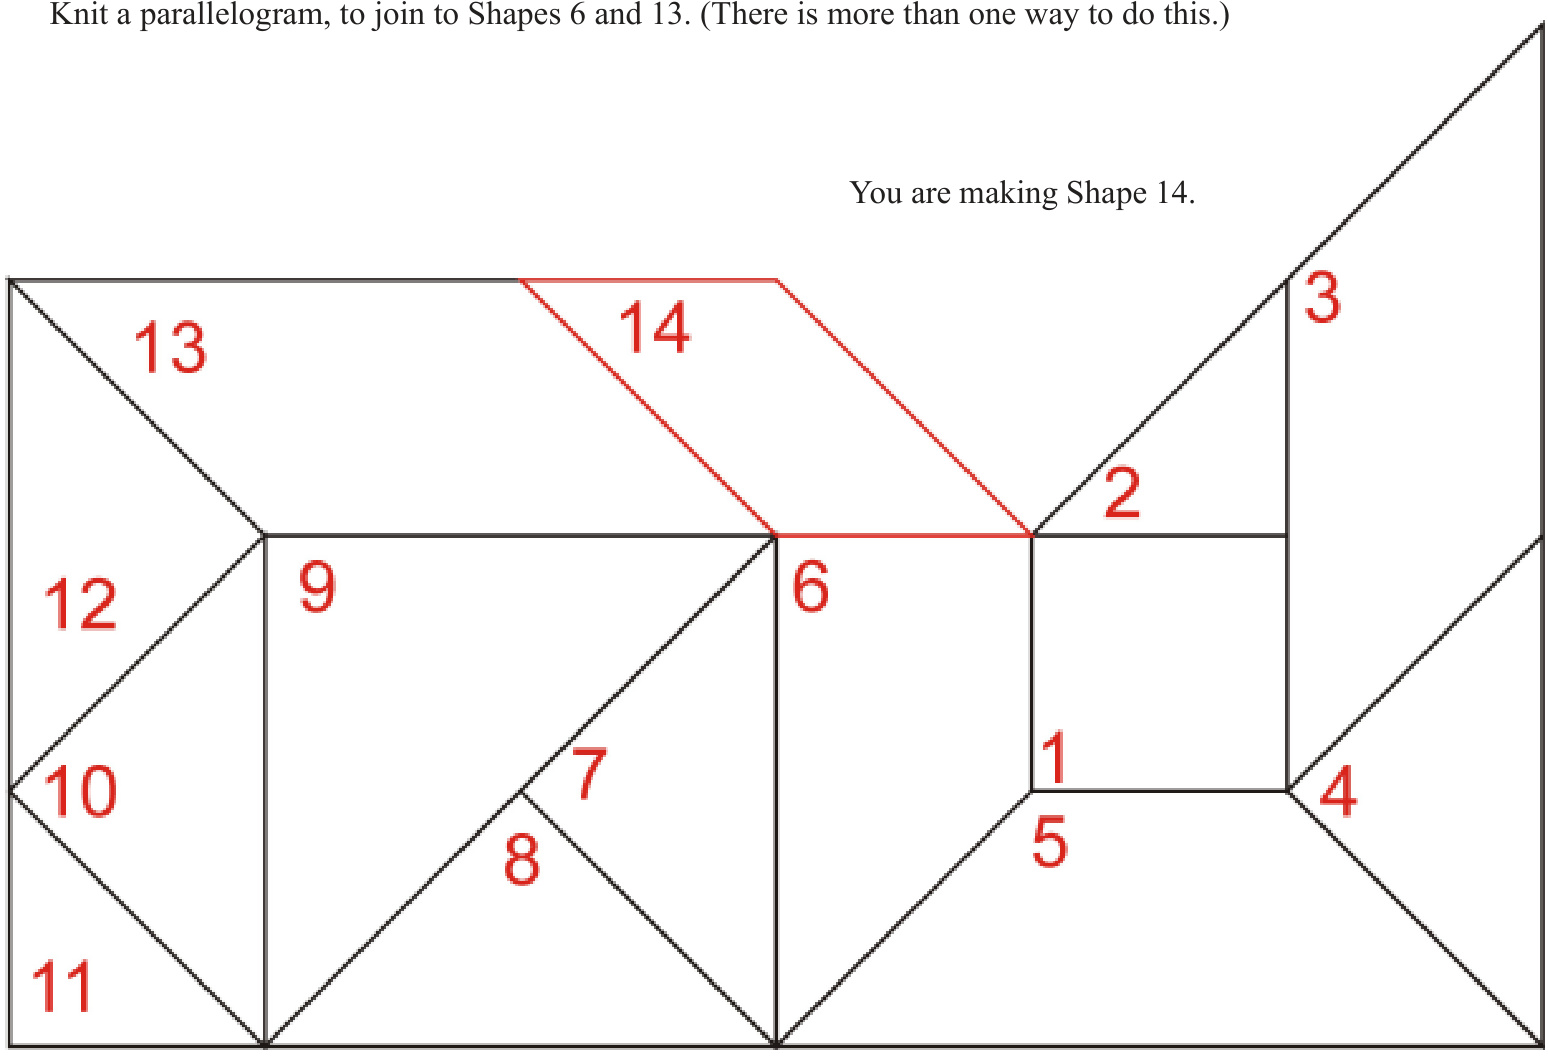
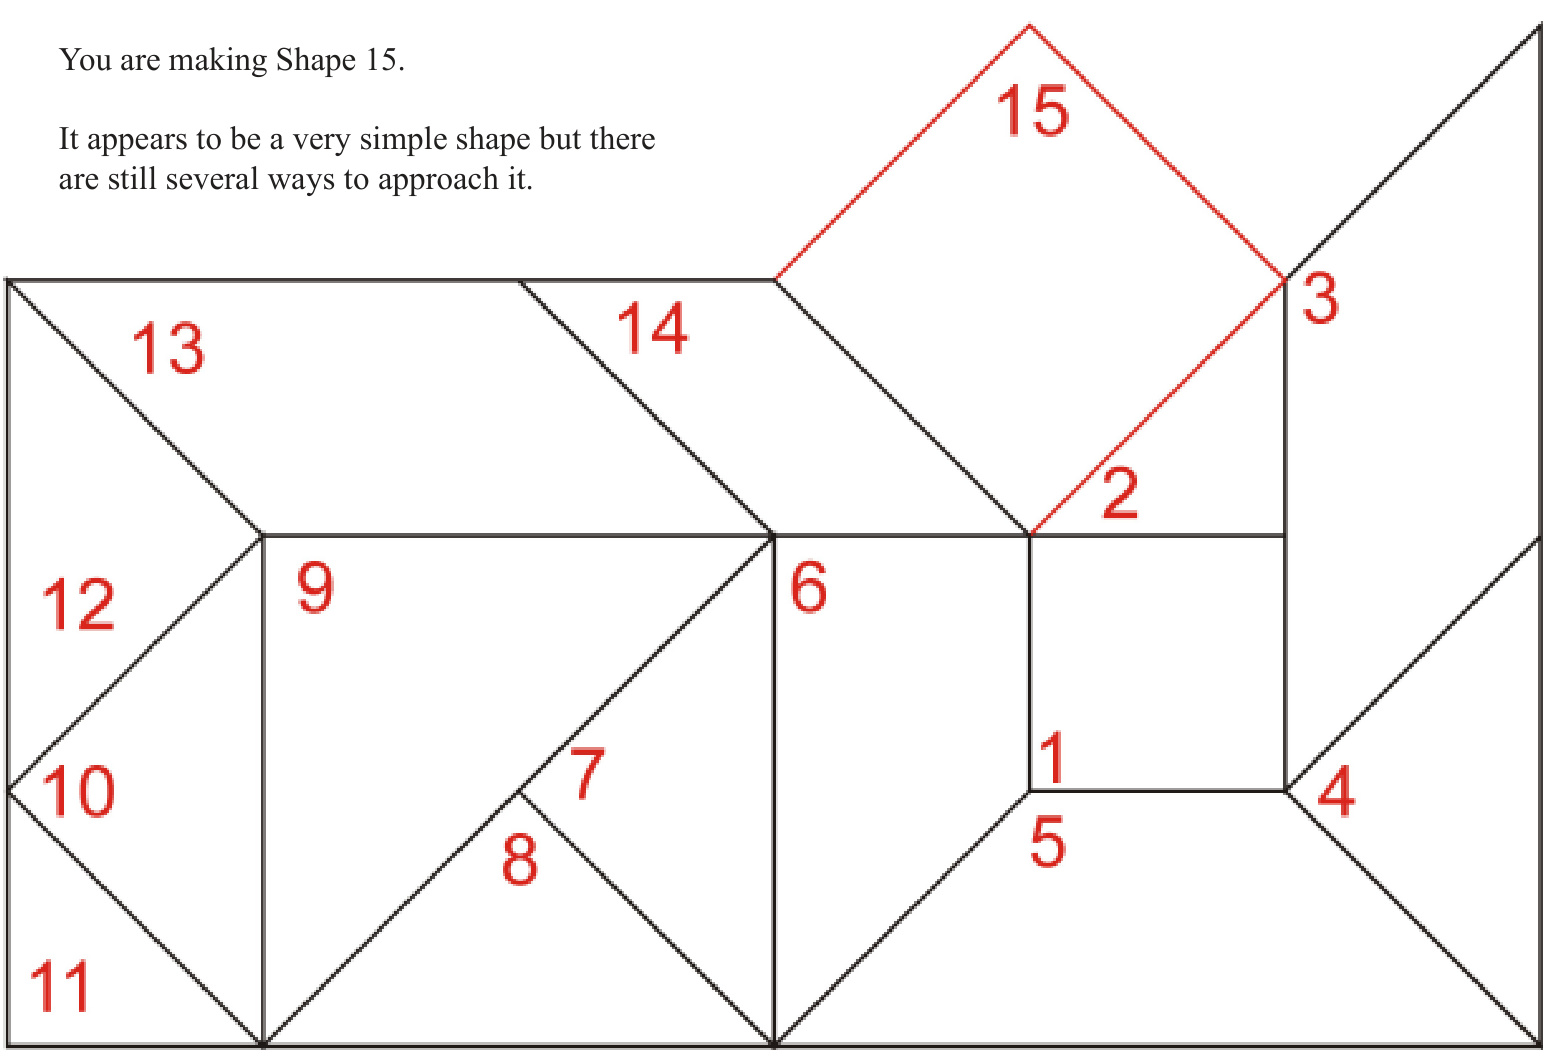
Shape 5 (Sharron's shape) I was thinking about a trapezium with the short side being along the original square and one side on the latest triangle. I added a further instruction to make sure we all get the same shape: The trapezium will have two 135 degree angles andtwo 45 degre angles. The distance between the square and the long edge parallel to it will be the same as the height of the square. Shape 7 A triangle with a 45 degree angle at each side, on the long side of the trapezium you just made. Shape 8 Pick up stitches from the lower (in relation to all the shapes knitted so far) side of Shape 7 and knit triangle with a 90 degree angle at the right-hand side and a 45 degree angle at the left (as you are loking at the shape when you pick up the stitches). Shape9 Pickup stithes all along the straight edge formed by Shapes 7and 8.Knit atriangle with a45 degree angle at each side. Shape10 Pick up stitches on the left of Shape 9. Knit a triangle with a 45 degree angle at each side. Shape 11 Pick up stitches on the lower side of Shape 10. Knit a triangle with a 45 degree angle at each side. Shape 12 Pick up stitches from the edge of Shape 10 and knit a triangle with a 90 degree angle at its right-hand side and a 45 degree angle at the left (as you are looking at the shape when you pick up the stitches). Shape13 Knit a parallelogram, to join to Shapes 9 and 12. (There is more than one way to do this.) Shape14 Knit a parallelogram, to join to Shapes 6 and 13. (There is more than one way to do this.) Shape15 Knit a square so that one of its corners will fit between Shapes 2 and 14. (There is more than one way to do this.) Shape 16 This shape is a pentagon (It has 5 sides) It is not aregular pentagon (The 5 sides are not equal). It islike a house standing on the point of its roof. The roof must fill the space between Shapes 3 and 15. The rest of the “house' is the same height as the height of the roof. (There is more than one way to do this.)
Shape 17
This shape is a hexagon (It has 6 sides). It is not a regular hexagon (The 6 sides are not equal). You might call it a lozenge. Three ofits sides fit to Shapes 14, 15 and 16. The second halfofthe shape is areflection ofthe first. (There is more than one way to do this.)
Shape 18
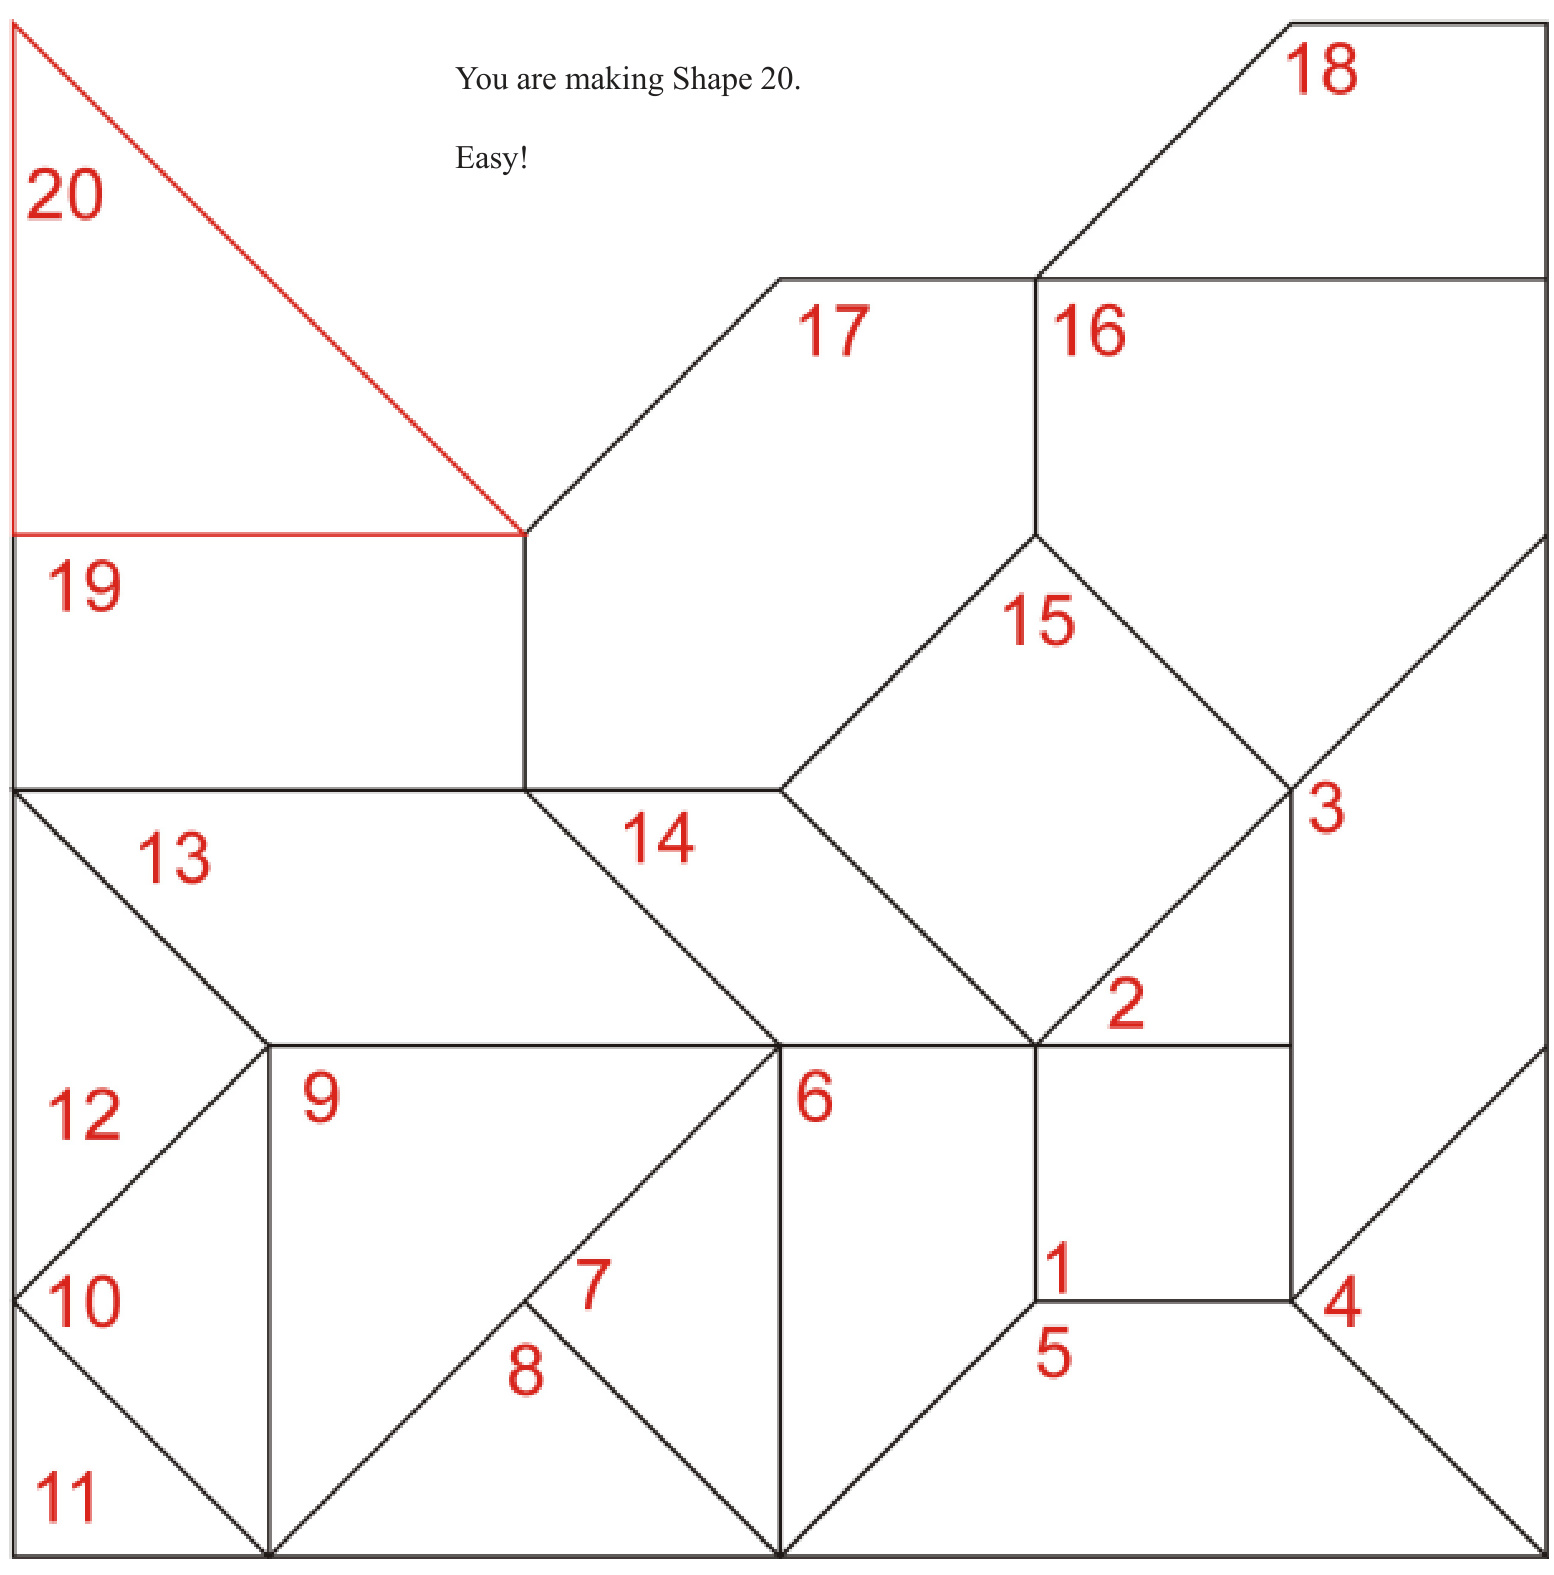
Pick up stitches from the top of Shape 16 and make a trapezium with a 90 degree angle at the right and a 45 degree angle at the left. The height should be the same as your starting square. Shape 19 A rectangle to fit along the sides of Shapes 13 and 17. (There is more than one way to do this.) Shape 20 Pickup stitches from the top ofShae 19.Knit atriangle with a 90degree angle at the lft anda45 degre angle at the right.
Shape 21
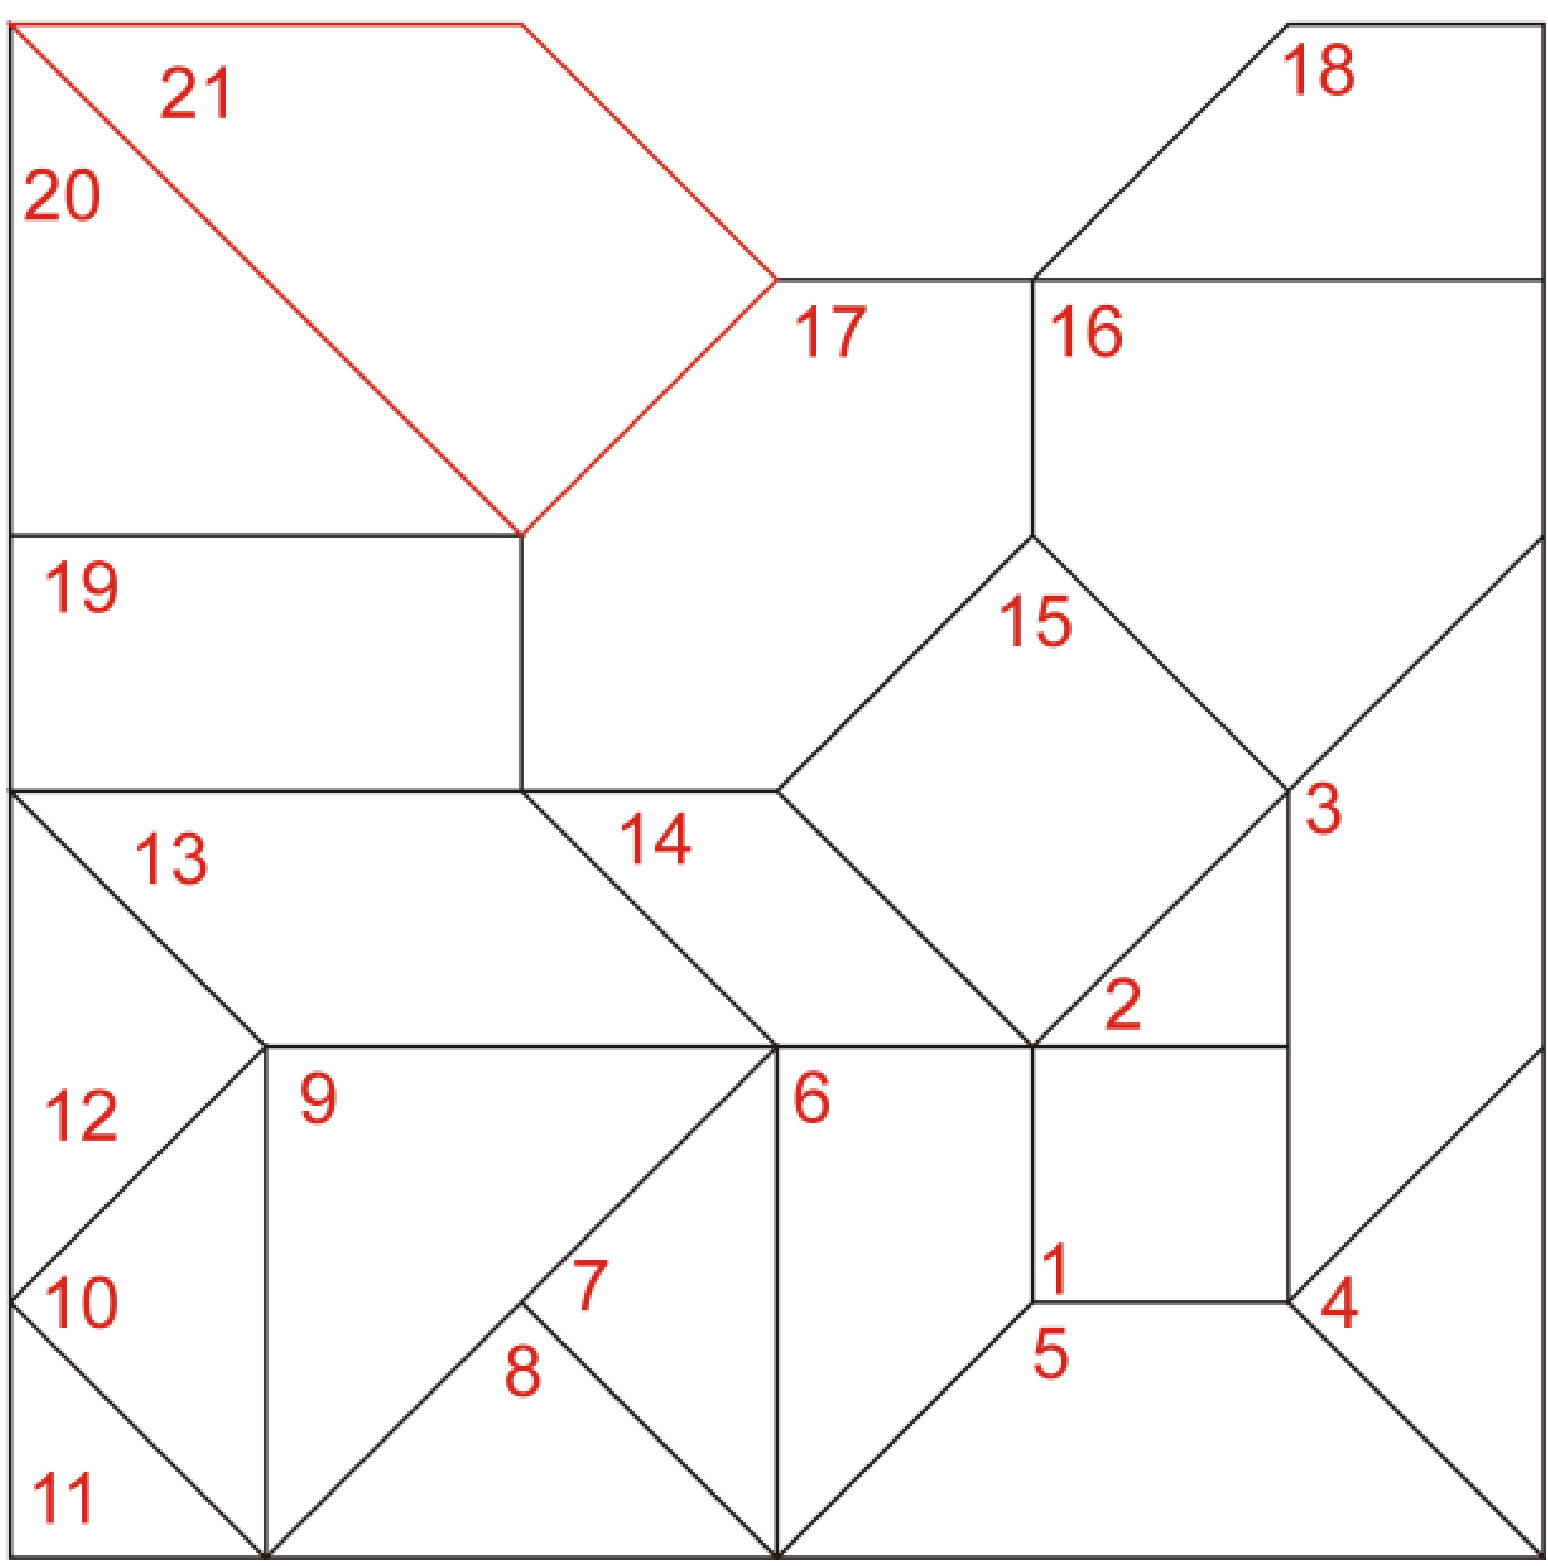
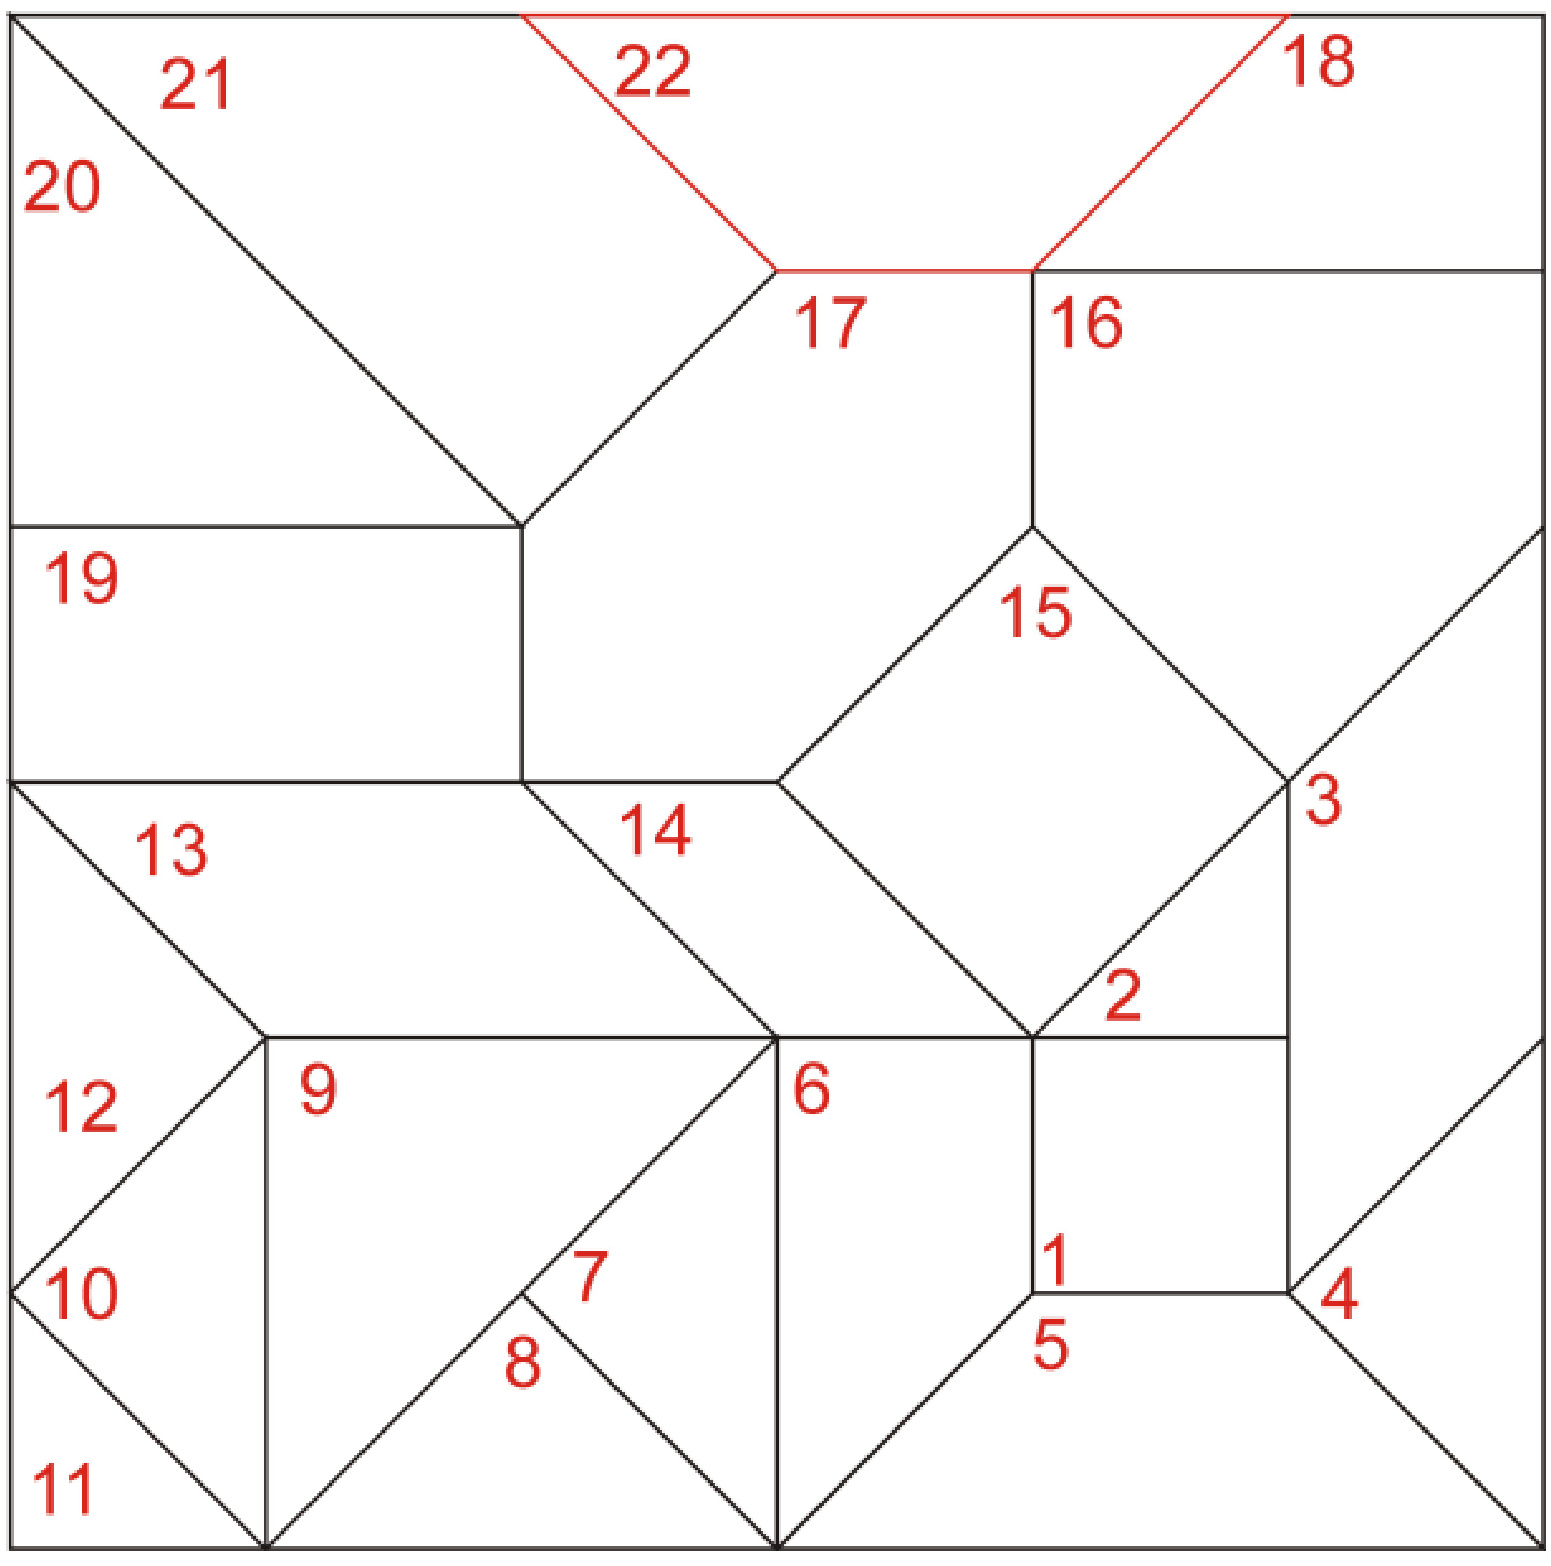
A trapezium with one 45 degree, one 135 degree and two 90 degree angles. It is to fit against Shapes 17 and 20 and form the outer corner of the cushion, with Shape 20. Shape 22 Fill in the space! Done!!! You should now have a $45\;\mathrm{cm}$ (18")square. If you want to add a simple borderall round, mite the corners with 45 degree angles. Alternatively, continue adding in your own way.
The Cushion Conglomeration Caper (CCC)
General instructions
Choose any ya and needles. Use approximately the same thicknessof yarn throughout. Gage is unimortant. Work in garter stitch. The finished cushion willbe $45\;\mathrm{cm}$ square (approximately 18") If you find yourself doing something different from the crowd, it will be your decision whether you rip or improvise. The Caper is meant to be fun!! Shape 1 - Starting Square Draw a $7.5\ \mathrm{cm}$ square. Draw the diagonal. Time spent drawing is saved later as it is so much quicker to measure with this template. Cast on nestith andinreaseuntil yourtriangle fits thetemlatuptothediagonalline; therease atth same rate. The Woolly Thoughts way is to knit twice into the last titch of the rw, when you are increaing, and to knit two together at the end of every row when you are decreasing. That's the easy way to teach the method but if you prefer to do the increases and decreases some other way, that's fine.) Important note: Remember how many stitches you had on the needle, at the widest point, when you reached the diagonal.

Shape 2
Instructions: Pick upthe stitches along anyonedge of your square and knit a triangle with the right hand-side vertical(ie.forming a continuous straight line with one side ofthe square) and the other side sloping inwards at 45 degrees. These rows will be parallel to the side of your square. You are creating shape 2.

(Shape numbers are in red; measurements are black) The number of stitches on the diagonal of the square must be divided by 1.4 to give the number of stitches to pick up along the edge of the square. (This works because of Pythagoras Theorem). Round to the nearest whole number.
Examples
Stitches on diagonal Divide by 1.4 Stitches to pick up 14 18 20 25 Knit straight on wrong side row; knit two together at the end of each right (public) side row. Continue until all stitches are worked off. The new triangle should be the same height as the first square.
Helpful note
When picking up stitches from diagonal ridges (e.g. the stitches along the edge of the square for shape 2) you are basically picking up 7 stitches from every 5 ridges. It helps to have a system. Here's one that works well: ridge ridge furrow ridge ridge furrow ridge Shape 3 (Cynthia’s shape) Instructions: a parallelogram attached to the long side of the square and triangl...It should continue the slope of the triangle (so that's a left-sloping parallelogram) .. It should be the same height as the square.
You are creating shape 3
Pick up the same number of stitches, from the square, as you picked up for Shape 2. The height of Shape 2 is the same height as the square so pick up the same number of stitches again. Special adjustment for thick yarns If you have chosen a very thick yarn and are unsure of the accuracy of your calculations, you can reduce rounding areas by doing another calculation now: Take the number of stitches on the diagonal of your square; double it; divide by 1.4 and round to the nearest whole number. If this answer is smaller than double the number of stitches for Shape 2, use the smaller number as your total to pick up now. Shaping Wrong side rows: decrease at the end of the row Right side rows: increase at the end of the row
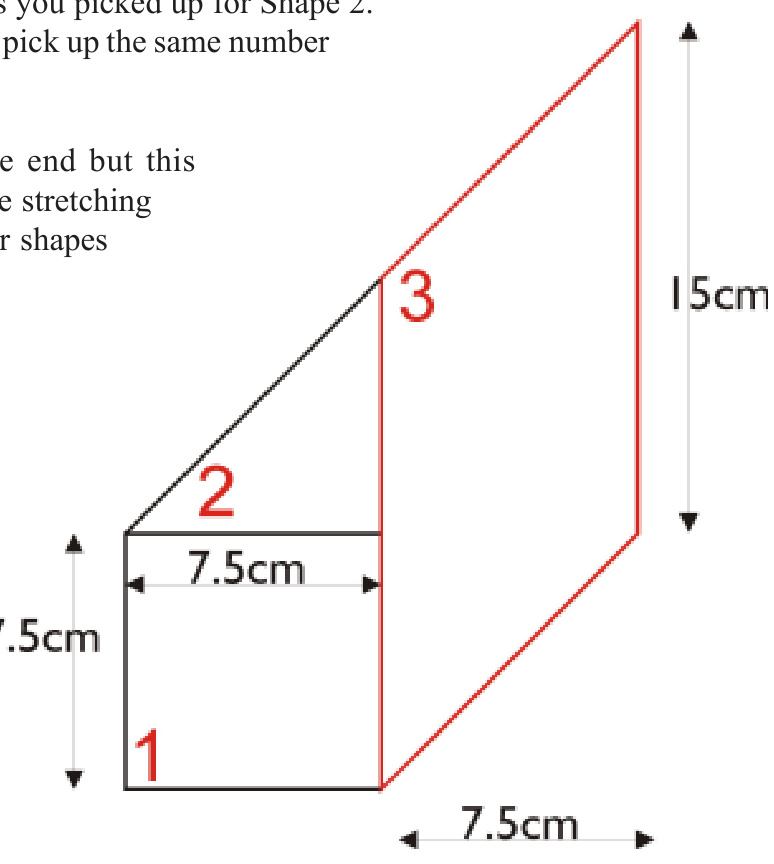
Each garter stitch ridge is the same height as one stitch. To make the parallelogram the same height as the square, knit the same number of ridges as the number of stitches you picked up along the edge of the square. As we do not know what shapes will follow you have the option of keeping the stitches on a spare needle or casting off instead of working the very last row.
Cynthia's example
According to my calculations, because Ihad picked up 14 stitches along the top of the square (20 stitches on the diagonal divided by 1.4), I have to pick up 28 stitches Shape 4 Instructions: The new shape is to be attached to the sloping side on the right of the parallogram you just made Itis a triangle with a 90 degree angle a the corer where itjust meets the starting square. The other two angles are 45 degrees.
You are creating Shape 4. The diagram is in the same orientation as the previous diagrams so you may need to turn it upside down to match the way you are working. No calculations needed! Shape 3 is the same height as Shape 1, therefore the sloping side of the parallelogram (Shape 3)is exactly the same length as the diagonal of the square (Shape 1). You know how many stitches you had on the diagonal of the square so that is the number of stitches to pick up now. Knit straight at the right hand side and knit two together at the end of every row where you want the 45 degree angle to form. You will notice that Shape 4 is a larger version of Shape 2. It slopes in the same direction. The only difference is that the stitches were picked up from a longer side. Shape 5 (Sharron's shape) This was Sharron's sugestion : I was thinking about a trapezium with the short side being along the original square and one side on the latest triangle. Ihave added a further instruction, to make sure we all get exactly the same shape : The trapezium will have two 135 degree angles and two 45 degree angles. The distance between the square and the long edge parallel to it will be the same as the height of the square. You are making Shape 5. There are two ways it can be done. Method 1 (The easier way) Pick up the same number of stitches, from the edge of the square, as you picked up for Shape 2. Increase at the end of every row. Continue until the number of garter ridges is the same as the number of stitches you picked up. Either cast off on the last row, or keep the stitches on a holder, in case you need them later. It is easiest to stitch the join between shapes 4 and 5, as the pieces will not match ridge for ridge. Method 2 - Stage 1 Pick up stitches from Shape 4. It is the same length as the diagonal of the square so you will need the same number of stitches. You need to form a 135 degree angle at the right-hand side and 45 degrees at the left (Turn the drawing, if necessary.) To achieve this, decrease at the end of every right side row and increase at the end of every wrong side row. To calculate the number of ridges to work to match the edge of the square:
The Mathematical Way
The Visual Way
Divide the number of stitches needed for the side of the square by 1.4 and work that number of ridges. (You will notice that this is the same as half the number of stitches on the diagonal of the square. If you have any inaccuracies, use the half-diagonal calculation) Imagine the two diagonals of Square 1. One of them would form a continuous line with the edge of Shape 4. This diagonal cuts the other in half so the number of ridges you have to work is half the number you had on the diagonal. Depending on your experience, and the orientation of your starting square you may be able to get you increase stitches by picking up one on each ridge from the square. Otherwise, stitch the join later. Method 2 - Stage 2 Continue to decrease on right side rows. Knit straight on wrong side rows, until all stitches are worked off. Shape 6 A trapezium with two 90 degree angles, one 45 degree angle and one 135 degree angle, to be attached to Shapes 1 and 5, with its longest side parallel to the side of the square. You are making Shape 6. There are two ways it can be done. This is very similar to Shape 5, except that it only slopes at one end. Method 1 (The easier way) Pick up the same number of stitches, from the edge of the square, as you picked up for Shape 5. Increase at the end of every right side row and knit straight on every wrong side row. Knit the same number of ridges as for Shape 5. Either cast off on the last row, or keep the stitches on a holder, in case you need them later. The ridges in this shape exactly match the ridges in Shape 5. As an alternative to your normal increase you could pick up one stitch from each ridge end of Shape 5. Method 2 - Stage 1 Pick up stitches from Shape 5. It is the same length as the diagonal of the square so you will need the same number of stitches. Decrease at the end of every right side row and increase at the end of every wrong side row. Knit the same number of ridges as you knitted for Stage 1 of Shape 5. Depending on your experience, and the orientation of your starting square you may be able to get you increase stitches by picking up one on each ridge from the square. Otherwise, stitch the join later. Method 2 - Stage 2 Decrease at the end of every row until all stitches are worked off. Shape 7 A triangle with a 45 degree angle at each side, on the long side of the trapezium you just made.
You are making Shape 7. This shape is the same length as Shape 3. Pick up the same number of stitches and decrease at the end of every row. Shape 8 Pick up stitches from the lower (in relation to al the shapes knitted so far) side of Shape 7 and knit atriangle with a 90 degree angle at the right-hand side and a 45 degree angle at the left (as you are looking at the shape when you pick up the stitches).

The side of the triangle is the same length as the diagonal of the starting square.Pick up the number of stitches you had on the diagonal. Decrease at the end of every right side row and knit straight on every wrong side row. Shape 9 Pick up stitches allalong the straight edge formed by Shapes 7 and 8. Knit a triangle with a 45 degree angle at each side.

Shapes 7 and 8 are both the length of the diagonal ofthe square, so you should pick up the double the number of stitches you had on your diagonal. Decrease at the end of every row. Shape 10 Pick up stitches on the left of Shape 9. Knit a triangle with a 45 degree angle at each side. You are making Shape 10. You could calculate the number of stitches to pick up by dividing the number of stitches picked up for Shape 9 by 1.4. This isn't really necessary as Shape 10 is the same length as Shape 3 and Shape 7 so you canjust pick up that same number of stitches.
Decrease at the end of every row. Shape 11 Pick up stitches on the lower side of Shape 10. Knit a triangle with a 45 degree angle at each side.
Decrease at the end of every row. Shape 10 is half the area of Shape 9. The dimensions of Shape 11 are half those of Shape 9. Shape 12 Pick up stitches from the edge of Shape 10 and knit a triangle with a 90 degree angle at its right-hand side and a 45 degree angle at the left (as you are looking at the shape when you pick up the stitches).
The side ofthe triangle is the same length as the diagonal ofthe starting square. Pick up the number of stitches you had on the diagonal. Decrease at the end of every right side row and knit straight on every wrong side row. This triangle is the same size as several you have made before. Knit a parallelogram, to join to Shapes 9 and 12. (There is more than one way to do this.)
This parallelogram is exactly the same as Shape 3. When you made Shape 3,there was only one way to do it. Now you have a choice of methods. Method 1 (As for Shape 3) From Shape 9, pick up twice as many stitches as you picked up along the edge of the starting square. Increase at the end of right side rows and decrease at the end of wrong side rows. The number of garter ridges is the same as the number of stitches for the side of the starting square. It is easiest to stitch the join with Shape 12. Method 2 From Shape 12, pick up the number of stitches you had on the diagonal of the starting square. Decrease at the end of right side rows and increase at the end of wrong side rows. The ridges in this shape exactly match the riges in Shape 9. Depending on your expertise, as an alternative to your normal increase, you could pick up one stitch from each ridge end of Shape 9. The number of ridges could be calculated. You can visualise it if you imagine rotating Shape 12 to fit on to Shape 13. The height is the same so the number of ridges must be the same. It must be the same numbers as the number of stitches you had on the diagonal of the starting square. Shape 14 Method 1
From Shape 6, pick up the same number of stitches you picked up from the edge of the starting square Increase at the end ofright side rows and decrease at the end of wrong side rows. Work the same number ofridges as the number of stitches you picked up. Method 2 (if you used Method 1 for the previous shape) From Shape 13, pick up the number of stitches you had on the diagonal of the starting square. Decrease at the end of right side rows and increase at the end of right side rows. The number of ridges is half the number of stitches you picked up. Method 3 (if you used Method 2 for the previous shape) Continue on the same stitches and work half as many ridges as you had in Shape 13. Shape 15 Knit a square so that oneofis corers willft between Shapes 2 and 14. There is more thanone waytodo this.)
The sideofthis square is the same length as the diagonal ofthe staring quare. Ue this forknitting a square with ridges parallel to its sides. The diagonal of this square is, therefore, 1.4 times the length of its side. Alternatively, you might see the diagonal as being twice the width of the starting square. Use this for a diagonally-knit square. Method 1 (Diagonally-knit) Make a separate square similar to the starting square (but bigger). Stitch it into place between Shapes 3 and 14 Method 2 (Diagonally-knit) The ridges on Shape 2 will match ridge-for-ridge; the ridges on Shape 14may match, depending on the method used for Shape 14. If youhave the expertise, you could make your increase stitches by picking upfrom one, or both shapes. Method 3 (Parallel) Pick up the required number of stitches and knit the same number of ridges.
Shape 16
This shape is apentagon (It has 5 sides) It is notaregular pentagon (The 5 sides are not equal). It islike ahouse standing on the point ofits roof. The roof must fil the space between Shapes 3 and 15. The rest of the house is the same height as the height of the roof. (There is more than one way to do this.)
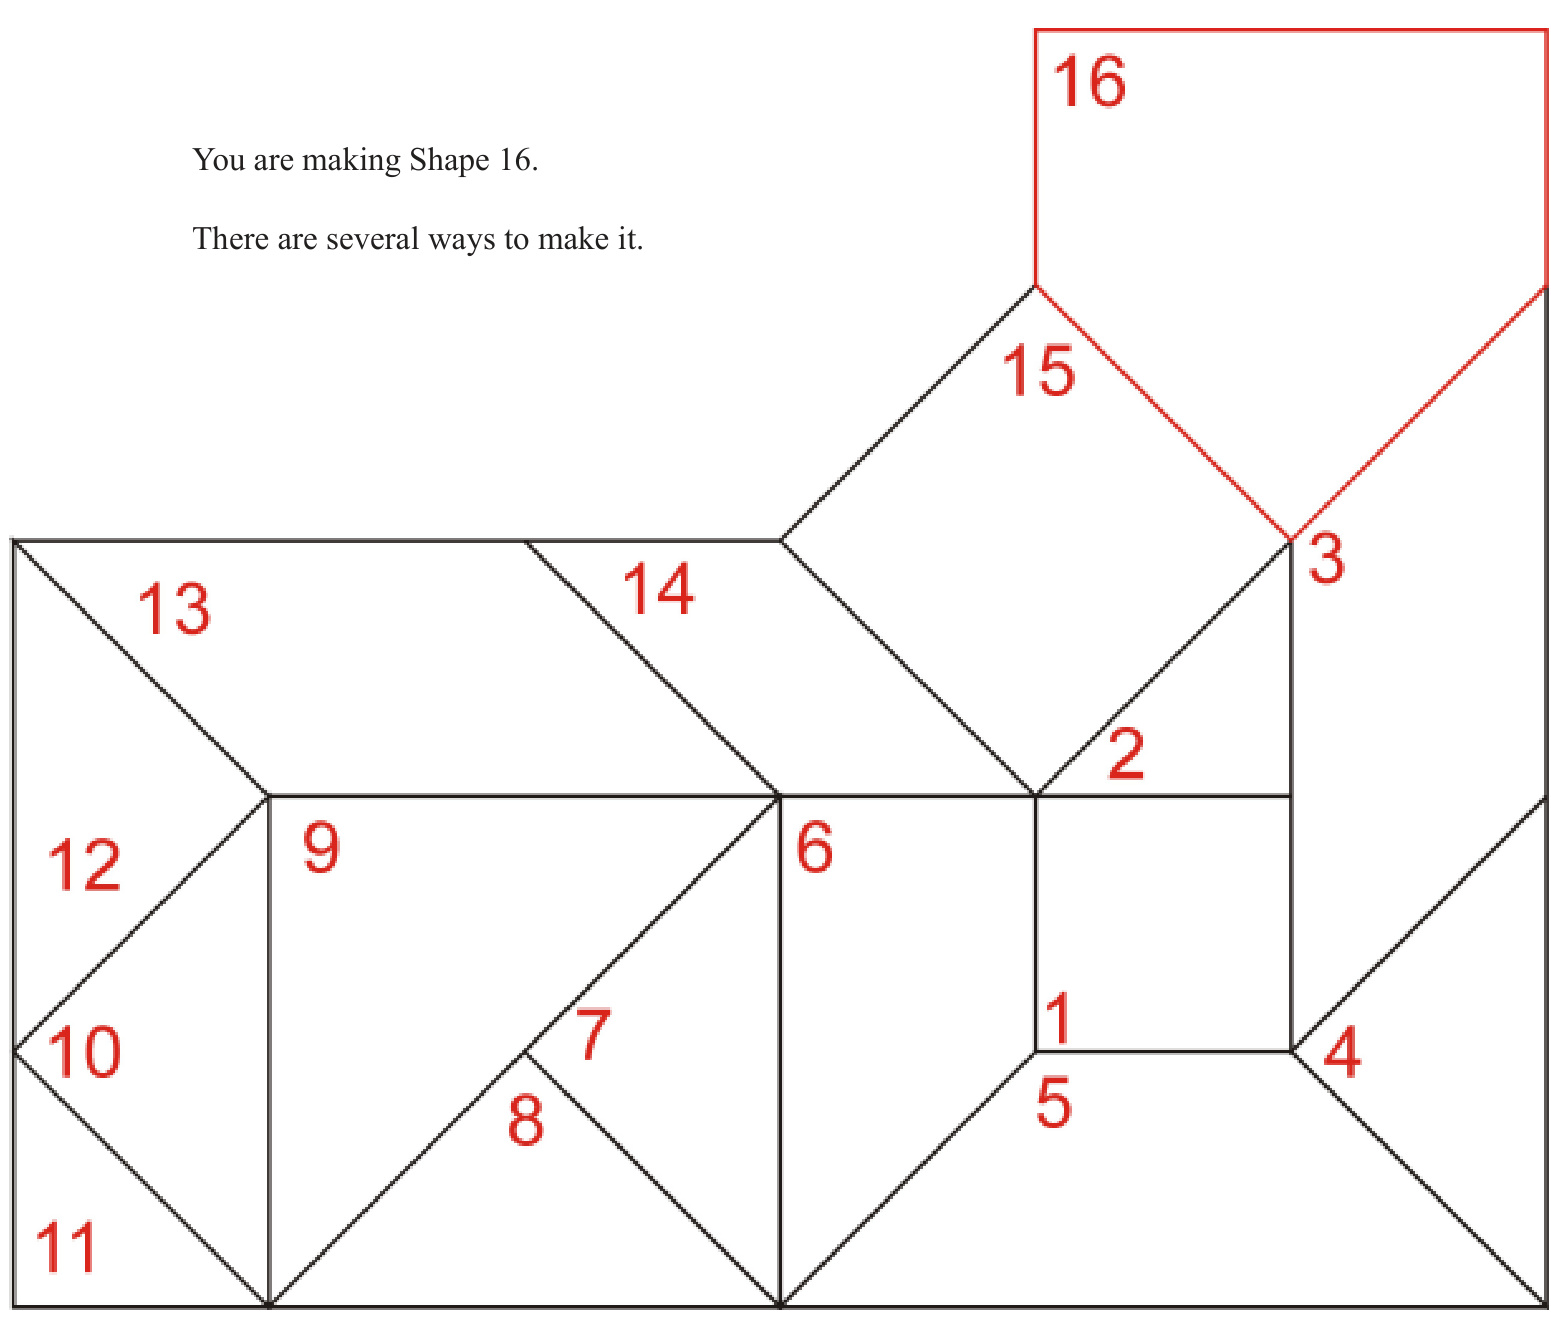
Method 1 (Diagonally-knit) Begin by using the same diagonally knit method you used for Shape 15. When you reach the widest point, knit straight for the number of ridges that make the height of the starting square. Other methods... Next page Method 2 - Stage 1 From Shape 15, pickup the numberof stitches youhad on the diagonal ofthe starting square Depending on the method you used for Shape 15, you may already have these on the needle.) Increase at the end of every right side row. Knit straight on every wrong side row. Continue until you have half as many ridges as the number of stitches you picked up. Method 2 - Stage 2 Continue to knit straight on wrong side rows. Decrease at the end of every right side row. Knit the same number of ridges as you had in Stage 1. Method 2 - Stage 3 Decrease at the end of every row. It is easiest to stitch the join with Shape 3. Method 3 - Stage 1 From Shape 3, pick up the number of stitches you had on the diagonal ofthe starting square. Knit straight on every right side row. Increase at the end of every wrong side row. Continue until you have half as many ridges as the number of stitches you picked up. Method 3 - Stage 2 Continue to knit straight on right side rows. Decrease at the end of every wrong side row. Knit the same number of ridges as you had in Stage 1. Method 3 - Stage 3 Decrease at the end of every row. Dependingonyouxpertise and thmethdused forhape 5 youmaybeabletojinas yougo.Thisisqute tricky. If in doubt stitch the shape to Shape 15. Shape 17 This shape is ahexagon (It has 6 sides). It is not a regular hexagon The 6 sides are not equal). You might call italozengeThree ofits sides fito Shape 14, 15 and 16The second halffthe shaeis areflectionofthe ist. (There is more than one way to do this.)
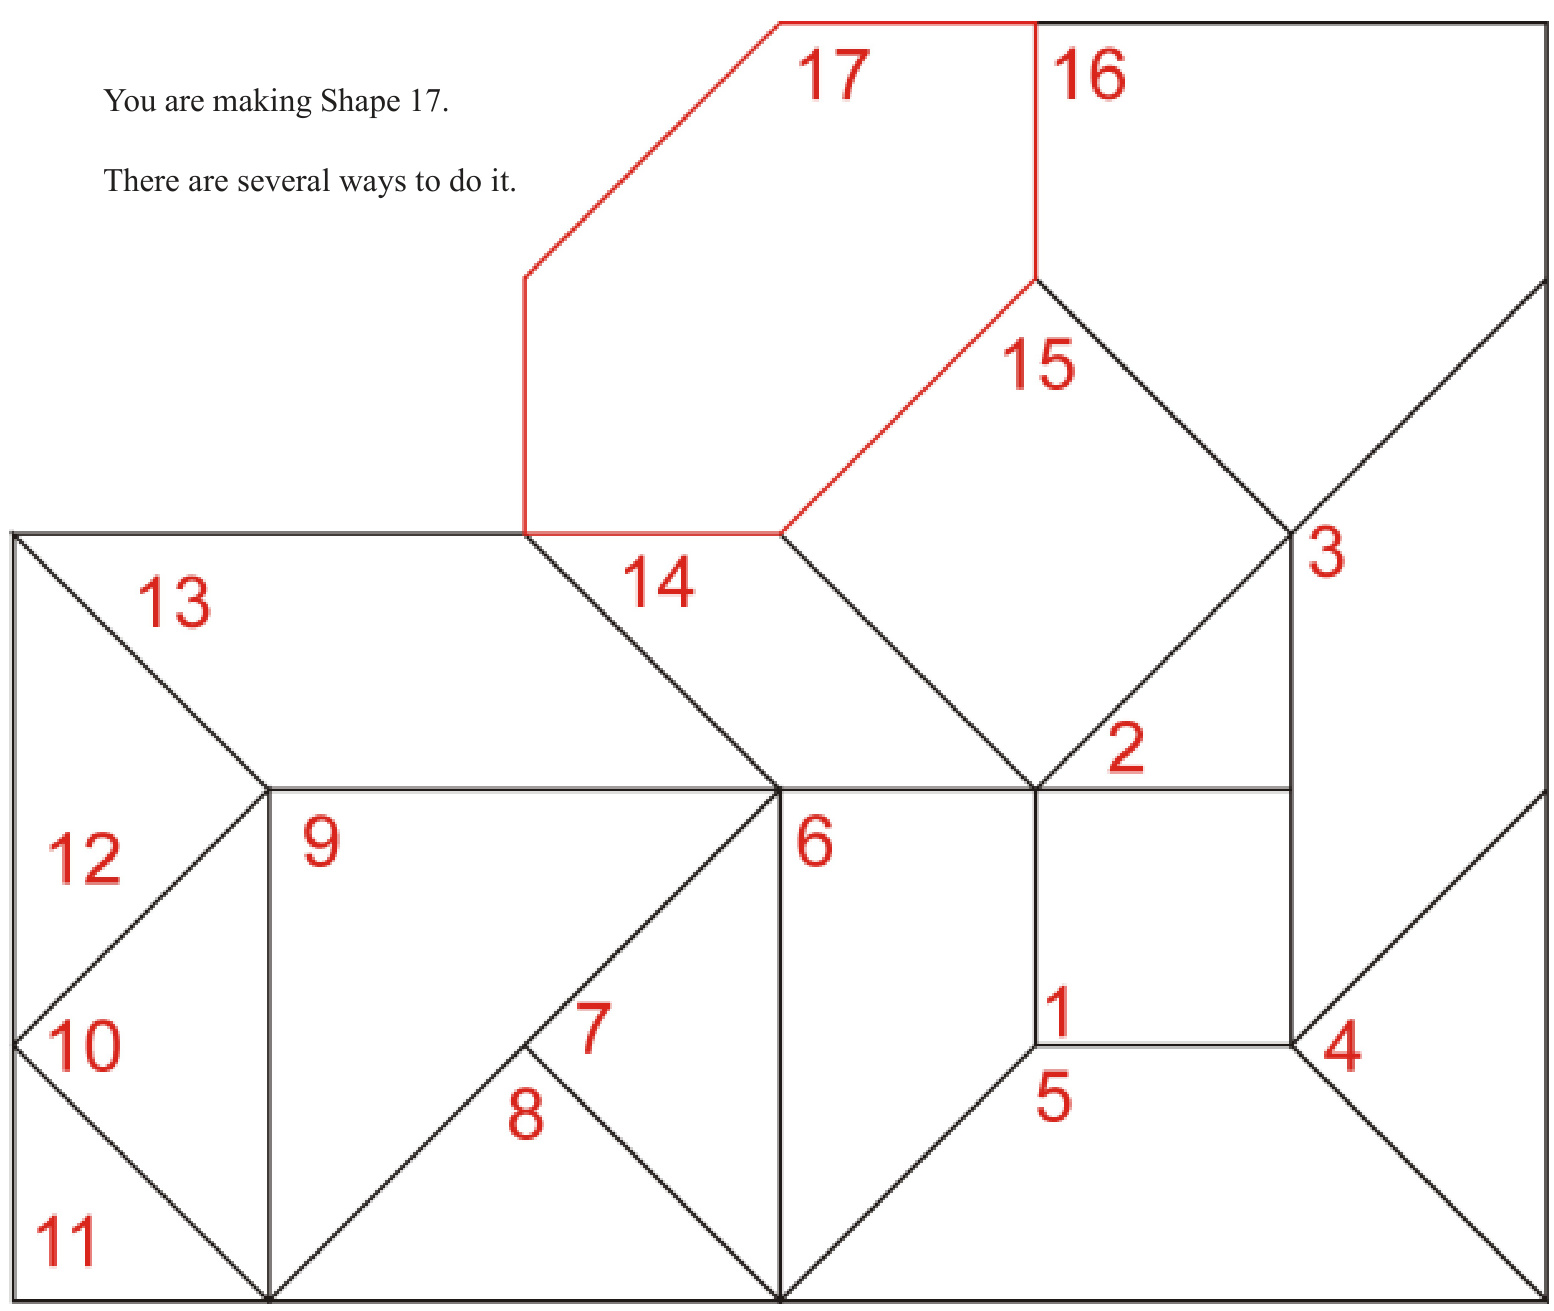
Method 1 (The easy way!) From Shape 15, pick up the number of stitches on the diagonal of the starting square. Increase at the end of everyrow. Continue until you have halfas many ridges as the number of stitches you picked up, then decrease at the end of every row for the same number of ridges. You may be able to join to Shapes 14 and 16 as you go. Otherwise, stitch the joins. Other methods... Next page
Method 2 - Stage 1
From Shape 14, pick up the number of stitches you had on the side of the starting square. Knit straight on every right side row. Increase at the end of every wrong side row. Continue until you have the same number of ridges as the number of stitches you picked up. Method 2 - Stage 2 Decrease at the end of every right side row. Knit straight on every wrong side row. Continue until you have the same number of ridges again.
Method 3 - Stage 1
From Shape 16, pick up the number of stitches you had on the side of the starting square. Increase at the end of every right side row. Knit straight on every wrong side row. Continue until you have the same number of ridges as the number of stitches you picked up. Method 3-Stage 2 Knit straight on every right side row. Decrease at the end of every wrong side row. Continue until you have the same number of ridges again.
Shape 18
Pick up stitches from the top of Shape 16 and make a trapezium with a 90 degree angle at the right and a 45 degree angle at the left. The height should be the same as your starting square.
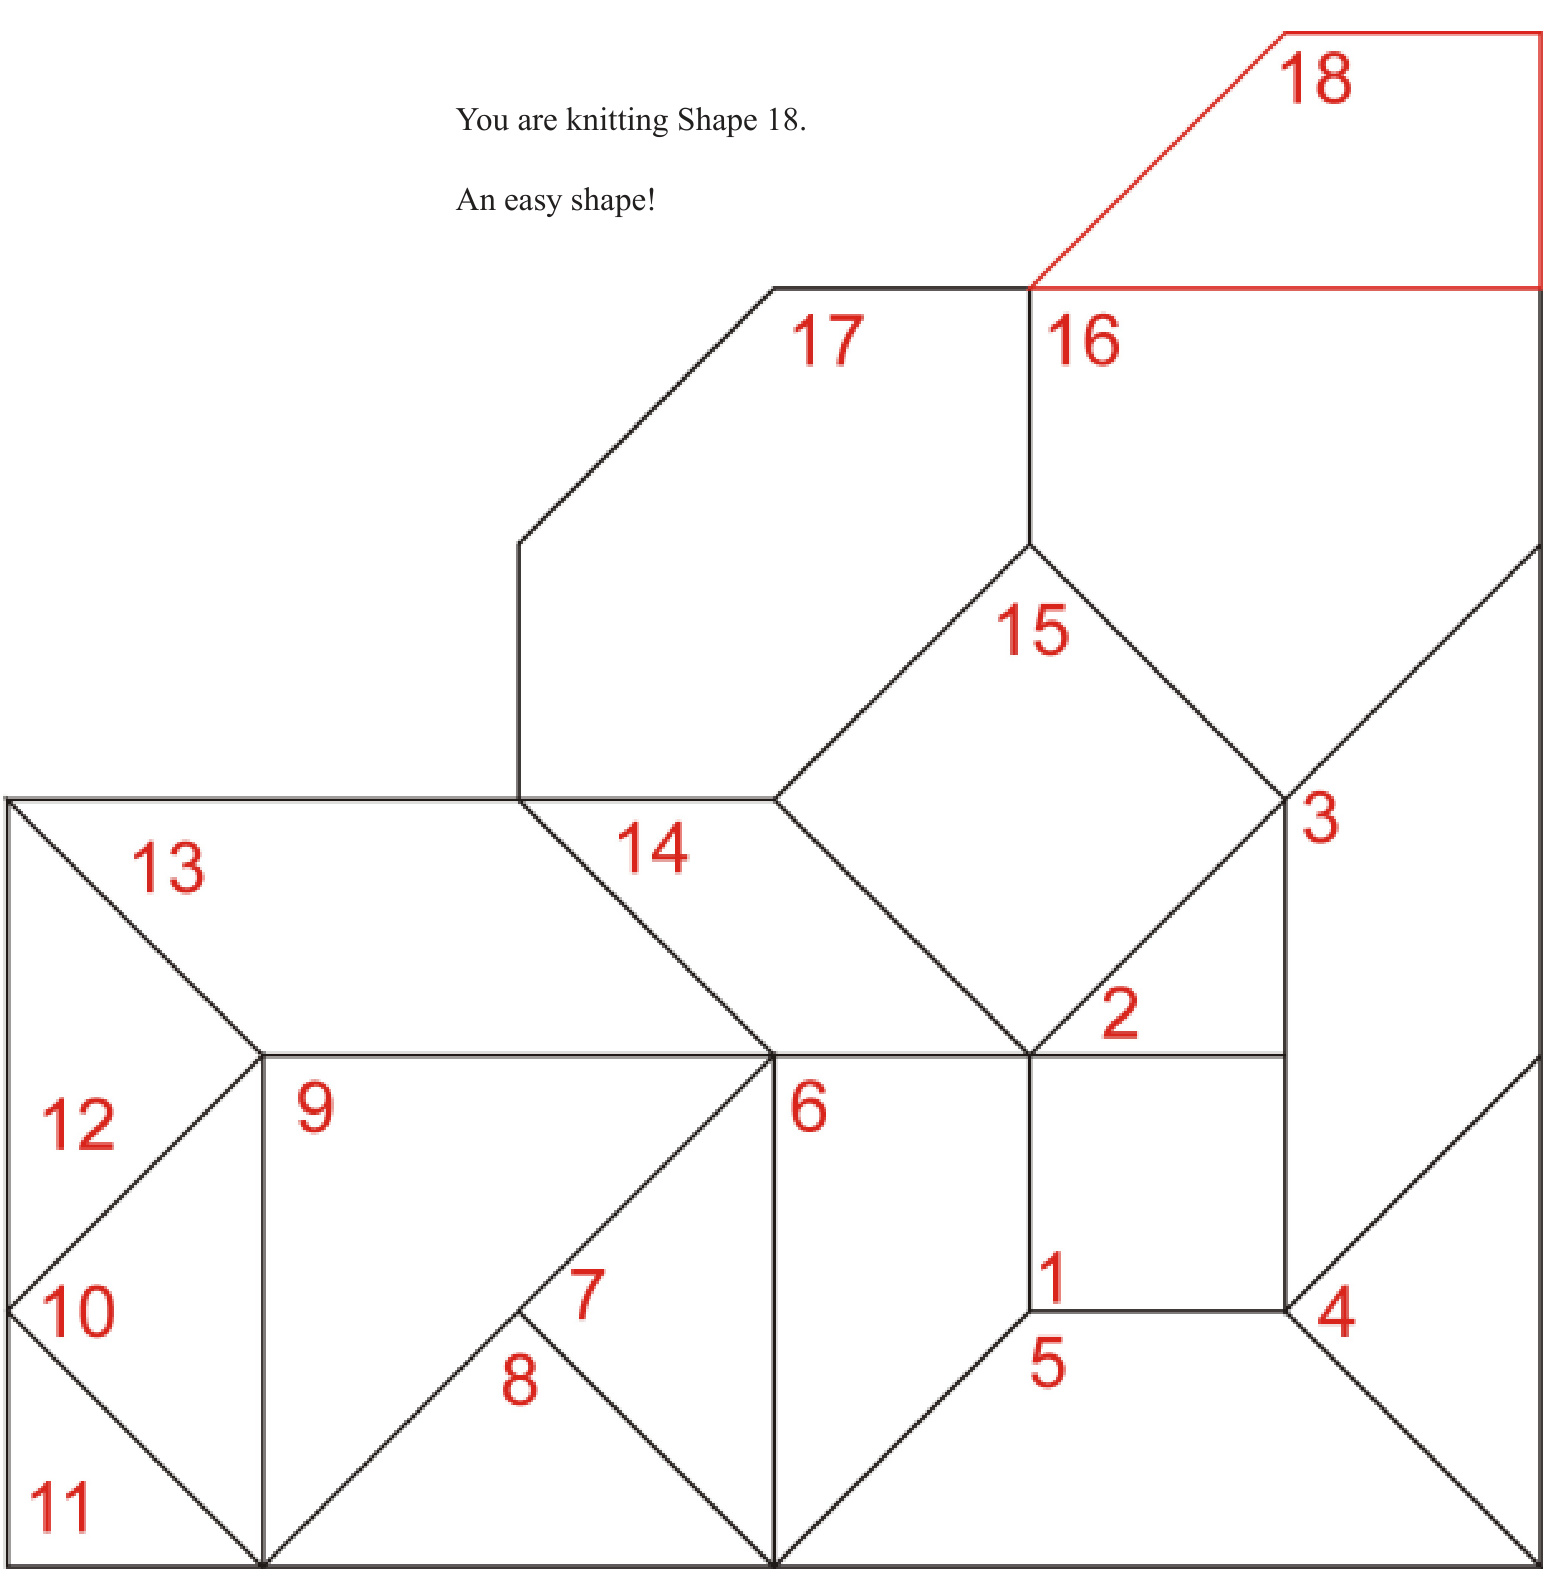
From Shape 16, pick up twice as many stitches as on the side of the starting square. Depending on the method used for Shape 16, you may already have these on a spare needle or be picking up from a row of cast-off stitches.) Decrease at the end of every right side row. Knit straight on every wrong side row. Knit the same number of ridges as the number of stitches on the side of the starting square. Shape 19 A rectangle to fit along the sides of Shapes 13 and 17. (There is more than one way to do this.)
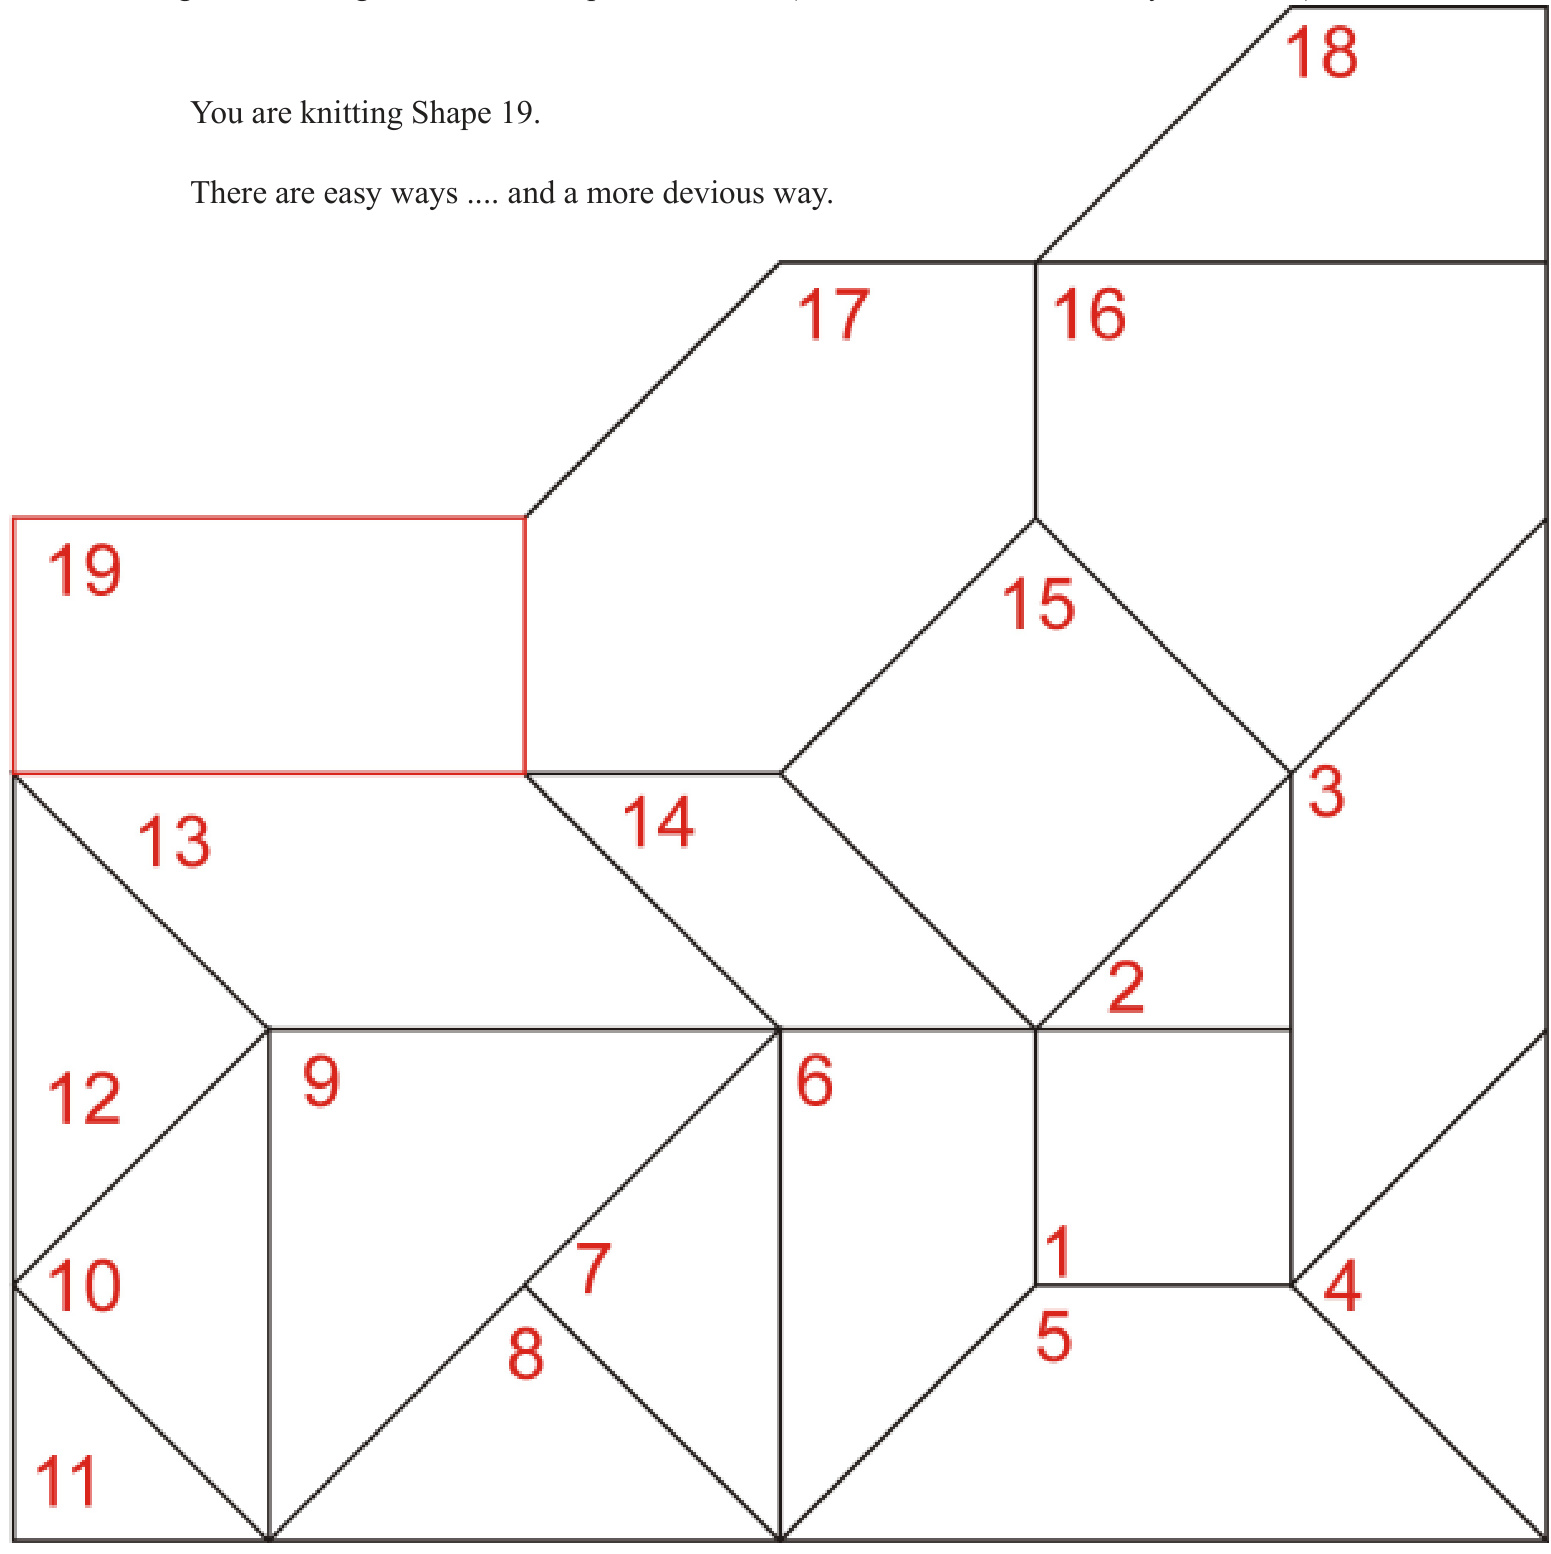
From Shape 13, pick up twice as many stitches as on the side ofthe starting square. Knit straight until you have half as many ridges as the number of stitches you picked up. Depending on themethdused forhape 13, you mayhave kept the stithes onaholer, orcouldbe picking up from a row of cast-offstitches. It is probably easiest to stitch the join with Shape 17. Method 2 (An easy way!) From Shape 17, pick up the same number of stitches as on the side ofthe starting square.Knit straight until you have twice as many ridges as the number of stitches you picked up. Depending nthe methdusedforhape 17, youmayhave kept the stithes onaholder, orcoulde pickingup from a row of cast-off stitches. Depending on your expertise, and the method used for Shape 13 you maybe able tojoin as you go.Ifnot, stith the join. Method 3 This method can be used to make a separate shape which is stitched in or, depending on what has gone before, you may be able to join as you go. The explanation is for aloose shape to be stitched in, and is described as though you are starting at the point where Shapes 13, 14 and 17 join. Stage 1 The corner is exactly the same as half of your starting square so you increase on every rowuntil you have the same number of stitches as on the diagonal of the square. Stage 2 Continue to increase at the end of every right side row. Decrease at the end of every wrong side row. Continue until you have the same number of ridges as in stage 1. Stage 3 Decrease at the end of every row. Shape 20 Pick up stitches from the topofShape 19.Knit atriangle with a90 degree angle at the left and a45 degree angle at the right.
From Shape 19, pick up twice the number of stitches on the side of the starting square. Knit straight on every right side row. Decrease on every wrong side row. Shape 21 A trapezium with one 45 degree, one 135 degree and two 90 degree angles. It is to fit against Shapes 17 and 20 and form the outer corner of the cushion, with Shape 20. You are making Shape 21. Methods ... Nex page
Method 1
From Shape 20, pick up twice as many stitches as on the diagonal of the starting square. Decrease at the end of every right side row. Knit straight on every wrong side row. Continue until you have half as may ridges as the number of stitches you picked up. You may be able to join to Shape 17 as you go. If not, stitch the join. Method 2 - Stage 1 From Shape 17, pick up the same number of stitches as on the diagonal of the starting square. Knit straight for the same number of ridges as the number of stitches you picked up. Method 2 - Stage 2 Knit straight on every right side row. Decrease at the end of every wrong side row. Shape 22 Fill in the space!
Method 1 (The easy way) Pick up the same number of stitches as on the side of the starting square. Knit the same number of ridges, increasing at the end of every row. Other methods... Next page Method 2 - Stage 1 From Shape 21, pick up the same number of stitches as on the diagonal of the square. Decrease at the end of every right side row. Increase at the end of every wrong side row. Continue until you have half as many ridges as the number of stitches you picked up. Method 2 - Stage 2 Continue to decrease at the end of every right side row. Knit straight on every wrong side row. Method 3 - Stage 1 From Shape 18, pick up the same number of stitches as on the diagonal of the square. Increase at the end of every right side row. Decrease at the end of every wrong side row. Continue until you have half as many ridges as the number of stitches you picked up. Method 2 - Stage 2 Continue to decrease at the end of every wrong side row. Knit straight on every right side row. Done!!! You should now have a $45\;\mathrm{cm}$ (18") square.fyou want toadd a simple border allround, mite the corers with 45 degree angles. Alternatively, continue adding in your own way.
More information ... Next page
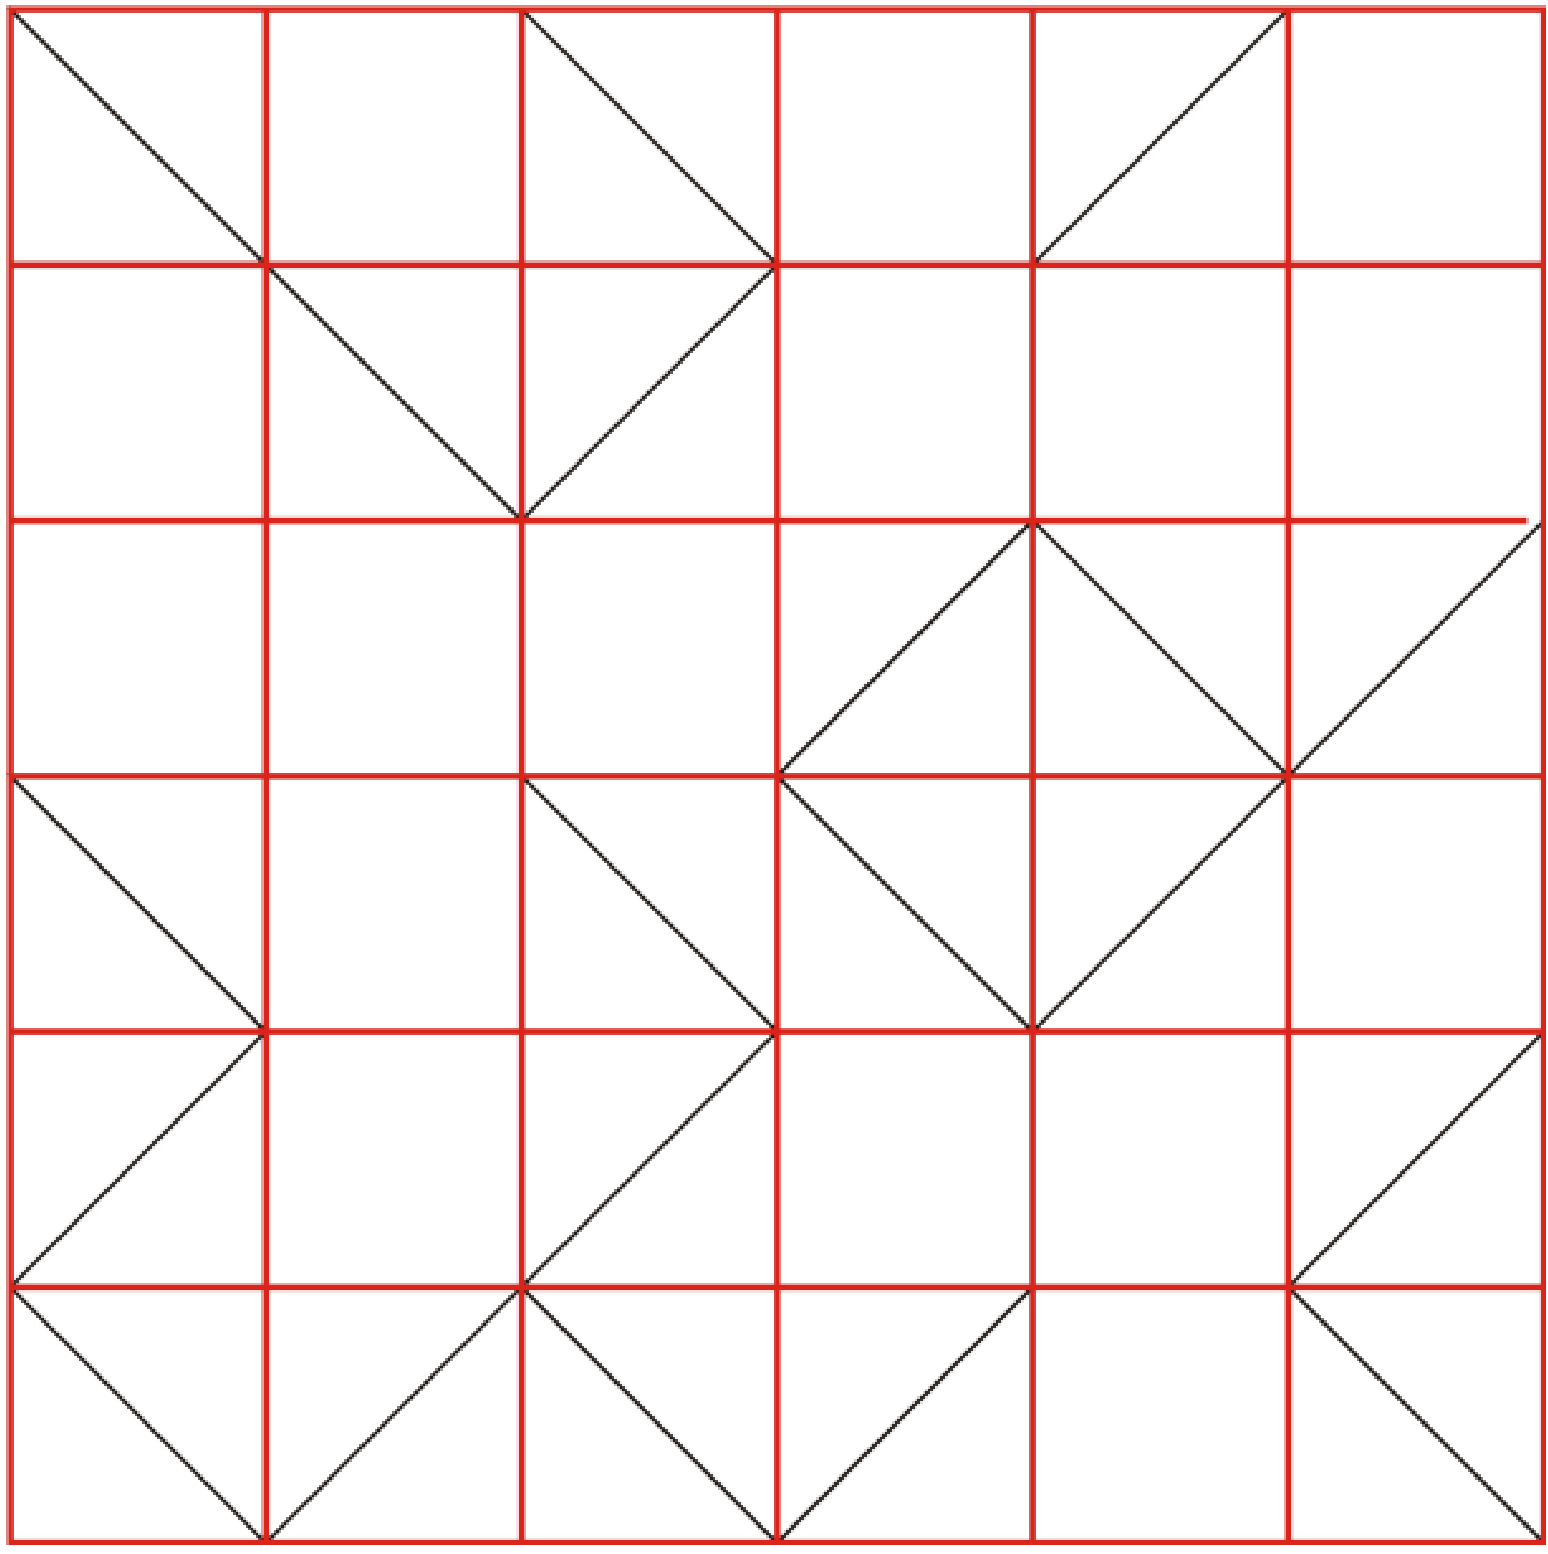
All the shapes fit on to a 6 by 6 grid. Every measurement (i.e. number of stitches or ridges) is the length of a square or its diagonal, or a multiple of those measurements.


