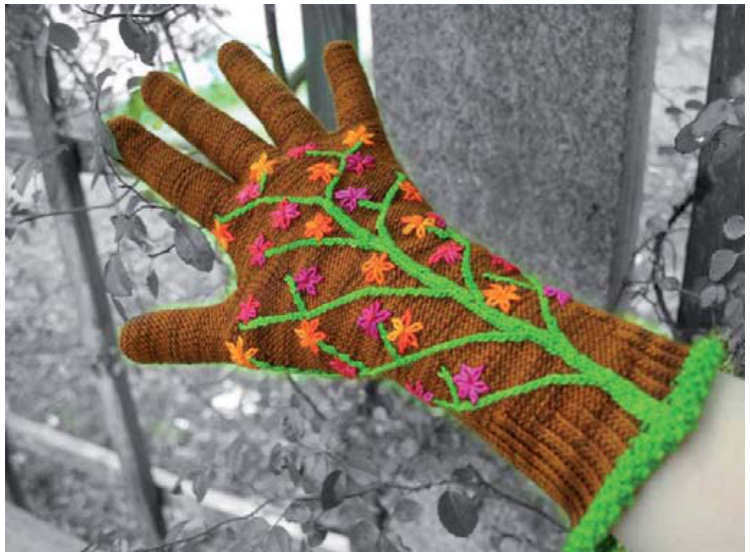
Blooming
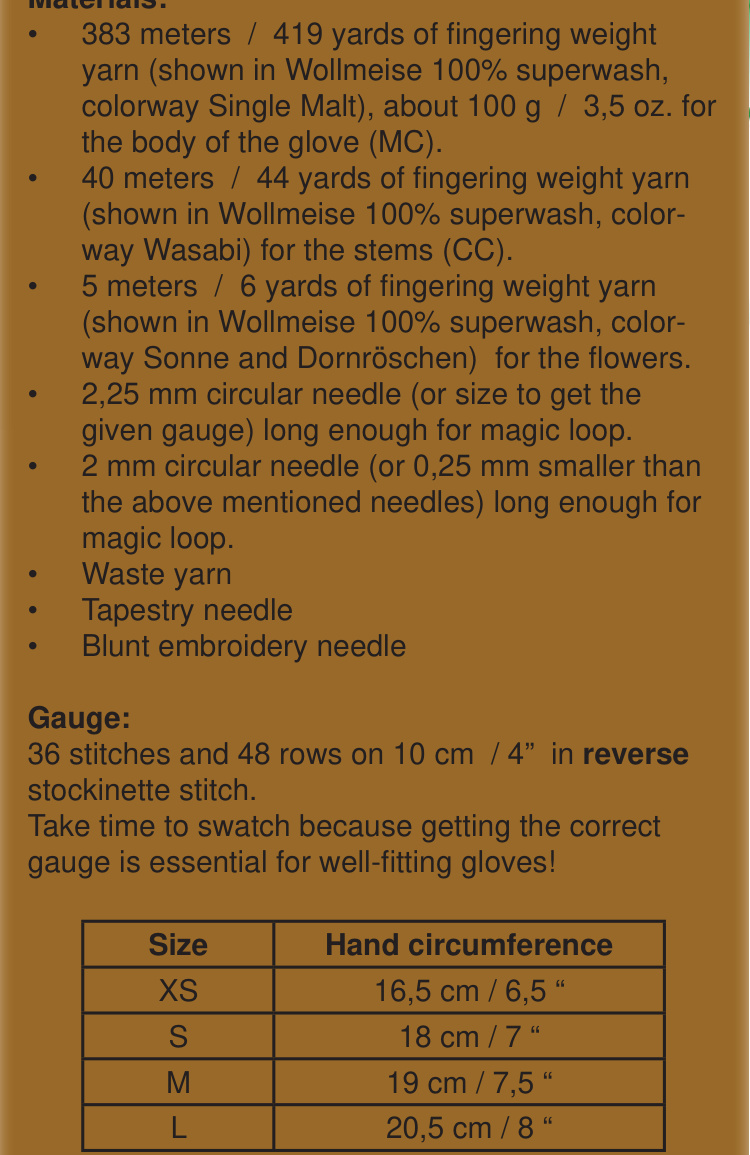
Materials:
Notes:
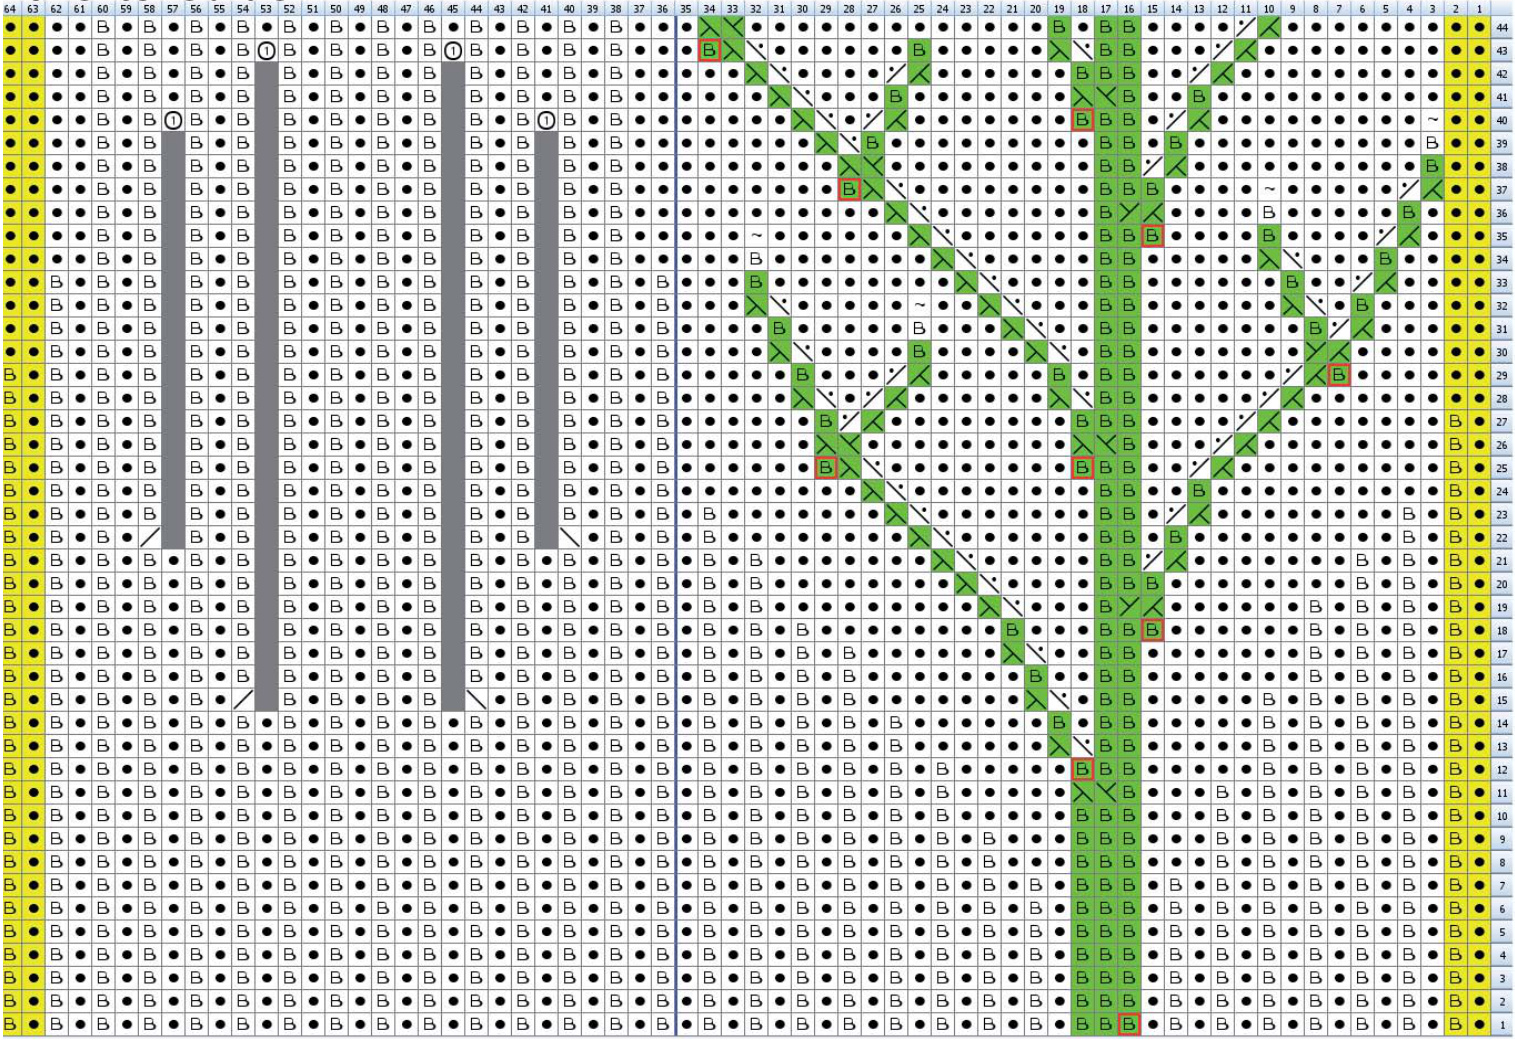
These gloves are knit using the ,magic loop" method, however you can use double pointed needles or two circular needles if you prefer. Just be aware that the instructions often refer to needles 1 and 2 (meaning each half of the total stitch count). The green stems are created while kniting the body of the glove, the flowers are embroidered on afterwards. Where stitch counts vary depending on the size, the following format is used: XS [S, M, L]. At the beginning of each section (cuff, hand), the round numbers start anew at 1. Instructions between 2 asterisks need to be repeated to the end of the round. $\mathsf{R G}=$ Instructions for the right glove $\mathsf{L G}=$ Instructions for theleft glove READ THE WHOLE PATTERN BEFORE YOU START KNITTING! SEPARATE' CHARTS ARE PROVIDED FOR EACH SIZE.BE SURE TO USE THE CORRECT CHART CORRESPONDING TO THE SIZE BEING KNIT.
Colored Cables 101
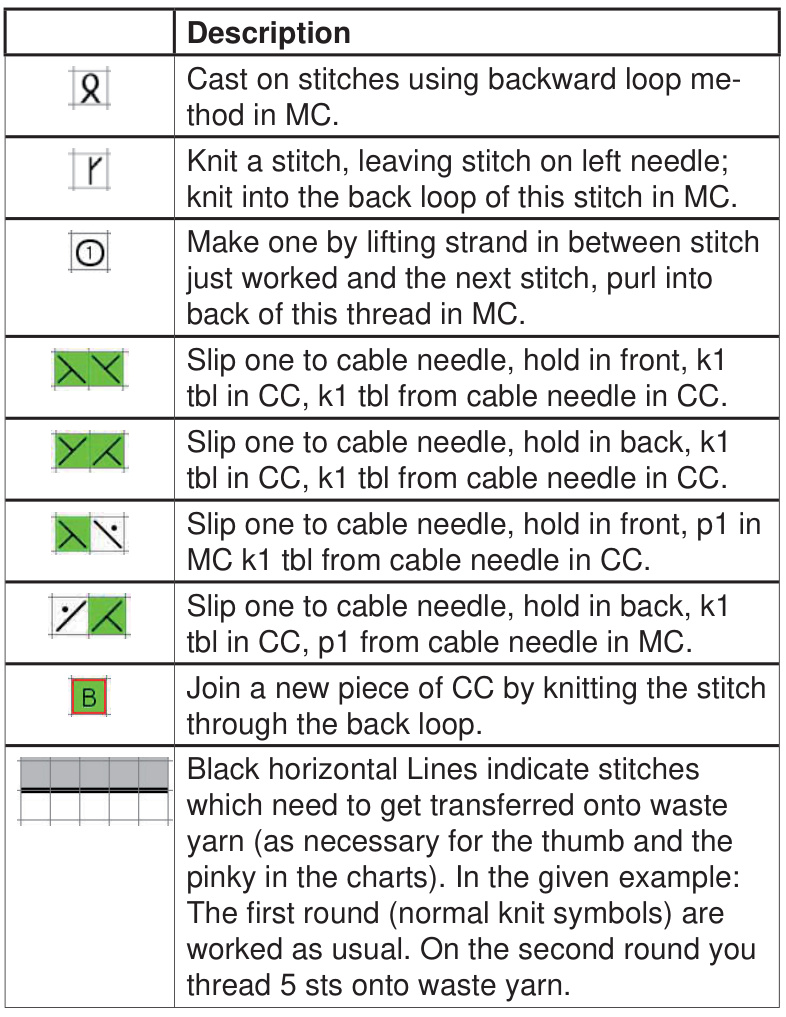
To work colored cables on a solid background without carrying the contrast color yarn for the rest of the round, a special technique is necessary. Let's start with a little example chart:
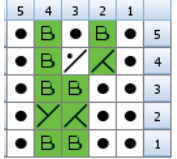
This translates to: Round 1: p2 using MC, cut off a piece of CC long enough for the entire branch and k2 tbl using CC, drop the CC yarn, p1 in MC. Round 2: p2 in MC, work a cable by slipping one stitch onto a cable needle, hold in back, k1tbl in CC (pick the yarn back up), k1tbl in CC from cable needle, drop the CC, p1 in MC. Round 3: same as round 1. Round 4: p1 in MC, work a cable by slipping one stitch onto a cable needle, hold in back, k1tbl in CC, p1 in MC from cable needle, k1tbl in CC, p1 in MC. Round 5: $\star_{\mathsf{p}1}$ in MC, k1 tbl in $\mathsf{C C}^{\star}$ twice, p1 in MC As you now have an idea how the basic principle works, Ill provide you with another example and explain some further details:
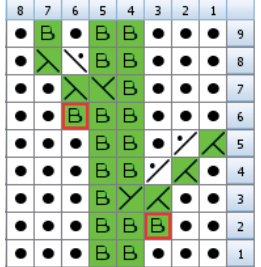
cable, a new piece of CC needs to be joined. To make it easier for you, the stitches where a new strand of CC needs to be attached have a red border (round 2, column 3; round 6, column 6).
Some general suggestions:
To estimate the length of CC you need, multiply the estimated length of the branch on the glove by 4 (if the branch is 1 stitch wide) or 8 (if the branch is 2 stitches wide). It isn't necessary to be $100\%$ precise about this. To make it less fiddly, don't join pieces longer than 1 m. If you run out of CC yarn before the branch is finished, you can always join another piece. When joining a new piece of CC, leave a long enough tail so it won't slip away while knitting. Same for the tail when you reach the end of the branch. Depending on your kniting style you may be able to pick up the CC strands without dropping the MC which saves a lot of time. Continental knitters for example can use the middle and ring finger of the right hand to pick the CC yarn up for the one or two stitches needed and then drop it again. Before knitting a stitch with CC tuck a little at the yarn to tighten up the stitch below. It can become a bit loose as you drop the CC for the rest of the round. If you reach the end of a branch and you don't need the CC-Yarn any more tuck the tail into the inside of your glove so it's out of the way. waste yarn and cast on two sts as indicated in the chart. Do NOT work round 46 [50, 55, 60].
Fingers:
The last round on the hand chart indicates which stitches will end up being which finger and mustn't be worked. Red: rina finaer Yellow: midle finger Blue: index finger The pinky isn't included as the stitches have already been transferred onto waste yarn. Transfer all sts onto waste yarn (or spare circular needle in the same size you're using or smaller). Except for the ring finger, youllhave to rejoin the yarn for each finger. Leave a long enough tail to make weaving in easy.
RG:
Ring finger: Put 8 [8, 10, 9] stitches from the back of the hand back on needle 1 and 7 [8, 8, 9] stitches from the palm side back on needle 2. Purl the stitches from the back of the hand, cast on 2 stitches using the backward loop method and complete the round by purling the stitches from the palm side. Continue working these 17 [18, 20, 20] sts in reverse stockinette stitch until the finger is $3\ \mathsf{m m}$ $/\ 1/8^{\ast\iota}$ shorter than your ring finger when wearing the glove. $^{\star}\mathsf{k}2\mathsf{t}0\mathsf{g}^{\star}$ to the end of the round. If the total stitch count is odd, knit the remaining stitch. Break the yarn and thread it through the remaining stitches twice. Pull tight and weave in the end.
Instruction
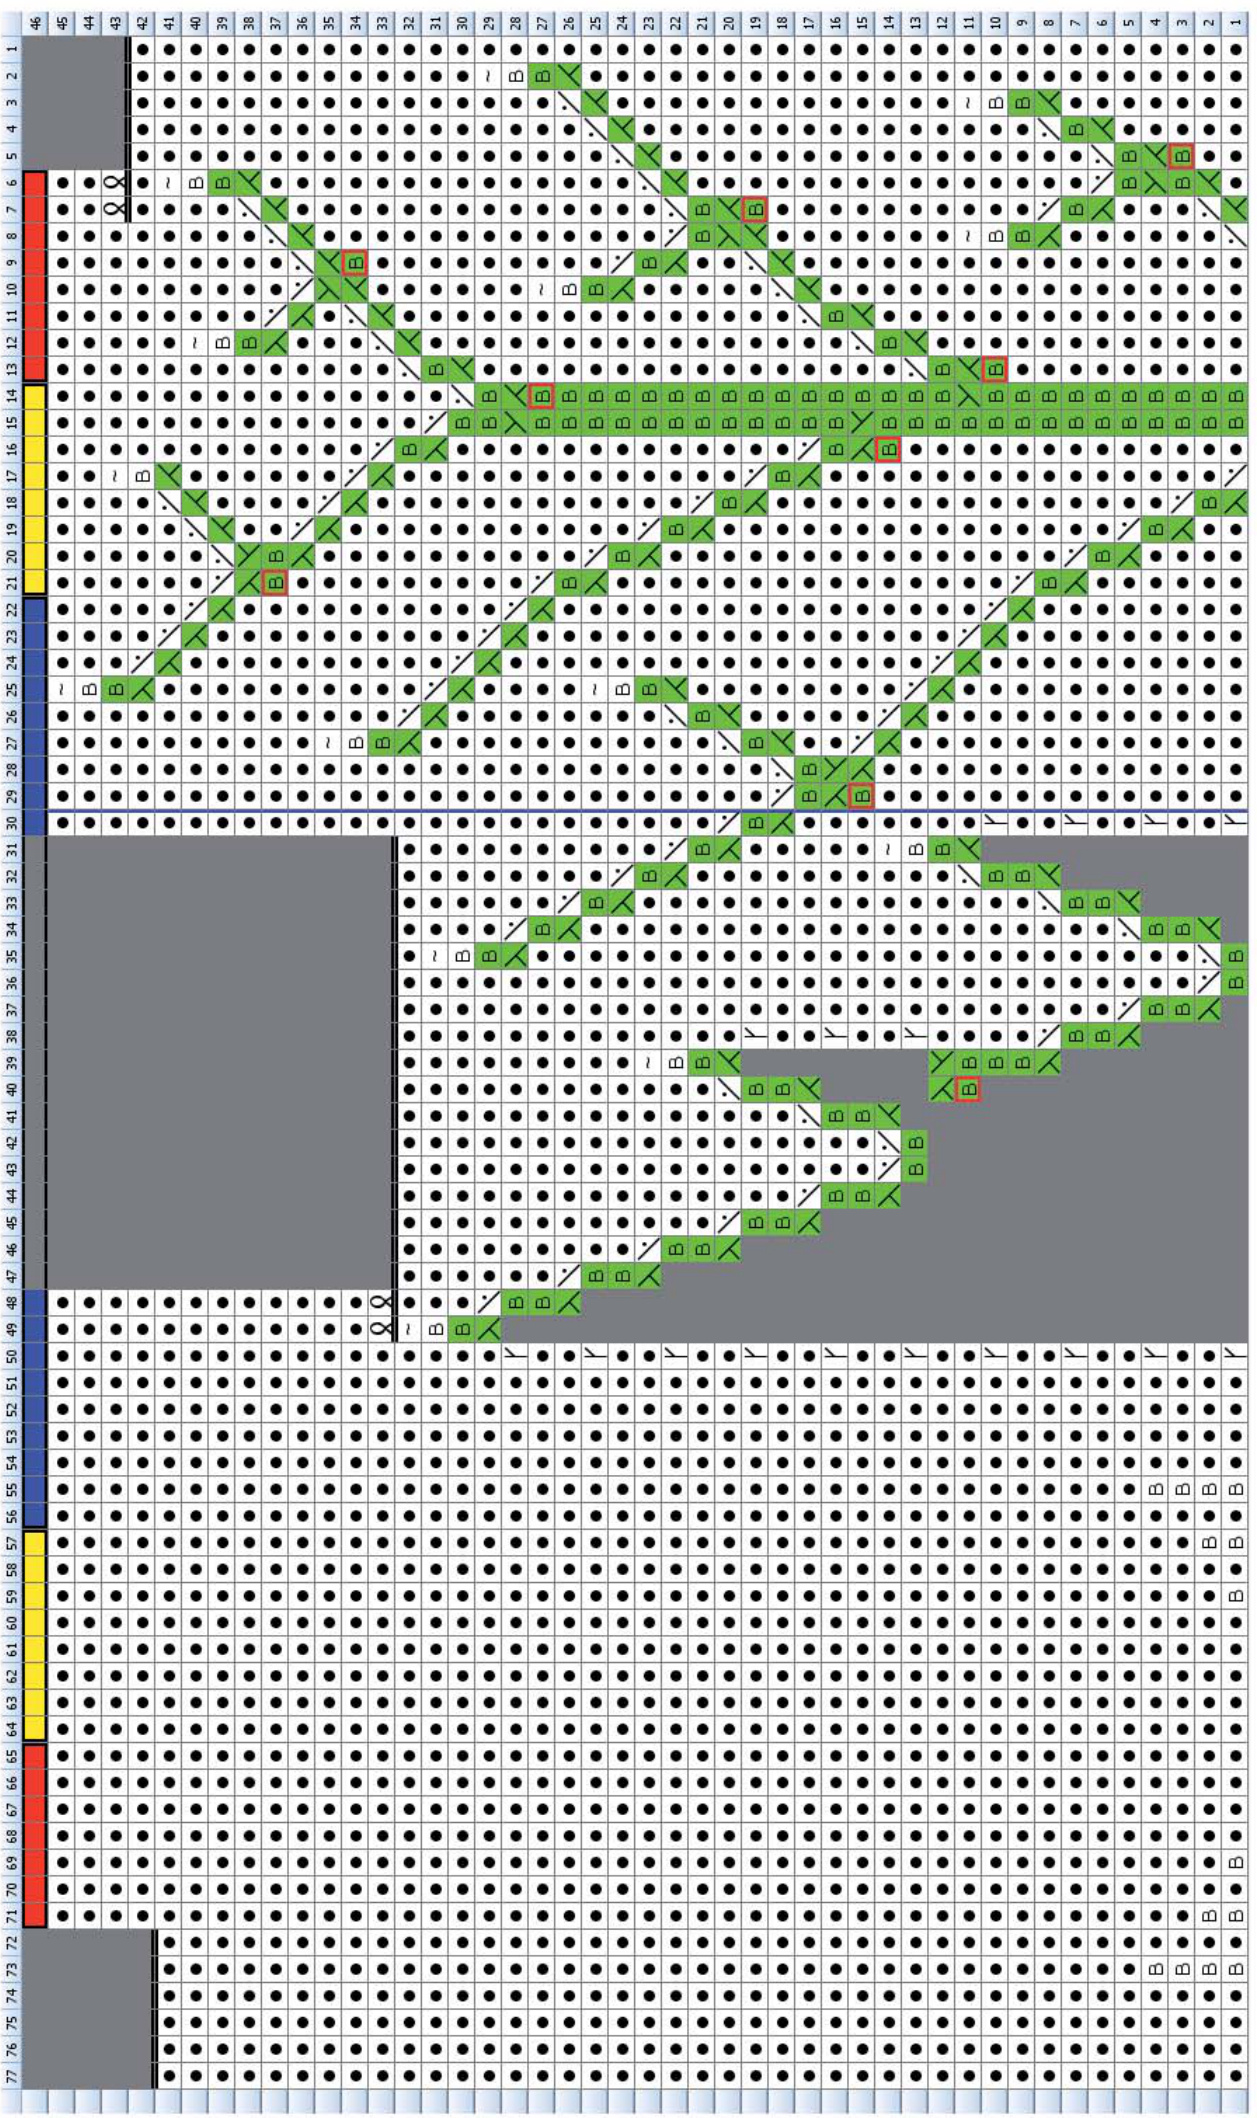
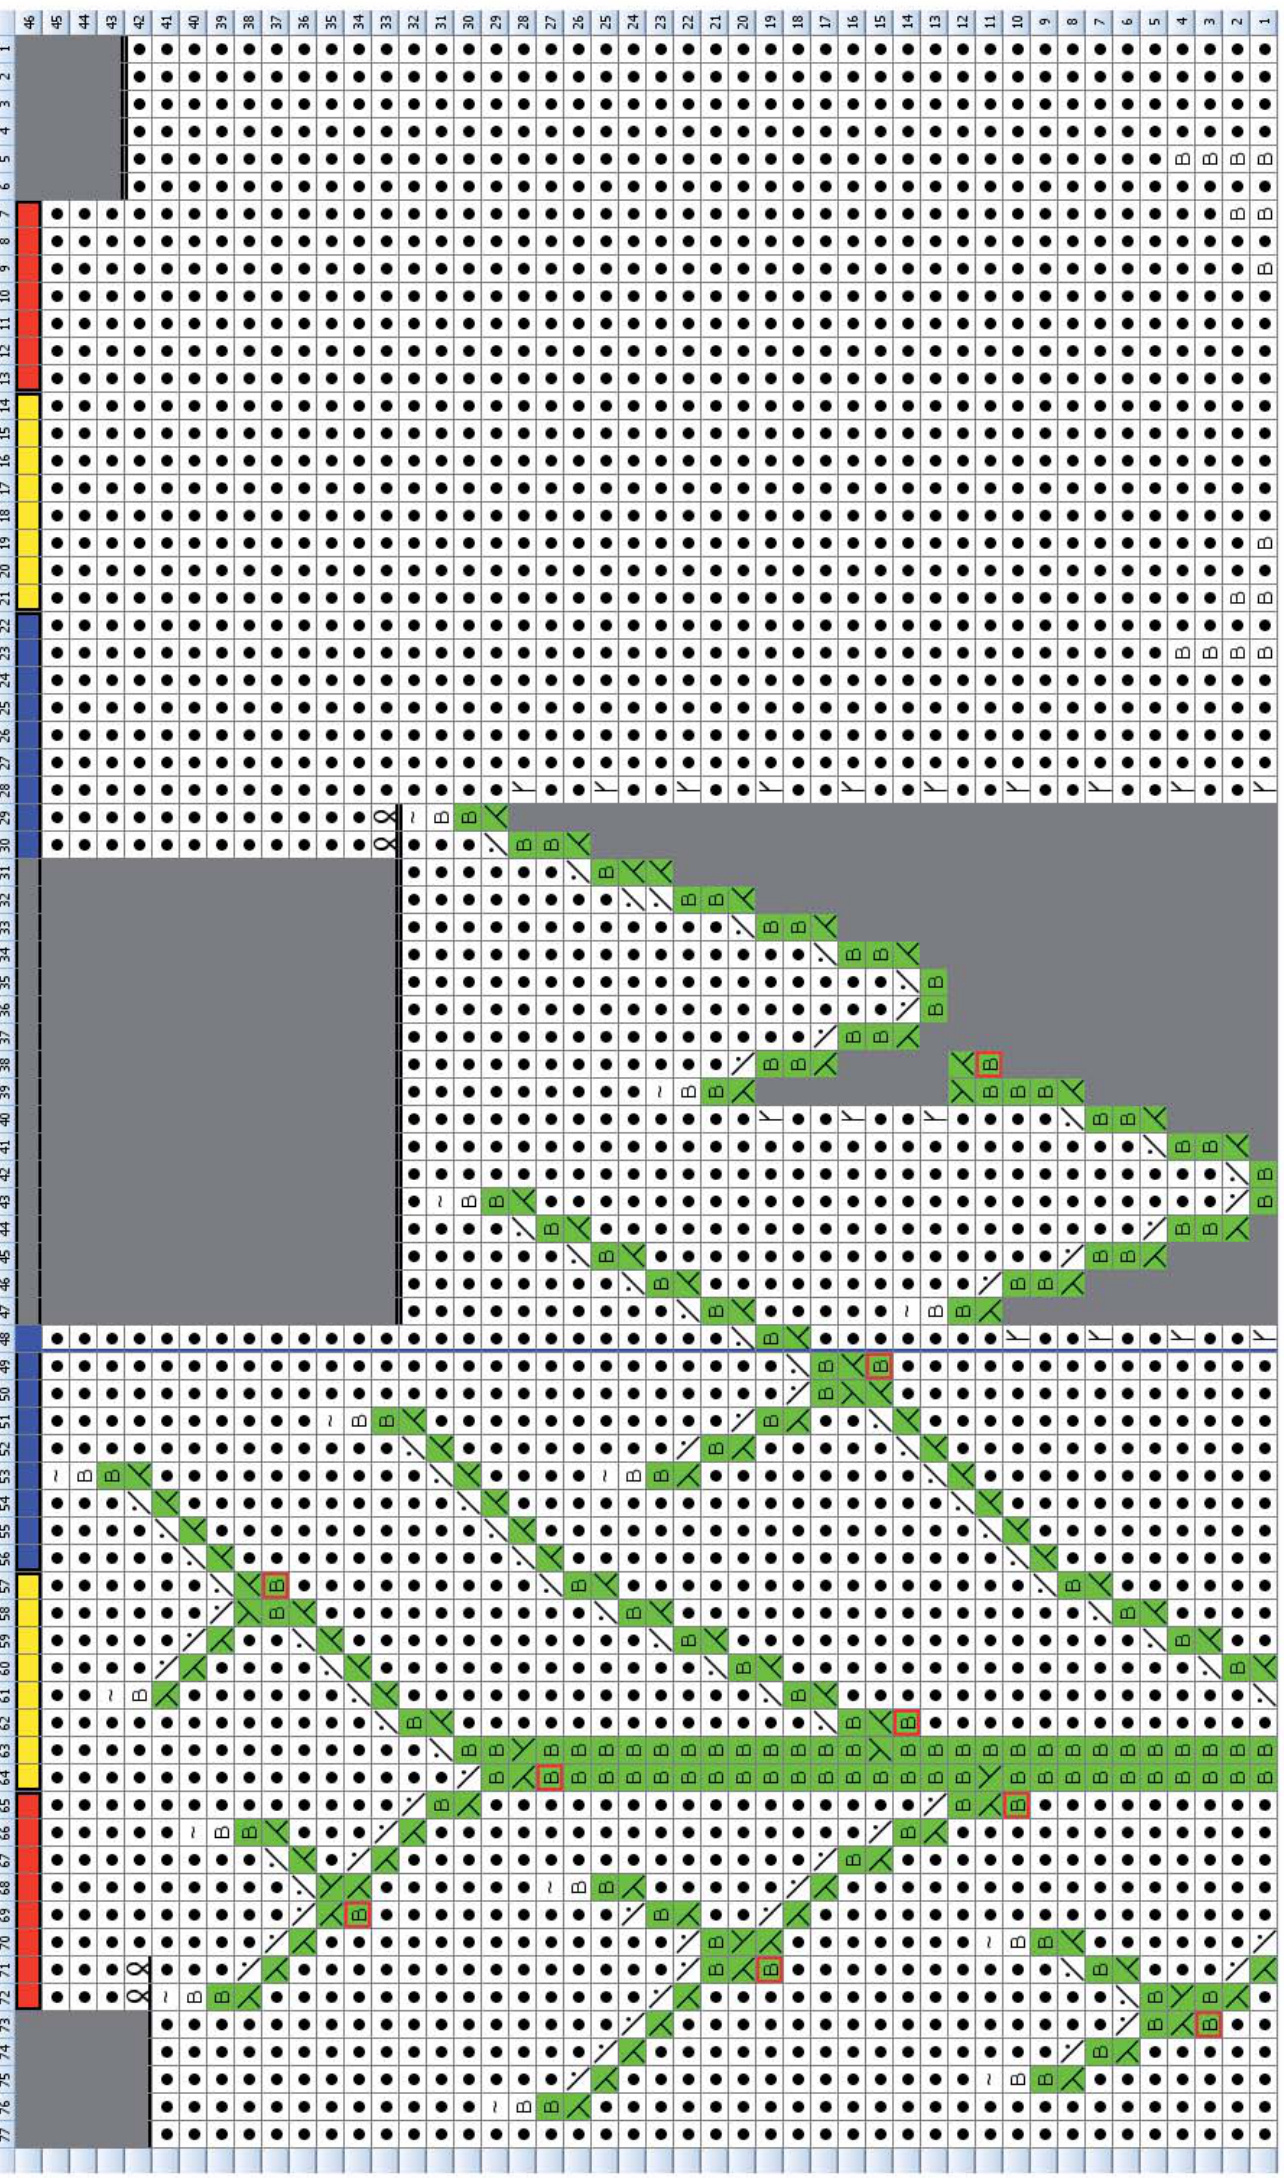
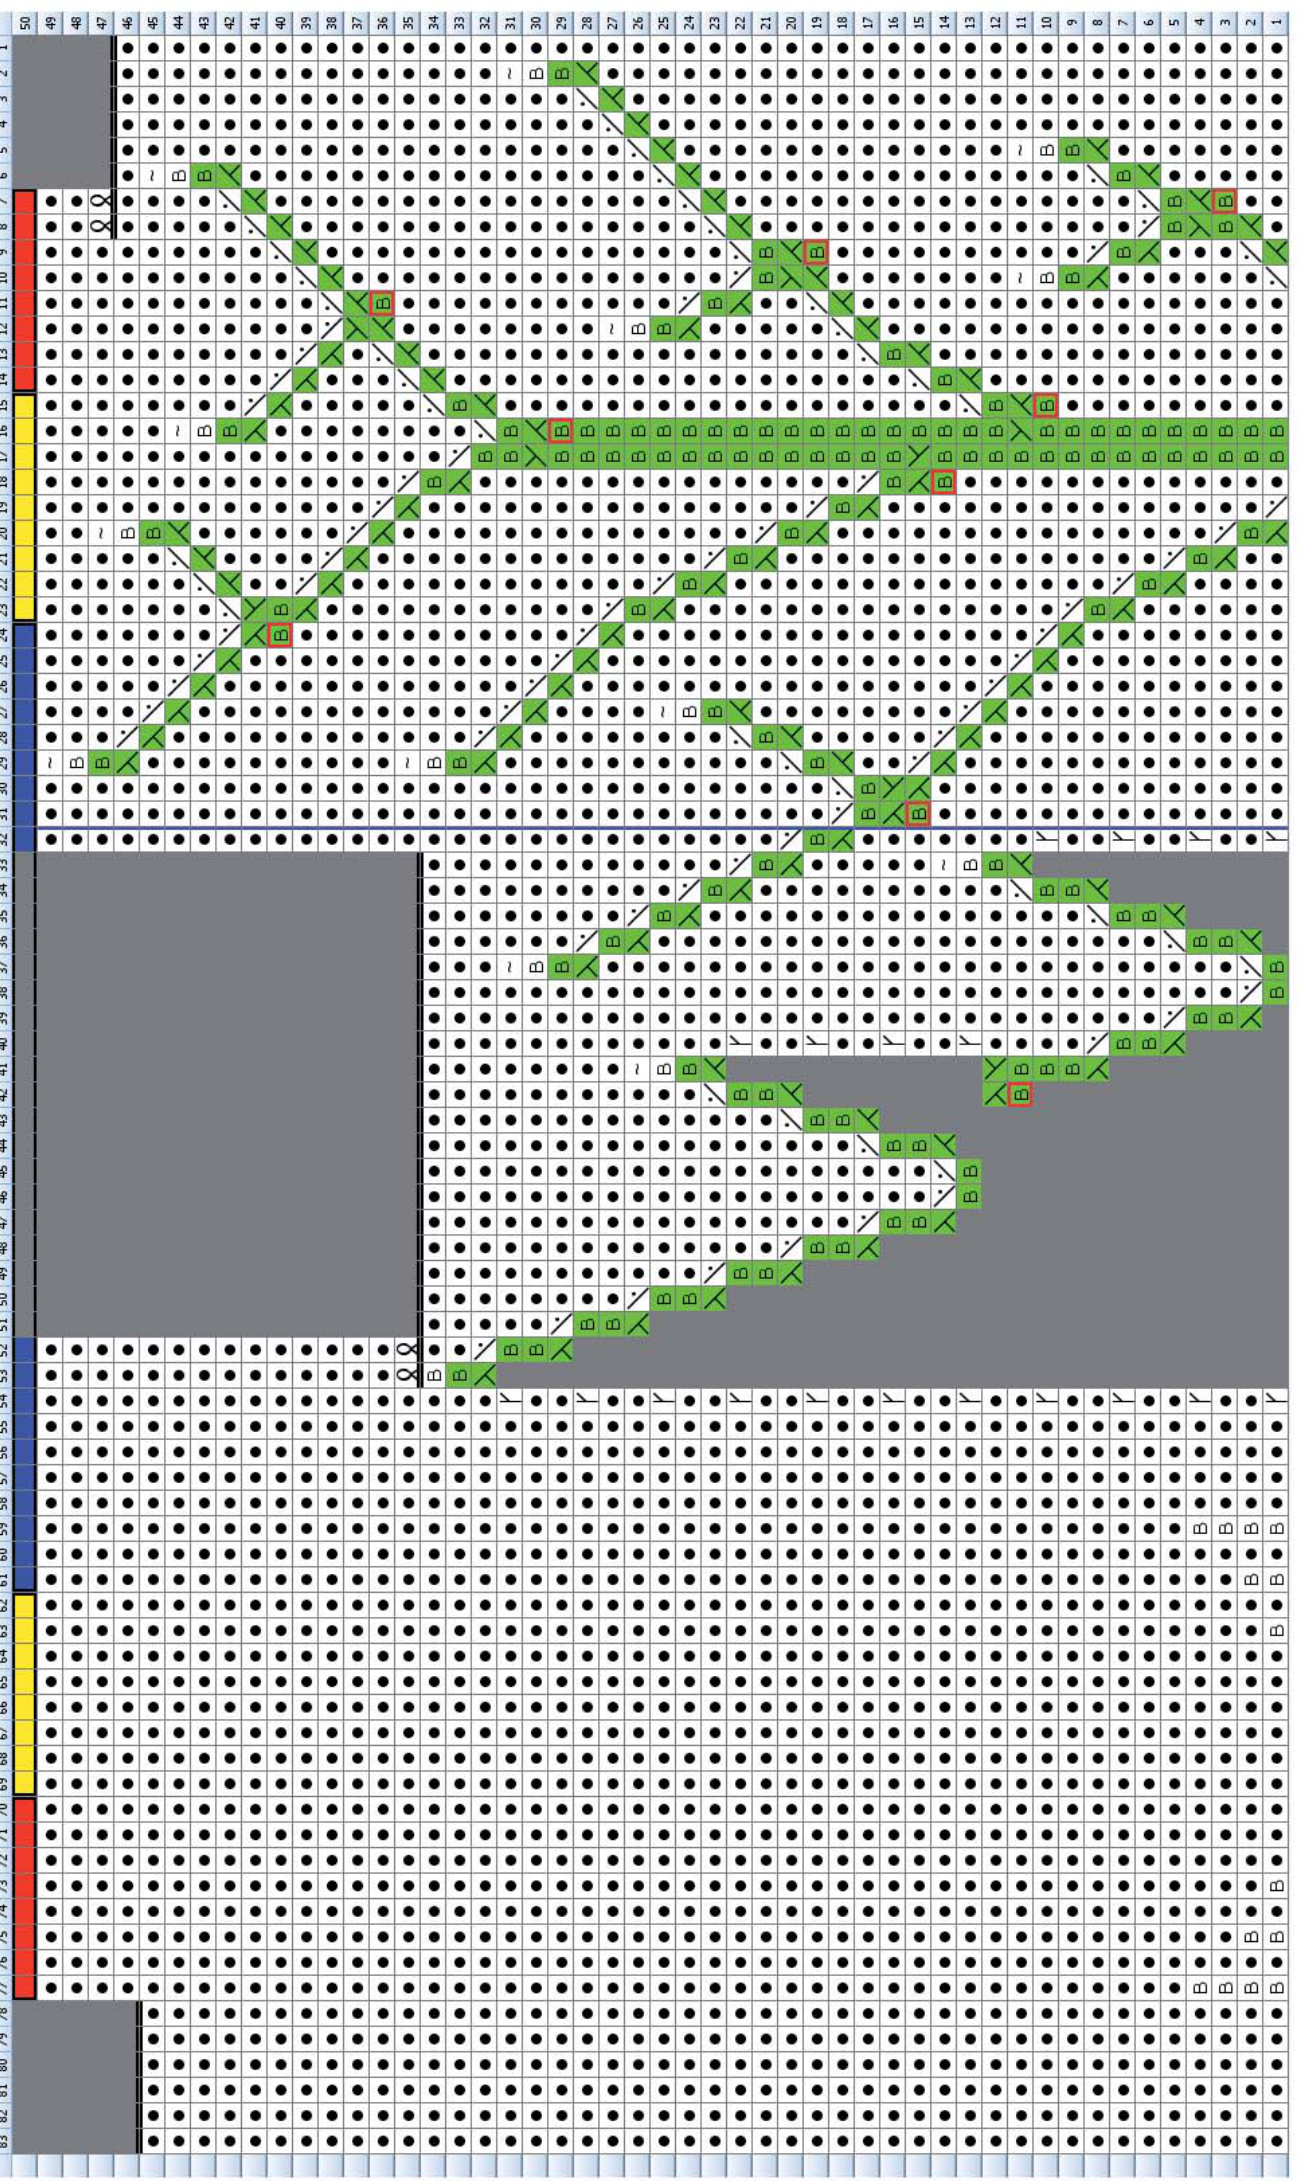
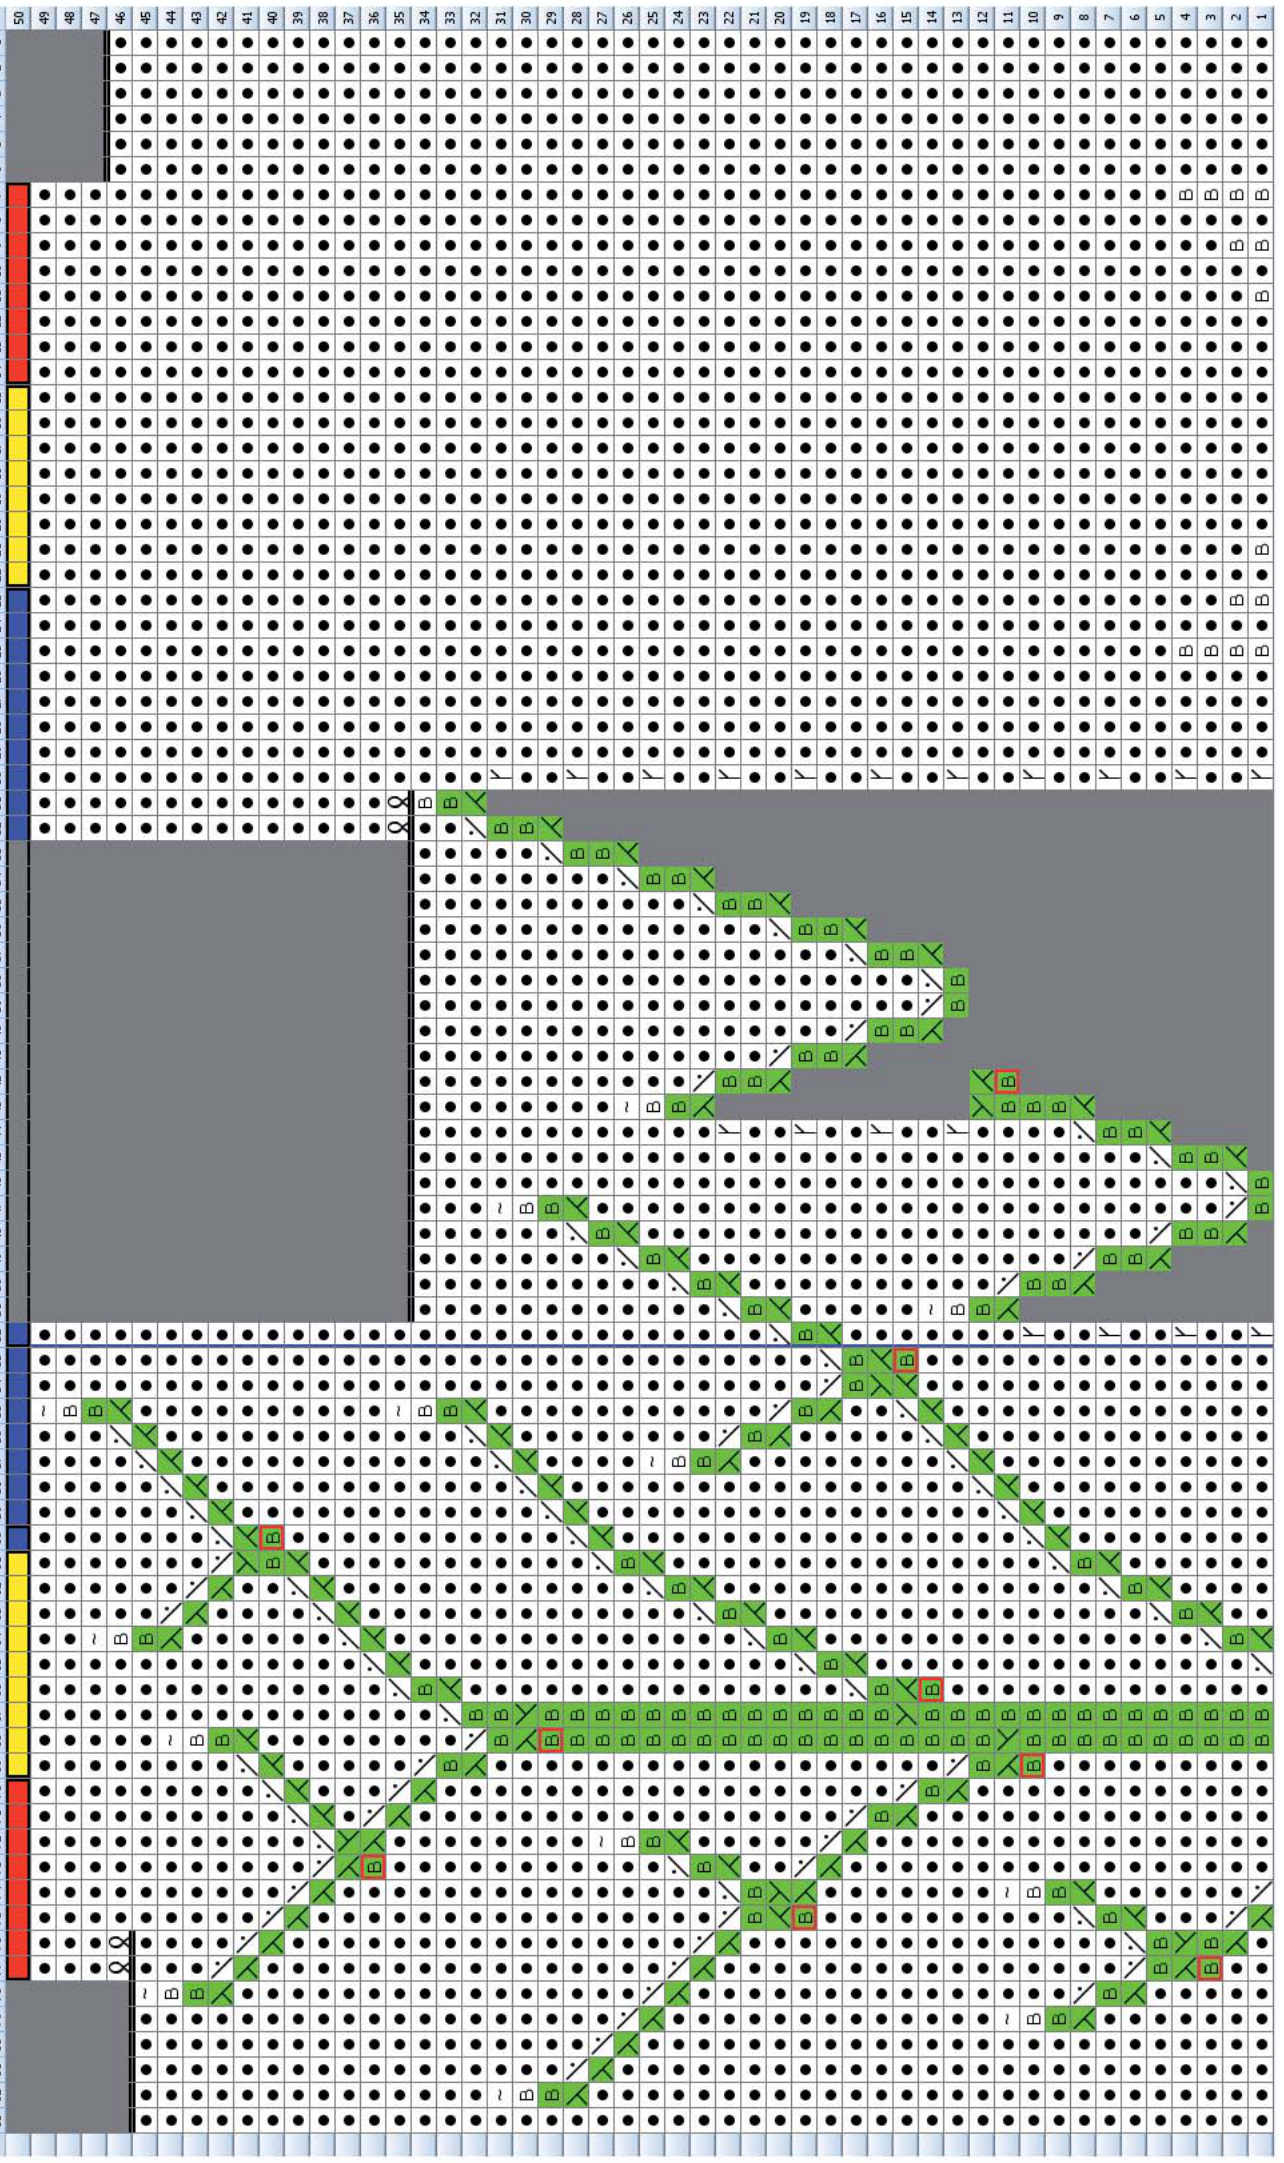
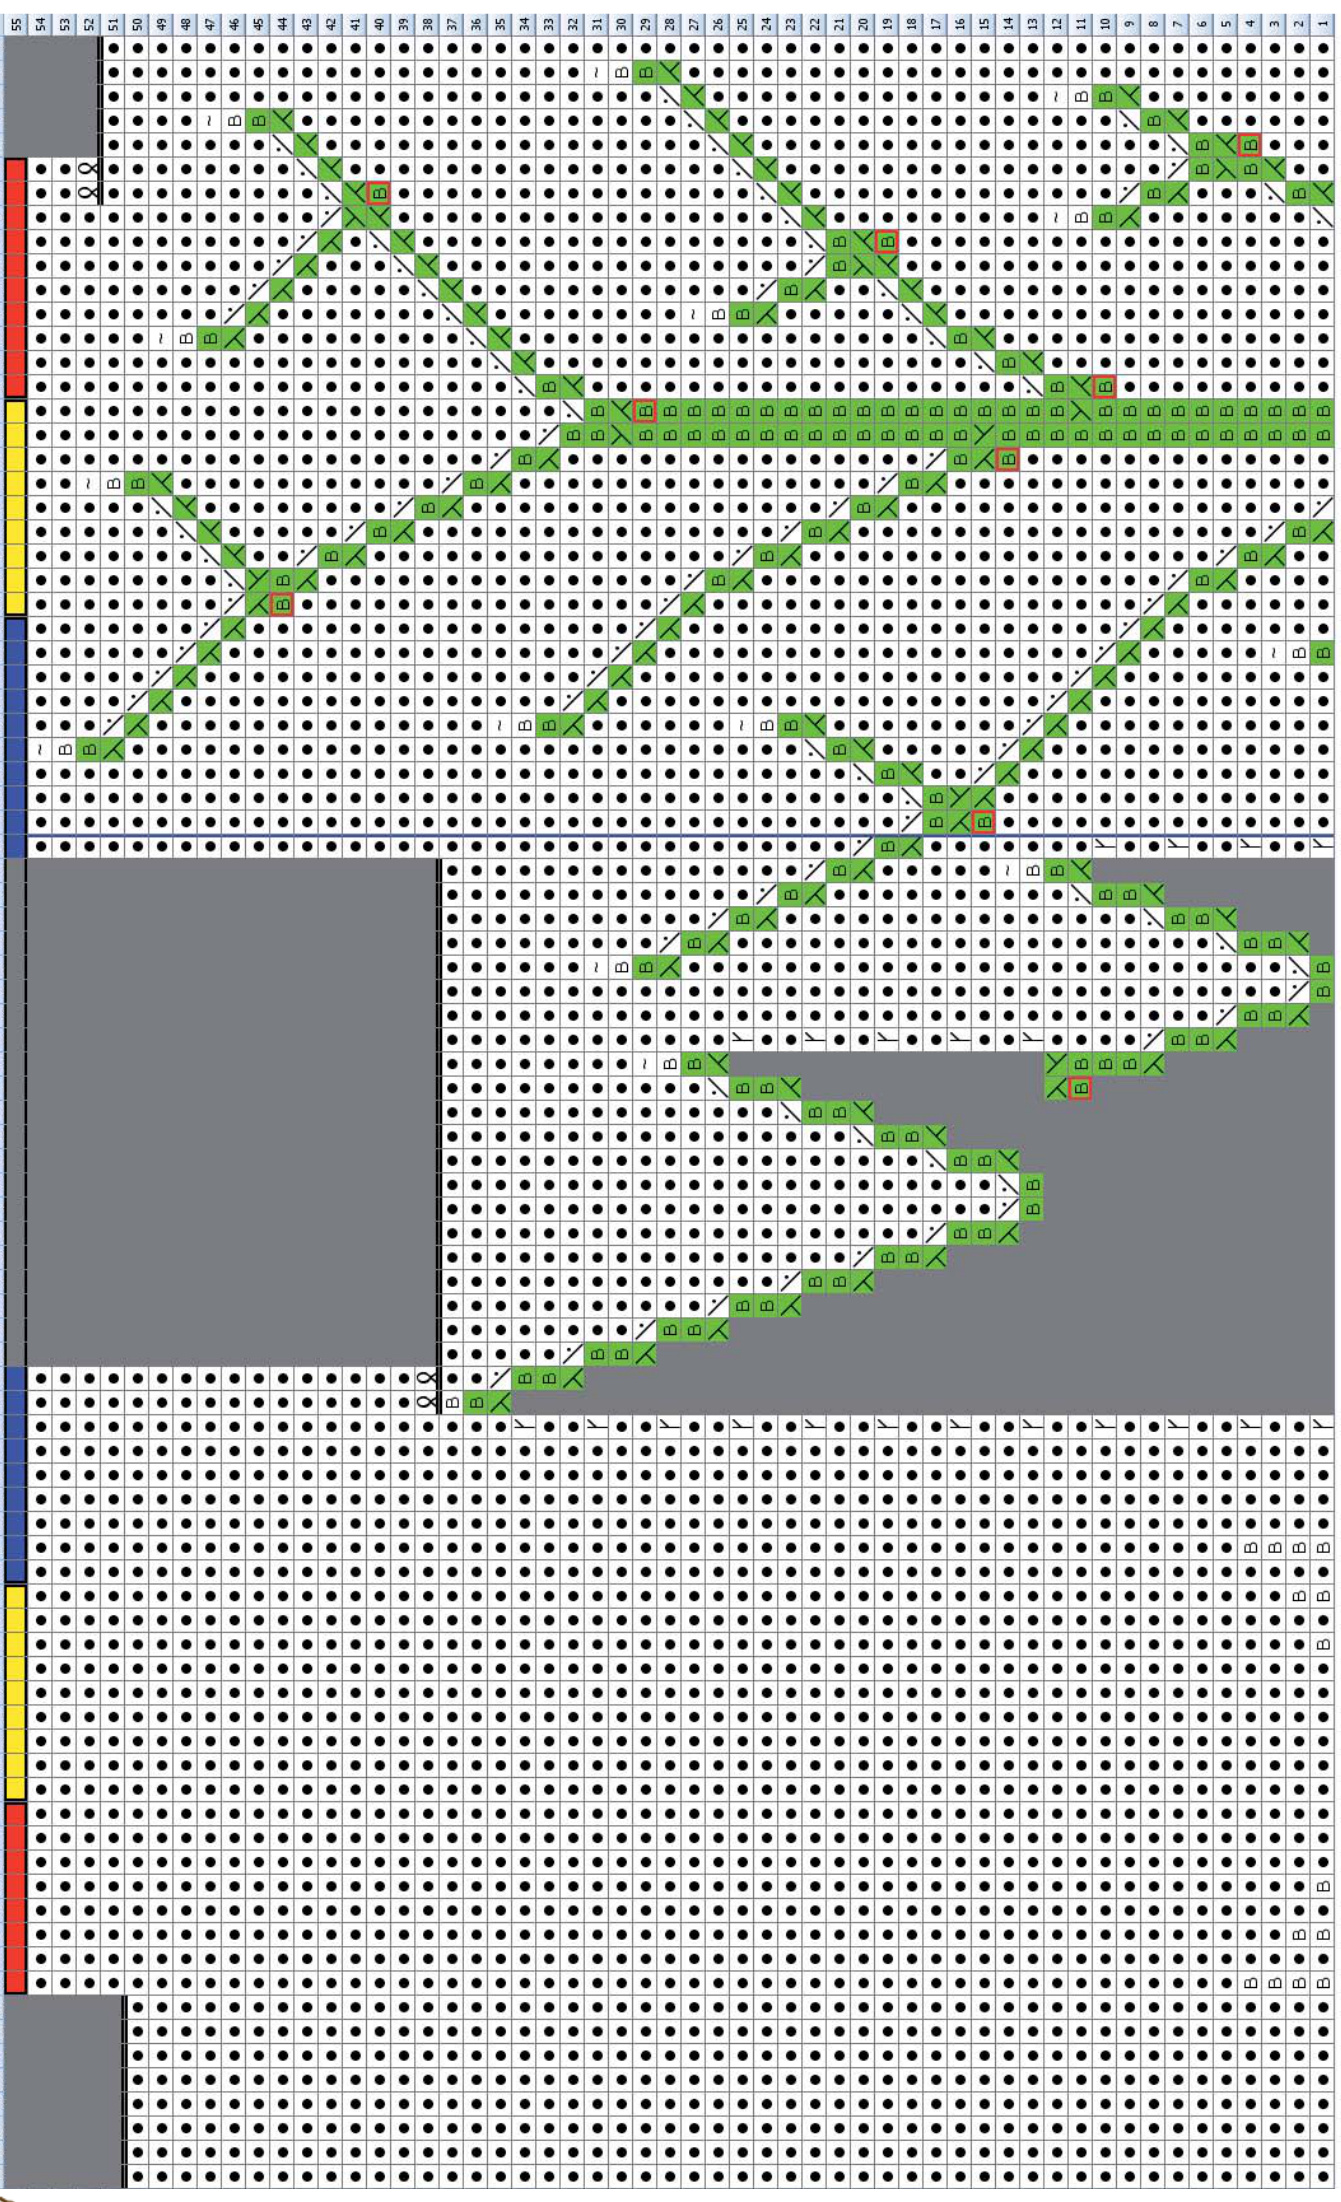
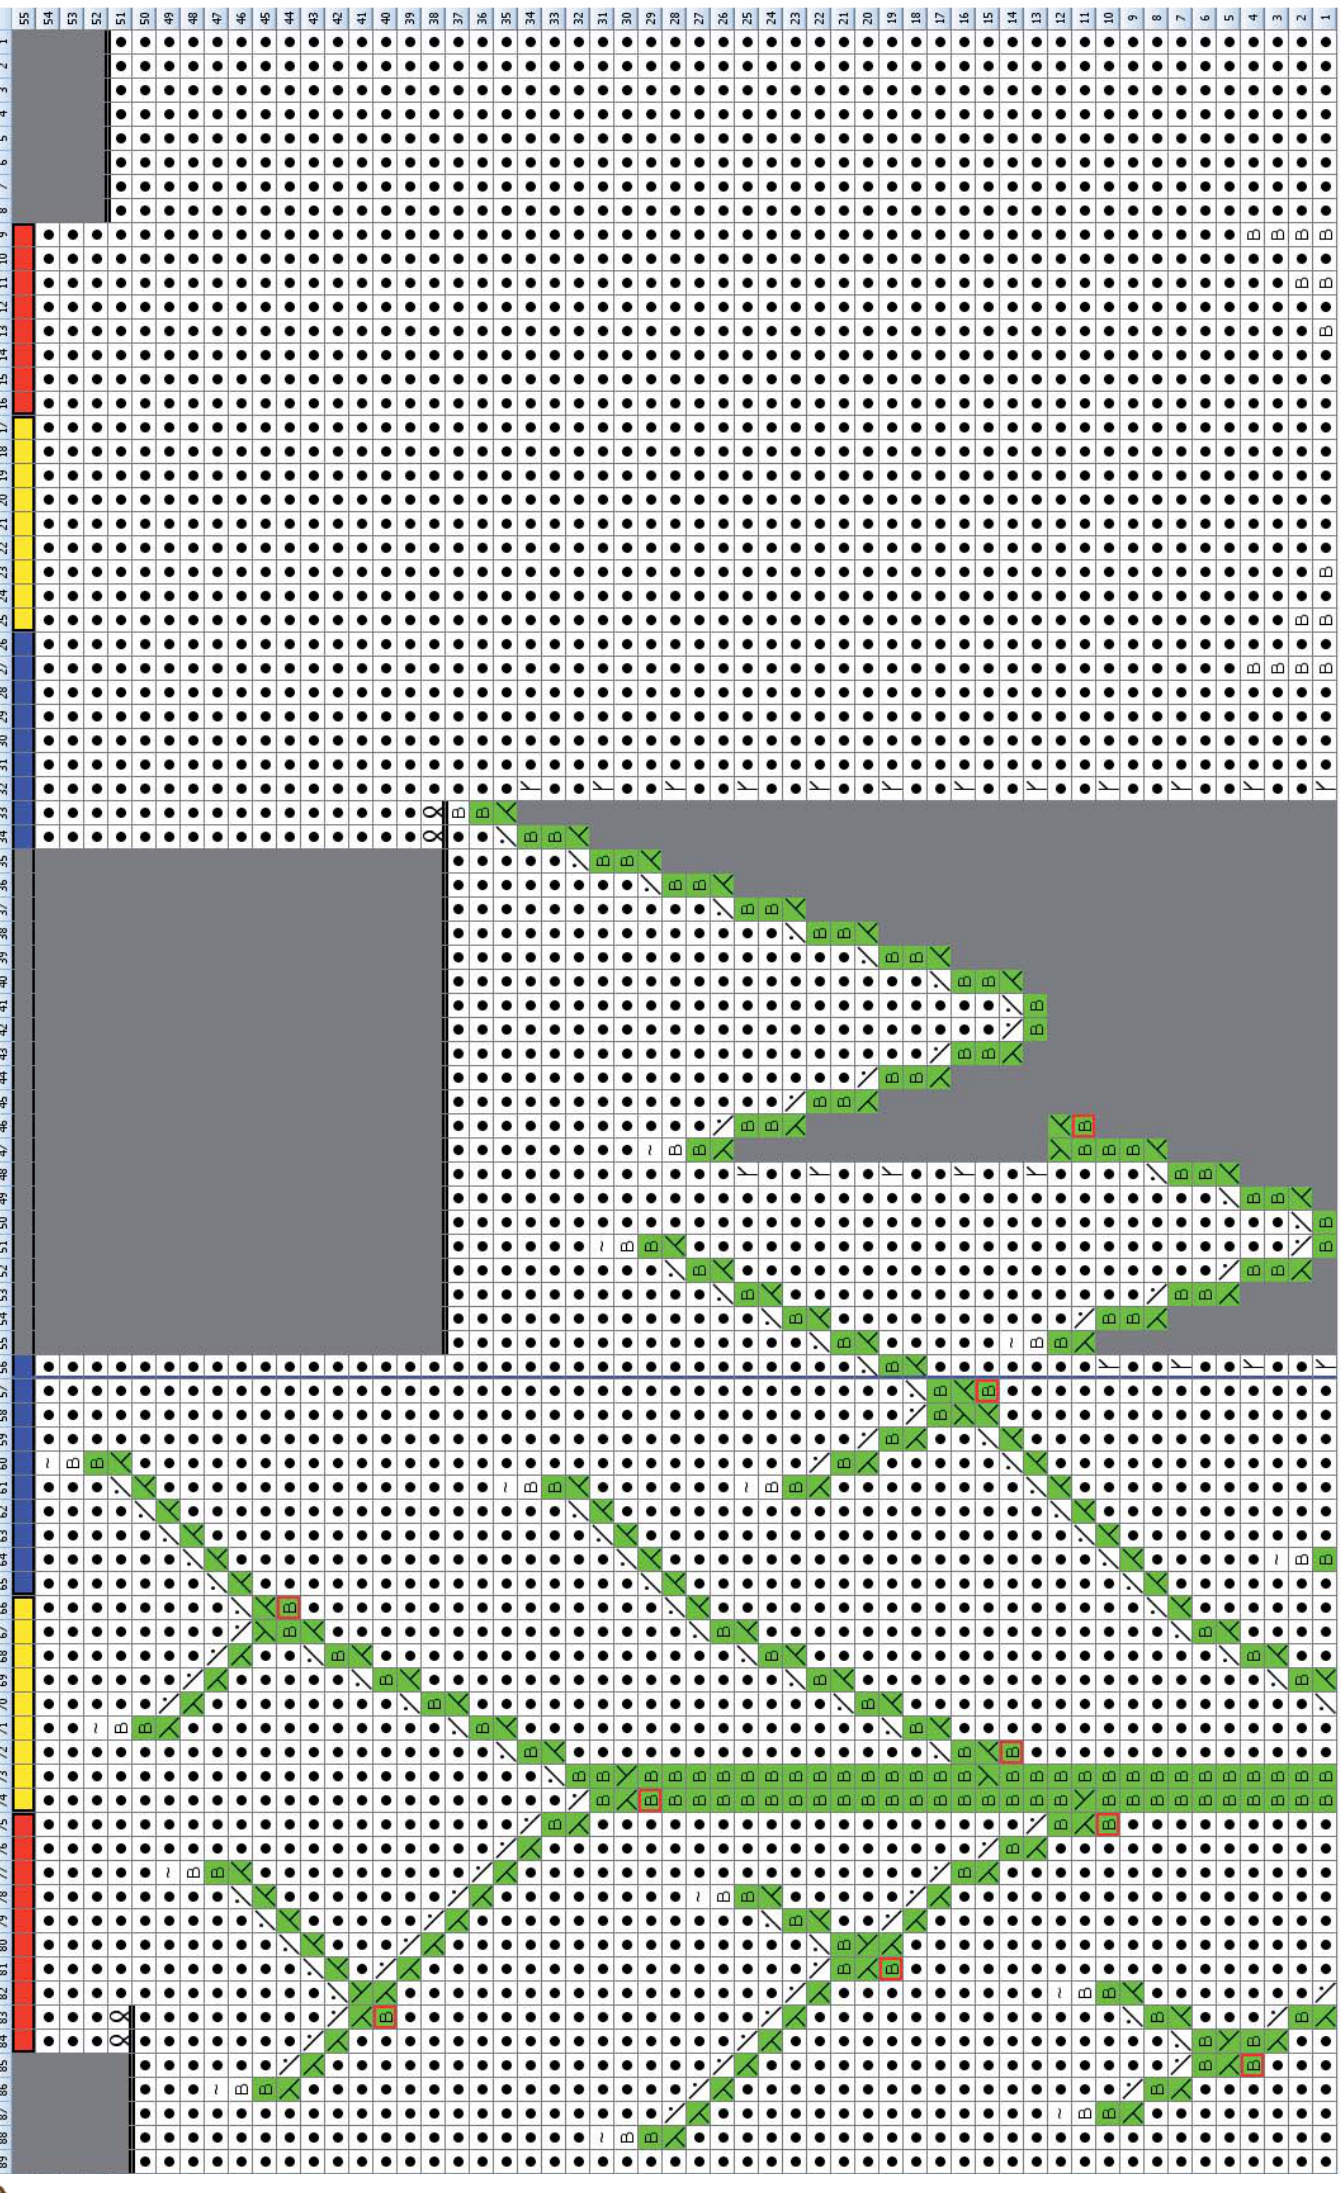
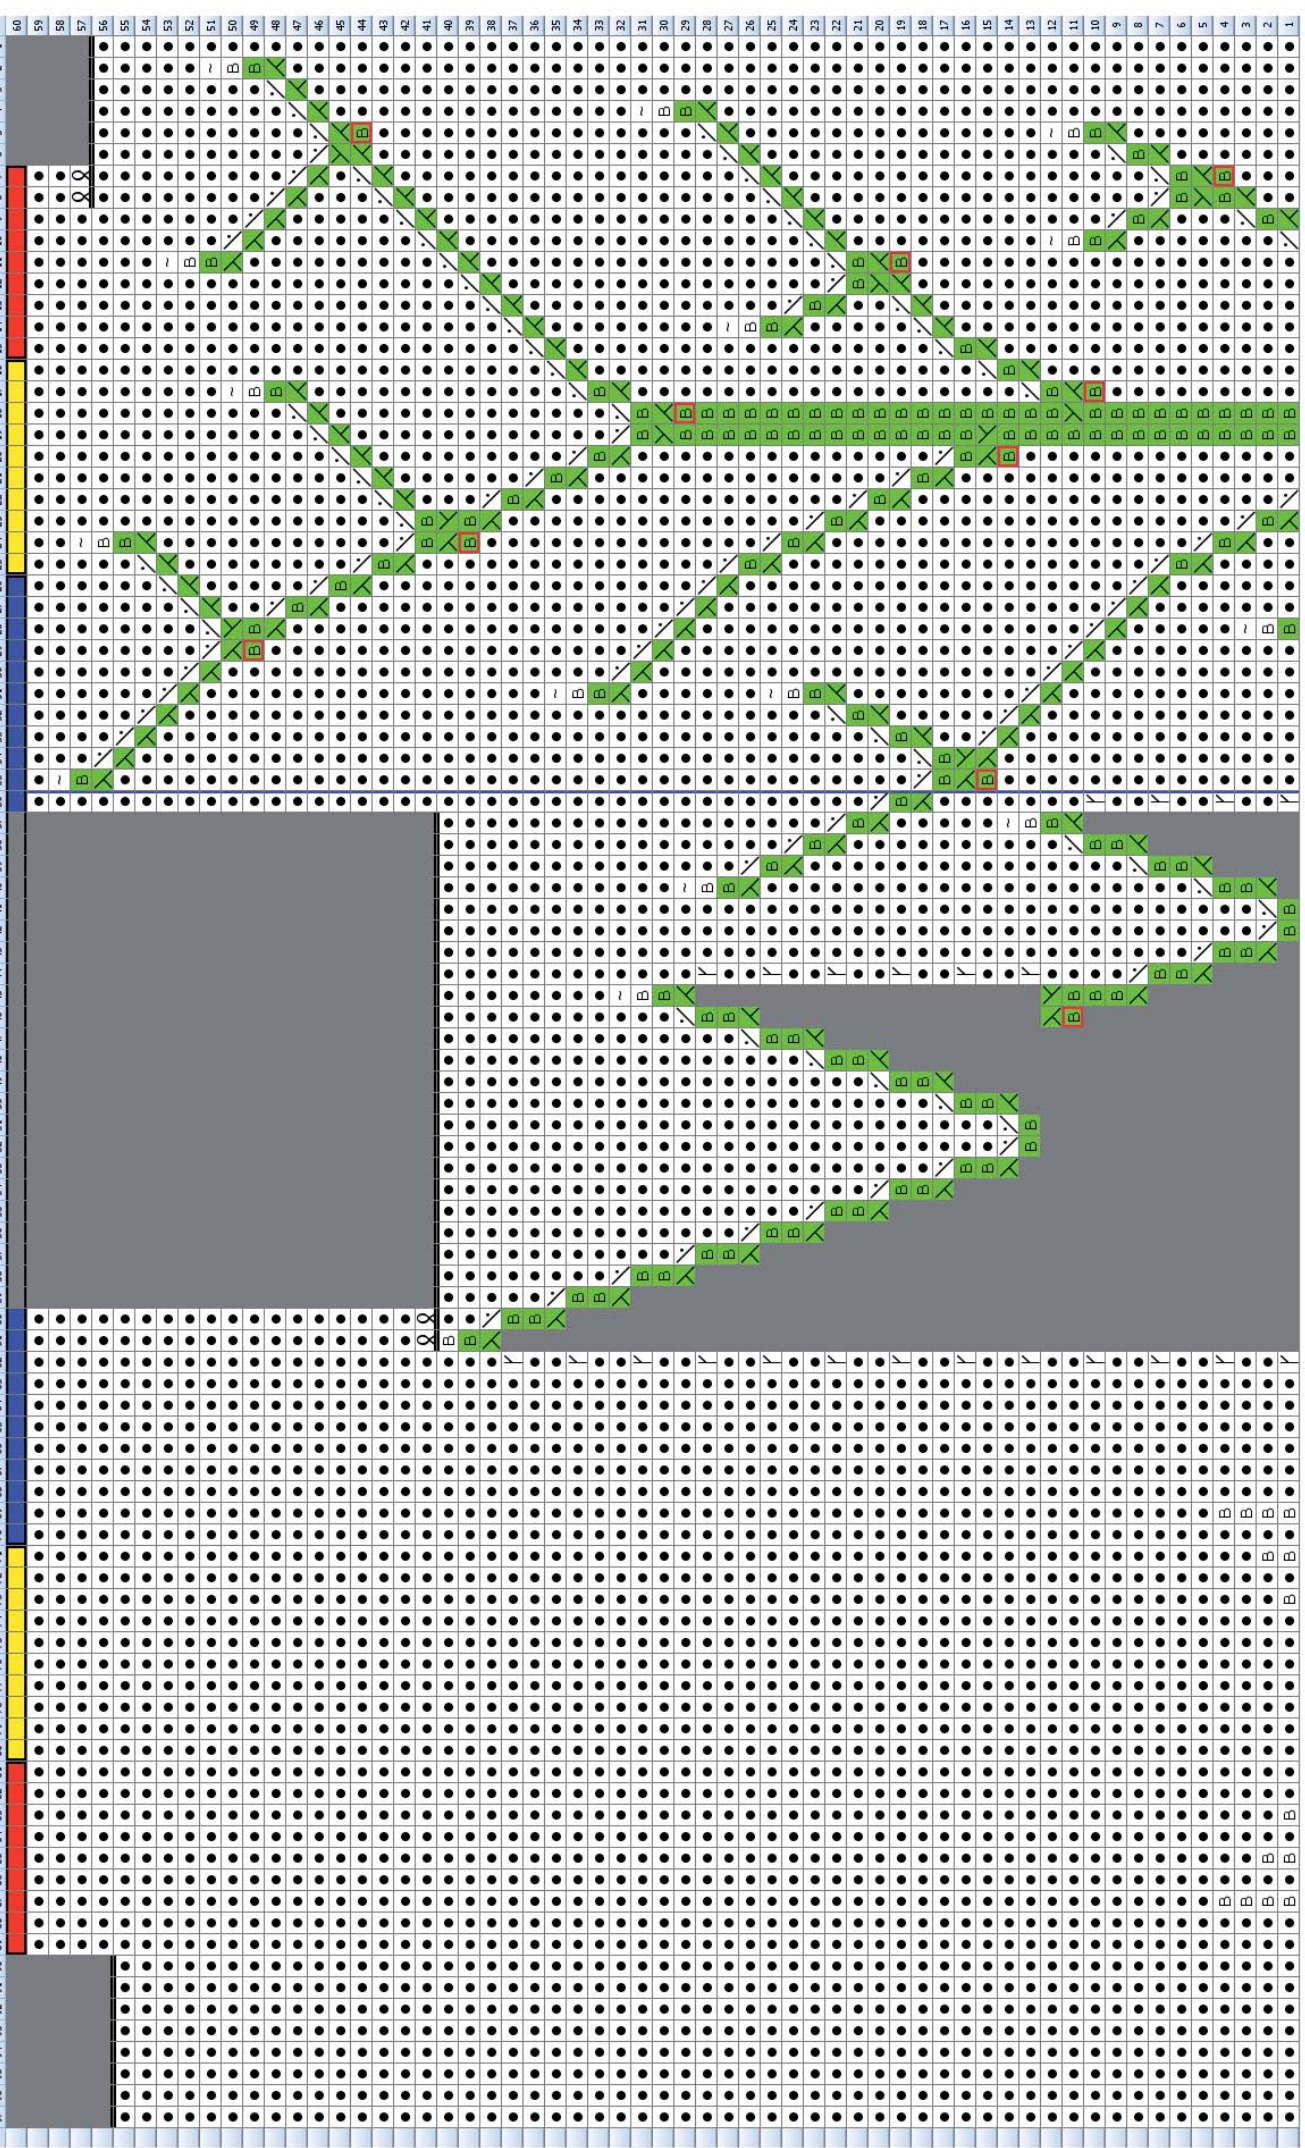
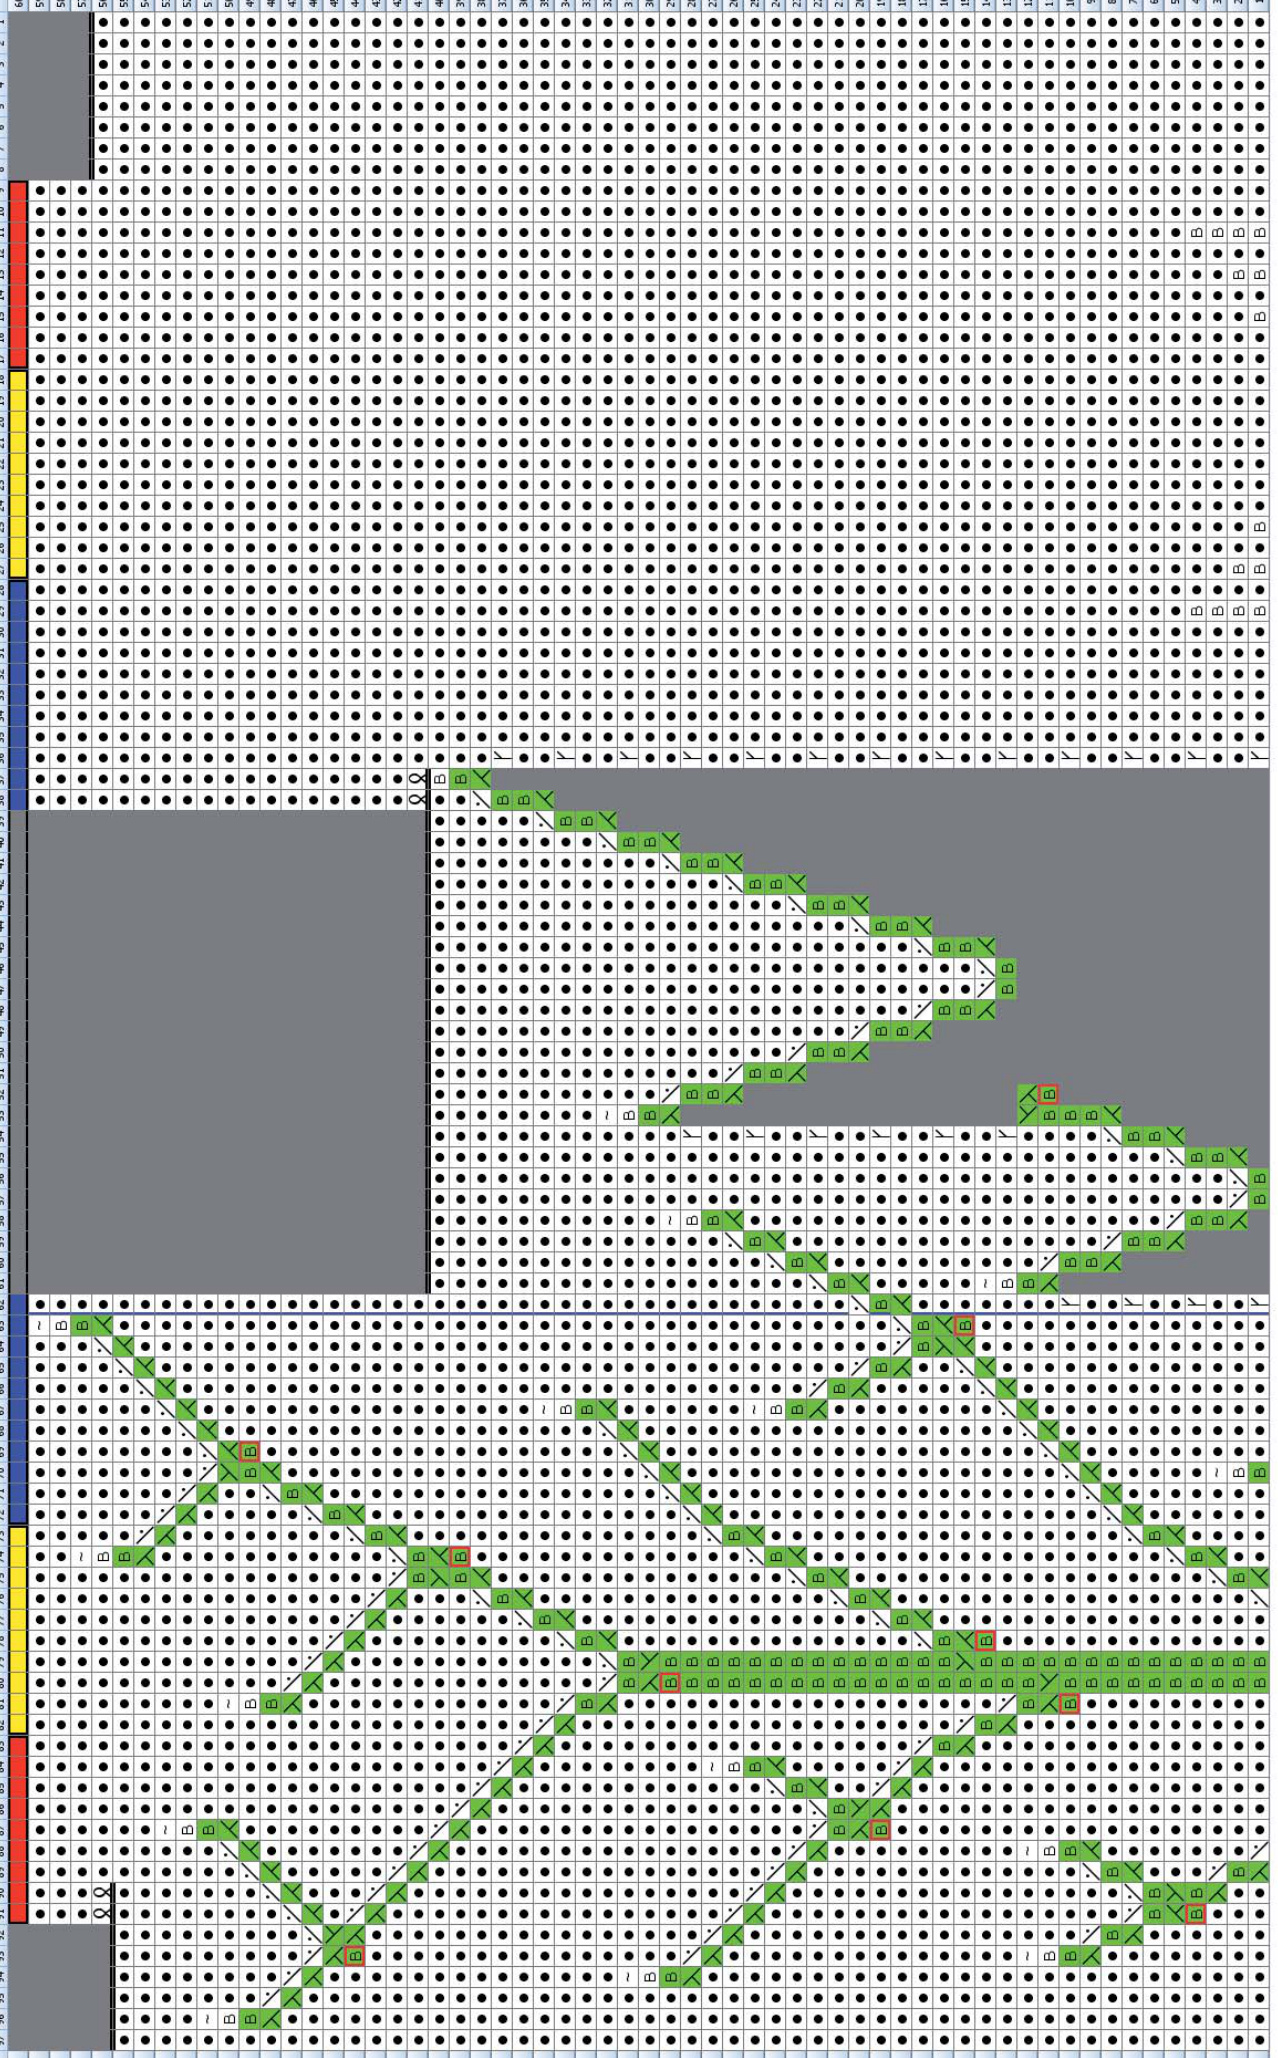
Cuff Edge (RG + LG) Using the provisional crochet cast-on (or something having the same effect like the magic cast-on), cast on 60 [64, 68, 74] sts using the smaller needle and the CC (green). Join in the round. Round 1: $\sp{\ast}\mathsf{k}\,1$ ,p1\* Round 2: $\star_{\mathsf{p}1}$ ,k1\* Repeat rounds 1 and 2 three more times (8 rounds total). Put the sts from the provisional cast-on on the bigger circular needle and fold the knitted piece so that both needles are side by side with the larger needle in the back. Work \*k2tog, p2tog\*, always using one stitch from each needle to form the decrease. Break the CC. Using the bigger needle, join MC and work the cuff chart and then the hand chart. Blue vertical lines indicate where the sts are separated (needle 1/2). Round 33 [35, 38, 41]: In this round the sts for the thumb gusset need to be put on hold. Transfer 19 [21, 23, 25] sts on waste yarn. After that cast on 2 sts using the backward loop method. At the end of round 42 [46, 51, 56] and in the beginning of the next round put 13 [14, 15, 16] sts for the pinky on Middle finger: Put 8 [9, 9, 10] stitches from the back of the hand back on needle 1 and 8 [8, 9, 10] stitches from the palm side back on needle 2. Purl the stitches from the back of the hand, cast on 2 stitches using the backward loop method, purl the stitches from the palm and pick up two stitches from the cast-on edge of the ring finger. Continue working these 20 [21, 22, 24] sts as described for the ring finger. Index finger: Put the remaining 18 [19, 19, 22] stitches back on the needle. Purl the stitches and pick up two stitches from the cast-on edge of the middle finger. Continue working these 20 [21, 21, 24] sts as described for the ring finger.
Put the 13 [14, 15, 16] stitches which have been on hold back on the needle, placing the 6 [6, 8, 8] stitches from the back of the hand on needle 1 and the 7 [8, 7, 8] palm stitches on needle 2. Pick up 2 stitches from the cast-on edge of the ring finger, then work the remaining stitches. Continue working these 15 [16, 17, 18] sts as described for the ring finger.
LG:
Ring finger: Put 7 [8, 8, 9] stitches from the palm back on needle 1 and 8 [8,10, 9]] stitches from the back of the hand back on needle 2. Purl the stitches from the palm, cast on 2 stitches using the backward loop method and complete the round by purling the stitches from the back of the hand. Continue working these 17 [18, 20, 20] sts as described for the RG ringfinger.
Middle finger:
Put 8 [8, 9, 10] stitches from the palm back on needle 1 and 8 [9, 9, 10] stitches from the back of the hand back on needle 2. Purl the stitches from the palm, cast on 2 stitches using the backward loop method, purl the stitches from the back of the hand and pick up two stitches from the cast on edge of the ring finger. Continue working these 20 [21, 22, 24] sts as described for the RG ring finger. Index finger: Same as on the right hand. Pinky: Put the 13 [14, 15, 16] stitches which have been on hold back on the needle, distributing them on needles 1 and 2. Work the stitches on needle 1 and 2, then pick up 2 stitches from the cast-on edge of the ring finger. Continue working these 15 [16, 17, 18] sts as described for the RG ring finger.
Thumb: $\underline{{(\mathsf{R G}+\mathsf{L G})}}$
Place the 19 [21, 23, 25] sts back on your needles.The beginning of the round is placed two stitches to the left of the cast-on gap. If unsure about the placement, look at the first line of the thumb chart. Rejoin the yarn and work the chart, then go on in reverse stockinette. Continue as described for the RG ring finger. Weave in all ends. If there are any holes from where the stitches are picked up, close them by weaving in while wearing the glove.
Embroidery
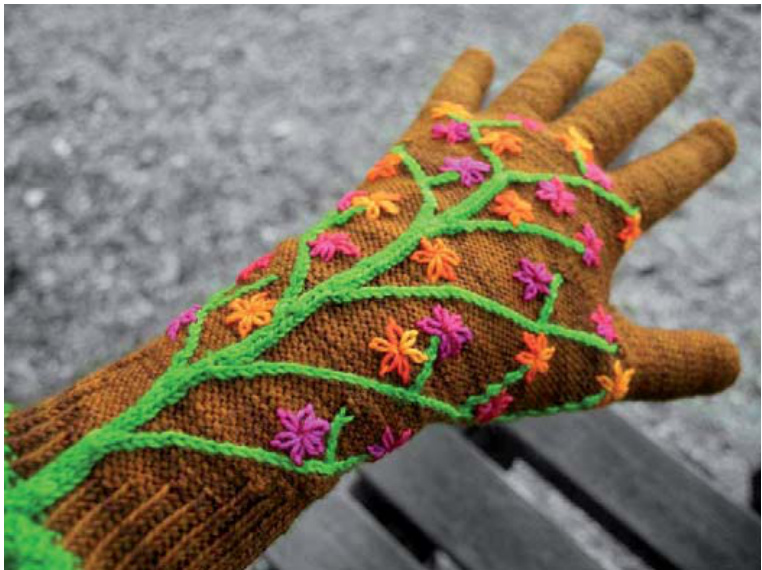
Now it's time to sprinkle some blossoms on the glove. Use the pictured glove as an inspiration and place the blossoms as you like. How to work the daisy stitch: Take a piece of yarn, at least 40 cm / 16 " long, thread it through the embroidery needle and decide where you want to place your first blossom.
Step 1:
From the wrong side, push the needle up through the fabric where you decided to place the center of the blossom.
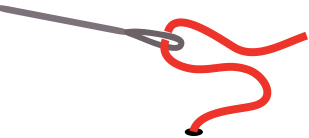
Make sure to leave a long enough tail for fastening the end after all the embroidery is done! Step 2: Form a little loop and push the needle back down through the same spot you have used to come up. Make sure that you keep the loop, don't pull to hard!
Step 3:
The petal length used on the pictured glove is about $7\ \mathrm{mm}\ /\ 2/8^{\ast}$ . Poke the needle back up short before that measurement and leaving just a little bit of fabric ..
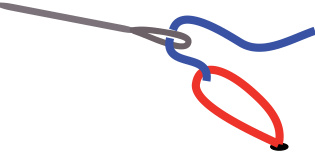
...before going down again, capture the first loop.
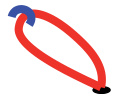
Repeat these 3 steps until there are 6 (or your preferred number of petals) around the center of your blossom.
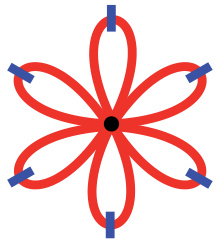
After that navigate to the center of the next blossom on the wrong side of the glove, making sure that you weave the yarn in on the way to the new spot (otherwise there will be big floats making pulling on the glove rather unpleasant). The yarn connecting one blossom to the other needs to have enough ease so that the glove can stretch a little bit, so don't pull too tight on the yarn! Weave in all ends and wear with pride!

Thumb Charts
RG + LG - Size XS

RG + LG - Size S

RG + LG - Size M

RG + LG - Size L

Cuff Charts
RG - Sizes XS and S
LG - Sizes XS and S
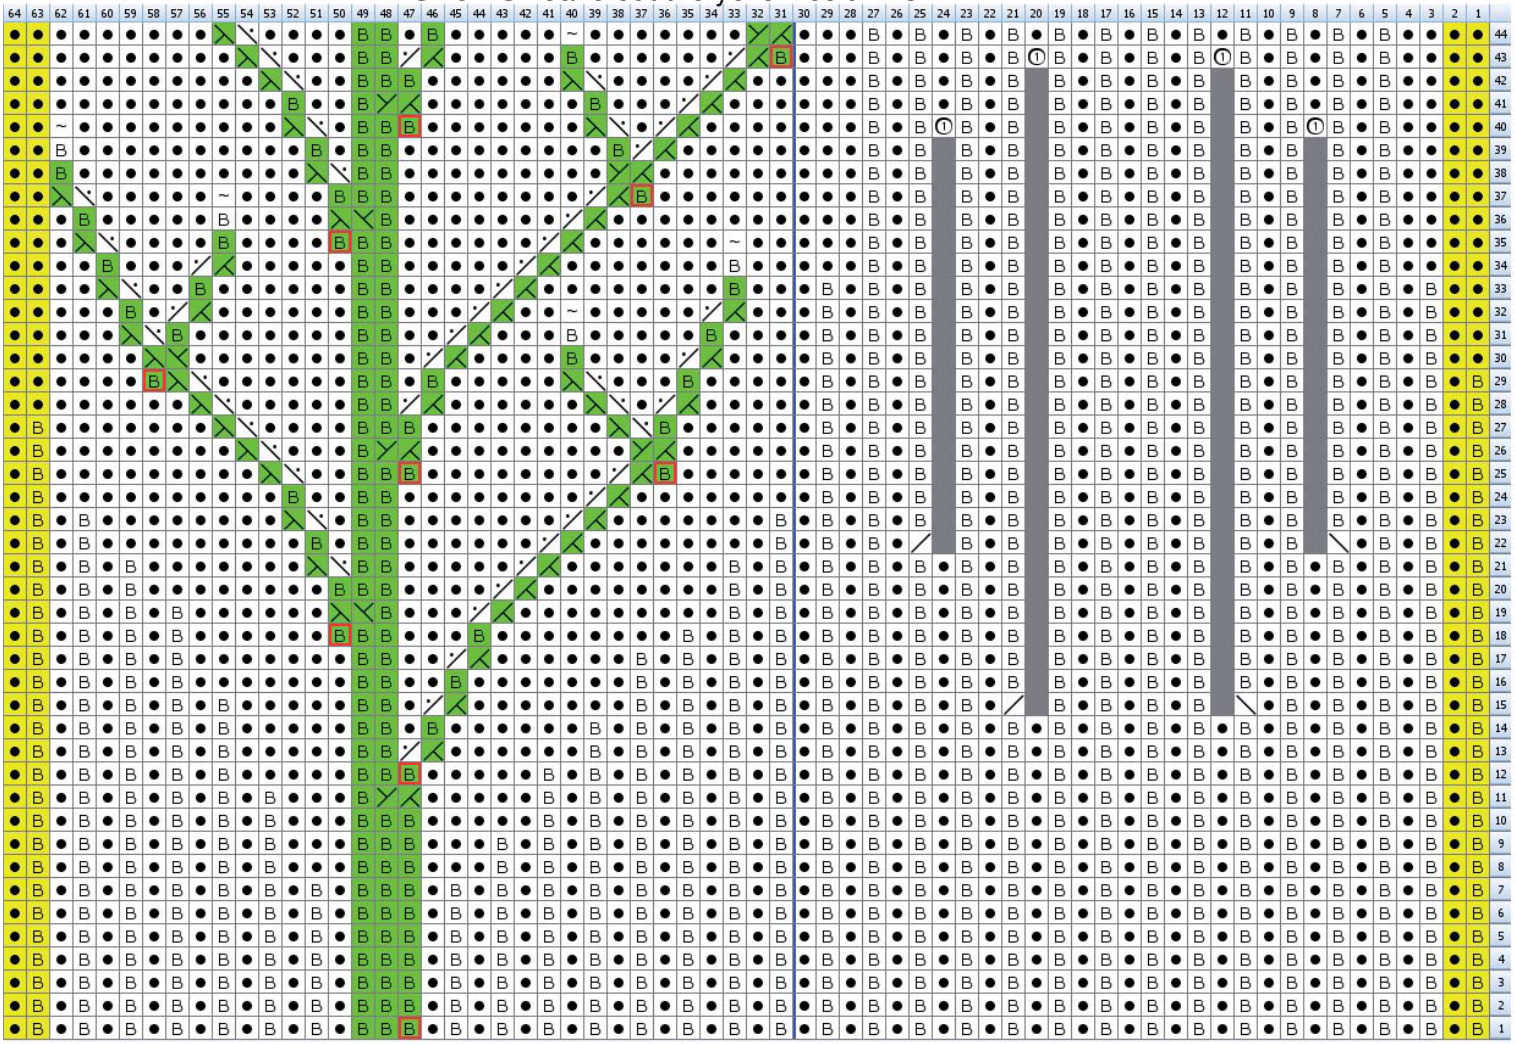
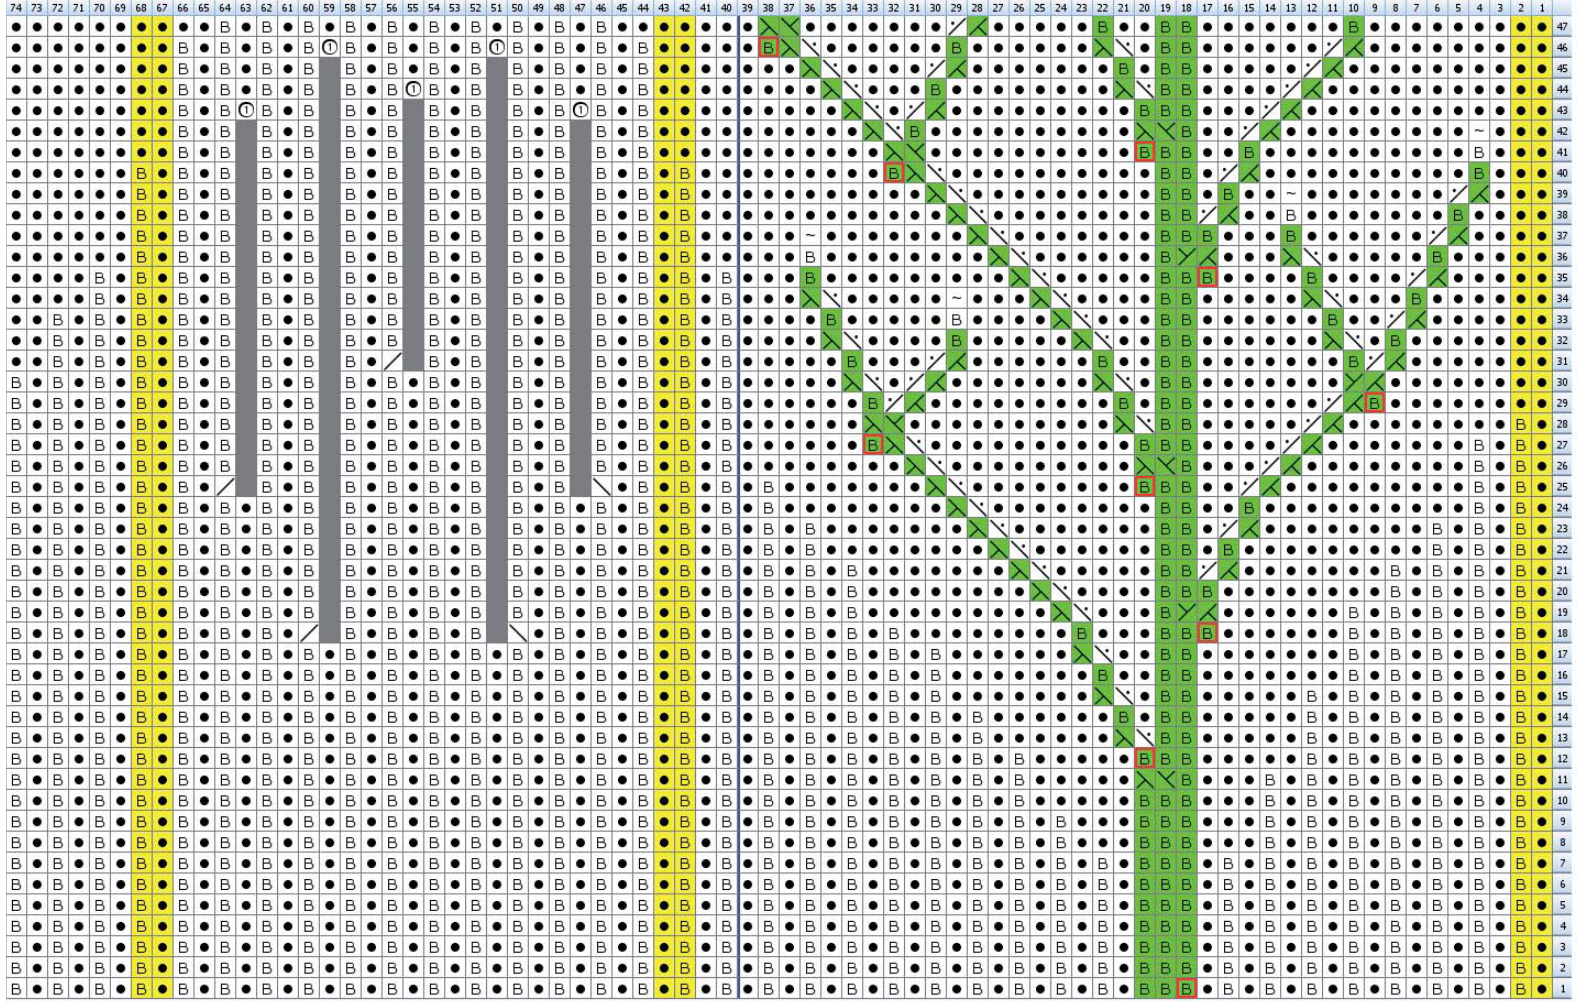
LG - Sizes M and L
Size M: leave out the yellow columns!