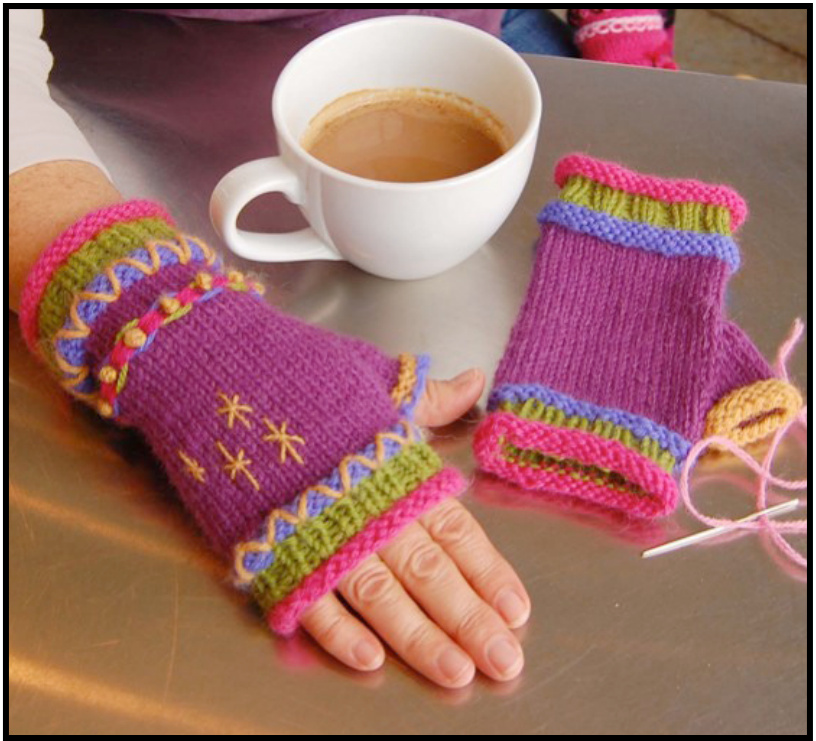
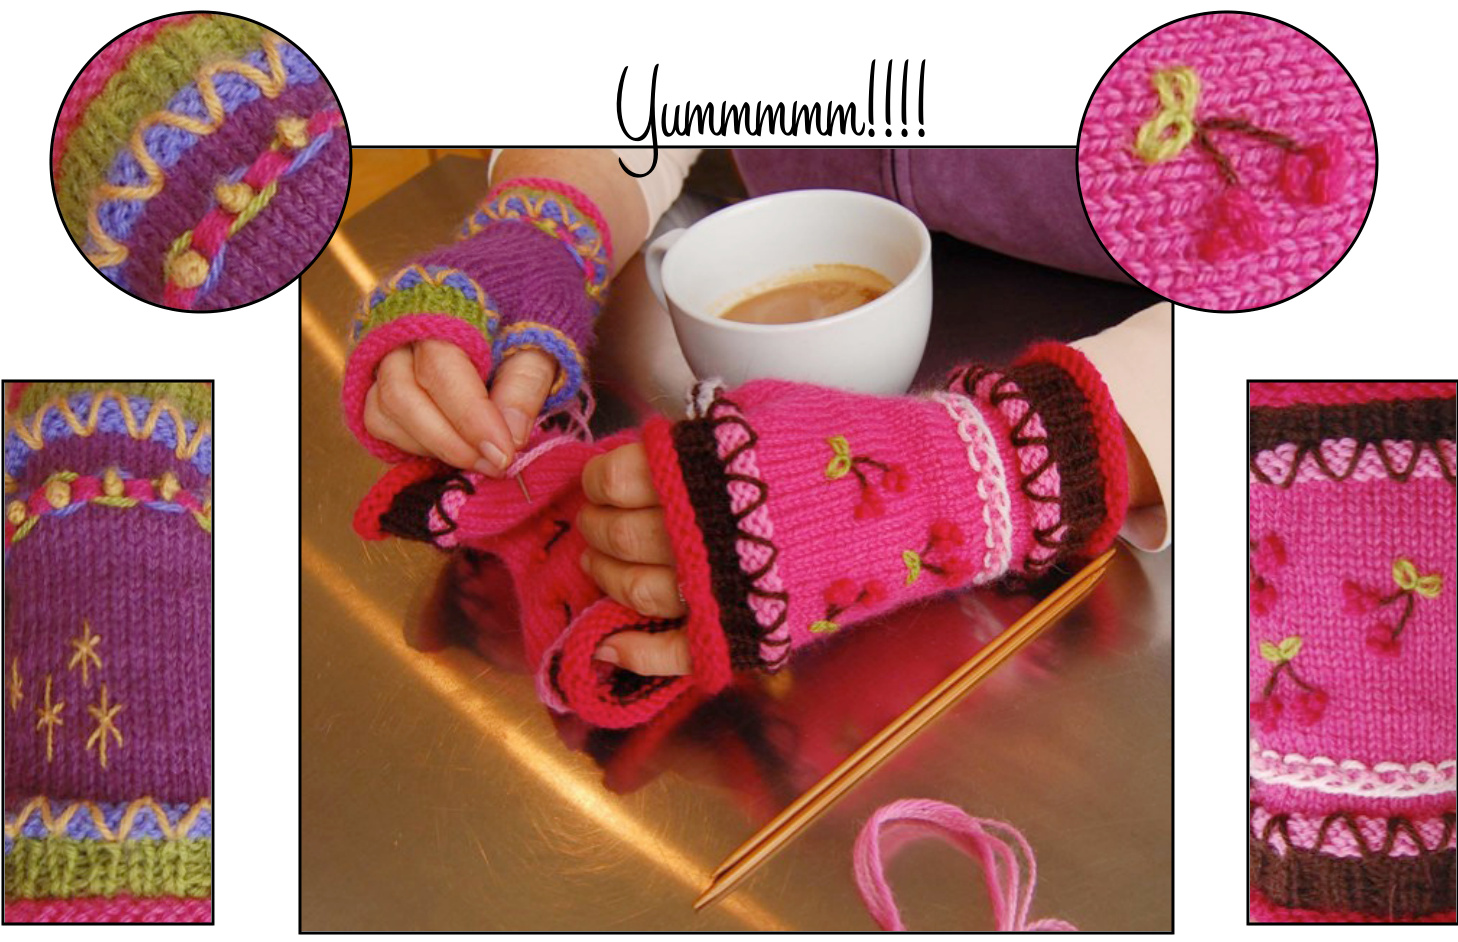
Yummy little project for the creative use of all your scrap yarn! This adult size version of the "cupcake" mitts are a treat to knit! Learn delicious techniques like knitting in the round on double pointed needles, making lovely thumb gussets with lifted increases and decorating with "icing" embroidery! Tasty technique tutorials included!

Finished Size
7" circumference (measure around palm of hand) to fit women's size Large $7.5^{\circ}$ hand, $7.25^{\circ}$ length Measure circumference of hand around the knuckles. DK weight wool or wool blend in similar gauge. Main Color (A): 66 yards; $60\;\mathrm{mm}$ Ribbing Color (B): 25 yards; $23\;\mathsf{m m}$ Rolled Edges & Welt Color(s) (C): 20 yards; $18\,\mathsf{m m}$ Embroidery Yarn: 10 - 20 yards; $10-20\ \mathrm{mm}$ (Get funky! You may want to use more than one color for your rolled edges, welts and for embroidering).
Needles and Notions
1 set US 5 (3.75mm) double pointed needles or size to obtain gauge. Ring markers, tapestry needle, strands of yarn for embroidery Skill Intermediate Gauge 5.5 stitches per inch. 7 rows per inch.
Pattern Techniques:
2 x 2 Ribbing: $^{\star}\mathsf{k}2$ , p2, rep from \* to end of round 1x1 Ribbing: $\ \star|\mathsf{k}|$ , p1, rep from \* to end of round M1 $\equiv$ Make One: Locate the running thread that connects the stitch just worked and the stitch to be worked on the left needle. Insert the left needle from front to back under the running thread. Knit into the back of the stitch to twist it closed. LLinc $\equiv$ Left Lifted Increase: Use right hand needle to lift the left side of the stitch that is two rows below the stitch on the right hand needle. Place on left needle, inserting tip from back to front. Knit this stitch through front loop to close hole. RLinc $\equiv$ Right Lifted Increase: We will be lifting the stitch in the row below the stitch on the left hand needle. Use right hand needle to lift right side of this stitch and place it on the left hand needle, inserting tip of Ihn from front to back. Knit through the back loop to close the hole.
Pattern: These mitts are knit from the bottom up, on double pointed needles (see tutorial on following page.)
Rolled edge: Using Color C, CO 40 sts Join (see trading places join at right) and knit 5 rounds of st st 2x2 Ribbing: Using Color B, knit 1 round. Work 6 rounds 2 x 2 ribbing Welt: Using Color C, , Knit one decrease round as follows: K2, k2tog, K18, K2tog, K16 - 38 sts rem, then purl 3 rounds. Main Body of Glove: Using Color A, Knit one decrease round as follows: (k17, k2tog) 2 times - 36 sts rem Then knit 9 - 12 rounds (depending on length of cuff desired) before thumb gusset shaping begins.
Next round begin Thumb Gusset increases:
Rnd 1: Knit 18,place marker (pm), m1, pm, Knit 18 - 1 gusset stbetween markers Rnd 2: Knit even Rnd 3: K18, slip marker, LLinc, knit to next marker, RLinc, slip marker, K18 - 3 gusset stitches between markers Rnds 4 - 13: Repeat Rnds 2 & 3 five MORE times, until there are 13 stitches between markers Rnd 14: Knit 18, slip 13 thumb gusset stitches onto waste yarn holder, “e”" loop cast on 2 stitches, join and work to end of round - 38 stitches on needle, 13 stitches on holder
Fingerless Section of Glove:
Rnds 15 & 16: Knit two rounds even, then work decrease rounds as follows: Rnd 17: k18, sl1-k1-psso, knit to end of round - 37 sts rem Rnd 18: k18, sl1-k1-psso, knit to end of round - 36 sts rem Rnds 19-21: Knit 3 rounds even in Color A Welt: Using Color C, Knit one decrease round as follows: K16, k2tog, k16, k2tog - 34 sts rem. Then purl 3 rounds Ribbed Section: Using Color B, Knit one decrease round as follows: K15, k2tog, k15, k2tog - 32 sts rem Then knit 5 rounds of 1x1 ribbing: $\star_{\mathsf{\Gamma}\mathsf{k}\top}$ , $\mathsf{p}1^{\star}$ , rep \* to \* to end of round Rolled Edge: Using Color C, Knit 4 rounds. Bind off, weave in ends. Thumb: Place 13 sts from holder on dpns and distribute as evenly as possible. Join Color A by picking up one stitch through the “e”" loop cast on edge, and then another stitch in the side of the glove. (Leave a long enough tail to weave in and close gaps during finishing). Knit across 13 stitches then pick up one stitch in the other side of mitt. Total of 3 stitches picked up - 16 stitches on needles. (Redistribute if necessary). Knit 3 rounds, Change to Color C, knit 1 round and purl 3 rounds. Bind off. Weave in all ends.
Time tobrost' your cupeae...yum!
Working On Double Pointed Needles
CAST ON all stitches ont( one needle, then divide stitches as evenly as possible over 3 needles. Be sure the stitches are not twisted by laying the needles flat in a triangular shape and arranging the stitches so the bottom of the cast on row is facing inwards (toward the center
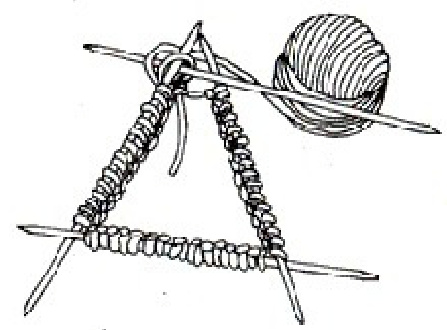
formed by the needles). The needle with the last stitch cast on will be on the right hand side. The working yarn should be coming out of the last stitch cast onto this right hand needle. JOIN and begin to knit by using the remaining empty needle (the working needle). After you have completed the Trading Places Join, you will be inserting the working needle into the first stitch on your left hand needle. TRADING PLACES JOIN: This join has the first and last stitch of your cast on trade places. This method of joining eliminates the loose loopy strand that occurs in standard “knit the first stitch" joins. Pull the last stitch that you cast on (see right hand needle) up and over the first stitch (leapfrog) KEEPING IT ON the left hand needle. Do not drop this stitch as you would in a bind off. This stitch is now your beginning of round stitch. Place marker and proceed with knitting the first round in pattern. THE DREADED LADDER: Looseness at the point where you change from one needle to the next can lead to a ladder forming from the yarn being stretched in the space between two distorted stitches. Fortunately, there are several ways to avoid them. The best way: Make it a habit to tighten things up when moving from one needle to the next by giving the yarn a tug after working the first and second stitches. Using a set of 5 needles rather than 4 will divide tension more evenly, keeping strain off of the stitches themselves. If you're still having trouble, knitting a couple of stitches forward from the next needle onto the one you've just finished with will shift the point of tension, thus helping to keep a vertical line from forming. Inserting the working needle under the previous needle will help you make a tighter stitch than if you come at it from above.
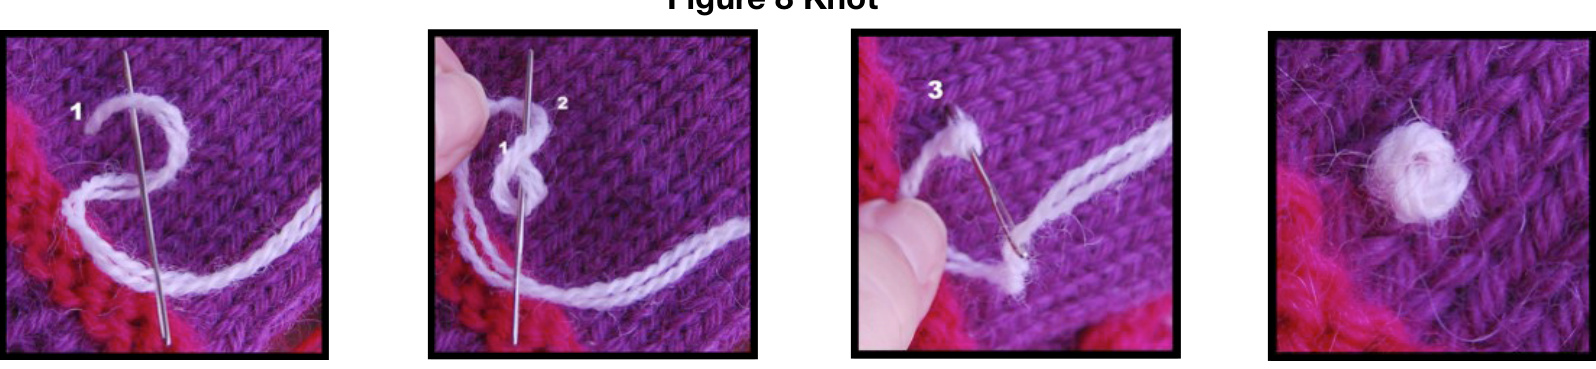
Deotn ofeng UThdWSf!
1) Bring threaded needle up through work from back to front at point 1. 2) Reinsert needle at same place that the needle emerged and 3) Come back out at front of work at a point that makes your loop the size you desire. 4) After forming the loop, snug up the loop gently against the working thread and tack down the loop by reinserting needle where thread emerged at point 3. 5) Bring needle from back to front at the same point that thread emerged at point 1. 6) Create new loops by inserting again in original point. 7) Tack down each loop in same manner with a short leg. 8) You may also start a new loop at any place on your work or weave thread through the tack down leg (3&4) and make a double loop.
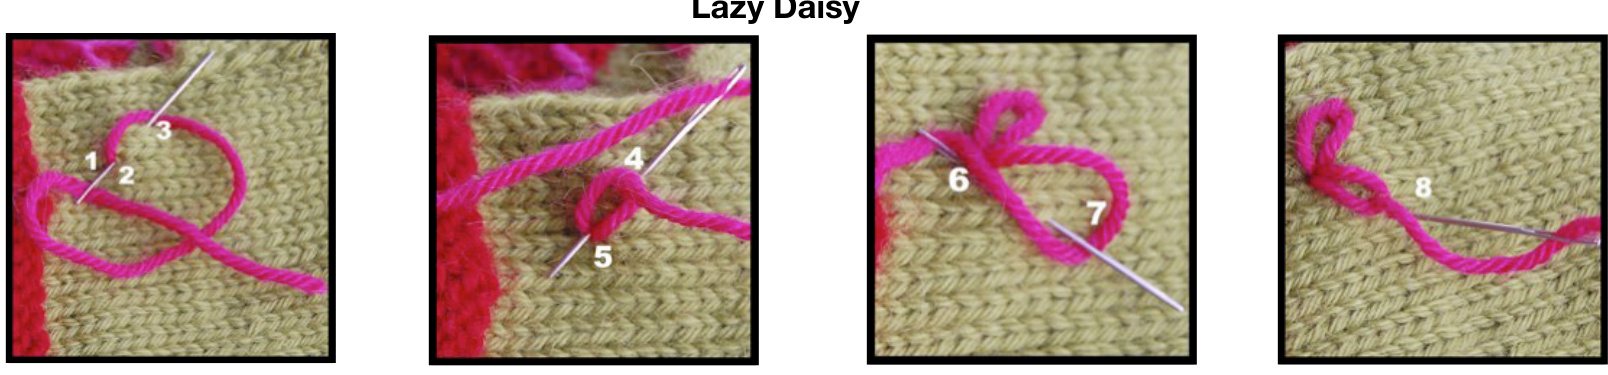
Embroidered Frosting
1)Bring threaded needeupthroughwork frombackto front at point 1. 2Insert needle from front toback at \*2"3Bring tiof needle out at $^{\ast}3^{\ast}$ which is halfway between point 1 and point 2. Be sure needle is over the top of the loop of yarn before pulling needle and yarn through. 4) Bring yan over the loop of \*frosting" and secure loop by reinserting needle in same place as it emerged at ${}^{\prime6}3{}^{\prime\prime}$ . 5) Bring tip of needle out at point $^{\ast}5^{\ast}$ and snug loop against work.
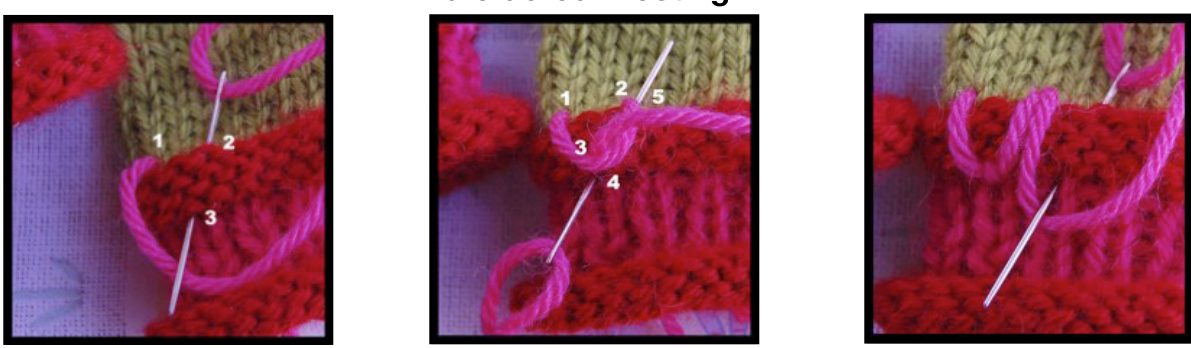
Slightly larger than a French Knot with a slight dimple in the center
1) Bring threaded needle up through work from back to front. 2) Wrap the thread around the tip if the needle in a "figure 8". 3). Keep the thread snug around the barrel of the needle as you complete the stitch by inserting the tip of the needle a few threads away from the point from which the needle originally emerged. 4) Pull thread through and secure at back of fabric.
Satin Stitch

Comprised of a group of Straight stitches stitched very closelytogether. Maybe stitched vertical, horizontallyordiagonally Keep stitches smooth and untwisted with uniform tension.
Butterfly Stitch
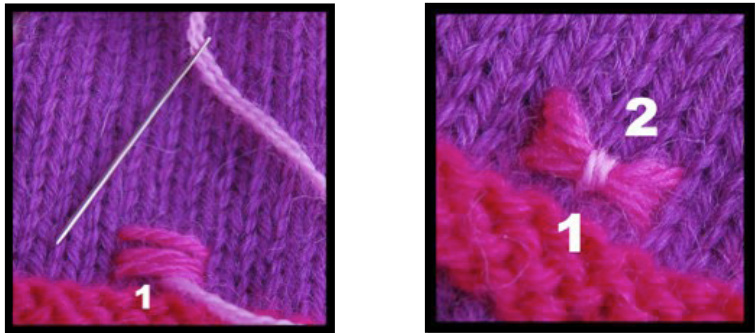
This is a composite stitch using a Satin Stitch and a contrasting color tack-down stitch.
fotn Yyou..
Abbreviations
beg - beginning BO - bind off CC - contrast color (background color) CO- cast on dec - decrease dpn - double pointed needle(s) Inc - increase k2tog - knit 2 stitches together (a right-slanting decrease) k or K - knit LH - left hand M1 - increase one stitch per pat tern instructions MC - main color (pattern color) ndl - needle p or P- purl patt - pattern pm - place marker rem - remain, remaining rep - repeat RH - right hand rnd - round RS - right side sl - slip sl1-k1-psso: slip 1 stitch knitwise, knit next stitch, pass sliped stitch over the knit stitch ssk - slip, slip, knit -(a left slanting decrease) st st - stockinette stitch st(s) - stitch(es) WS - wrong side yo - yarn over [] repeat instructions within brackets number of times stated () repeat instructions inside pa rentheses number of times stated Websites to Browse: STITCH with the Embroiderers' Guild http://www.embroiderersguild.com/stitch/stitches/index.html Step by Step Decorative Embroidery Stitches online http://www.craftown.com/instruction/embroidery.htm http://www.knittinghelp.com/videos/advanced-techniques Helpful Books: Encyclopedia of Needlework by Donna Kooler Readers Digest Complete Guide to Needlework

$\odot2008$ , Karen Neal a.k.a. Karendipity: the Serendipitous Designer. You are supporting the efforts of a fellow knitter by respecting copyrights. Thank you! See more designs at www.karendipity.etsy.com The fine print: When you purchase a patter from Karendipity i isfor personal use only You may reproduce the actual pattern by printin i fr your wn records, make a backup of the fle, or copy it ontomultipe computers in your house/worklace for your personal use. Also, any garments that you may create after following the pattern may be offered for sale without the need to seek permission from the copyright holder. You may not reproduce the pattern (the text & images) for use by others, offer it for sale or free download, or copy/send it to your friends. In addition, you cannot use the patterns or instructions to teach a class or workshop, unless prior permisson has been obtained from Karen Neal karendipitydoo@gmail.com


