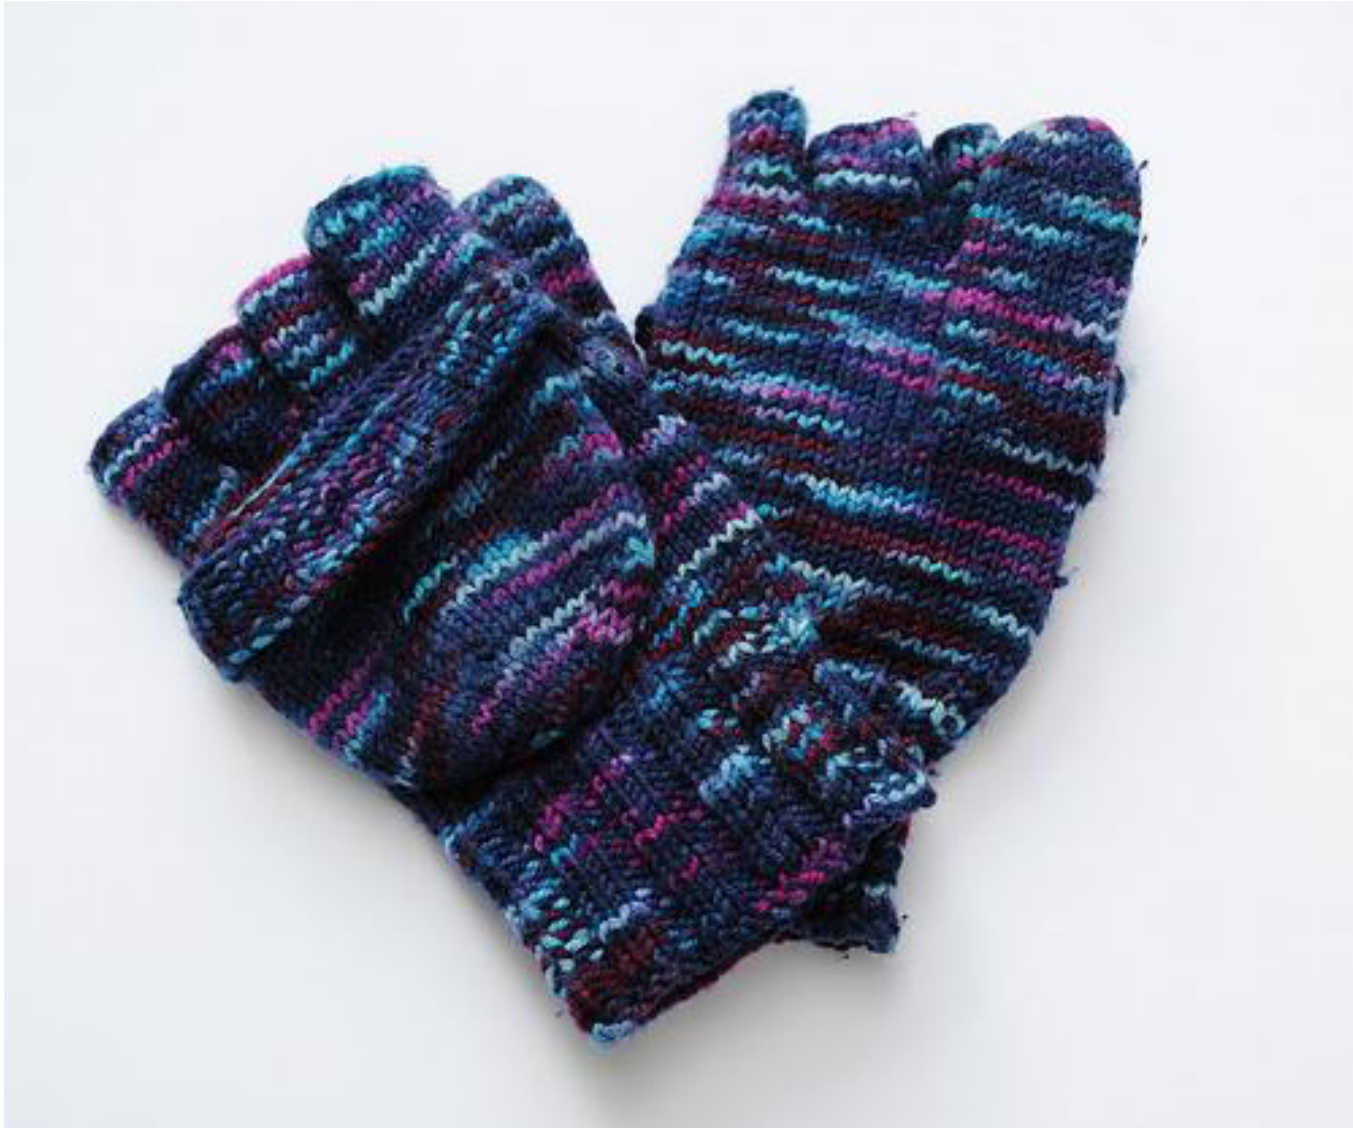
FlipFlop
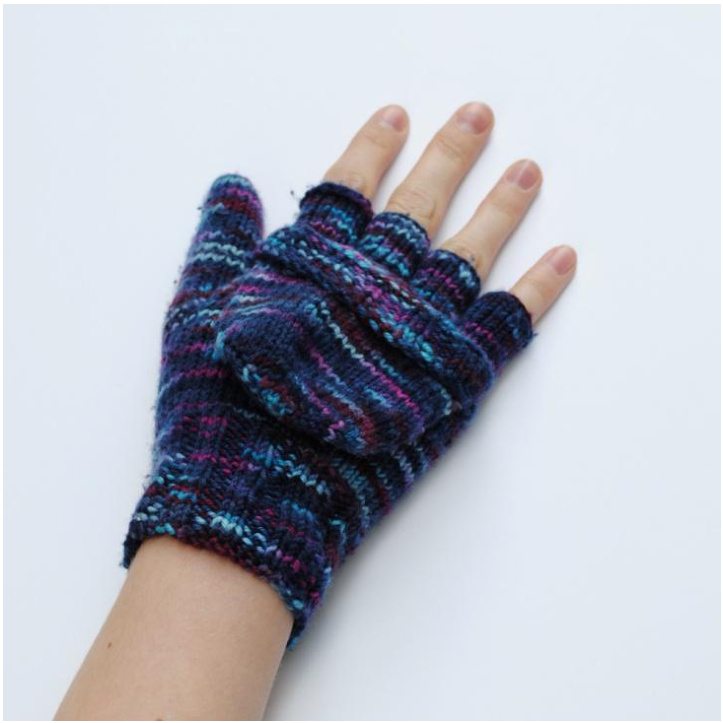
Mittens
What Do I Need?
5 double pointed needles size 4mm 2x 50g balls of DK yarn. (250 yards) Small amount of waste yarn Embroidery needle 2x 1/4" buttons Gauge: 24 st / 40 rows = 4 inches
How Do I Do It?
Flap CO 6, arrange across 4 needles with 2 stitches on needles 1 & 3, 1 stitch on needles 2 & 4 1" row - Kfb in each stitch. 12 Stitches 2" row - Kfb. Knit to last stitch on needle 2. Kfb. (first stitch of needle 3) Kfb. Knit to last stitch on needle 4. Kfb. 16 stitches. Repeat row 2 for 6 rows (40 stitches) Next row - Kfb. Knit to the end of needle 2. (First stitch of needle 3) Kfb. Knit to the end of needle 4. (42 stitches) Knit 26 rows Now take the first 21 stitches and put them onto one needle, Place the remaining 21 stitches onto waste yarn. Knit back and forth in the following pattern for 6 rows. Row 1, 3, 5 (RS) - (K2, P2) x2, K2, P1, K2, (P2, K2) x2 Row 2, 4, 6 (WS) - (P2, K2) x2, P2, K1, P2, (K2, P2) x2 BO all stitches.
Fingers
Thumb (Make 2) CO 4. Arrange across 3 needles - 1 stitch on needles 1 and 2, 2stitches on needle 3. This way you can always tell when you've finished the round as the last needle has twice as many stitches as the other two. Join to knit in the round. 1" row - Kfb in each stitch. 8 stitches 2" row - Kfb in each stitch.16 Stitches Knit for 25 rows. Put all stitches on to waste yarn. Break working yarn.
Little finger (Make 2)
CO 12 stitches. Arrange across 3 needles. Join to knit in the round. Knit across all stitches for 10 rows. Put all stitches on to waste yarn. Break working yarn Middle/Ring finger (Make 4) CO 14 stitches. Arrange across 3 needles. Join to knit in the round. Knit across all stitches for 10 rows. Put all stitches on to waste yarn. Break working yarn Index finger Obviously you need to make 2 of these (!) so you can either make them at the same time with two different balls of yarn, or make the second index finger when you've finished the first glove. CO 14 stitches. Arrange across 3 needles. Join to knit in the round. Knit across all stitches for 10 rows. Arrange stitches across 2 needles - 7 stitches on each one. Do not break working yarn.
Joining fingers
Arrange the middle finger stitches behind the index finger stitches on the needles. Do the same thing with the stitches of the ring and litle finger. Using 5" needle knit first 5 stitches of index finger. Ssk. Knit first 2 stitches of middle finger together, K3, Ssk. Knit first 2 stitches of ring finger together, K3, Ssk. Knit first 2 stitches of little finger together, K4. K4, Ssk. Knit first 2 stitches of ring finger together, K3, Ssk. Knit first 2 stitches of middle finger together, K3, Ssk. Knit first 2 stitches of index finger together, K5. You now have 42 stitches arranged over 4 needles. Mark the beginning of the round and knit 3 rows. Joining Row for Mitten Flap. Left hand only - knit 21 stitches. Keep those 21 stitches on 2 needles or place onto waste yarn. The next 21 stitches are the ones you will attach the flap to, place these onto 1 needle. Right hand only - Place the 1" 21 stitches onto one needle. (You can keep the other half of the stitches on 2 needles, or if that's too fiddly place them onto waste yarn.) Place the live stitches of the mitten flap onto another needle. Now hold the flap with the flap facing down and the ribbed section facing away from you. Take the glove section and place it behind the flap, against the ribbing. For the right glove you want the index finger on the right as you look at it, and for the left glove you want the index finger on the left. Now, taking another needle, insert it into the first stitch on the front needle, then the first stitch on the back needle. Knit the stitches together. Repeat across the remaining stitches. You should now have 21 stitches and the flap and glove joined together. Right hand only - If you have placed the other stitches of the glove onto waste yarn, put those stitches back onto the needles now. knit across these 21 stitches. You are now back the beginning of the row. You can leave the stitches where they are on the needles or rearrange them to suit Left hand only - you are already back to the beginning. All you need to do is arrange the stitches across the needles to suit. Knit 13 rows Join Thumb Right hand: knit to the last 8 stitches of the row. Graft these onto the first 8 stitches of the thumb using Kitchener stitch. Left hand - using Kitchener stitch graft the first 8 stitches of the next row onto the first 8 stitches on the thumb. Knit the rest of the row. Next row: slide the remaining 8 stitches of the thumb onto the nearest needle and knit these along with the rest of the row. Knit 20 rows Work a K2, P2 rib for 20 rows (Or 40 if you want to fold the cuffs Over.) BO using a sewn bind of. Great instructions for Kitchener stitch can be found on http://www.knittinghelp.com/videos/knitting-tips Finishing Weave in ends - use ends to close gaps between fingers. Sew buttons on backs of hands in middle, just above the ribbing. Take the end inside the top of the mitten flap, thread it onto an embroidery needle and make a loop for the button, fasten it with a knot inside the flap. Fold the mitten flap down and fasten the button. Sew the edges of the ribbing on the mitten flap on to the glove.