Crafts for The Knittn' Kitten
A community project in support of local crafty retail
Table of Contents:
Introduction. Bib-Style Statement Necklace, by Heather Mann www.dollarstorecrafts.com Crocheted Ribbon & Bead Necklace, by Heather Mann www.dollarstorecrafts.com Knit & Stitch Zipper Pouch, by Lee Meredith www.leethal.net Seed Bead Hairpins, by Teresa Sullian wwwteresasullivanstudio.com Dress Up a Dish Towel, by Diane Gilland www.craftypod.com Felt Halloween Bag, by Joey Groendes www.addiepearl.com .11 Cupcake Applique,by Christine Blystone wwwflappergirl.org ..13 Jersey Doily Scarf, by Bridget Benton wwweyesaflame.blogspot.com Fabric & Button Pincushion, by Susan Beal www.westcoastcrafty.com 19 Meet Our Contributors . 21
Special thanks...
... to Diana Schreiber, who generously designed the cute Knittn' Kitten graphic. .. to Le Meredith, who took althe gorgeous photos of Knittn Kitten craft supplies. ... to Ethel and Rome and The Knittn? Kitten, for fueling our crafty pursuits.
Introduction
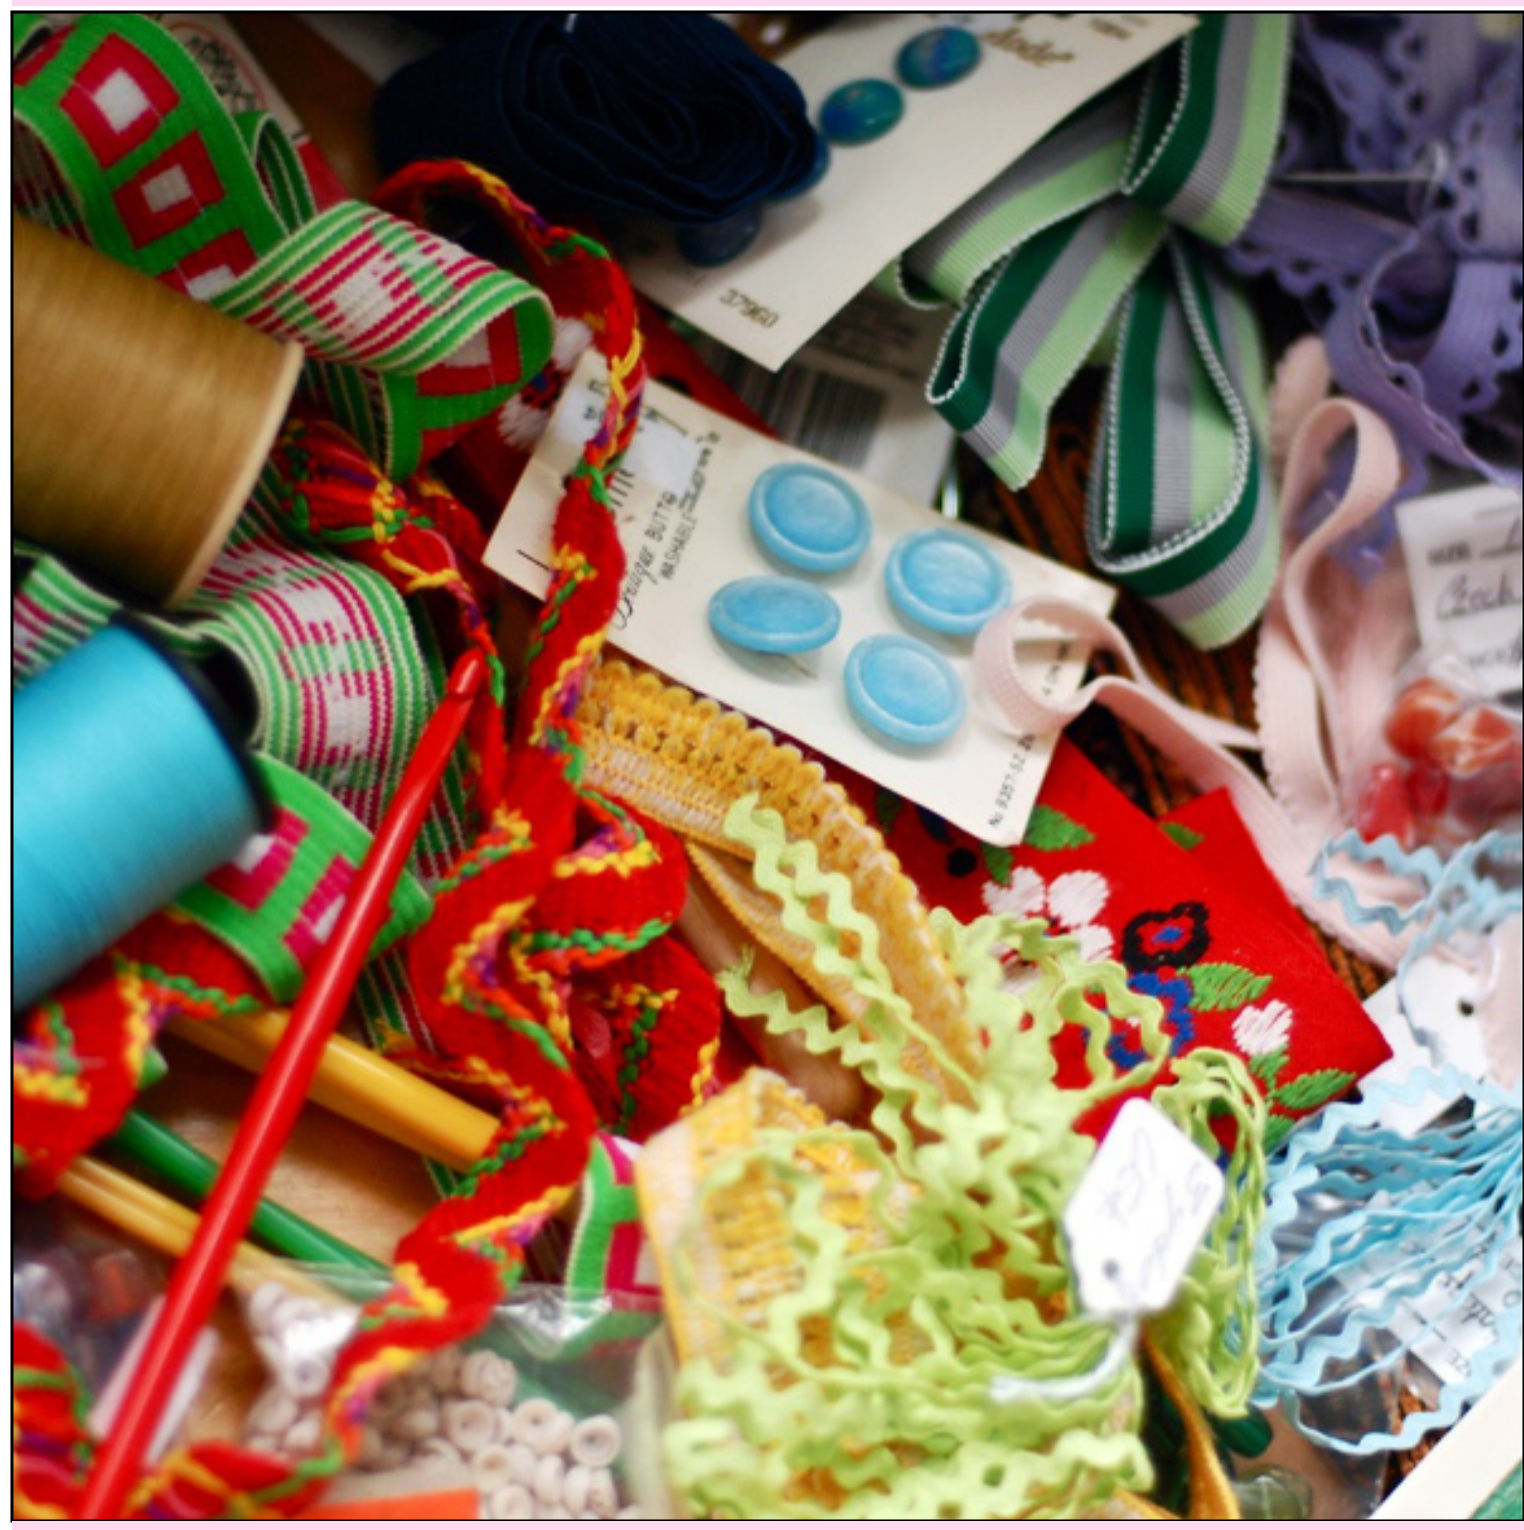
In Portland, Oregon, where we all live, there's a tiny shop called The Knittn' Kitten. It's a craft-supply thrift store, filled with vintage fabrics, sewing notions, yarns, beads, buttons, patterns, and lots of other treasures. It's owned by a mother and daughter team, who visit estate sales, take donations from local crafters, and Occasionally travel overseas to find wonderful crafty things. "The Kitte" (as its affectioatelycalled around here) has become avital part of the Porland craft sene. Crafters from all over town visit the shop to find treasures for their handmade projcts. And quite a fw local artisans rely on the shop's low prices to keep their small businesses profitable. But, as much as we allove The Knittn' Kitten, economic forces have us shopping less in general ltely. And so, in early Fall 2009, we learned that our beloved Kitten was in some danger of closing for good. A group of us got together to see what we might do to help. Christine Blystone came up with a great idea: what if we each donatd a projct sheet to the stor?Then peple could stop in, pick up the free project, and get all the materials they'd need to make it. We tok turns, offering up a new projct ach week and spreading the word on our blogs It helped - it got people into the shop, and got them buying some things. .And since our blogs are read by people who live far from Portland, and can't get to The Knittn Kitten, we thought we'd also share our project sheets in this ebook - it's our gift to you. All we ask in return is that you support your favorite local independent craft stores. They need you. You can visit The Knittn? Kitten online at www.knittnkitten.com . If you're in Portland, stop by at 7530 NE Glisan, Tuesday - Saturday, 10-6.

Supplies Needed:
·Sequined appliques · Cord or ribbon ·Hot glue gun · Needle and thread (optional)
Bib-StyleStatement Necklace
by Heather Mann The “Statement Necklace” is a key fashion accessory this season. Make your own bib-style necklace inspired by trendy boutiques, for a fraction of the price you would pay in stores.
# How to Make:
Step 1: Arrange the sequined appliques as desired and hot glue them together. Step 2: Cut the cord or ribbon to your desired length. Step 3: Tie sliding knots in the ends of the cord, or if you're using ribbon, leave the ends loose for tying around your neck. Step 4: Glue the cord/ribbon to the appliques. Step 5 (optional): If you like, you can secure the ribbon to the appliques with a needle and thread, sewing around the glue (it's too hard to sew through!) Wear and enjoy your necklace! It's a great way to dress up a plain t-shirt or top.


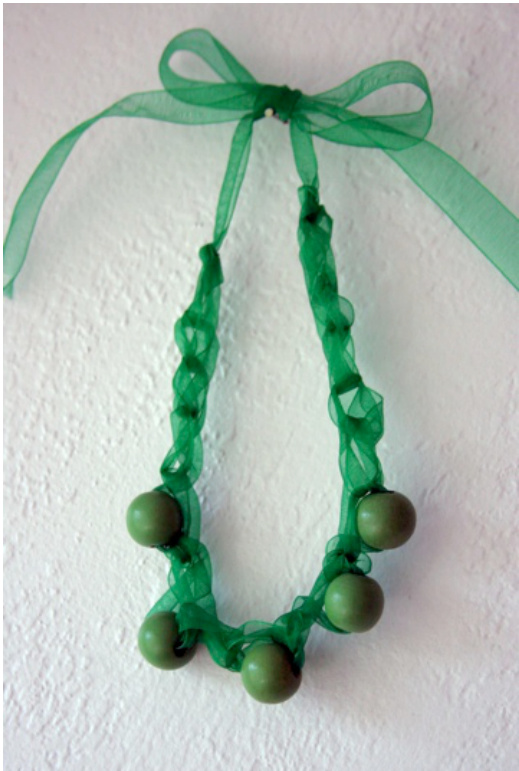
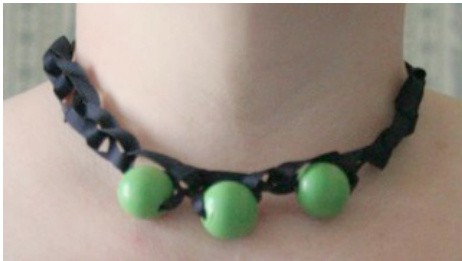
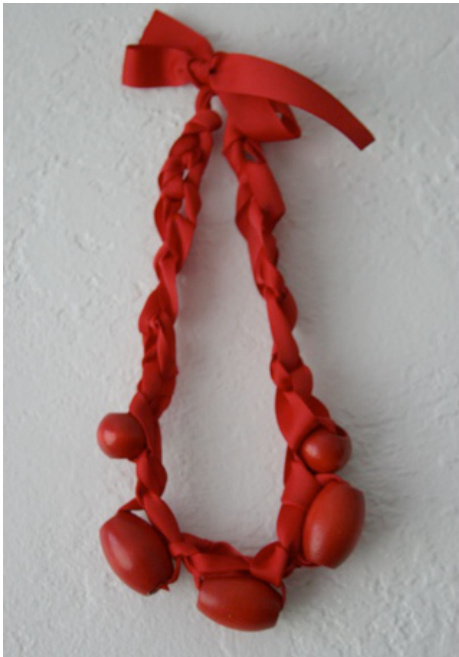
Crocheted Ribbon & Bead Necklace
by Heather Mann Choose from Knittn' Kitten's selection of wooden beads and crochet up this quick and easy necklace with your LlUItL Ul lIuvUs. valy tiil ribbon, beads, and length for a variety of looks. A great holiday gift idea!

# Supplies Needed:
Wooden beads · Ribbon · Crochet hook ·Needle and thread (optional) · Scissors
To Make a Choker:
Step 1: Leaving the ribbon attached to its spool, string 5 beads onto the ribbon. Step 2: Leave a $12^{\circ}$ tail of ribbon, and then chain 6 stitches. Step 3: Slide one bead along the ribbon until it's at the edge of crochet hook, and chain one stitch around the bead. Repeat this step for the remaining beads. Step 4: Chain 6 more stitches and fasten off. Leave another $12^{\circ}$ tail at this end of the strand. Step 5: Try the necklace on to make sure it is your desired length, and the beads are placed where you want them. (The ends of the ribbon tie in a bow at the back of your neck.) Undo the chain stitches and adjust if desired. Step 6: Use a match to gently melt the edges of the ribbon so they won't fray.
To Make Longer Necklace:
Adjust the number of chain stitches and beads as desired.
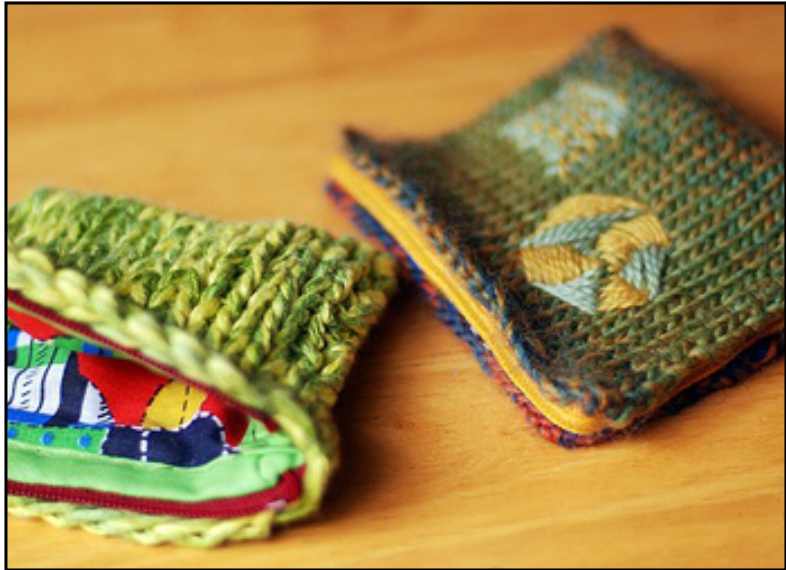
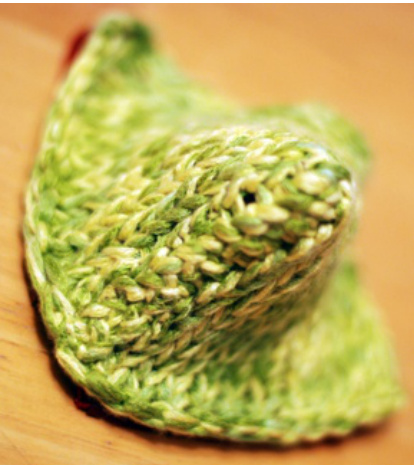
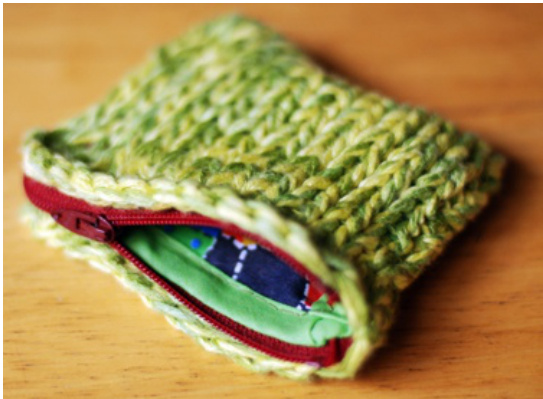
Lined Zippered Knit Coin Pouch
by Lee Meredith Combine a little knitting and a little sewing to make this adorable and useful carry-all. You can embellish your pouch with embroidery, buttons, or anything else you like.
# Supplies Needed:
· 10-30 yards yarn, depending on gauge · Knitting needles for your choice of yarn · Emboidery floss or other embellishments · 7" zipper · Bias tape · Scissors · Sewing needle and thread · 4" x 7"' piece of fabric
How To Make:
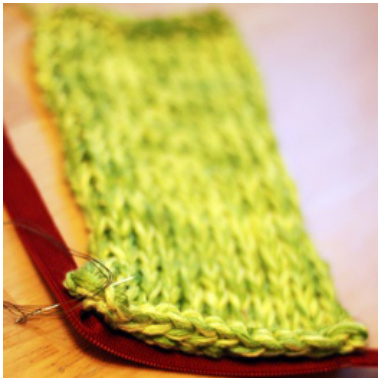
Step 1: Knit a piece that measures about 4 inches wide by 7 inches long; the cast-on number will depend on your yarn/needles/ gauge. ·Using worsted weight yarn JL Vega self-striping wool), for a gauge of about $5\,\,1\,/2$ stitches per inch, I cast on 25 stitches. · Using 4 strands of bamboo JL Bamboo Spica) held together, for a gauge of about 3 stitches per inch, I cast on 12 stitches. Work in stockinee stitch (kit every stith of the right side, purl every stith of thewong sideutil the pce measures about 7 inches, then bind off. Step 2: You won't be sewing the fabric on yet, but it'll be easiest to cut it to the right size now, before the zipper causes the knitted piece to fold up. Cut the lining fabric just a little smaller than the knit piece (about a quarter inch shorter on each side) so it'll cover the whole inside.

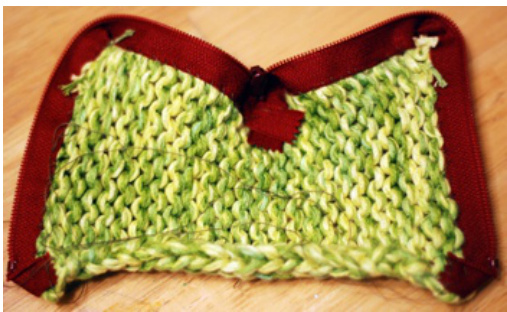
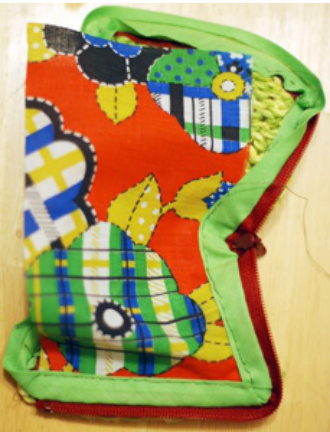
Step 3: Fold your knitted piece in half - the folded end is the bottom of the pouch. Sew the zipper to the knit piece so that it zips across the top, around one corner, and down one side. Make sure you fit the bottom around the zipper as you can see pictured.
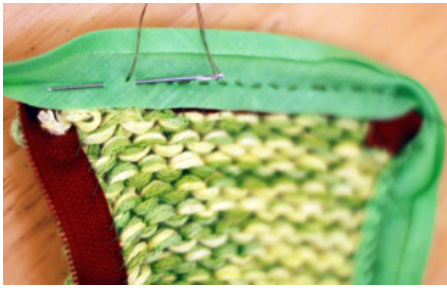
Step 4: Open one crease of the bias tape, and line up the open edge with the bottom of the zipper. Stitch along the crease, using a backstitch. For the side with no zipper, stitch however will work best with your knit fabric - I used a diagonal kind of stitch to get a good grip on the bulky bamboo.
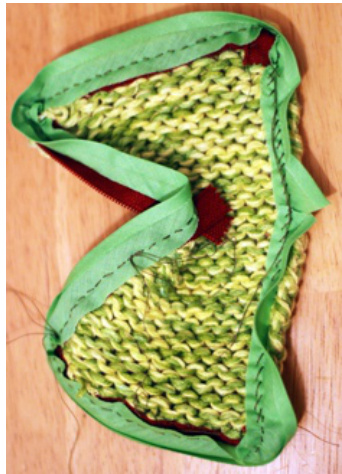
Step 5: Turn down the bias tape over the fabric, and sew a backstitch through the tape edge and the fabric. Fold the corners in neatly, first pulling down the center, then creasing the sides in.
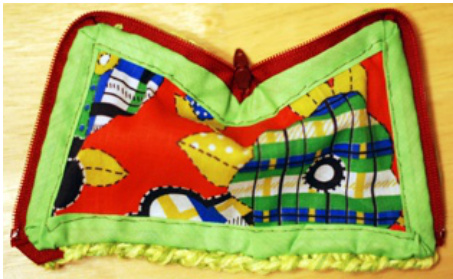
Step 6: Use yarn and your yarn needle to sew up the knit edge, using whichever stitch you like. I like to start at the bottom, seam up to the top, then sew back down to the bottom, tying the two ends together, which makes a secure seam and prevents a knot at the top where it's noticeable. Step 7: Use wool or embroidery floss to stitch on a design, or sew on buttons or beads, or anything else you want to use to decorate your new coin purse!
Beaded Wire Flower Hairpins
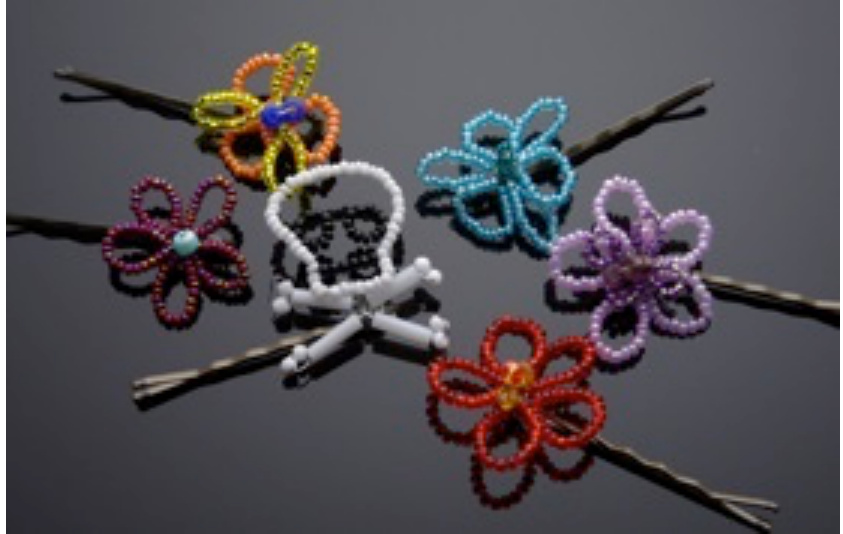
by Teresa Sullivan Adorn your hair with these cute little accents. They whip up quickly, and making them is very addictive!
8
Supplies Needed:
· 28 gauge craft wire · Wire cutters · Standard bobby pins · Several size $6/0$ seed beads or other larger bead, per flower ·Size $11/0$ seed beads in lots of colors
How To Make:
Step 1: On a $12^{\circ}$ piece of wire,thread 20 of the tiny beads and slide them to the center of the wire. Step2: Keing thebeas in place, carefullybend the wire othat thebeaed section fors a loop, with thebeads fitting snugly. Twist this loop a couple of times to hold the beads in place. Step 3: Thread 20 more seed beads onto the wire,then bend another loop and twist a couple of times. Step 4: Repeat this until you have 5 or 6 petals, making each new petal on eithr side of the frst petal. Step 5: Thread one or more $6/0$ seed beads onto one of the remaining ends of wire. Step 6: Slide this bead up the wire until i's resting against your flower. Bend the petals around this center bead until they form an even ring around it. Then take the remaining wire that's sticking out of the center bead and wrap it across the flower and between two petals, then behind the flower, to secure it. Match it up with the other loose end of the wire and twist them together twice. Step 7: Wrap the two ends of the wire around the “elbow' of the bobby pin several times to secure it and trim off the excess. (Some variations on the next page!)
Fun Variations on the Beaded Wire Flower Hairpin:
· Poinsettia or flowers with leaves: Pinch each petal at the tip to form a point (at the 10-bead mark). · Butterflies: Make four “petals",two big and two small and arrange them in a butterfly shape.
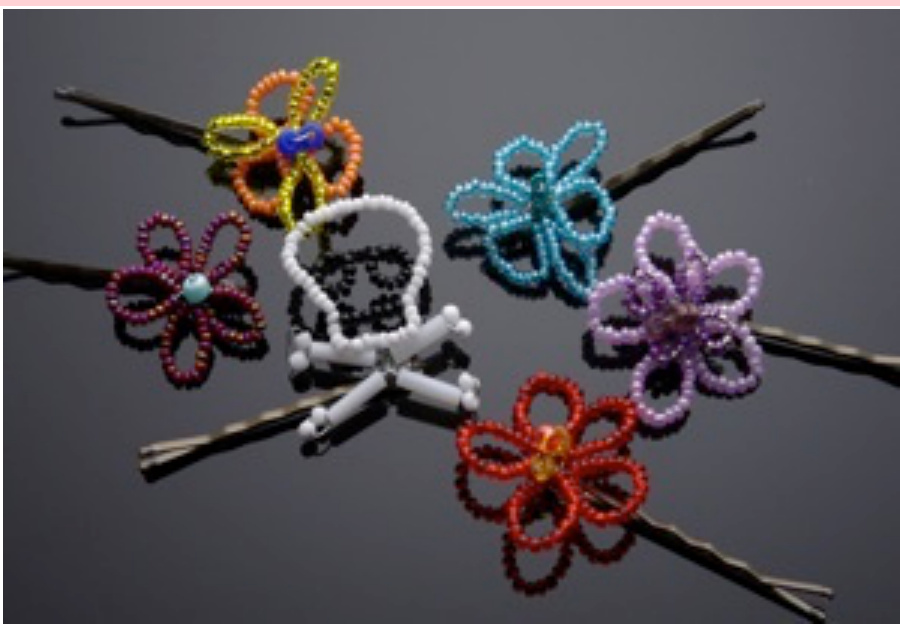
· Skull and crossbones:
Step 1: with $18^{\circ}$ of wire, string about 28 white (skull beads onto the middle and bend in a “U” shape. Step 2: String 11 black (eye) beads on one end; twist just the black beads into a loop; repeat on the other end of the whitebeads. Step3:String 4 white beads on one end,then 5 larger black (mouth)beads. Bend the wire at a right angle where the black beads begin. Step 4: String 4 white beads on the other end of the wire and pass the wire through the black mouth beads, going toward the other wire, so the wires cross over each other and each comes out the other end of the black beads. Step 5: String 6 white beads (for the chin on the ends of each wire, and curve them toward each other. Twist the wirestogethertwice. Step 7: To make crossbones, string a white bugle bead and 2 larger white beads (or about 8 larger white beads) Skip over the last 2 beads, and feed the wire back through the bugle or last 6 beads. Use needle nose pliers to pull the wire tight if needed. Twist the wire and repeat this step 3 times for the rest of the crossbones. Step 8: Secure the remaining wire to the bobby pin as you did with the flowers.

Dress Up a Dish Towel
by Diane Gilleland Turn a household necessity into a useful and affordable gift with some simple patchwork. This project is a great way to use up scraps of pretty fabric.
# Supplies Needed:
· 4-5 coordinating cotton fabrics · Cotton dish towel (flour-sack type) Straight pins · Sewing machine and thread · Scissors ·Ruler
How To Make:
Step 1: Pre-wash alyour fabrics and dish towels. Then, cut $6{\sqrt{2}}$ squares from each of your cotton fabrics. You'll need 3 or4 squares of eachfabric Next, cut about half of these squares inhalf, so they measue $3^{\circ}\mathrm{~x~}6^{\circ}$ . And then, cut a few of those pieces in half again, so they measure $1.5^{\circ}\mathrm{~x~}6^{\circ}$
Step 2: Now, place these pieces side by side, mixing the different widths and colors. Sew them together with a $1/4$ seam allowance. Keep sewing the pieces together until you have a strip that's a couple inches longer than the width of your dish towel. Press all the
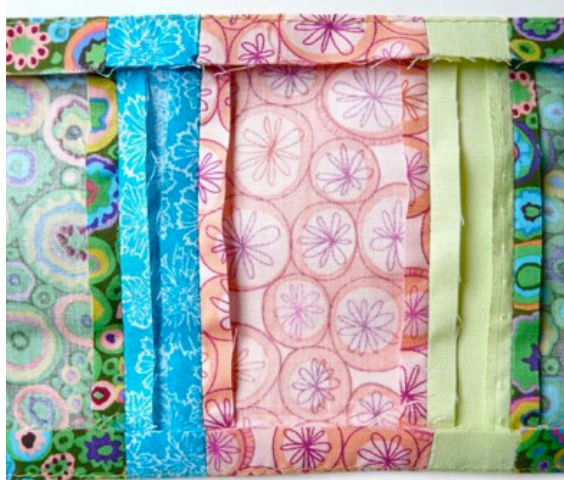
Step 3: Turn a $1/2^{\circ}$ hem along the two long sides of the patchwork strip. Press the hem in place, but don't sew it.
Dress Up a Dish Towel, Cont'd
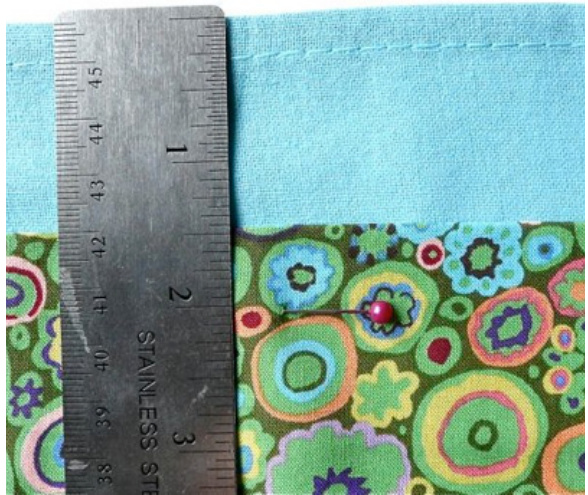
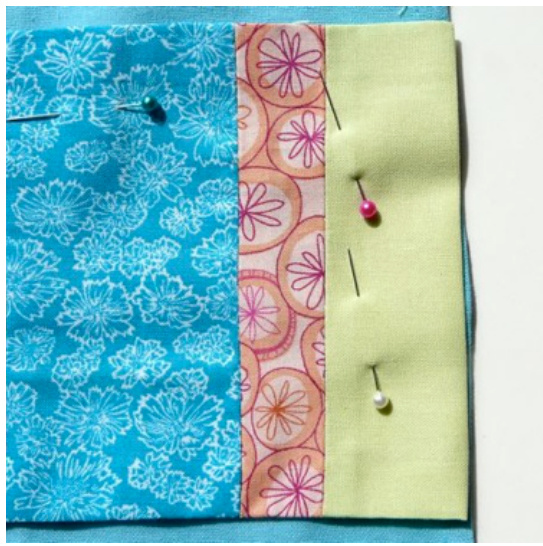
Step 4: Pin the patchwork strip along the bottom edge of the dish towel, measuring to make sure it's straight. (Mine is $1\ 1/2^{\circ}$ from the bottom edge.)
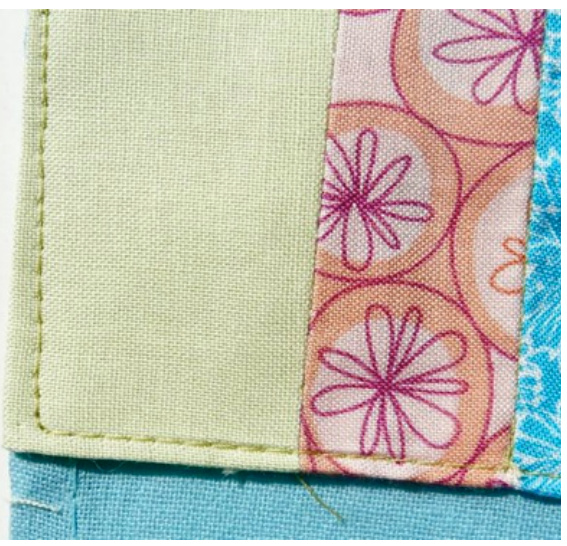
Step 5: At the two ends of the patchwork strip, turn under the raw edge so the strip matches the edge of the dish towel. Step 6: Sew close to the folded edge along all four sides of the patchwork strip. Optional Step: You may also want to sew along the seams between the patches. This is called “Stitching in the Ditch,” and it will help the patchwork lay flatter through future washing and drying.

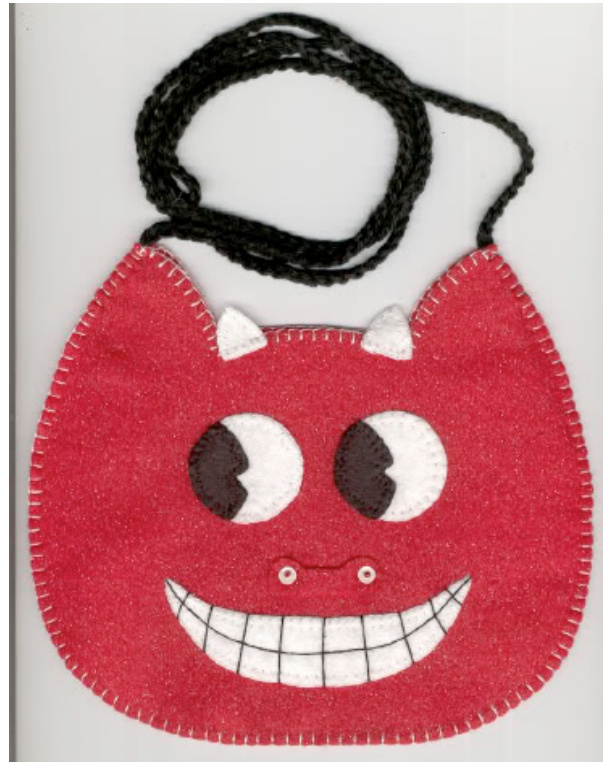
Felt Halloween Bag
by Joelle Groendes, This adorable bag is just the thing for Halloween! And it's easy to make with materials you likely have in your stash right now.
# Supplies Needed:
·2 large pieces of felt, same color · Scraps of various color felt · Scissors · Needle and thread · Beads, sequins, buttons · Cord or yarn for strap
How To Make:
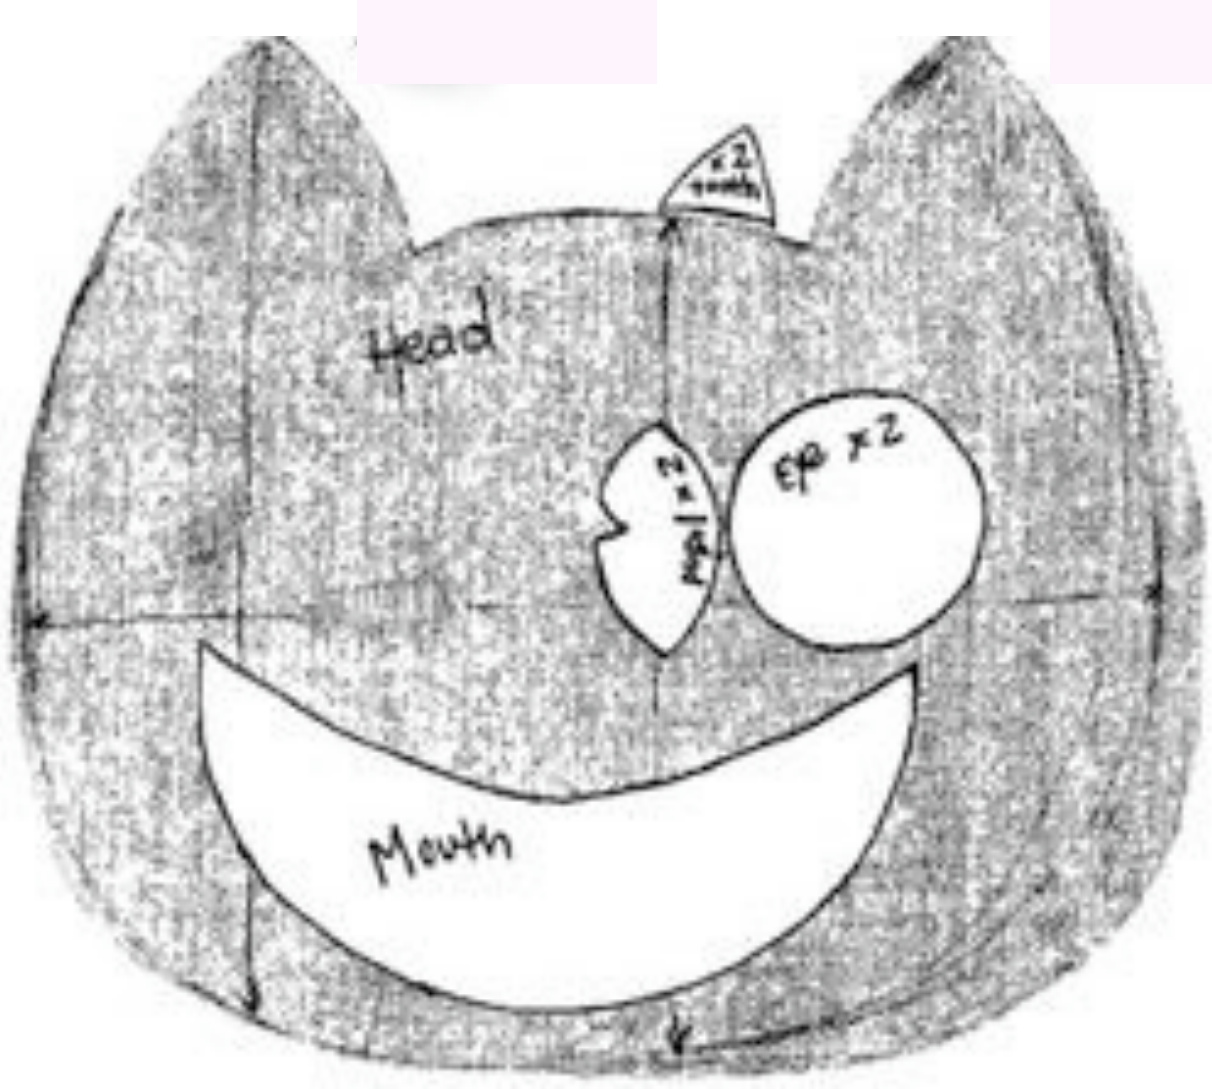
Step1:Cut ot the hapeonth next page andtransfer thm tothfltCut theHadshae frmachfyou t large pieces of felt. Cut the Eyes, Teeth, and Mouth from your scraps of felt, using colors of your choice. Step 2: Sew the Eye, Tooth, and Mouth piees to one of the head pieces, using a blanket stitch or whip stith. (You can also glue these down.) Step3: Decorate the face with beads, sequins,ric rac - anything you likel You can sew or glue these mbellshments in place. Step 4: Sew the two Head pieces together along the sidea, leaving an opening between the two ears. You can use blanket stth orhip sthAt the toponing youmight alant to thalong theege f ach layerof fet to give the bag a more finished look. Step 5: Atach the ends of the stap to the inner corner of each ear, using the photo above for placement. Secure it with small whip stitches.
Felt Halloween Bag Pattern:
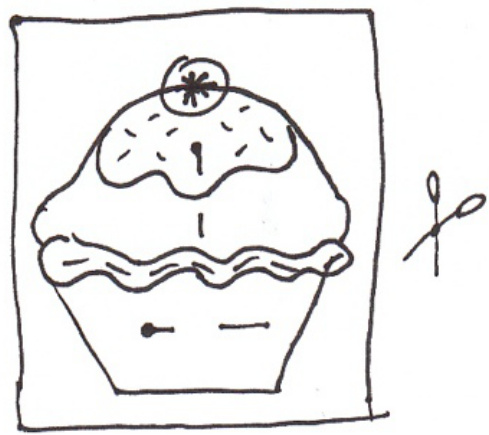
Cute Cupcake Iron-On Patch
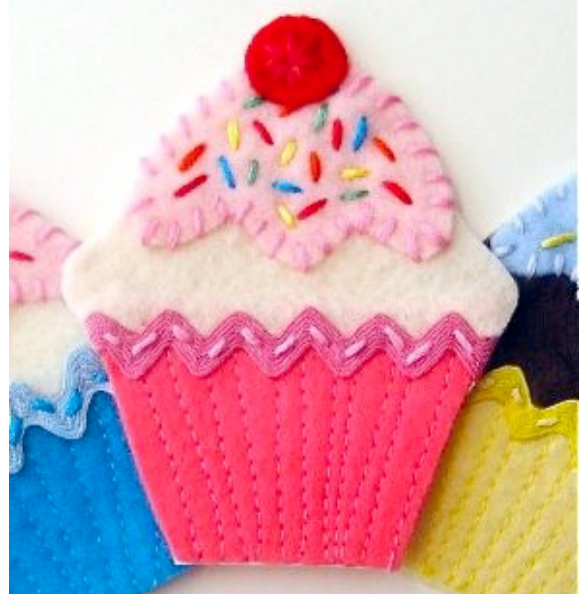
by Christine Blystone What a cute embellishment for any garment, bag, or pillow! (And you can probably find a whole lot of other places to use it.)
# Supplies Needed:
· Felt in three colors of your choice · Red felt (for the cherry) · Straight pins · Sewing machine & thread · Ric Rac, 3 1/3" · Embroidery thread, several colors (see below) · Scissors · Heat-n-Bond Ultra Hold · Embroidery needle · Iron & ironing board
How To Make:
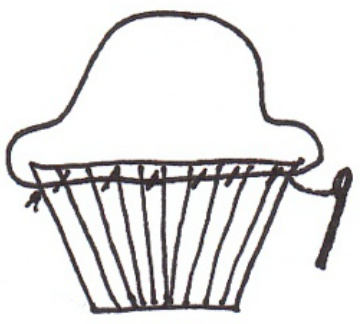
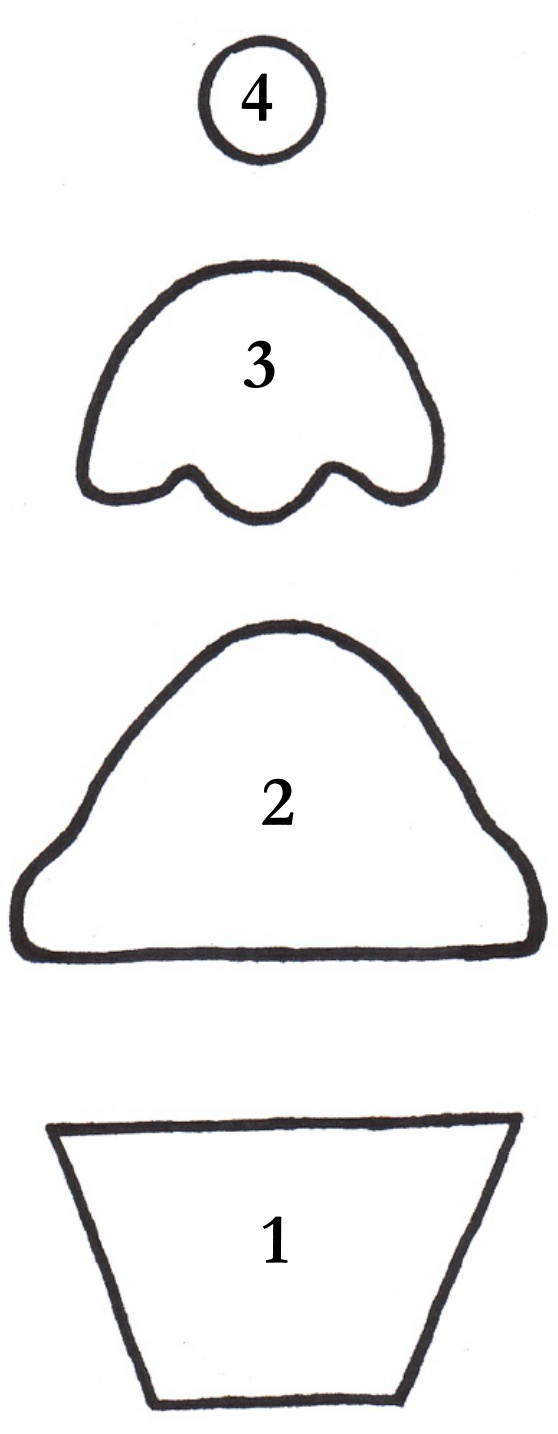
Step 1: Use the pattern pieces on page 15 to cut the following pieces out of felt: · Pattern piece i: Cupcake wrapper (Color C) Pattern piece 2: Cake (Color A) · Pattern piece 3: Frosting (Color B) Pattern Piece 4: Cherry (Red)
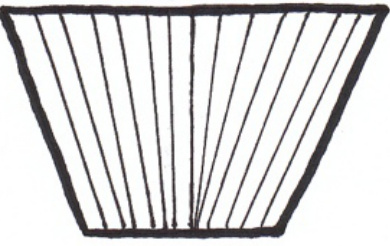
Step 2: Using your sewing machine, sew lines onto the front of the felt cupcake wrapper (Pattern piece 1), using this image as a guide. Step 3: Pin the felt cake (Pattern piece 2) to the front of the felt cupcake wrapper (Pattern piece 1). Pattern piece 2 should overlap Pattern piece 1 about $1/4^{\circ}$ Using an embroidery needle and the embroidery thread that matches Color A, hand-sew the cake in place using a Running Stitch. Stitches that appear on the front of the cupcake should be small (about $1{\it-}2\;\mathrm{cm}$ long), so they can be covered later by ric rac. the goal is to baste the cake in place so it doesn't shift, using the fewest visible stitches on the front as possible.
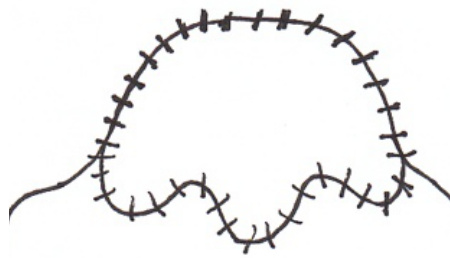
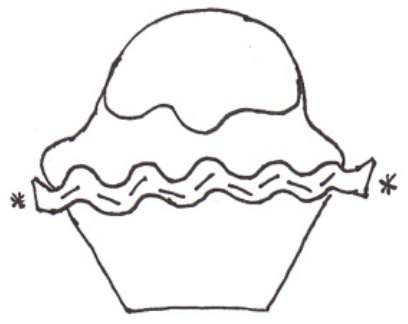
Step 4: Pin the felt frosting (Pattern piece 3) to the front of the felt cake (Pattern piece 2), lining up all edges on the top curve of the cupcake. Using an embroidery needle, and embroidery thread that matches color B, stitch the frosting into place, using an Overcast Stitch. To make an overcast stitch, make diagonal stitches over the raw edges of the felt, spacing them equally. Be careful not to pull these stitches too tight. Use the diagram as a guide. Step 5: Pin the ric rac over the seam that connects the felt cake Pattern piece 2) to the wrapper (Pattern piece 1). Using an embroidery needle and the embroidery thread that matches Color C, hand-sew the ric rac in place, making sure to fold the ends of the ric rac behind the seams as you sew. Use the diagram as a guide. (Note: a basic Strsight Stitch will work for this step.)
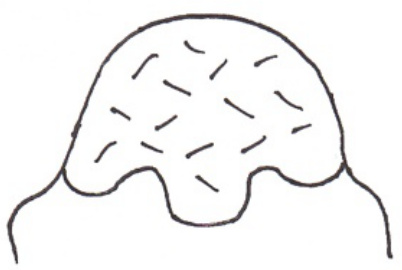
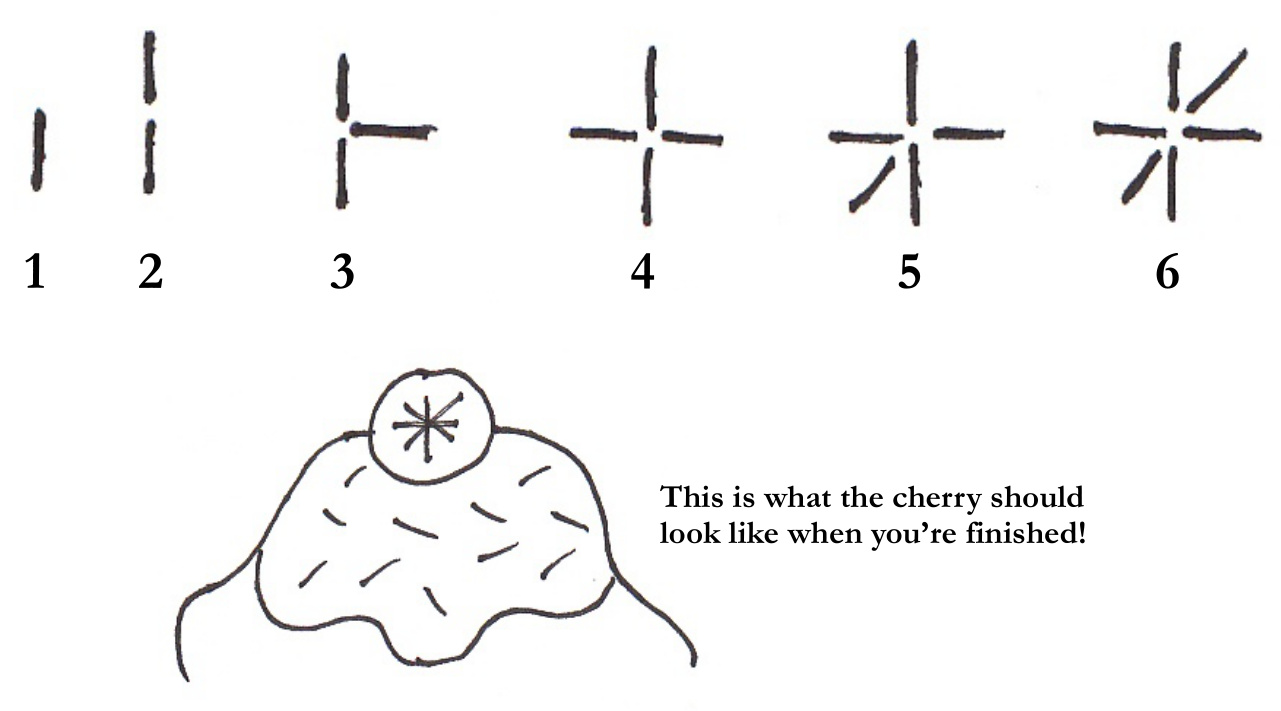
Step 6: Using an embroidery needle and embroidery thread, stitch sprinkles into the felt frosting You can stitch as many sptinkles as you like, using as many different colors as you like. I like to keep my sprinkles about $1/4^{\circ}$ in length, but feel free to experiment! Step 7: Take the felt cherry Pattern piece 4), and center it on the top of the cupcake. make sure the bottom half of the cherry is overlapping the top of the cupcake. Pinch the cherry in place using your thumb and index finger Now, stitch the cherry in place using an embroidery needle and red embroidery thread. For this step, use a Starburs Sitch. The steps are outlined below:
Step 8: We're almost done! Set up your ironing board. Set your iron to the Wool/Cotton setting. For this project, do not use steam. Place a scrap piece of fabric a little larger than the finished cupcake on your ironing board.
Now take your cupcake and pin it to the rougher side of the Heat-n Bond that's not covered in paper. (Leave the paper backing in place On the other side of the Heat-n-Bond.) Cut the Heat-n-Bond as close to the edge of the felt as possible. Once you've finished cutting the Heat-n-Bond, keep the cupcake pinned to it. Bring the whole thing to the ironing board, and place it face up on the scrap piece of fabric. Gently remove your pins, taking care not to disturb the alignment of the Heat-n-Bond. Place the iron on top of the cupcake. Dont wiggle the iron - just leave it in place for 10 seconds, using firm pressure. CAUTION: The cupcake will be extremely hot! Allow it to cool for two minutes before you handle it. Not all of the Heat-n-Bond willbe attached to the cupcake afer ironing. Gently fli the cupcake over so the paper backing of the Heat-n-Bond is facing up.Using firm pressure, iron allover th cupcake for about 2 seonds, making sure to iron over all the edges. Again, the cupcake will be extremely hot after ironing! Allow it to cool for a full 10 minutes before handing it. Step 9: Once the patch has cooled, inspect it If there are any extra bits of Heat-n-Bond sticking out from the edges of the patch, carefully trim them away with scissors. Congratulations! You've just made a cupcake iron-on patch! Now you're ready to attach it to something!
ATTACH YOUR PATCH:
Step 1: Remove the paper backing from your patch by gently peeling the paper off. Step 2: Preset your iron to the Medium (Cotton/Wool) setting. Do not use steam. Step 3: When your iron is completely heated, place your patch where you want it on your garment or bag. Step 4: Place the iron on top of the patch and hold it there for five seconds to lightly secure the patch in place. Step 5: Gently but firmly iron all over your patch for 30 seconds. Step 6: Alow the patch to cool completely(2 to 5 minutes). Step 7: Carefully turn the garment inside out, and then iron the back side of the patch for another 30 seconds. Step 8: Alow the patch to cool completely (2 to 5 minutes). St9:T yu gant rght sieut and inspt ur pathf thre ar places that aretflly seu t garment, iron them again for a fw seconds each until they are firmly atached. Let the patch cool again (2 to 5 minutes). Step 10: Be the coolest guy or gal on the block with your new custom garment!
Felt Cupcake Pattern Pieces:
Feel free to increase or decrease the size on a copier.

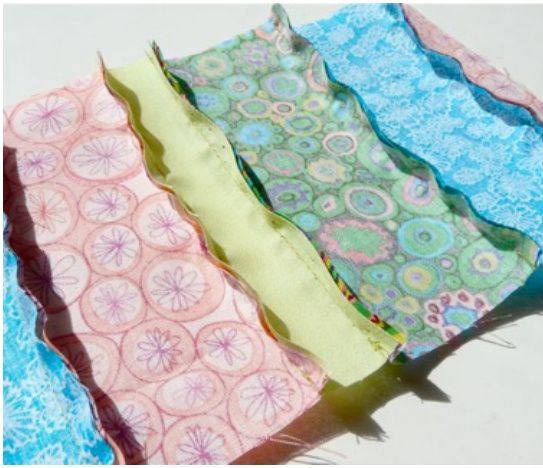
Jersey Doily Scarf
by Bridget Benton
I can't crochet, but I can sure as heck buy crocheted doilies from the Knittn' Kitten, and experiment with 100 ways to get them off the couch and onto my clothes. I heartily encourage you to do the same!
Supplies Needed:
· 3-6 doilies in a variety of sizes · 3 large T-shirts or 1.5 yds jersey fabric, coordinating colors ·Scissors · Sewing machine, thread ·Straight pins Tape measure
How To Make:
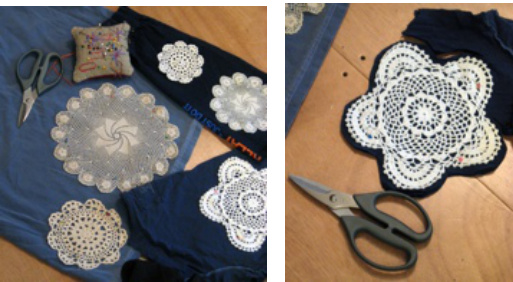
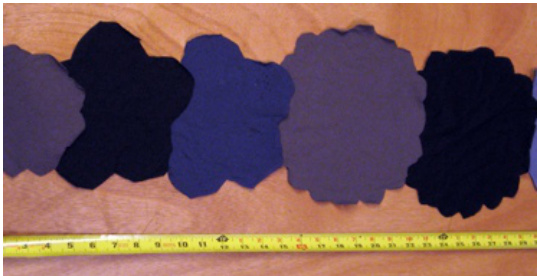
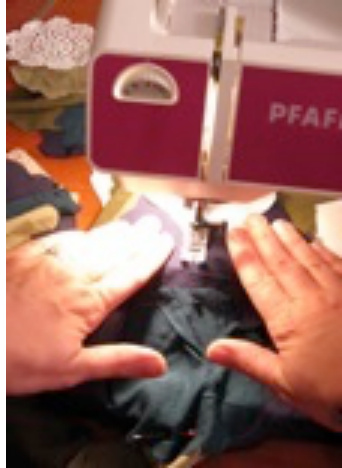
Step 1: Fold the fabric over double, and pin doilies to the fabric. Use the doily as a pattern to cut out shapes from the jersey. For a 6.5 foot scarf, you wil need approximately 6 large shapes,15 medium shapes, and 15 small shapes. Step 2: Using a tape measure as your guide, lay out all of your large pieces and as many of your medium pieces as needed on either end to reach your desired length. Overlap the pieces by about an inch
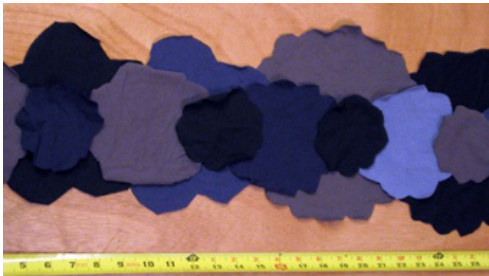
Step 3: Now, add a layer of small and medium shapes on top of your first layer. Arrange them in a way that is pleasing to you. You will be sewing a long seam down the center, so try to ensure that you have at least two layers of jersey in every spot that you will be sewing.
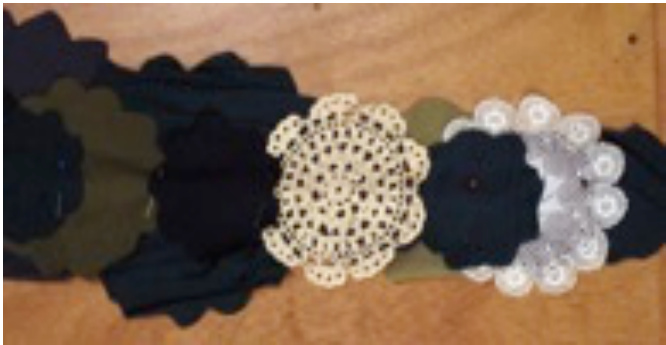
Step 4: As a final touch, incorporate some doilies into the design. Soft, draping ones will work best. Pin the pieces in place down the center. If you know the fiber content of your doilies, you might even try dyeing them to match your fabric. (Most fabric paints will make them too stiff) Or, pick your fabric to match the doilies! Step 5: Using a sewing machine, stitch a single seam down the center of the scarf. Back-stitch the beginning and end of the seam to secure the thread. And you're done! Or, you're only just beginning ...
More options: using doilies (or lace!) as stencils...
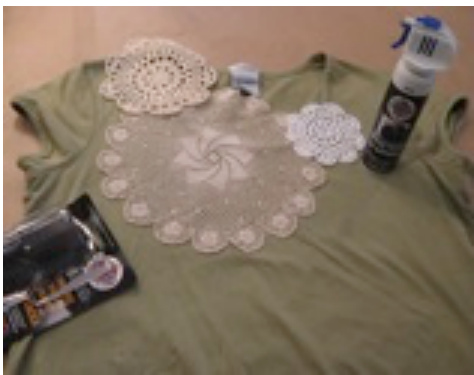
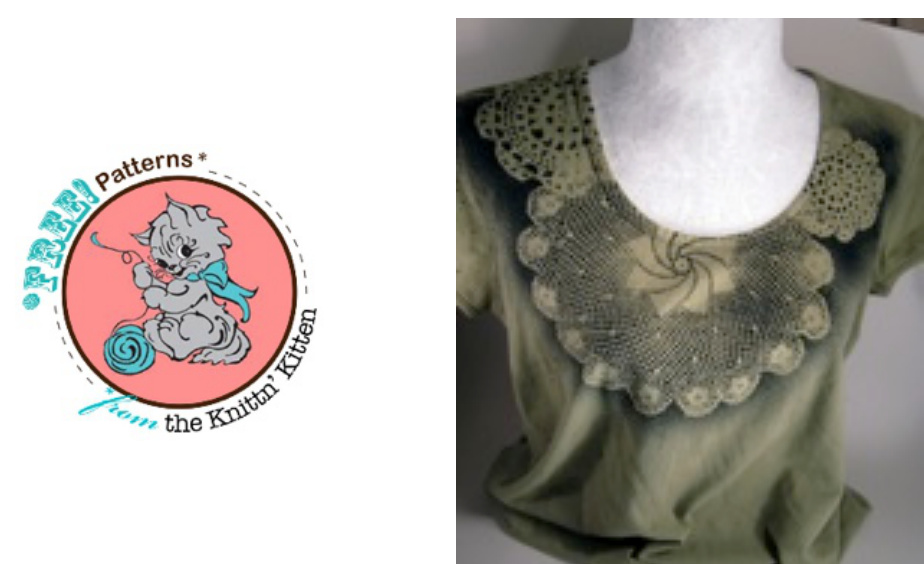
As part of my doily love, I played with using a spray-on fabric paint called \*Simply Spray Stencil Paint’' that I found at Jo-Ann Fabrics. I just laid the doilies down on a t-shirt in the desired pattern, and sprayed the stencil paint over the doilies per the instructions on the can! With gloved hands, I lifted the doilies off, and they left a beautiful pattern behind! 1let it dry, and poof Ihad an instantly cooler t-shirt. I encourage you to try this with lace and other odd bits you find!
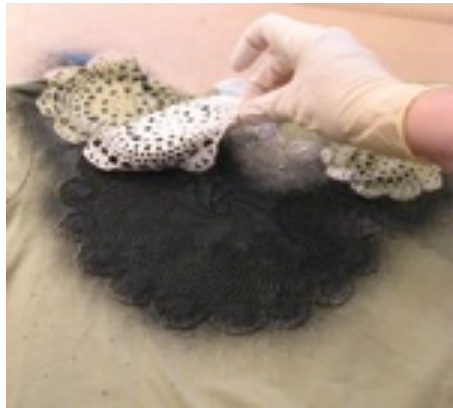
The only bad news? The stencil spray renders the doilies too stiff for putting into clothes. Good news? You now have reusable stencils!
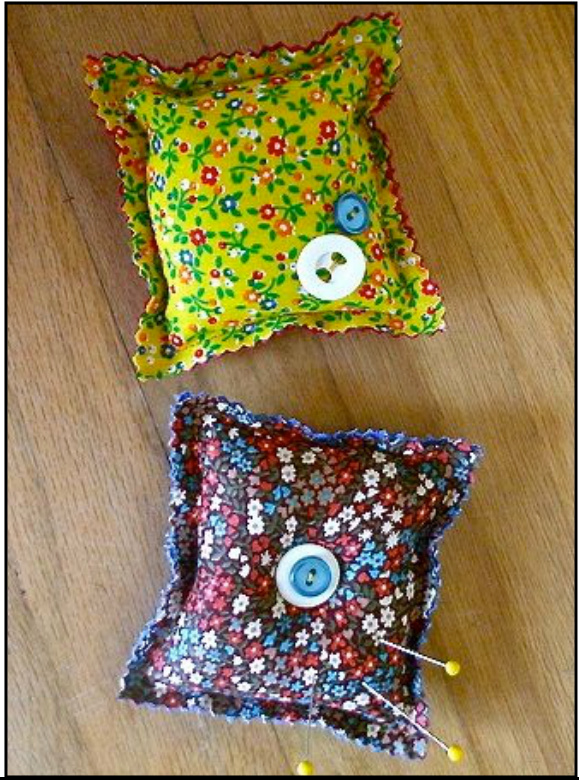
by Susan Beal
Fabric & Button Pincushion
Supplies Needed:
This is a quick, easy, and inexpensive holiday gift that's perfect for all the seamsters and seamstresses on your list! Try making it with different fabrics for the front and back and using contrast thread and button colors for a fun effect.
· Piece of woven cotton fabric · Piece of corduroy fabric · Sewing machine & thread
Two buttons: one small, one medium · Pinking shears · Polyfll bating ·Straight pins ·Scissors
How To Make:
Step 1: Pin the two layers of fabric together, right sides out, and cut out two approximately 4inch squares Sew by hand or with your machine) around the perimeter of the square, about $3/8$ inch in from the edge. Leave a 2-inch opening in the center of one side. Backstitch at the beginning and end of your seam to hold it. Step 2: Stuff the pinushionfull of batting, using a chopstick topushit into each corne if nedd. Step 3: Pin the opening together and stitch it securely closed. Step 4: Trim the edges of the pincushion with pinking shears. Step 5: Stick a few pins in it and you're done! (Some variations on the next page!)
Fun Variations on the Fabric & Button Pincushion:
Tufted Pincushion: For the tufted version, stitch through the center of the pincushion and double back through to draw the fabric together there. Now place one medium-sized button on the first side and stitch it on. When your needle comes through to the other side, stitch on a second matching button there. After a few stitches through, layer smaller buttons on the medium-sized ones and stitch those on as well if you like!
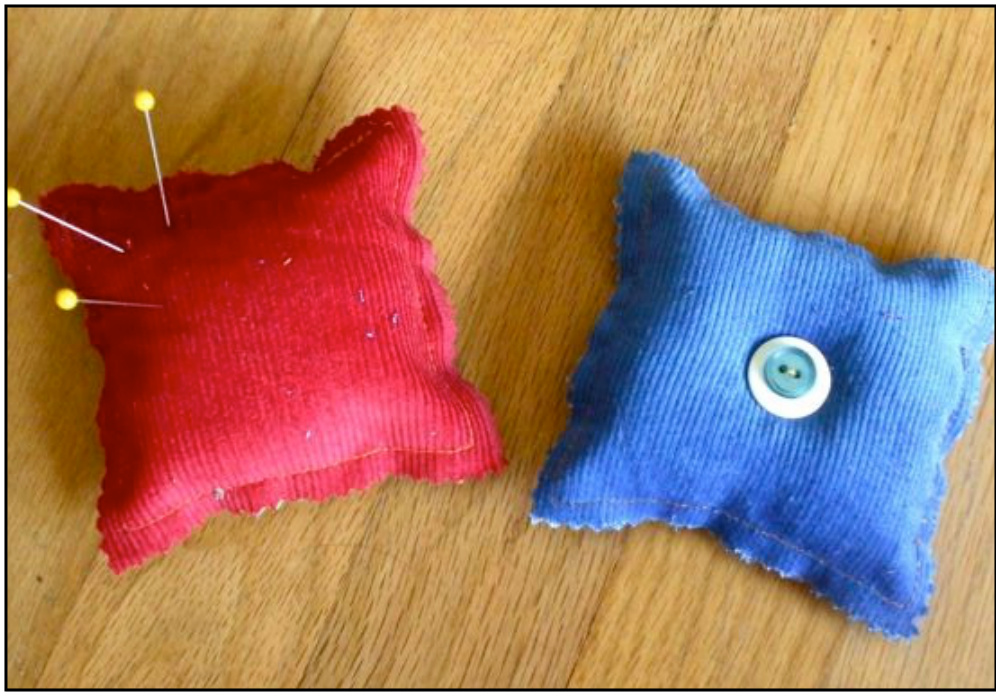
Button-Adorned Pincushion: For the button-ornamented version, just choose a couple of favorites and sew them onto the front of the pincushion wherever you like, attaching them to the surface instead of stitching al the way through to form a tuf, leaving the back plain.
More customizing ideas:
·Embroider a frind’s initial or add a felt applique to your fabric squares before you start sewing · Add lavender flowers to the batting and it can double as a sachet for clothes. ·Make pincushions in different sizes or shapefive or six inches across for a heftierversion, twoinches acrosfora teeny-tiny one.

Meet Our Contributors
A little background on the folks who donated these projects to The Knittn? Kitten:

Heather Mann is the founder of Dollar Store Crafts (www.dollarstorecrafts.com), a daily blog devoted to hip crafting at dollar store prices, and editor and publisher of CROQ Zine (www.croqzine.com), a print zine about hip crafting and indie business. She is the founding editor of CraffFail, a community blog devoted to sharing our not-so-successful crafting attempts (www.craftfail.com).

Lee Meredith is the woman behind wwlethal.net - a maker of things who designs kniting patterns, makes yarn and more, writes about craftines and takes tons of photos. She loves small, quick projects and has a monthly club with mini-skeins of recycled yarn and knitting patterns which use 15 yards or less. She has also released plenty of larger knit accessory patterns, as wellas a full ebook about a new knitting concept she created, called Game Knitting!

Teresa Sullivan has exhibited her unique beadwork nationally since 1995 in juried exhibitions and galleries, and took part in an invitational exhibit at Tokyo Metropolitan Museum of Art in 2008. In 2009 she was awarded a solo exhibit at Mesa Arts Center and is one of 18 artists selected for Interweave's Beadwork VI: The Beaded Book. Her work has been published in Lark Books² 500 Beaded Objects, Beadwork magazine, CRAFT magazine, the Dairy Barn's Bead International exhibit catalogs, and 1000 Ideas for Creative Reuse. Visit her online at www.teresasullivanstudio.com .

Diane Gilland is crafer, writer, and npenent publisher She produces CraftyPod, a lg and podcast about making stuf She has published a number of craft-related books, incluing Making a Great Blog: a Guide for Creative People. Visit her online at www.craftypod.com .
As a kid, Joelle Groendes had a big orange Kinney's shoe box where she kept all her cherished scraps: felt, googly eyes and pipecleaners. As she got older, she made beaded jewelry for about 8 years. Then she found Craftster.org, which rekindled her love affair with good ol' arts and crafts and helped her rediscover her secret orange craft box. She uses anything she can get her hands on that wili stay glued, stitched or hammered together, and has endless hours of fun and excitement seeing what she can come up with next. Visit her online at www.addiepearl.com

Christine Blystone spends most of her time either combing through vintage treasures at antique malls and thrift stores, or expressing her creativity though sewing, embroidery, and jewelry design. Blystone brings these two passions together with Flapper Girl (www.flappergirl.org ), a line of cute, retro, and well-crafted designs that are inspired by fabulous second-hand treasures and life in lovely Portland, Oregon.

Bridget Benton loves making stuff, and loves helping other people make stuff. For more about Bridget's artwork and her classes, visit her website at www.eyesaflame.com or her blog at www.eyesaflame.blogspot.com

Susan Beal is a crafter and writer in Portland and the author of Button It Up and Bead Simple. She writes about things she likes and projects to make at West Coast Crafty (www westcoastcrafty.com ). Her all-time favorite find at the Kitten is a hot pink vintage sewing box.


