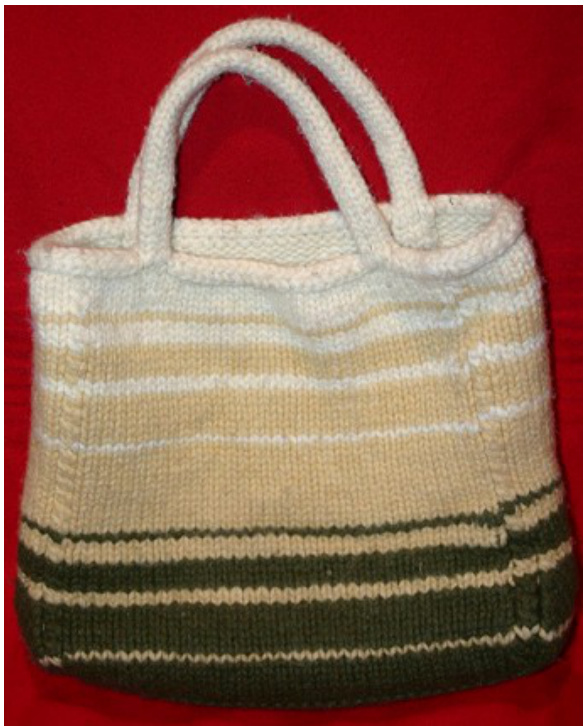
Striped Felted Tote Bag
Designed by Natalie Proctor Servant
This started as a simple bag. It still is, but I added a few details as I was knitting. I knew I wanted a felted bag with a thick and wide bottom. I decided to use cables to help the corners stand out. I did the stripes as I went in a pattern that made me happy. I finished off with applied I-cord and then knit the handles into the bag and grafted at the half way point to make them sturdy and symmetrical.
Finished measurements
My finished felted bag is about 13 inches wide, 4 inches deep, and 13 inches high. The handles are about 12 inches long.
Materials
3 cakes of White Buffalo Unspun in your favorite colors (122 yards/8 oz, 112 m/225g) Substitute: other feltable wool. If you use something that's skinnier, your bag will be smaller. If you want no stripes, use one color. If you have lots of different colors, go to town! Needles US10 / 6mm cable needle set of US10 / 6mm dpns Notions darning needle 8 stitch markers
Not critical - whatever seems solid enough and doesn't break your hands to knit - you're going to felt it anyway
Pattern
Cast on 40 stitches for the base. Knit every row (garter stitch) for 20 rows, or until you like the shape of the base. Pick up stitches around the 3 remaining sides.
I picked up 20, 40, 20 (total of 120), to have a bag that's wider at the bottom. To make the bag straight with no decreases, pick up 1 stitch for each row of garter stitch (10). This would give you sides of 40, 10, 40, 10, for a total of 100. The numbers for this variation are in brackets in the instructions below. Add stitch markers for corners: To make the cabled corners, you use 1 stitch from the end of each side as part of the cable. First round: K39, place marker, k2, place marker, k18 (8), place marker, k2, place marker, k38, place marker, k2, place marker k18 (8), place marker, k2, place marker. Begin cables & decreases: If you are knitting straight, leave out the decreases C1L $\cdot$ slip 1 st onto cable needle & hold in front, k1, k1 from cable needle Rnd 1: K38, C1L, k2 tog, knit until 2 stitches before next marker, ssk, C1L, k38, C1L, k2 tog. knit until 2 stitches before next marker, ssk, C1L. Rnd 2: Knit all stitches. Striping: I began my striping while I was still doing decreases. If you want a similar stripe pattern, the number of rows of each color was: 6A, 1B,6A,2B,4A,3B,1A,12B,1C,6B, 2C, 4B, 3C, 1B, 6C Continue decreases: Repeat rnds 1&2 until there are only 8 stitches between the short side markers (or half the number of garter stitch rows in the base minus 2, if you've got a different base size). Finish the body: Rnd 1: K38, C1L, k8, C1L, k38, C1L, k8, C1L. Rnd 2: Knit all stitches. Continue on striping as you go until there are approximately 56 rows of knitting in the body of the bag, or until you find the proportions pleasing. Applied I-cord edging: For this, you can use 2 dpns in the same size as your circular. Cast on 3 stitches to a dpn. Slide the stitches back so that you're knitting the first cast on stitch and without turning, knit 2, sl1, yo, knit the first bag stitch from the circular needle, then pass 2 stitches over (the slipped stitch & the yo). Slide the stitches back to the other side of your dpn $\&$ repeat the row without turning (k1, sl1, yo, knit 1 bag stitch, pass 2 stitches over). Keep it up until you hit the end of the bag stitches. Graft the seam as nicely as you can Handles: The handles are 6-stitch tubes, but they start with 3 stitches knit up the inside of the bag, then pick up 3 stitches from the outside once you hit the top of the bag. The tube then begins in earnest. To keep the symmetry of the handles and the strength of the attachment to the bag, each handle is knit from both sides and then grafted in the middle. Locate where you'd like your handles to be. For me, they started about 6 stitches in from the cable on the long side of the bag. On the inside of the bag, pick up & knit into 3 stitches about 5 rows down from the top of the bag with a dpn. Purl these 3 stitches. On the next knit row, knit each stitch together with a stitch from the bag. Purl 3 stitches. Continue until you get to the top. When you have knit 3 stitches together with the inside of the applied I-cord, using a new dpn, pick up and knit 3 stitches from the outside of the applied I-cord. You now have 6 stitches, 3 on each dpn. Using another dpn, knit this tube untilit is half as long as you'd like the handles to be (from the top of the bag, perhaps about 26 rounds). Make 3 more half handles in the same way. Graft the handles together. Felt: Use your favorite method, felt this sucker until it's the thickness/consistency/size you want it. Pat it into shape & let it dry. Snip off any long nubbly ends. Line the bag if you're feeling keen.


