Contents
Lily's Socks Scatterling 4 Sugar Bay .... Rosie Socks.. ...13 Tachimawari. .17 Calcite. .20 Constellation. .24 Café. .28 Butterfly Scarflet. 29 Flower Power.. .33 Holiday .... .37 Mi Amorita. .41 Pavonia. 44 Tulia Girl. 48 Panda and Zebra. .50
Lily's Socks
by Lisa Lackney
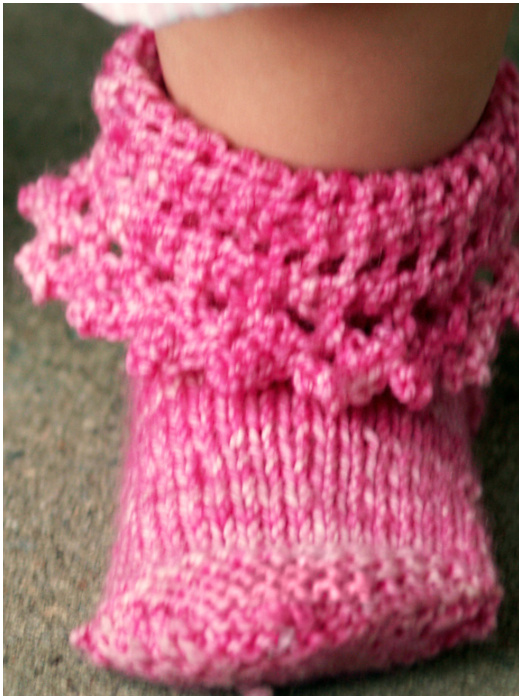
A sweet little lace cuff is knit first, then evolves to the sock leg by picking up stitchesalong the side of thelace.It'sa guarantee that any little baby girl wearing these darling socks will draw an "awwww" from all observers.
LACE PATTERN
Worked flat; stitch count varies each row. Row 1: K3, (yo, ssk, k1) 2 times, (yo) 2 times, k1, (yo) 2 times, k1. Row 2: [K2, p1] 4 times, k3. Row 3: K3, yo, ssk, k1, yo, ssk, k7. Row 4: Bind off 4 sts; k3, p1, k2, p1, k3.
PATTERN NOTES
The lace cuff on this sock is first knit flat, then grafted into a circle. The sock leg then starts by picking up Skill level: Beyond beginner; assumes experience with simple lace, picking up stitches, grafting, basic sock knitting, and wrap/turn Sizes: At stated gauge, these will fit a baby 3-6 months old. You can increase or decrease the gauge to make smaller or larger socks Gauge: 9 stitches per inch in stockinette Yarn: Less than $25\mathrm{g}$ fingering weight yarn, preferably machine washable. Shown in Sophie's Toes $100\%$ Superwash merino wool, fingering weight, 100 grams, $350\;\mathrm{yd}/320\mathrm{m}$ , Color: Cotton Candy. Needles: US 1.5 $(2.5\mathrm{mm})$ dpns or circulars, or size needed to obtain gauge Supplies: $10^{\circ}$ scrap yarn, yarn needle stitches along the edge of the lace and working in simple stockinette (knit every round). · Provisional cast-on: an easy way to work a provisional cast-on is to cast on normally using scrap yarn, then continue knitting with the main yarn. Garter stitch grafting: If you are familiar with Kitchener stitch (grafting) of stockinette, garter stitch grafting is worked in almost the same fashion, with the following changes: Front ndl: Knitwise 1st stitch on front, drop off ndl, purlwise 2nd stitch on front Back ndl: Knitwise 1st stitch on back, drop off ndl, purlwise 2nd stitch on back [Note: If you haven't grafted before, www.knitty.com has very clear instructions.] · The heel is a garter-stitch short row heel, and is worked exactly like a normal short-row heel, but without purl ing or the need to pick up wraps. The toe is a garter-stitch short-row toe, worked in the same fashion as the heel.
INSTRUCTIONS
Cuff
Cast on 11 stitches provisionally, leaving a $\mathtt{15^{\prime\prime}}$ tail on the main color yarn. [See Pattern Notes.] Knit 17 repeats of the Lace Pattern. (68 rows) Undo the provisional cast-on and place stitches on another DPN or the other end of the circular needle. Graft edges with $15^{\prime\prime}$ tail using a garter stitch grafting technique. [See Pattern Notes.] When finished, the garter stitch grafting will have created a ridge similar to a garter-stitch ridge. Consider that the "wrong side" of the lace cuff.
Leg
Turn the lace cuff so that the wrong side is out. Pick up one stitch in each garter ridge along the edge of the cuff for a total of 34 sts. You will now be knitting in rounds. Rounds 1-8: $\ast\mathsf{K}1$ , p1; rep from \* to end. Rounds 9-20: Knit.
Heel (Short-row Garter Stitch Heel)
[See Pattern Notes.] The heel is knit back-and-forth on the first 17 sts on your ndls. Turn and knit 17 stitches; wrap and turn. Knit 16 stitches; wrap and turn. Knit until 1 stitch before last wrapped stitch; wrap and turn. Repeat until all but 5 stitches are wrapped. Knit up to, and including, the first wrapped stitch; wrap and turn. Repeat until all wrapped stitches have been worked and working yarn is back to the beginning of the round. The round will begin on the right-hand side of the heel. The last 17 stitches will be the instep.
Foot
Rounds 1-25: Knit all stitches
Toe
This is a garter stitch short-row toe and is worked the same as the heel over 17 stitches of instep. Using Kitchener stitch or garter stitch grafting, graft the 17 stitches on the bottom of the toe to the 17 sole stitches.
FINISHING
Weave in ends. Lisa is currently a graduate student in history. When not reading books and writing
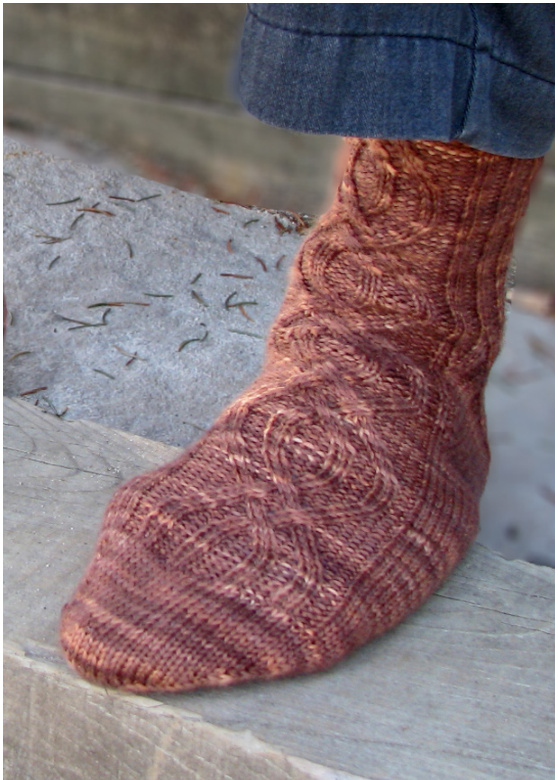
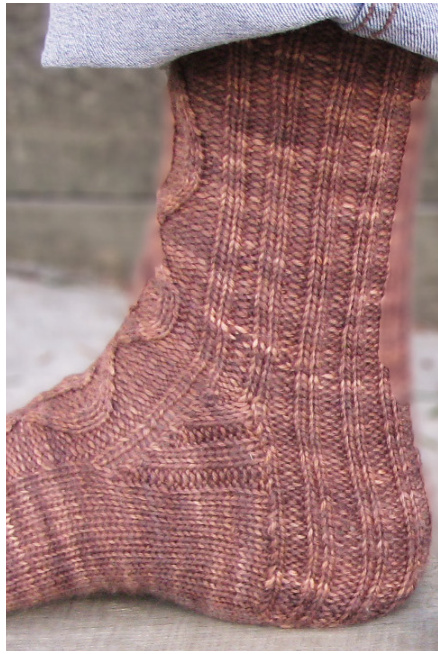
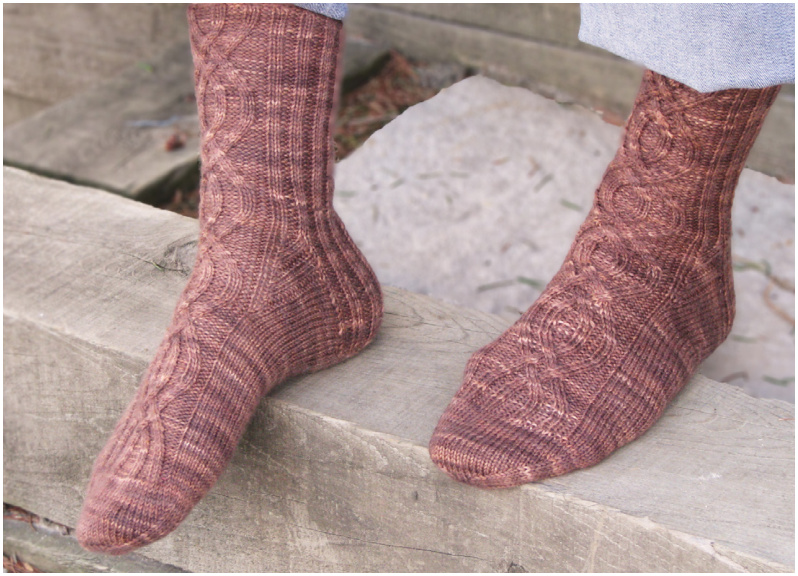
Scatterling
byHunterHammersen "Scatterling" means: "One who has no fixed habitation or residence; a vagabond." My family tends to venture far afield, but we come together when it counts. We recently reunited to celebrate my grandfather's 90th birthday. These socks, with their wandering but interlocking cable, were designed for him.
SPECIAL STITCHES
See abbreviations accompanying main charts for cable instructions
PATTERN NOTES
You need to know two things as you make these socks: the size (small or large) and the foot (left or right). The Ribbing and Leg charts have columns of shaded stitches that are only worked when making the large size. The Gusset and Foot sections have Skill level: Adventurous; intricate cables, chart reading, top-down sock techniques Sizes: S/M [L/XL]. Model shown in S/M. Finished measurements: $8^{\circ}$ circumference for size S/M. Gauge: The stretchiness of this pattern doesn't allow an exact gauge measurement. As a guide, aim for a gauge of 8.5 stitches per inch in thin yarn and 7.5 stitches per inch in thick yarn in stockinette. The sample was worked with 32 stitches and 44 rows per $4^{\circ}$ squareof stockinette (worked fat). Yarn: 325-425yd sock yarn. Sample shown in Ewetopia Hand Dyed Merino Sport Weight Sock Yarn, $100\%$ Merino, $350\mathrm{yd}/320\mathrm{m}$ Needles: US 1 $(2.25\mathrm{mm})$ ), or size needed to obtain gauge Supplies: Cable needle, yarn needle separate charts for each size. This is all explained in the instructions, but it is important to pay attention to the chart titles. If you wish to make mirrored socks, pay special attention to the abbreviations accompanying the charts.
INSTRUCTIONS
Cast On CO 60 [68] sts. Divide evenly over 4 ndls and join for working in the round.
Cuff
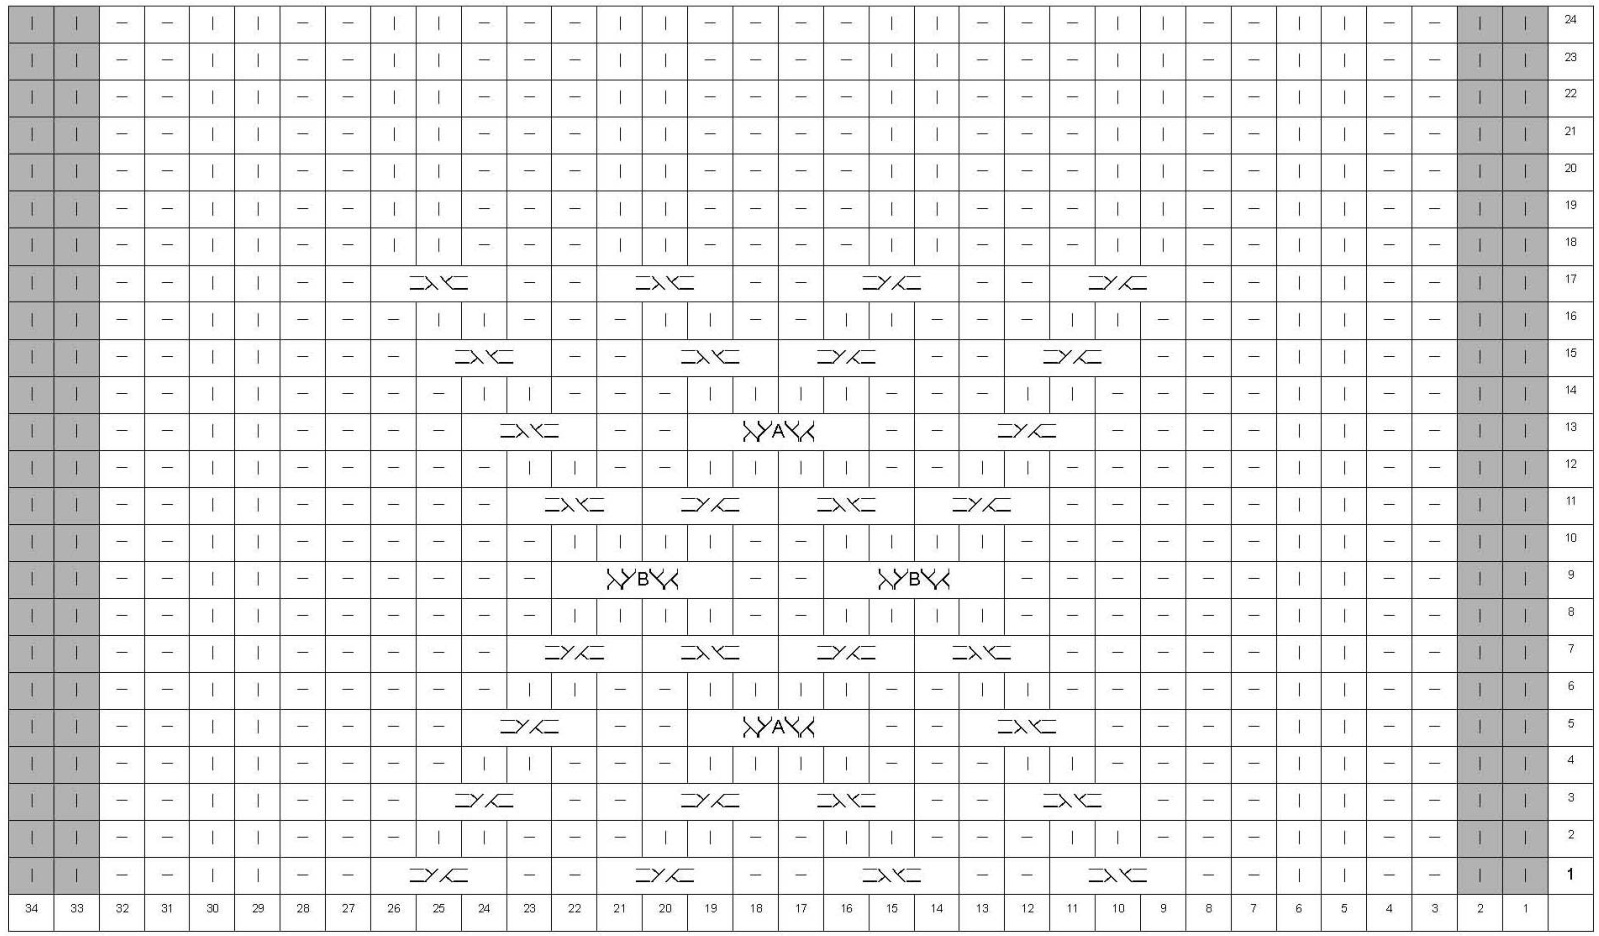
Work 6 rounds of the Ribbing Charts. Note that the first chart shows the sts on ndls 1 and 2 and the second chart shows the sts on ndls 3 and 4. Shaded sts are only for the larger size. Follow the Leg Chart for the sts on ndls 1 and 2. At the same time, follow the Ribbing Chart for the sts on ndls 3 and 4. Shaded sts are only for the larger size. Work the chart until the leg reaches the desired length. End after finishing row 24. In the pictured sock, the chart was worked twice.
Heel Flap
The heel is worked over the 30 [34] sts on ndls 3 and 4 (these are the "heel sts"). Row 1 (WS): Sl 1, p1, $\ast\mathsf{k}2$ , p2; rep from \* to end of heel sts. Row 2 (RS): Sl 1, k1, $\ast\mathsf{k}2$ , p2; rep from \* to end of heel sts. Work these 2 rows 16[18] times for a total of 32[36] rows in the heel flap.
Heel Turn
Row 1: Sl 1, p16 [18], p2tog, p1, turn. Row 2: Sl 1, k5, ssk, k1, turn. Row 3: Sl 1, p6, p2tog, p1, turn. Row 4: Sl 1, k7, ssk, k1, turn. Row 5: Sl 1, p8, p2tog, p1, turn. Row 6: Sl 1, k9, ssk, k1, turn. Row 7: Sl 1, p10, p2tog, p1, turn. Row 8: Sl 1, k11, ssk, k1, turn. Row 9: Sl 1, p12, p2tog, p1, turn. Row 10: Sl 1, k13, ssk, k1, turn. Row 12: Sl 1, k15, ssk, k1. (18 heel sts) For size S/M: the heel turning is complete, so proceed with "Gusset Setup" For size L/XL: Row 13: Sl 1, p16, p2tog, p1. Row 11: Sl 1, p14, p2tog, p1.
Row 14: Sl 1, k17, ssk, k1. (20 heel sts)
Gusset Setup
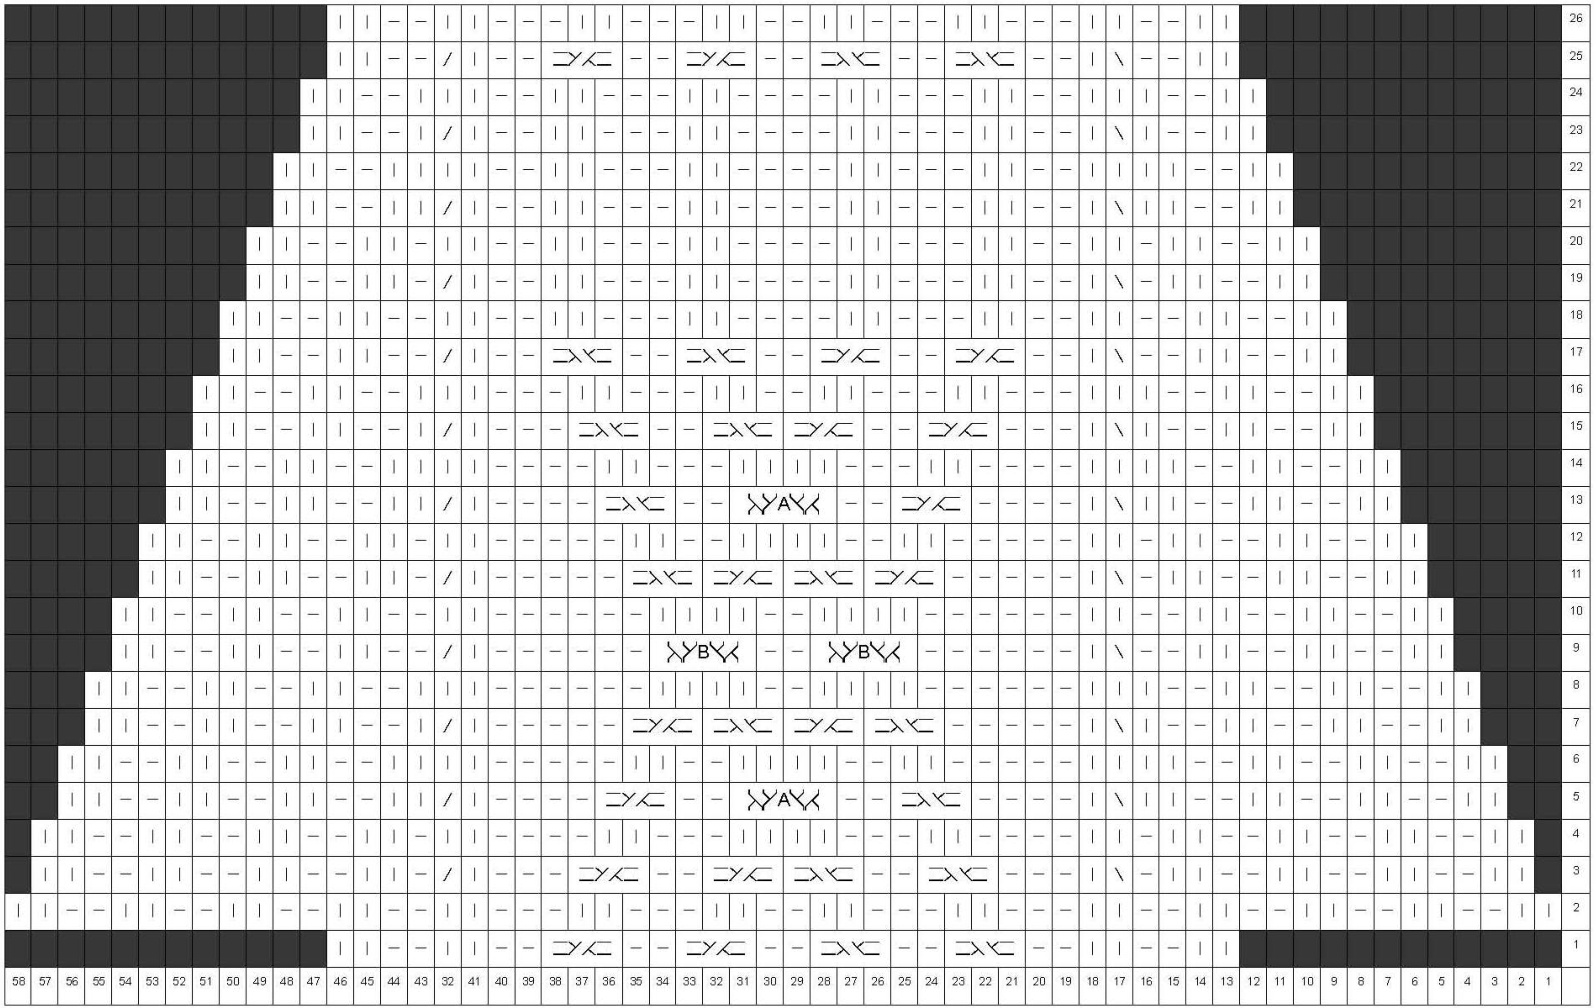
Using the ndl holding the 18 [20] sts on the bottom of the heel flap, pick up and k 17 [19] sts along the side of the heel flap. This is ndl 1. Work first 15 [17] sts of the first row of the appropriate Gusset Chart (large or small). This is ndl 2. Work the second 15 [17] sts of the first row of the appropriate Gusset Chart (large or small). This is ndl 3. Pick up and k 17 [19] sts on the other side of the heel flap. K the first 9 [10] sts off of ndl 1. This is ndl 4. Redistribute sts on the ndls as follows: Move the last 11 [12] sts on ndl 1 to the beginning of ndl 2. Move the first 11 [12] sts on ndl 4 to the end of ndl 3. You should now have 15 [17] sts each on ndls 1 and 4 and 26 [29] sts each on ndls 2 and 3. The extra sts on ndls 2 and 3 will be decreased away as you make the gusset.
Gusset Shaping
K all sts on ndls 1 and 4; at the same time, follow the appropriate Gusset Chart (large or small) for the sts on ndls 2 and 3. When you have completed the Gusset chart, you will have 30[34] sts for the sole of the sock and 30[34] sts for the instep (top) of the sock.
Foot
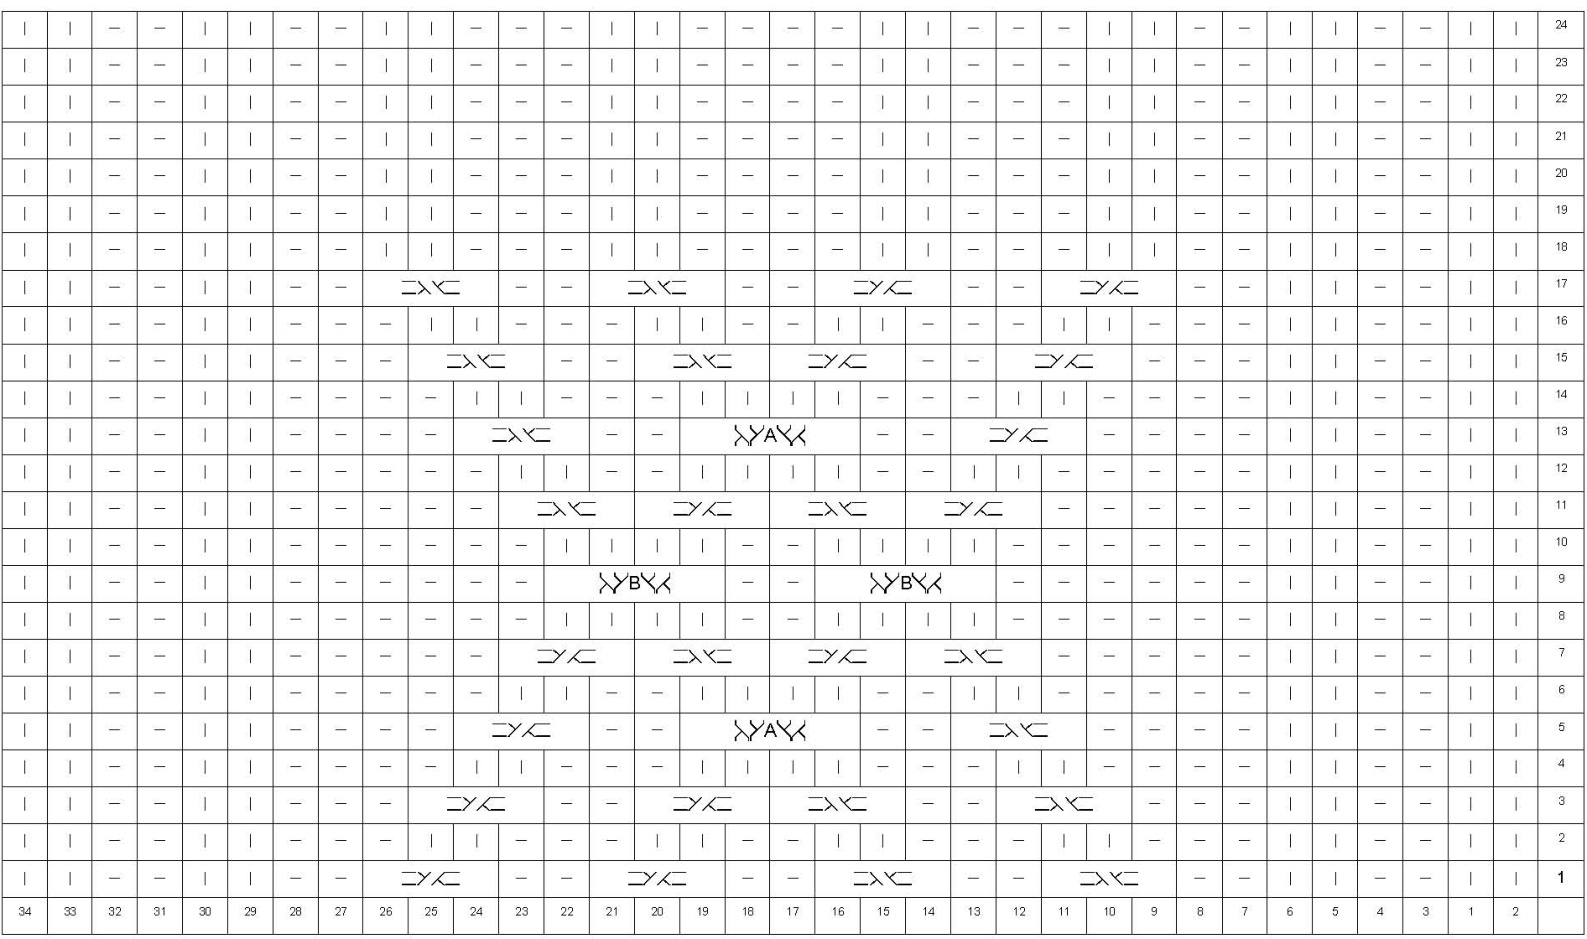
Knit all sts on ndls 1 and 4; at the same time, follow the appropriate Foot Chart (large or small) for ndls 2 and 3. For the large size only: start the first repeat of the Foot Chart at row 3. Work until the sock measures 1.75-2" short of the total desired length.
Toe
Round: K until 3 sts remain on ndl , k2tog, k1; on ndl 2, k1, ssk, k to end of ndl; on ndl 3, k to last 3 sts on ndl, k2tog, k1; on ndl 4, k1, k remaining sts on ndl.
"Plain" Round:
Knit. Work these 2 rounds 5 [6] times. (40 [44] sts) Work the Decrease Round 6 [7] times more. (16 sts) K to end of ndl 1. Move the sts on ndl 4 to ndl 1. Move the sts on ndl 2 to ndl 3.
FINISHING
Graft the toes and weave in the ends.
Gusset Chart (size Large)
Foot Chart (size Large)
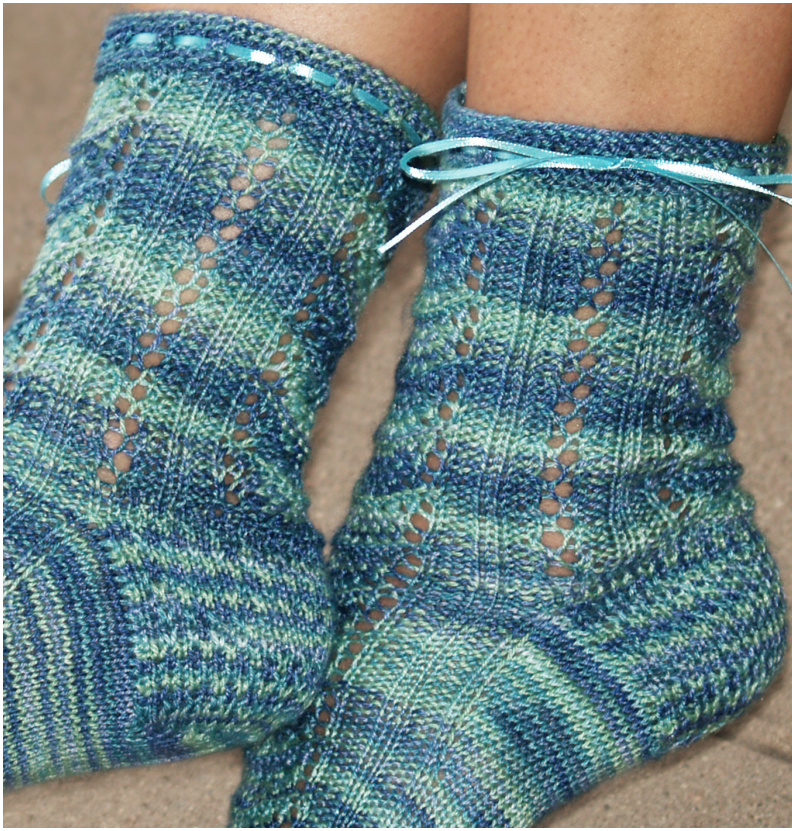
Sugar Bay by Melissa Goodale
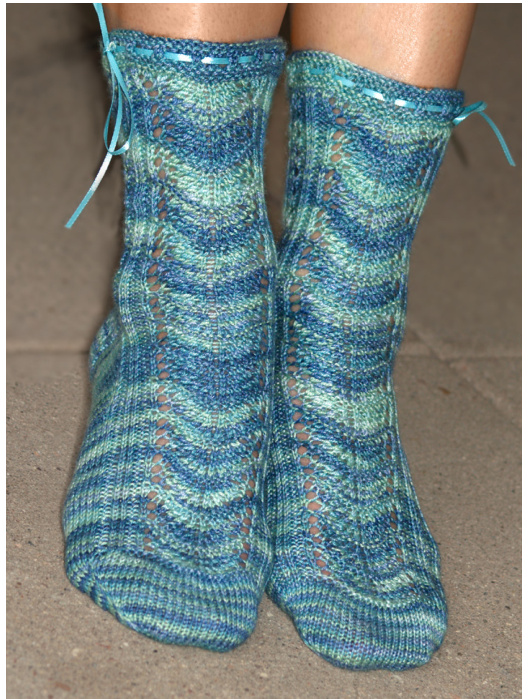
Skill level: Adventurous; lace, chart reading, sock construction Sizes: Women's medium Finished measurements: Circumference: Approximately $8^{\circ}$ $(20{\mathsf{c m}})$ ribbing adds stretch. Length: $8.5^{\circ}$ $(22\mathsf{c m})$ as shown, can be adjusted. Gauge: 32 stitches over $4^{\circ}$ $10\mathrm{cm})$ in stockinette stitch Yarn: 275 yds of Ewetopia Fiber Shop Hand Dyed Fingering Panda Sock, $60\%$ Superwash Merino/ $30\%$ Bamboo/ $10\%$ Nylon, $460\mathrm{yd}/420\mathrm{m}$ Needles: US 2 $(2.75\mathrm{mm})$ dpns, or size needed to obtain gauge. These socks can also be knit using two circulars or the Magic Loop method. Supplies: Tapestry needle, ribbon When I opened the mail and discovered this beautiful sock yarn waiting for me, I thought of a warm, tropical sea. The color of the yarn reminded me of the ocean in Sugar Bay, Saint Thomas, US Virgin Islands. So, I designed a wavy sock to emphasize the feel of the ocean, much like the waves that lap along the shore. The lightness of the lace makes them perfect springtime socks: a splash of happy color rippling on your legs, hinting of summer and long days at the beach. Sl 1 - Slip 1 st from the left needle to the right needle as if to purl with yarn held in back. W&T - Wrap and turn. At the end of a knit row, slip 1 st as if to purl, bring the yarn forward, slip 1 st back to the left needle and turn work. At the end of a purl row, slip 1 st as if to purl, bring the yarn to the back, slip 1 st back to the left needle and turn work.
SPECIAL ABBREVIATIONS
L1R - Lift 1 Right: Insert the right needle from back to front into the top of the st below the next one to be knit. Lift it onto the left needle, knit this st; 1 st increased. L1L - Lift 1 Left: Insert the left needle from back to front into the top of the st 2 rows below the one just knit, this lifts it onto the left needle. Insert right needle from right to left and knit this st; 1 st increased.
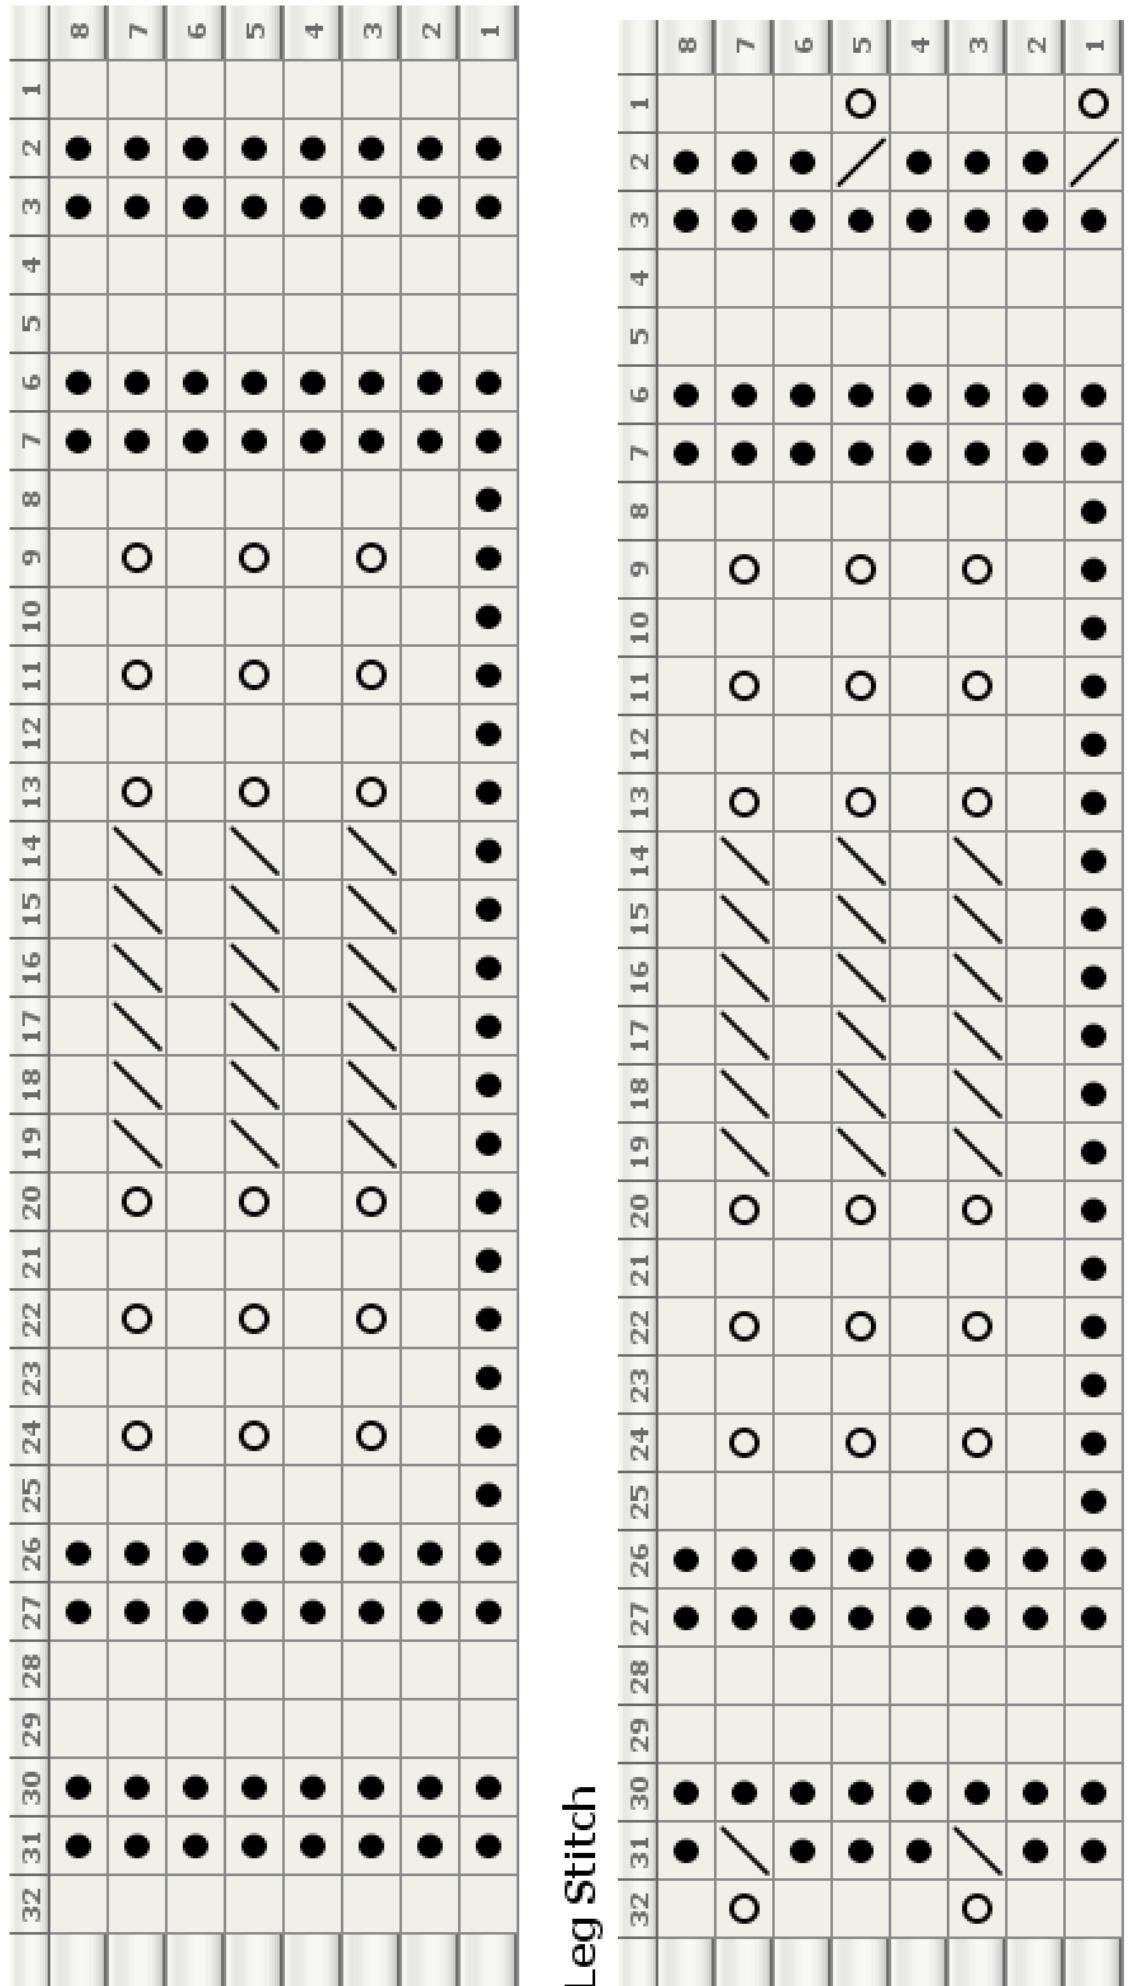
FOOT STITCHPATTERN
Worked in the round across 32 sts and 8 rows, instructions also available in chart form: Round 1: K1, p2, k2, p22, k2, p2, k1. Rounds 2, 4, 6 and 8: K1, p2, k2, p2, k18, p2, k2, p2, k1. Rounds 3, 5 and 7: K1, p2, k2, p2, [k1, yo] 3 times, k2tog 6 times, [yo, k1] 3 times, p2, k2, p2, k1.
LEG STITCH PATTERN
Worked in the round across 32 sts (twice over 64 sts), instructions also available in chart form: Round 1: YO, ssk, p1, k2, p22, k2, p2, k1. Rounds 2, 4, 6 and 8: K1, p2, k2, p2, k18, p2, k2, p2, k1. Rounds 3 and 7: K1, p2, k2, p2, [k1, yo] 3 times, k2tog 6 times, [yo, k1] 3 times, p2, k2, p1, k2tog, yo. Round 5: YO, ssk, p1, k2, p2, [k1, yo] 3 times, k2tog 6 times, [yo, k1] 3 times, p2, k2, p2, k1.
PATTERN NOTES
The pattern is written for 5 dpns; Needles 1 and 2 are the sole needles and Needles 3 and 4 are the instep needles. Magic loop or 2 circulars may be substituted; treat Needles 1 and 2 as the first half of the sts and Needles 3 and 4 as the second half of the sts.
INSTRUCTIONS
Toe
Round 2: Knit. Round 1: L1R, knit across Needles 1 and 2, L1L; L1R, knit across Needles 3 and 4, L1L. Knit across Needles 1 and 2 and work in Foot Stitch Pattern across Needles 3 and 4 until sock measures 5.5 inches, or 3 inches less than the desired finished length, ending after completing a Round 4. Repeat these two rounds an additional 9 times for a total of 20 rounds. [64 sts] Setup: Cast on 24 sts, 12 per side, with a Magic Cast-On, or seamless toe-up cast-onof choice. Knit 1 round.
Foot
Gusset
Begin increasing for gusset as follows: Round 1: L1R, knit across Needles 1 and 2, L1L, work in Foot Stitch Pattern across Needles 3 and 4. Round 2: Knit across Needles 1 and 2 and work in Foot Stitch Pattern across Needles 3 and 4. Repeat these two rounds 9 times more, for a total of 20 rounds, ending after completing a Foot Stitch Pattern Round 8. [84 sts]
Short Row Heel Cup
Worked back and forth across Needles 1 and 2: K35, w&t. P18, w&t. K17, w&t. P16, w&t. Continue working the short rows until k9, w&t is completed. P14, picking up the short row wraps along the way, w&t, return to working in the round. K36, picking up short row wraps along the way, work in Foot Stitch Pattern across Needles 3 and 4. K18, [L1R, k1] 8 times, [k1, L1L] 8 times, k18, work in Foot Stitch Pattern across Needles 3 and 4. [100 sts]
Heel Flap
Worked back and forth across Needles 1 and 2: K50, ssk, turn. Rows 1 and 3: P33, p2tog, turn. Row 2: K1, [k1, sl1] 16 times, ssk, turn. Row 4: K1, [sl 1, k1] 16 times, ssk, turn. Repeat Rows 1 through 4 until 35 sts remain on Needles 1 and 2. P33, p2tog, turn. [66 sts] K1, [k1, sl 1] 16 times, ssk, turn. [65 sts] [Note: The last st in the ssk is the first st from Needle3.] Sl 1, p32, p2tog, w&t.[64 sts] [Note: The last st in the p2tog is the last st from Needle 4.]
Leg
Resume working in the round. Sl 1, [sl 1, k1] 16 times; work in Foot Stitch Pattern across Needles 3 and 4.(Note the first sl st becomes the last st on Needle 4.) Knit across Needles 1 and 2; work in Foot Stitch Pattern across Needles 3 and 4. [K1, sl 1] across Needles 1 and 2; work in Foot Stitch Pattern across Needles 3 and 4. Knit across Needles 1 and 2; work in Foot Stitch Pattern across Needles 3 and 4. [Sl 1, k1] across Needles 1 and 2; work in Foot Stitch Pattern across Needles 3 and 4. Knit across Needles 1 and 2; work in Foot Stitch Pattern across Needles 3 and 4. Work in Leg Stitch Pattern around all needles until leg measures 5.5 inches, or desired length, ending on a Round 8.
Cuff
Work in garter stitch (knit 1 round, purl 1 round, etc) for 5 rounds. [K2tog, yo] around. Work in garter stitch for 3 rounds. Bind off as follows: P2tog, \*place st just created back on left needle, p2tog; repeat from \* to end. Cut yarn and pull through last remaining st.
FINISHING
Weave in ends and enjoy!
(uo Aupunoyjux mmm) azjens/ !uy u pageau
Rosie Socks
by Diana Troldahl
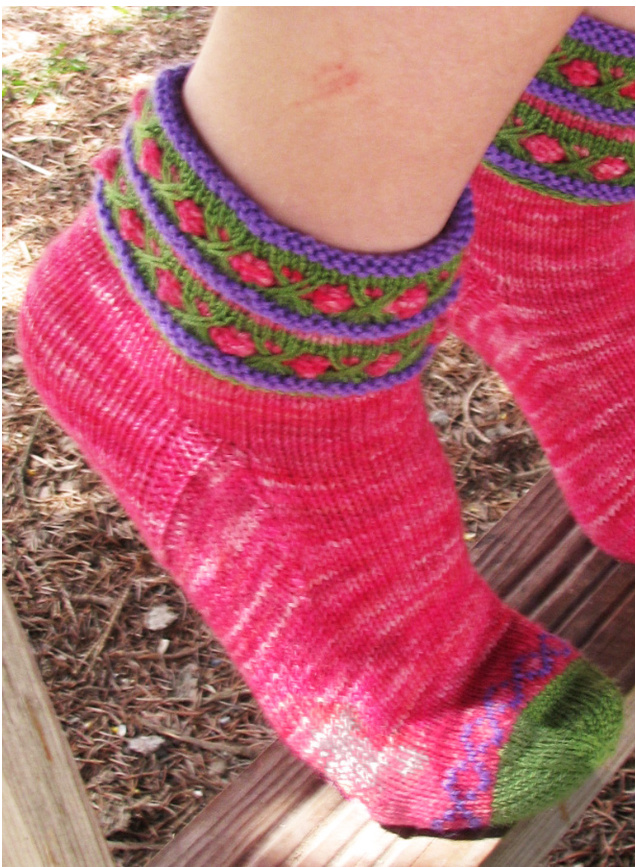
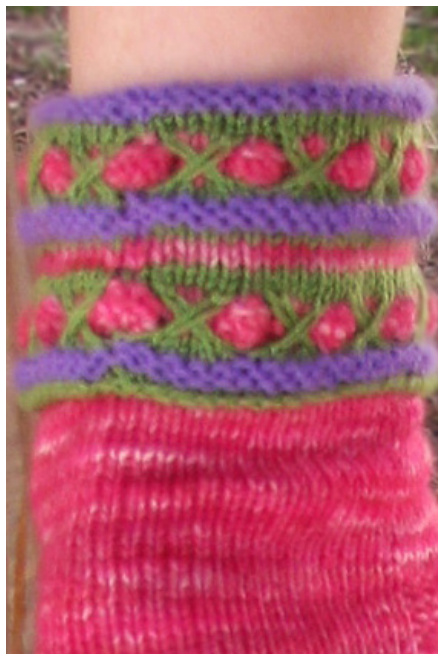
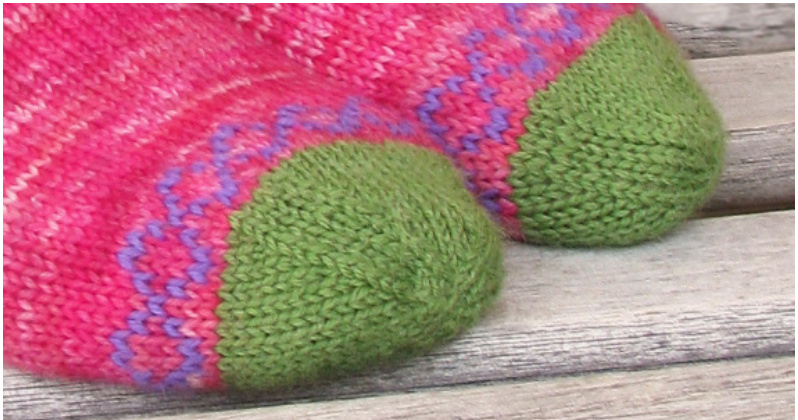
Rosebuds peek through the briars in the colorfully textured cuff of these top-down socks. A cleverly fitted German heel (with garter stitchcolumns for close fit)and French toe make this sock something special. A small section of stranded knitting near the toe echoes the latticed design of thecuff.
SPECIAL ABBREVIATIONS
Kn A, Kn C - Knit n sts in color A or color C K1w2 - K1, wrapping yarn twice over needle: Put RH ndl through next stitch as if to knit, wrap yarn twice around the RH ndl, then pull both loops through to complete the knit stitch. P2tog - purl 2 sts togetherP3tog - purl 3 sts together Skill level: Adventurous; colorwork, sock construction Sizes: Medium child (C) [small tween/adult (S), medium adult (M), large adult (L)]. Model shown in size S. Finished measurements: $5.5^{\circ}$ $\left[6.5^{\circ}\right]$ ,$7.75^{\circ}$ $8.75^{\circ}]$ circumference, unstretched Gauge: 36 stitches and 46 rows 0ver $4^{\circ}$ $10\mathrm{cm})$ in stockinette stitch on smaller needles Yarn: Color A: Araucania Ranco Sock Yarn, $75\%$ $\mathbb{W}_{00}|/25\%$ Nylon $(376\mathrm{yds}/100\mathrm{g})$ , color 312 (multicolor/pinks), 1 skein for all sizes; Colors B/C: Schoeller & Stahl Fortissima Socka, $75\%$ Superwash $\mathbb{W}_{00}|/25\%$ Polymide $(229\,\mathrm{yd}/50\mathrm{g}$ ball), approx 30 yd of each color: B: gras/green (#1006), C: veilchen/ purple (#1014) Needles: US 1 $(2.25\mathrm{mm})$ and US 1.5 $(2.5\mathrm{mm})$ dpns, or size needed to obtain gauge
CROSS STITCHEDBOBBLE PATTERN
Worked in the round over a multiple of 10 sts Rounds 1 and 2: With B, knit. Round 3: \*K1w2, k2, k1w2, p1; rep from \* to end of round. Drop B. Round 4: With A, $\mathbf{\Psi}^{*}\mathbf{s}|\mathbf{\Psi}1,$ dropping extra loop; k2, sl 1, dropping extra loop; $^{\ast}[\mathsf{k}1,$ $\mathsf{y}\mathsf{o},\,\mathsf{k}\mathsf{1},\,\mathsf{y}\mathsf{o},\,\mathsf{k}\mathsf{1}]$ into next st; rep from \* around. Rounds 5 and 6: \*Sl 1, k2, sl 1, p5; rep from \* repeat around. Round 7: \*Sl 1, k2, sl 1, \*p2tog, p3tog, pass p2tog st over p3tog st; rep from \* around. Drop A. Round 8: With B, \*drop first elongated st off needle, sl 2 wyib; drop next elongated st off needle, place first elongated st on the Ih needle, pass the slipped stitches from rh needle back to lh needle, then place the second elongated stitch on the Ih needle, k5; rep from \* around.
INSTRUCTIONS
Cuff With larger needles and B, CO 50 [60, 70, 80] stitches Rounds 1 and 2: Knit. Drop B. Round 3: Join C; knit. Rounds 4 and 5: Purl. Cut C. Rounds 6 to 13: Work 1 repetition of Cross Stitched Bobble Pattern. Rounds 14 and 15: Cont with B, knit. DropB. Rounds 16 and 17: With A, knit. Drop A. Rounds 18 and 19: With B, knit. Drop B. Round 20: With C, knit. Rounds 21 and 22: Purl. Rounds 23 to 30:Work 1 Repetition of Cross Stitched Bobble Pattern. Rounds 31 and 32: Cont with B, knit. Cut B. Round 33: With C, knit. Rounds 34 to 36: Purl. Cut C. Turn cuff inside out. Change to smaller needles and, with A, knit one round. Then knit in $\ast\mathsf{k1}$ ${\mathsf{p1^{*}}}$ ribbing until about $1/4^{\prime\prime}$ shorter than the cuff (the ribbing will be hidden by the cuff). [Note: For size $S,$ this will be approx. 17 rounds of ribbing.]
Continuing with A, knit 25 rounds more, or until the leg beyond the folded-down cuff measures about $z^{\prime\prime}$
Heel Flap
Setup Row 1: K13 [15, 18, 20], p2, k2; turn. Setup Row 2: Sl 1, p33 [37, 43, 47]; turn. You now have 34 [38, 44, 48] stitches on the heel flap, the remaining 16 [22, 26, 32] stitches are instep stitches. You will work back and forth on the heel stitches, the instep stitches will not be worked until later. Heel flap row 1 (RS): Sl 1, k1, p2, k until 4 stitches remain, p2, k2; turn. Heel flap row 2 (ws): Sl 1, purl across; turn. Repeat these two rows until you complete 26 [30, 36, 40] rows. You should have 14 [16, 19, 21] slipped stitches on each side edge of the heel flap.
Heel Turn
Row 1 (RS): Sl 1, k1, p2, k 16 [18, 21, 23], ssk; turn. Row 2 (ws): Sl 1, p7, p2tog; turn. Row 3: Sl 1, k8, ssk; turn. Row 4: Sl 1, p9, p2tog; turn. Row 5: Sl 1, k10, ssk; turn. Row 6: Sl 1, p11, p2tog; turn. Continue knitting/purling 1 stitch more on each row, until all the heel stitches are incorporated into the turn. End with a WS (purl) row. On the final few rows, k or p until 2 sts remain, then decrease as before until you reach the target of 20 [22, 24, 26] heel sts.
Gusset Setup
Knit 10 [11, 12, 13] Change to new needle. Knit 10 [11, 12, 13] WITH THE SAME NEEDLE, pick up and knit a stitch through each of the slipped sts along the side of the heel flap: 14 [16, 19, 21] picked up sts. Pick up and knit one more st between the heel flap and instep stitches. You now have a totalof 25[28, 32, 35]sts on that nee
dle. With a new needle, knit across the 16 [22, 26, 32] instep sts. With a new needle, pick up and knit a stitch between the instep needle and the heel flap. With the same needle, pick up and knit 14 [16, 19, 21] sts, and continue and knit across the 10 [11, 12, 13] sts from the top of the heel flap. This is the center bottom of the foot, and the beginning of round. You now have a total of 66 [78, 90, 102] sts distributed on the needles as: 25 [28, 32, 35] on needle 1, 16 [22, 26, 32] on needle 2, and 25 [28, 32, 35] on needle 3. Knit 1 round, knitting through the back loop of the stitches you picked up and knit in the previous round. This tightens the stitches, reducing any holes.
Gusset Shaping
Round 1: K until 3 sts remain on the first needle, ssk, k1; k across instep stitches; k1, k2tog, k to end of needle 3.
Round 2: Knit.
Repeat Rounds 1 and 2 until the sts on needles 1 and 3 have each been reduced to 17 [19, 22, 24]. You now have a total of 50 [60, 70, 80] sts. [Designer's Note: This variation on gusset shaping will produce a more prominent gusset shaping, visually balancing the texture made with the garter ridges of the Germanheel.] You can now redistribute the stitches to have the same number of instep sts and sole sts: 25 [30, 35, 40] instep stitches, and 25 [30, 35, 40] sole stitches; to work the foot.
French Toe
In preparation for working the toe, adjust the number of sts on your needles to a multiple of 3 in the transition round.
Foot
Continuing with A, knit every round until foot section is 1-1/3 [2-1/4, 2-1/2, 2-3/4] inches shorter than the total length of foot desired, including any negative ease desired. [Note: The French toe is a shallower toe than a more standard decreased toe.]
Toe Colorwork
Round 1: \*K1 C, k3 A, k1 C; rep from \* around. Round 2: $\ast\mathsf{K}1$ A, k1 C, k1 A, k1 C, K1 A; rep from \* around. Round 3: $\ast\mathsf{K}2$ A, k1 C, k2 A; rep from \* around. Round 4: $\ast\mathsf{k1}$ A, k1 C, k1 A, k1 C, K1 A; rep from \* around. Round 5: \*k1 C, k3 A, k1 C; rep from \* around. Cut C. Transition round: With A, work the following: Size C only: K1, k2tog, k round until 3 sts remain, k2tog, k1. Size S: Knit. Size M: K1, m1, k until 1 st remains, inc. Size L: K1, k2tog, k until 3 sts remain, k2tog, k1. You now have a total of 48 [60, 72, 78] sts. Redistribute stitches if necessary to have 16 [20, 24, 26] sts per needle. Cut A. With B: Round 1: $\ast\mathsf{K1}.$ , ssk, k until 3 sts rem on 1st needle, k2tog, k1; rep from \* around. Round 2: Knit. Repeat Rounds 1 and 2 until twelve total sts remain, ending with a Round 1.
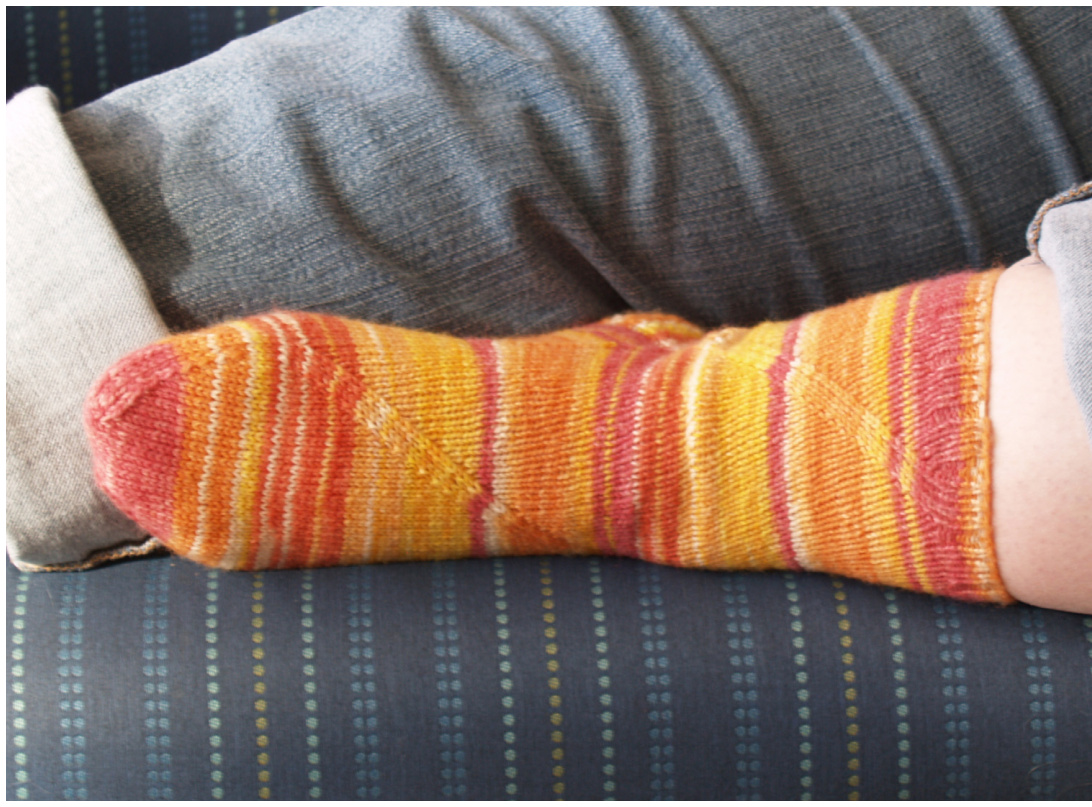
Tachimawari
by Lisa Lackney Skill level: Beyond Beginner; sock construction Sizes: Womens small [womens medium/mens small, womens large/ mens medium]. Shown in womens medium.
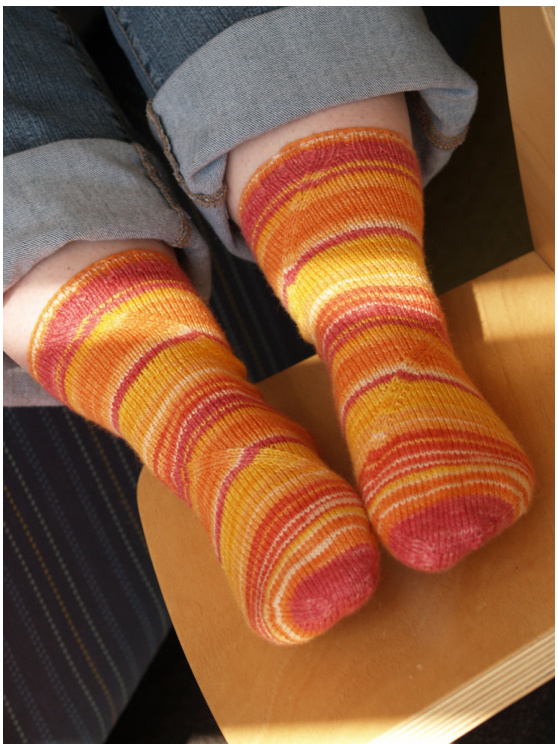
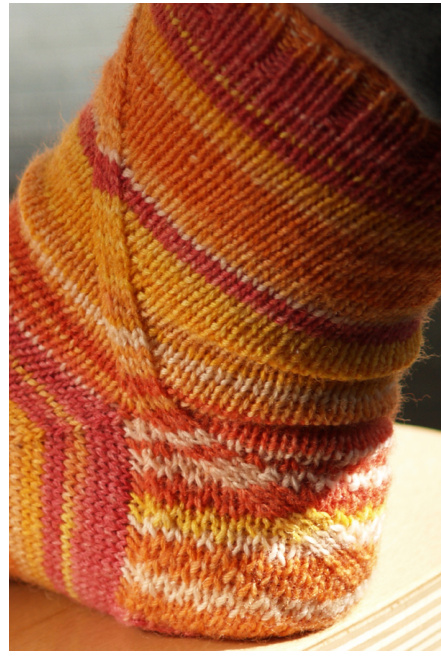
Finished measurements: 6.5 [7.5, 8.5]" foot circumference Gauge: 8.5 stitches per inch in stockinette stitch Yarn: Opal Schafpate, $75\%$ Superwash Wool, $25\%$ Nylon, (425m / 100g skein); 1 skein, color 2710 [Note: You may need to add an extra skein if you want the leg of the sock to be more than $5^{\prime\prime}$ : If you are making a size L and want a leg longer than $5^{\prime\prime},$ 2 skeins may be needed.] I designed these socks while watching old Japanese samurai movies. The high point is always the grand sword fight at the end, or tachimawari. Mawari means to to spin around, and just as Toshiro Mifune used to turn and attack his opponents, two biasing bands rotate around these socks, adding just enough interest to a self-striping yarn.
SPECIAL STITCHES
Eye of the Partridge Stitch (EoP) Row 1: $\ast\mathsf{K}1$ , sl1; rep from \* to end of row. Row 2 & 4: Purl. Row3: $\ast_{\mathsf{S l1}}$ , k1; rep from \* to end of row.
PATTERN NOTES
Be sure to follow appropriate instructions for the leg, heel flap, and Needles: US 1.5 $(2.5\mathrm{mm})$ dpns, or size needed to obtain gauge Supplies: 2 stitch markers, yarn needle
gusset shaping for right or left sock,
· The heel flap for this sock is worked in the Eye of Partridge stitch; the heel turning is worked as a "Rounder Heel" method of short-rowing. All slipped sts are slipped purlwise unless otherwise noted. INSTRUCTIONS Cuff Cast 0n 56 [64, 72] stitches, Round 1: $\ast\mathsf{K}3,$ p1; rep from \* to end. Work this round 9 more times.
Leg (Left Sock)
Set-up round: K3, k2tog, pm, k2, m1, k 24 [28, 32], k2tog, pm, k2, m1, k to end. Round 1: Knit. Round 2: \*Knit to two stitches before marker, k2tog, slip marker, k2, m1; rep from \* to end of round. Repeat Rounds 1 and 2 until leg is desired length, ending on a Round 2. Proceed to the "Heel Flap (Left Sock)"
Leg (Right Sock)
Set-up round: K3, m1, pm, k2, ssk, k 24 [28, 32], m1, pm, k2, ssk, k to end. Round 1: Knit. Round 2: \*Knit to marker, m1, slip marker, k2, ssk; rep from \* to end of round. Repeat Rounds 1 and 2 until leg is desired length, ending on a Round 2. Proceed to the "Heel Flap (Right Sock)"
Heel Flap (Left Sock)
Arrange 28 [32, 36] stitches on one needle for flap so that one of the markers is 4 stitches from left edge of flap and yarn is ready to be worked starting at the right edge of the flap. Row 1: Sl 1, work in EoP until 2 stitches before marker, k2tog, sl marker, k2, m1, work in EoP until end. Row 2: Sl1, purl to end of row. Row 3: Sl 1, work in EoP until 2 stitches before marker, k2tog, sl marker, k2, m1, work in EoP until end. Row 4: Sl1, purl to end of row. Repeat these four rows for 28 [32, 36] rows, or until flap is desired length, and then proceed to "Turning the Heel".
Heel Flap (Right Sock)
Arrange 28 [32, 36] stitches on one needle for flap so that one of the markers is 2 stitches from right edge of flap and yarn is ready to be worked starting at the right edge of the flap. Row 1: Sl 1, work in EoP until marker, m1, sl marker, k2, ssk, work in EoP until end. Row 2: Sl1, purl to end of row. Row 3: Sl 1, work in EoP until marker, m1, sl marker, k2, ssk, work in EoP until end. Row 4: Sl1, purl to end of row. Repeat these four rows for 28 [32, 36] rows, or until flap is desired length, and then proceed to "Turning the Heel".
Turning the Heel
Odd rows are right side, even rows are wrong side. Row 1: Sl1, k15 [17, 19], ssk, k1, turn. Row 2: Sl1, p7, p2tog, p1 turn. Row 3: Sl1, knit to 1 stitch before gap, ssk, k1, turn. Row 4: Sl1, purl to 1 stitch before gap, Repeat rows 3 and 4 until all stitches have been worked, ending on a knit row.
Gusset
Pick up one stitch in each slip stitch along first edge of flap, plus one in the corner between flap and instep. Work instep, maintaining biasing pattern established on leg (maintain instep either by placing instep stitches on separate needle or by placing markers at either edge of instep). Pick up one stitch in next corner, and one stitch in each slipped stitch along second edge of flap. Round begins at center back of sock. Round 1: Knit to three stitches before instep, k2tog, k1, knit across instep, k1, ssk, knit to end of round. (Left sock) Round 2: Knit to two stitches before marker, k2tog, slip marker, k2, m1, knit to end of round. (Right sock) Round 2: Knit to marker, m1, slip marker, k2, ssk, knit to end of round Repeat Rounds 1 and 2 until original number of stitches has been reached.
Foot
Knit each round until foot is the desired length.
Toe
Round 1: Knit to 3 stitches before instep, k2tog, k1; on instep k1, ssk, knit to last 3 stitches, k2tog, k1; k 1, ssk, knit to end of
round.
Round 2: Knit.
Repeat Round 1 until 44 total stitches are left, then work Round 1 until 20 stitches are left. Graft toe closed and weave in ends. Lisa is currently a graduate student in history. When not reading books and writing papers, she enjoys knitting socks while watching period dramas and looking for new knitting projects on Ravelry. Her Ravelry name is TheRogueKnitter.
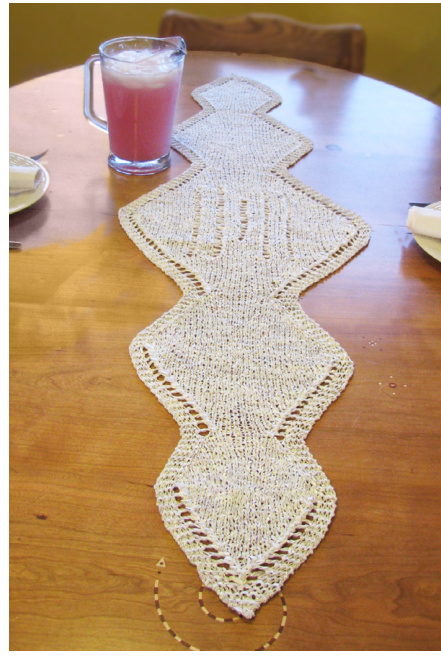
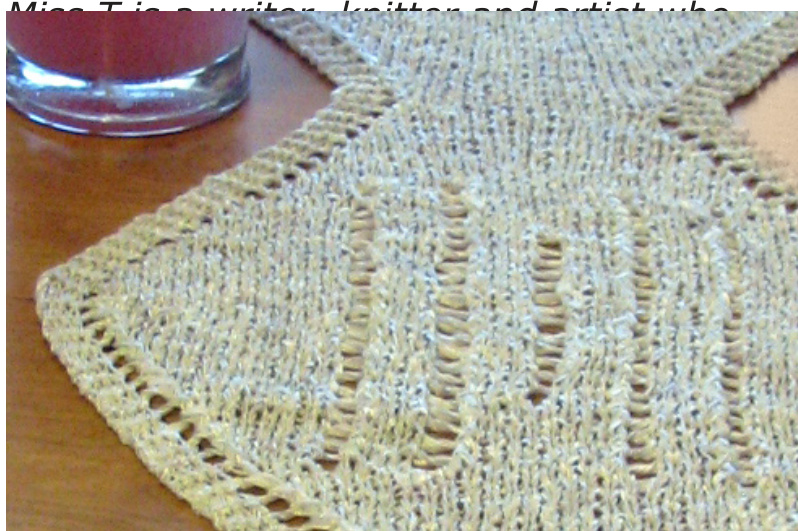
Calcite by Miss T
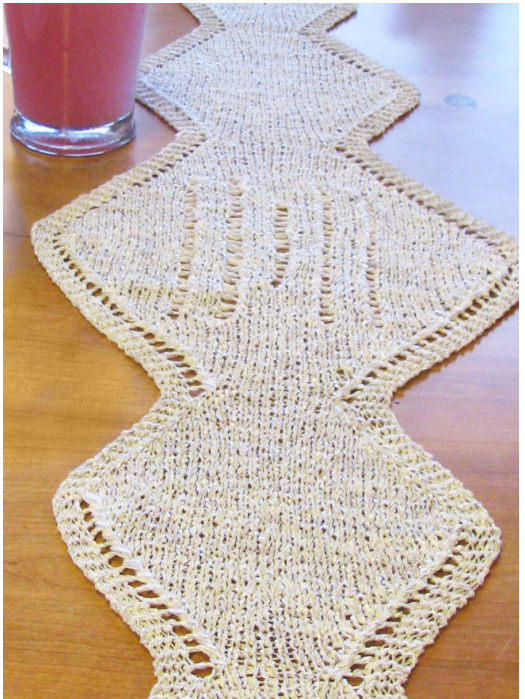
Calcite is a very common mineral -- but common doesn't mean boring. This stone appears in a stunning array of colors and formations. Transparent calcite is particularlybeautiful.Ithasanethereal beauty created by the mysterious properties of double refraction in its naturally rhomboid-shaped crystals, and once you pick it up, you hate to put it down. This table runner was designed to capture calcite's distinctive shapes and delicate refraction, and it makes an elegant statement on any dining table or buffet.
SPECIAL ABBREVIATIONS
Sk2p - Slip one stitch knit-wise, k2tog, pass slip stitch over (double left-leaning decrease) Sm - Slip marker K3tog - Knit three stitches together as one (double right-leaning decrease) Skill level: Beyond beginner; lace Finished measurements: $58^{\circ}$ long and $19^{\circ}$ wide at widest point Gauge: 18 stitches and 22 rows over $4^{\circ}$ $10\;\mathrm{cm})$ in stockinette stitch Yarn: Crystal Palace Party $[100\%$ nylon ribbon, 87 yds $(80\mathrm{m})/50\ \mathrm{gm}$ skein]; color #407 Ice Storm, 3 skeins Needles: US 10 ( $\left(6\mathrm{mm}\right)$ , or size needed to obtain gauge Supplies: Yarn needle, sewing needle, ribbon, sewing thread to match ribbon, stitch markers, row counter
PATTERN NOTES
Because the suggested yarn is slippery, I recommend Lily Chin's technique for joining ribbon as presented in her book, Knitting Tips & Tricks: Overlap approximately $1/8^{\prime\prime}$ of ribbon from the old skein with ribbon from the new skein; sew together with sewing thread and needle.
INSTRUCTIONS
First Diamond Cast on 1 stitch. Row 1 (RS): K1. Row 2 (wS): Kfb. Row 3 : K1, kfb. Row 4: K to last stitch, kfb. (4 sts) Rows 5-9: Repeat Row 4.(9 sts after completing Row 9) Row 10: K4, p1, k4. Row 11: K4, yo, k to last 4 st, yo, k4. (11 sts) Row 12: K4, p to last 4 sts, k4. Rows 14 - 36: Repeat Rows 11 and 12 until there are 35 sts on needle, ending with a wS row. Row 37: K4, ssk, k across to last 6 sts, k2 tog, K4. (33 sts) Row 38: K4, p across to last 4 sts, k4 Rows 39 -54: Repeat Rows 37 and 38 until there are 17 sts left on needle, ending with WS row.
Second Diamond
Rows 55 - 84: Repeat Rows 11 and 12 until there are 47 sts on needle, ending with WS row. Rows 85 - 110: Repeat Rows 37 and 38 until there are 21 sts left on needle, ending with WS row.
Center Diamond
Rows 111 - 128: Repeat Rows 11 and 12 until there are 39 sts on needle, ending withWS row. Row 129: K4, yo, k5, pm, yo, k2tog, k3, yo, k2tog, k7, ssk, yo, k3, pm, ssk, yo, k5, yo, k4. (41 sts) Row 130: K4, p across to last 4 sts, k4. Row 131: K4, yo, k to marker, sm, yo, k2tog, k3, yo, k2tog, k7, ssk, yo, k3, sm, ssk, yo, k to last 4 sts, yo, k4. (43 sts) Row 132: K4, p across to last 4 sts, k4. Rows 133 - 138: Repeat rows 131 and 132 until there are 49 sts on the needle, ending with a ws row. Row 139: K4, yo, k10, sm, yo, k2tog, k3, yo, k2tog, k3, yo, k2tog, k2, ssk, yo, k3, sm, ssk, yo, k10, yo, k4. (51 sts) Row 140: K4, p across to last 4 sts, k4. Row 141: K4, yo, k to marker, sm, yo, k2tog, k3, yo, k2tog, k3, yo, k2tog, k2, ssk, yo, k3, sm, ssk, yo, k to last 4 sts, yo, k4. (53 sts)
Row 142: K4, p across to last 4 sts, k4. Rows 143 - 152: Repeat rows 141 and 142 until there are 63 sts on the needle, ending with a ws row. Row 153: K4, y0, sk2p, k14, sm, y0, k2tog, k3, yo, k2tog, k3, yo, k2tog, k2, ssk, yo, k3, sm, ssk, yo, k14, k3tog, yo, k4. (61 sts) Row 154: K4, p across to last 4 sts, k4. Row 155: K4, y0, sk2p, k to marker, sm, yo, k2tog, k3, yo, k2tog, k3, yo, k2tog, k2, ssk, yo, k3, sm, ssk, yo, k to last 7 sts, k3tog, yo, k4. (59 sts) Row 156: K4, p across to last 4 sts, k4. Rows 157 - 164: Repeat Rows 155 and 156 until there are 51 stitches on needle, ending with a ws row. Note:The centercolumnofeyeletswill have 13 eyelets at this point. Row 165: K4, y0, sk2p, k8, sm, yo, k2tog, k3, yo, k2tog, k7, ssk, yo, k3, sm, ssk, yo, k8, k3tog, yo, k4. (49 sts) Row 166: K4, p across to last 4 sts, k4. Row 167: K4, y0, sk2p, k to marker, sm, yo, k2tog, k3, yo, k2tog, k7, ssk, yo, k3, sm, ssk, yo, k to last 7 sts, k3tog, yo, k4. (47 sts) Row 168: K4, p across to last 4 sts, k4. Rows 169 - 174: Repeat Rows 167 and 168 until there are 41 sts on needle, ending with a ws row. Note: The four outside columns of eyelets will each have 23 eyelets at this point. Row 175: Removing markers as you come to them, k4, yo, sk2p, k across to last 7 sts, k3tog, y0, k4.(39 sts) Row 176: K4, p across to last 4 sts, k4. Rows 177 - 194: Repeat Rows 175 and 176 until there are 21 sts on needle, ending with a ws row.
Fourth Diamond
Row 195: K5, m1, k across to last 5 sts, m1, k5. (23 sts) Row 196: K4, p across to last 4 sts, K4. Rows 197 - 220: Repeat Rows 195 and 196 until there are 47 sts on needle, ending with a ws row. Row 221: K4, y0, sk2p, k across to last 7 sts, k3tog, yo, k4 (45 sts) Row 222: K4, p across to last 4 sts, k4. Rows 223 - 250: Repeat Rows 221 and 222 until there are 17 sts on needle, ending with a ws row.
Fifth Diamond
Row 251 - 268: Repeat Rows 195 and 196 until there are 35 sts on needle, ending with a ws row. Row 269 - 290: Repeat Rows 221 and 222 until there are 13 sts on needle, ending with a ws row.
End Segment
Row 291: K4, yo, sk2p, slip single stitch just made back onto LH needle, k3tog, yo, k4. (11 sts) Row 292: K4, p across to last 4 sts, k4. Row 293: K4, k3 tog, k4.(9 sts) Row 294: K across. Row 295: Ssk, k to last 2 sts, k2tog. (7 sts) Row 296: K across. Rows 297 - 300: Repeat Rows 295 and 296, ending with a WS row. (3 sts) Row 301: K3tog. Cast off.
FINISHING
Weave in ends. Wet block to measurements, pulling out points of diamonds.

Constellation
by KatherineVaughan Every summer, knitters the world over plan to get a jump on their winter gift knitting. But, for many of us, it's so hot in the summer! Who wants to work on some large woolly shawl all summer long? This is probably is why so many of us make cotton dishcloths as gifts... So... why stick to the same-old-same-old when there are so many techniques to try and so many little home projects to experiment with - like... napkin rings!! These rings use sock yarn (perhaps the end of a skein already turned into socks?) and a small number of beads each to depict four popular and easy-to-identify constellations in the night sky. This is a good introduction to beading and chart reading, as the background is a straightforward stockinette stitch with garter edging, and the buttonhole is made with a double yarnover.

SPECIAL ABBREVIATIONS
Bead - Place bead (see Pattern Notes) Yo2 - double yarn over Skill level: Beyond beginner; lace, simple beading techniques Sizes: One size, fits most napkins Finished measurements: $2.25^{\circ}$ wide by $6.5^{\circ}$ long Gauge: 30 stitches and 42 rows over $4^{\circ}$ $10\mathrm{cm})$ in stockinette stitch Yarn: Kangaroo Dyer Superwash Sock, $75\%$ superwash wool, $25\%$ nylon (450 yds/113 gram skein), approx. 0.15 skeins “Glory Needles: US 2 $(2.75\mathrm{mm})$ ), or size needed to obtain gauge Supplies: 26 size $6/0$ beads, $4{-}5/8^{\circ}$ buttons, yarn needle, sewing needle and thread (p1, k1) into yo2 - Purl into the first loop of the double yarn over, then knit into the second loop.
PATTERN NOTES
Prior to casting on for a napkin ring, thread the number of beads needed for the selected ring onto the yarn. Since the yarn needle will probably be too thick to fit through the bead holes, you will probably need a sewing or beading needle to assist you in getting the beads onto your yarn. To place a bead (Bead): Work until the stitch before where the bead should be placed. Slide the bead up until it is nearly flush with the knitting needle. Slip the next stitch purlwise with the yarn (and bead) held in front. Knit the next stitch. On the return row, make sure the bead does not slide into one of the stitches beside it. All Napkin Rings CO 11 sts. Row 1 (RS): K11. Row 2 (Ws): Kfb, k8, kfb, k1. (13 sts) Row 3: Kfb, k10, kfb, k1. (15 sts) Row 4: Kfb, p12, kfb, k1. (17 sts) Row 5: Kfb, k14, kfb, k1. (19 sts) Row 6: K2, p15, k2. Row 7: K7, k2tog, yo2, ssk, k8. Row 8: K2, p7, (p1, k1) into yo2, p6, k2. (19 sts) Row 9: K19. Row 10: K2, p15, k2. Rows 11-48: Repeat Rows 9 and 10 nineteen more times. Rows 49-62: Using the charts 0r written instructions, work desired constellation section. Rows 63-102: Work Rows 10 and 11 twenty times. Row 103: K2, ssk, k11, k2tog, k2. (17 sts) Row 104: K1, k2tog, p11, k2tog, k1. (15 sts) Row 105: K1, k2tog, k9, k2tog, k1.(13 sts) Row 106: K1, k2tog, k7, k2tog, k1. (11 sts) Row 107: K11. BO in knit. Block each ring to make it lie flat. You may wish to steam lightly with some spray sizing (starch) to stiffen the rings, particularly if the yarn you are using has a lot of drape.

Sew button to bound-off end of ring so that the ends overlap by approximately $1^{\prime\prime}$
Constellation Sections
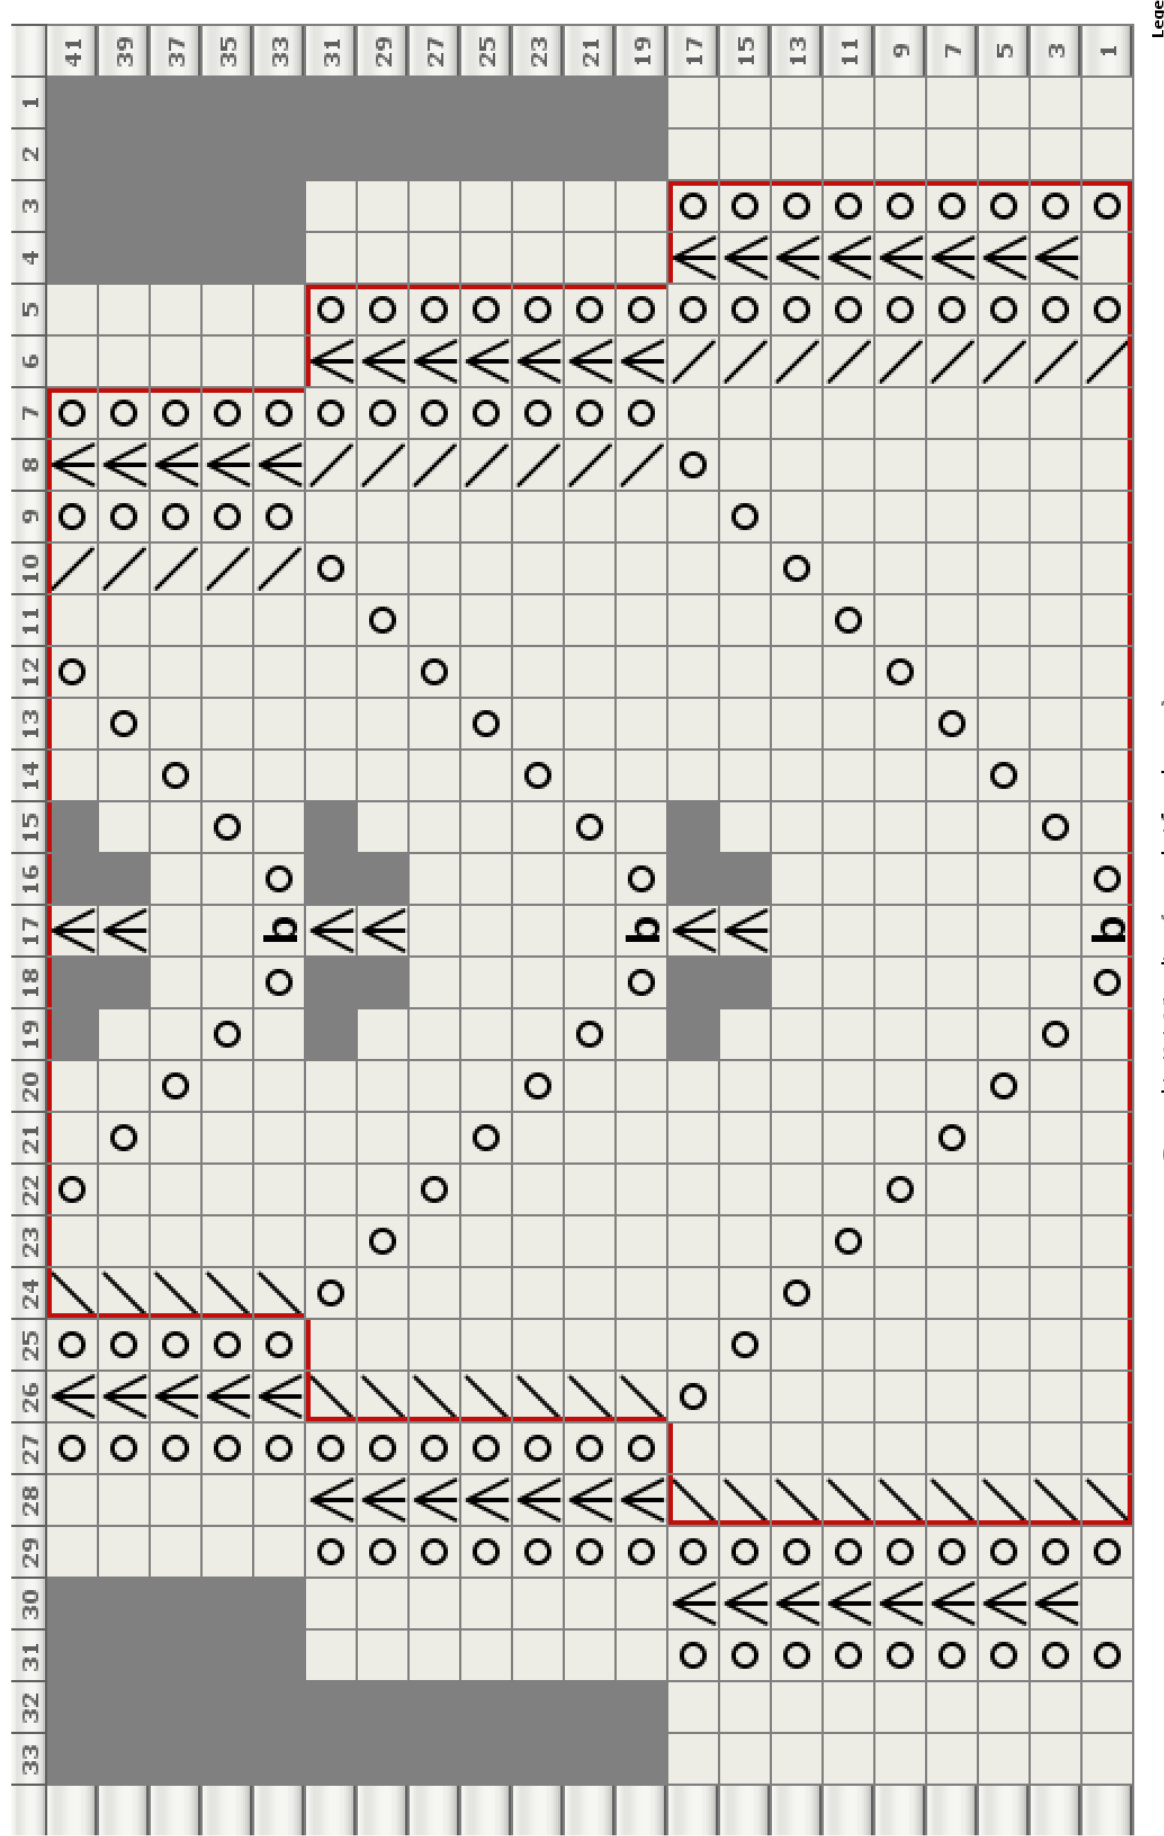
Instructions are given in both line-by-line and chart formats.
Big Dipper
Row 1 (RS): K4, bead, k2, bead, k11. Row 2 and all wS rows: K2, p15, k2. Row 3: K19. Row 5: K3, bead, k4, bead, k10. Row 7: K19. Row 9: K10, bead, k8. Row 11: K19. Row 13: K12, bead, k2, bead, k3. Row 14: K2, p15, k2.
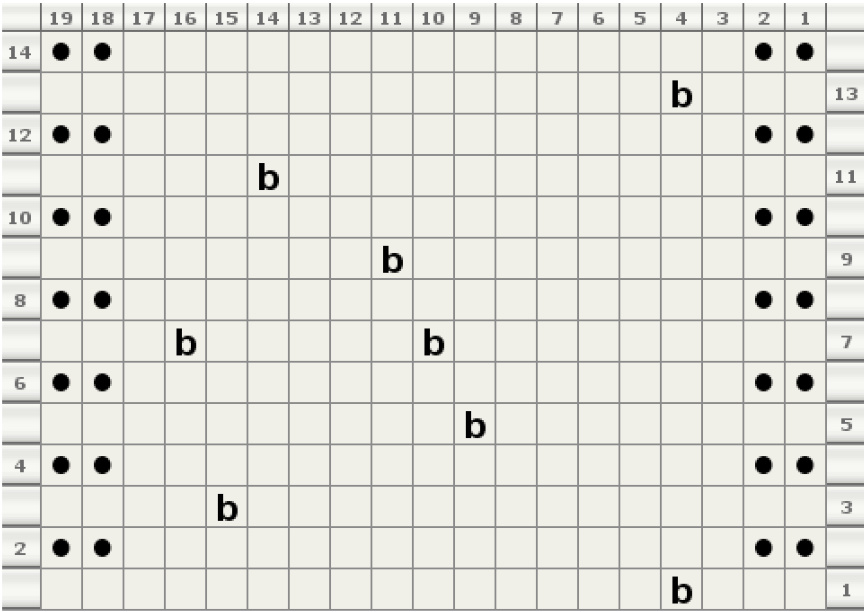
Cassiopeia
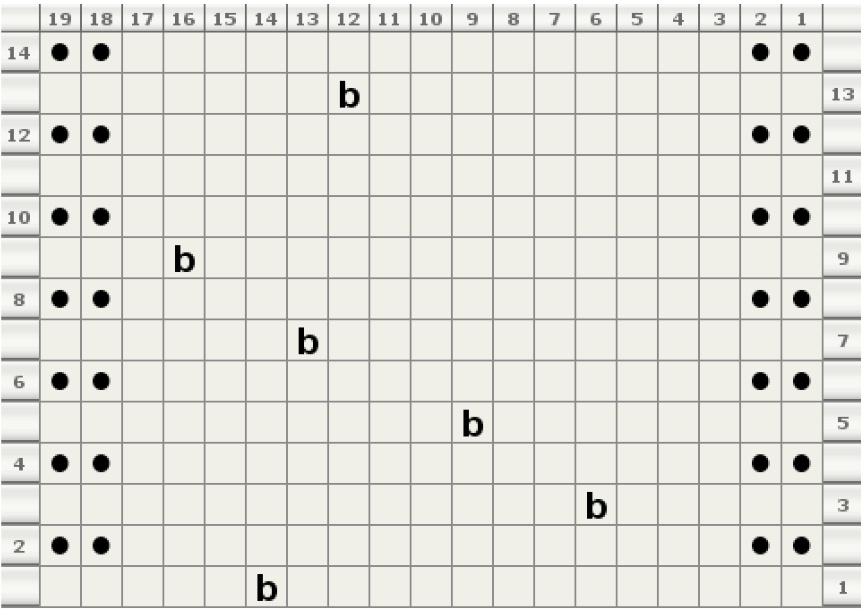
Row 1 (RS): K19. Row 2 and all ws rows: K2, p15, k2. Row 3: K5, bead, k13. Row 5: K11, bead, k7. Row 7: K8, bead, k10. Row 9: K3, bead, k15. Row 11: K15, bead, k3. Row 13: K19. Row 14: K2, p15, k2. Row 2 and all WS rows: K2, p15, k2. Row 3: K3, bead, k15. Row 5: K8, bead, k10. Row 7: K12, bead, k6. Orion Row 2 and all ws rows: K2, p15, k2 Row 3: K14, bead, k4. Row 5: K8, bead, k10. Row 7: K9, bead, k5, bead, k3. Row 9: K10, bead, k8. Row 11: K13, bead, k5. Row 13: K3, bead, k15. Row 14: K2, p15, k2. Row 9: K15, bead, k3. Row 11: K19. Row 13: K11, bead, k7. Row 14: K2, p15, k2. Southern Cross Row 1 (RS): K13, bead, k5. KatherineVaughanhas beenknitting for $^{25+}$ years, designing for more than 5, and dreaming of learning other fiber skills for 10. She primarily designs childrenswear and accessories for adults and the home, and lately has discovered a love of projects using less than one skein of sock yarn. She daylights as a medical librarian in North Carolina, where it is (almost) never too hot toknit. Blog: http://knitwithkt.blogspot.com
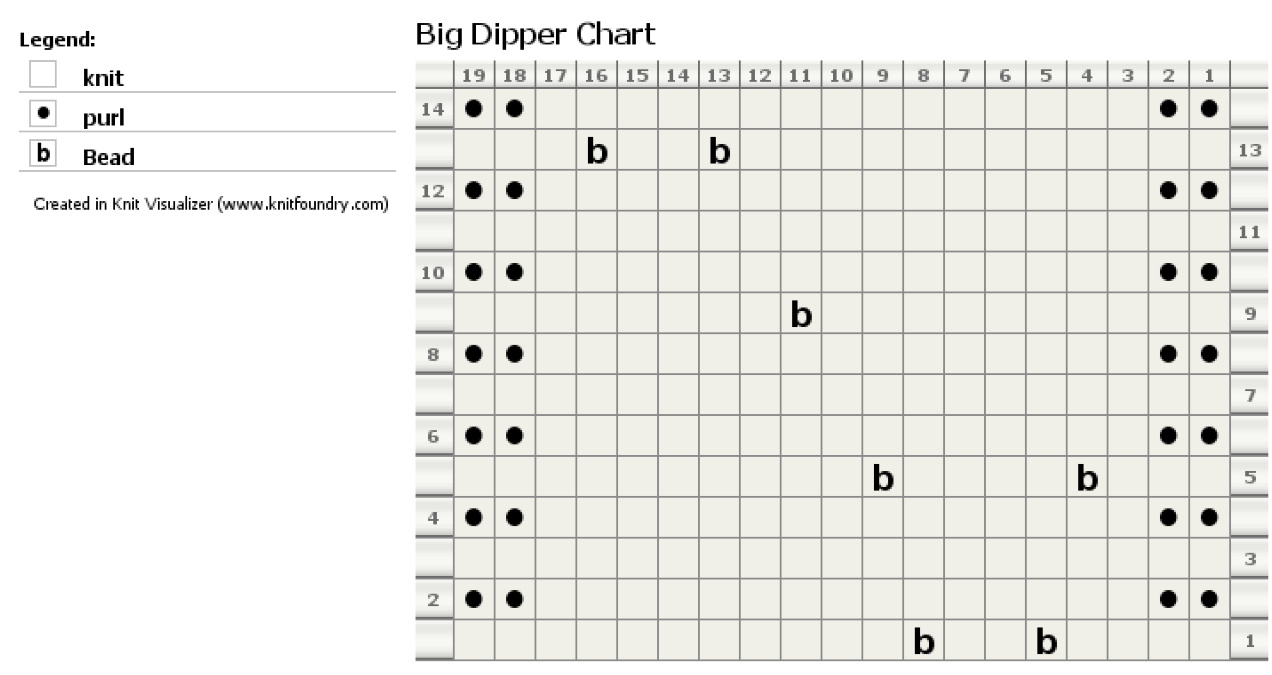
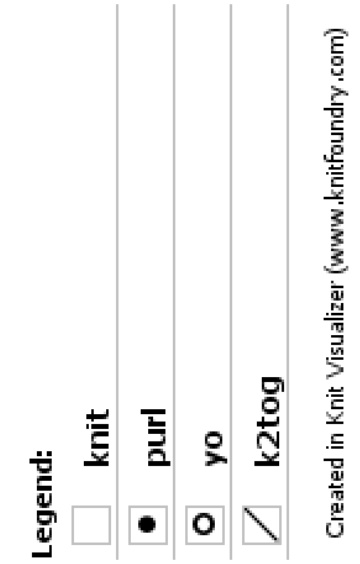
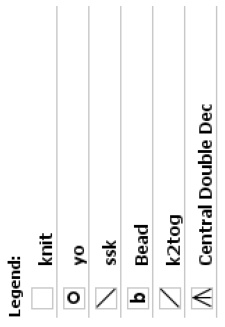
Legend:
knit 口purl Bead Created in Knit Visualizer (www.knitfoundry .com)
Cassiopeia Chart

Created in Knit Visualizer (www.knitfoundry.com)
Orion Chart
Created in Knit Visualizer (www.knitfoundry.com)
Southern Cross Chart
Created in Knit Visualizer (www.knitfoundry .com)
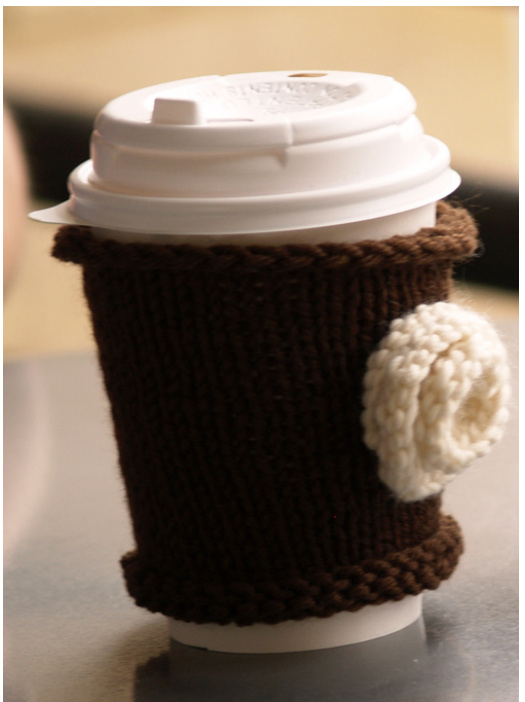
As I designed this coffee sleeve, I imagined how I wanted to feel while using it. $I$ picturedmyselfsittinginmyfavoritecoffee shop, reading a book or sketching in a journal,andlookingverymysteriousand alluring. I would have the coolest coffee cup sleeve in the joint, and I would appear ever so much moremysterious and alluring as I confessed to admirers that I knit it myself.
INSTRUCTIONS
Sleeve Cast on 36 sts. Join, pm to indicate beginning of round, and work stockinette stitch for 4.5 inches. Bind off loosely. Flower Cast on 13 sts. Row 1: K across. Row 2: P across. Skill level: Beginner Finished measurements: $3.75^{\circ}$ wide and $4.5^{\circ}$ high (before allowing edges to curl) Gauge: 9.5 stitches and 14 rows over $2^{\circ}$ $\left.10\mathrm{cm}\right)$ in stockinette stitch Yarn: Cascade 220, less than one skein (you can knit this project with a small amount of any leftover smooth worsted weight yarn). Needles: US 7 $(4.5\mathrm{mm})$ dpns, or size needed to obtain gauge Supplies: Yarn needle, stitch marker Row 3: Kfb across. (26 sts) Row 4: P across. Row 5: Kfb across. (52 sts) Row 6: P across. Bind off, leaving an 8 to 10 inch tail.
FINISHING
Twist flower into a spiral so that it resembles a rose. There's not a right or wrong way to do this, so make it look the way you like it. Sew it together with yarn tail, and then sew it to the sleeve. Weave in ends and head to the coffee shop! Miss T is a writer, knitter and artist who hides out in the badlands of the suburban Upper Midwest with her husband, dog, books and yarn.
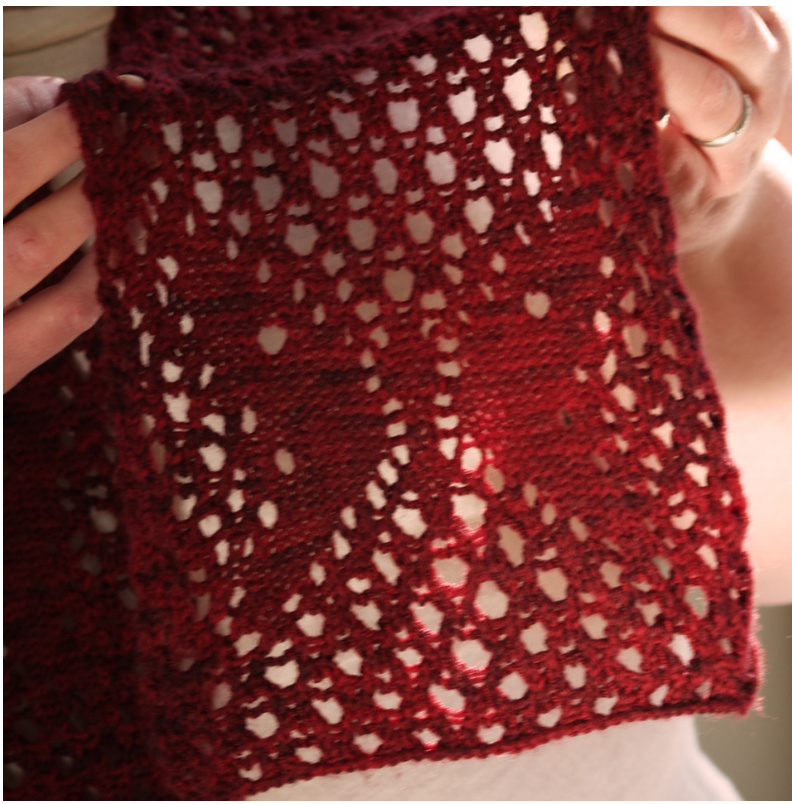
Butterfly Scarflet
by Michelle Miller
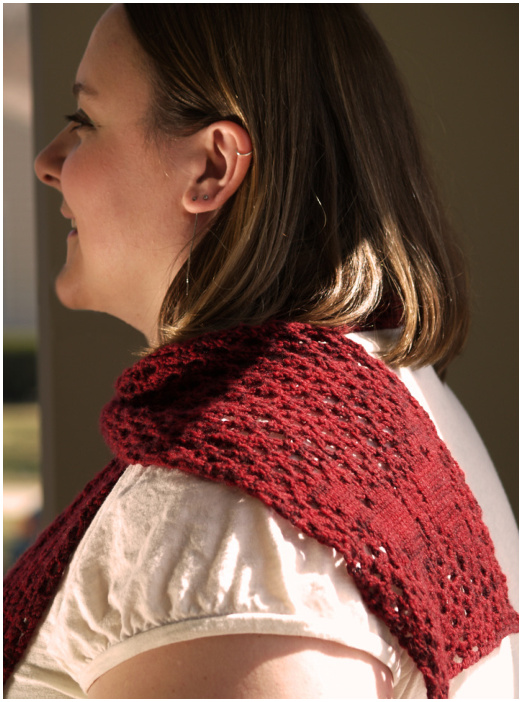
Skill level: Beyond Beginner; simple lace, chart reading or written instructions, three-needle bind-off Finished measurements: $57^{\circ}$ by $8^{\circ}$ (145cm by 21cm) Gauge: 24 stitches and 28 rows over $4^{\circ}$ $10\mathrm{cm})$ in stockinette stitch Yarn: Stricken Smitten Sinful Sock Yarn, $80\%$ Superwash Merino, $10\%$ Cashmere, $10\%$ Nylon (400 yds/366m per $100\mathrm{g}$ skein), color: Aubriana, 1 skein. Sample scarf used 345 yards/315 meters. Needles: US 5 $(3.75\mathrm{mm})$ , or size needed to obtain gauge, and spare needle same size or smaller for three-needle bind-off Last summer we raised a few Painted Lady Butterflies for my three-year-old daughter. The scarf brings back the memories of watching the slow transformationfrom homelycaterpillars tobeautifulbutterflies. It was a happy and bittersweet memory to watch the transformed butterflies take flight and soar off into the wind.
bind off.
All of the knit rows employ a double yarnover in 1 or more places. when purling the even-numbered rows, work a (p1, k1) into every double yarnover created in the previous row.
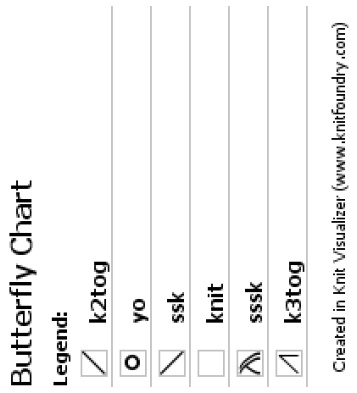
SPECIAL ABBREVIATIONS
Double yo (double yarnover) - Make a yarnover twice on the needle. K3tog - knit 3 together as one Sssk (slip, slip, slip, knit) - slip 3 sts knitwise, one at a time, then k them tog tbl. [Note: This is used only in row 31.]
INSTRUCTIONS
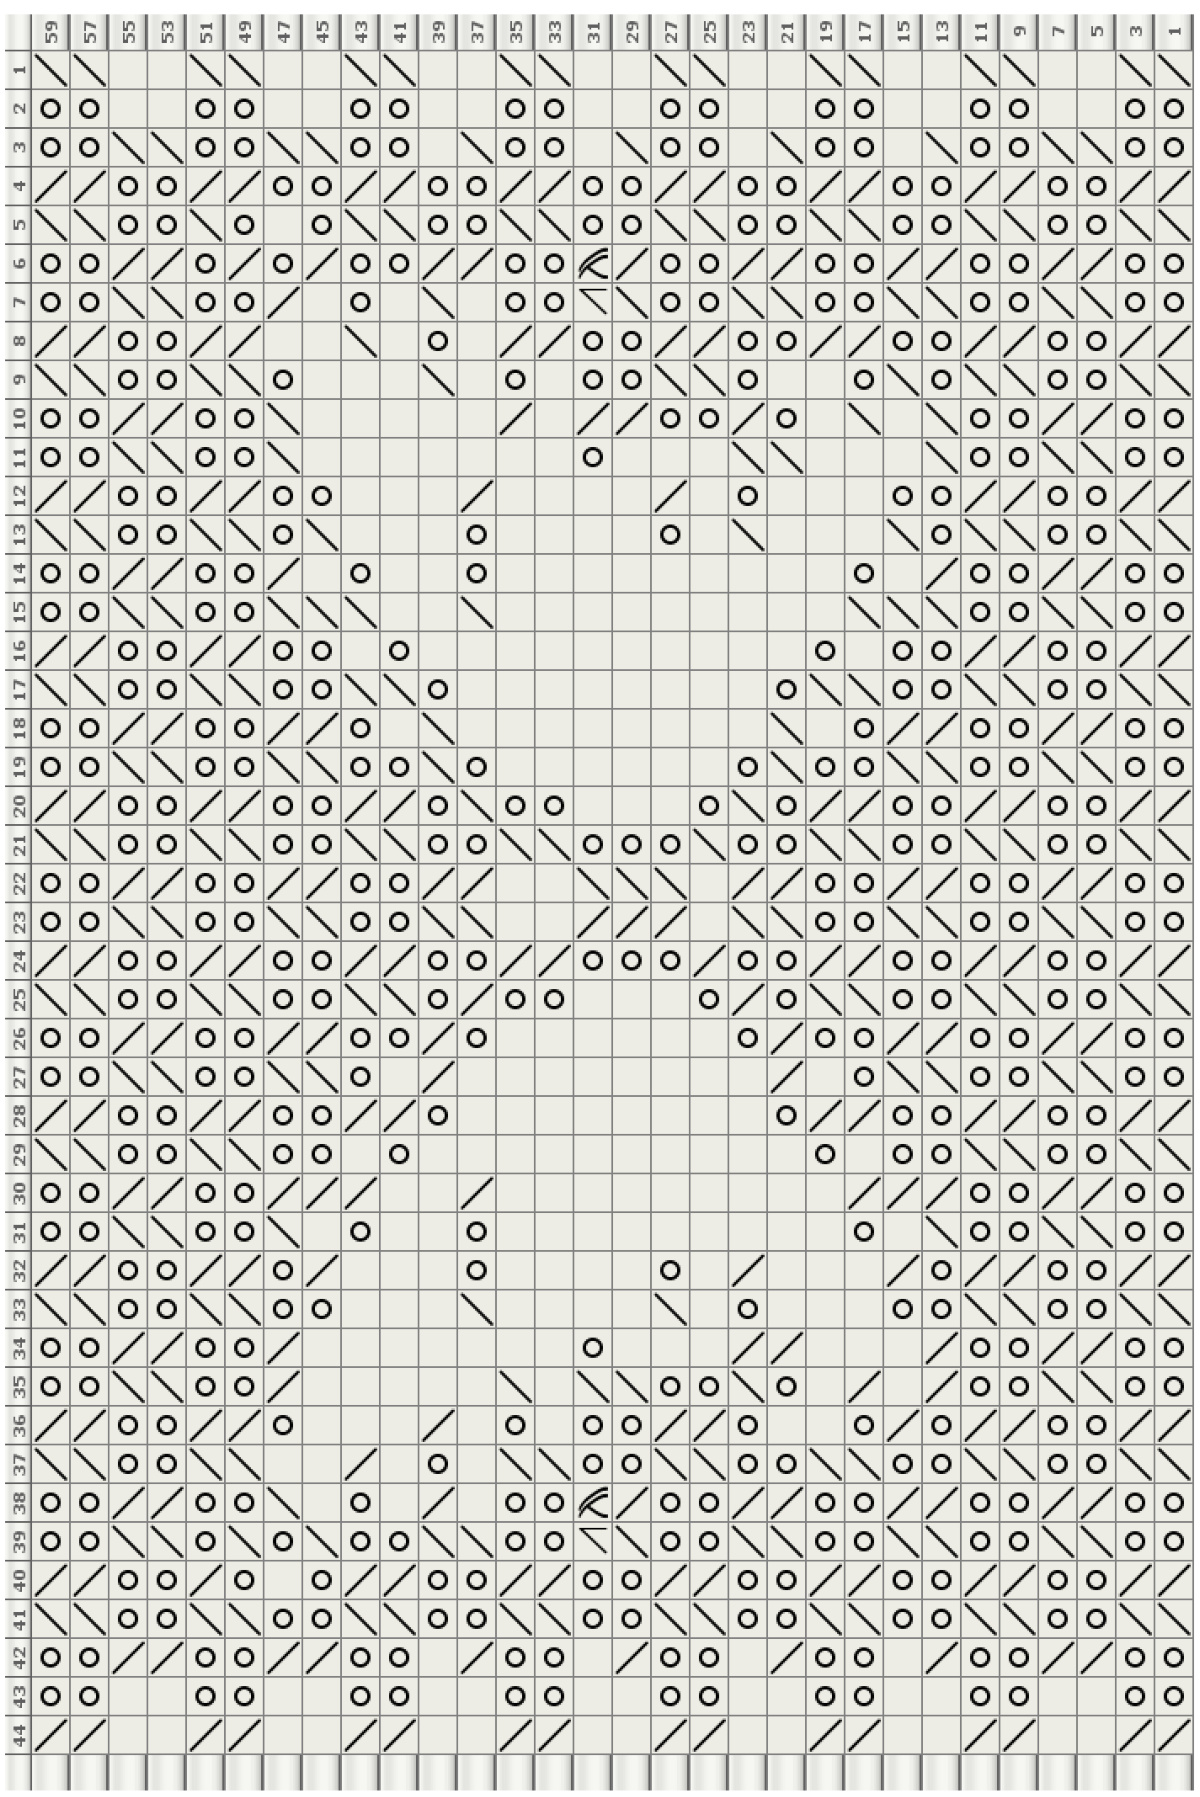
Cast on 44 stitches. Setup row: Purl 1 row. Work the Butterfly Chart through Row 59, working (p1, k1) into all double yarnovers on all even-numbered (purl) rows. This simple lace scarf is knit in two pieces and joined using three-needle After Row 59, continue with Rows 1-8 of the chart, or until the scarf measures 24 inches from cast-on edge.
PATTERN NOTES
Move all stitches to a stitch holder. Repeat the preceding instructions to create the second half of the scarf, but do not place the sts on a holder when finished.
FINISHING
Place the stitches from the first half back onto a needle. Position the two halves of the scarf right sides together and, with the spare needle, connect the two halves of the scarf with a three-needle bind-off. Weave in all ends. Block.
BUTTERFLYCHART WRITTEN INSTRUCTIONS
Row 1 [RS]: [K2tog, double yo, ssk] 11 times. Row 2 and all even-numbered rows [Ws]: Purl, working (p1, k1) into all double yarnovers created on the previous row. [Note that these rows are not shown in the chart.] Row 3: Repeat Row 1. Rows 5 and 7: K2; [k2tog, double yo, ssk] 10 times; k2. Rows 9 and 11: [K2tog, double yo, ssk] 11 times. Row 13: K2, k2tog, double yo, ssk, k2tog, double yo, k2tog, k2tog; [double yo, ssk, k2tog] 5 times; double yo, ssk, ssk, double yo, ssk, k2tog, double yo, ssk, k2. Row 15: K3, double yo, ssk, k2tog, yo, k2tog, k2, yo, k2tog, k1; [k2tog, double yo, ssk] 4 times; k1, ssk, yo, k2, ssk, yo, ssk, k2tog, double yo, k3. Row 17: K2tog, double y0, ssk, k2tog, double yo, ssk, yo, k2tog, k3, yo, k2tog, k1; [k2tog, double yo, ssk] 3 times; k1, ssk, yo, k3, ssk, yo, k2tog, double yo, ssk, k2tog, double yo, ssk. Row 19: K2tog, double y0, ssk, k2tog, double yo, ssk, k7, yo, k2tog, k1; [yo, ssk, k2tog, yo] 2 times; k1, ssk, yo, k7, k2tog, double yo, ssk, k2tog, double yo, ssk. Row 21: K2, k2tog, double yo, ssk, k2tog, yo, k1, yo, k2tog, k5, yo, k2tog; [k2tog, double yo, ssk] 2 times; ssk, yo, k5, ssk, yo, k1, yo, ssk, k2tog, double yo, ssk, k2. Row 23: K3, double y0, ssk, k2tog, double yo, ssk, k2tog, yo, k2tog, k5, yo, k2tog, yo, ssk, k2tog, yo, ssk, yo, k5, ssk, yo, ssk, k2tog, double yo, ssk, k2tog, double yo, k3. Row 25: K2tog, double yo, ssk, k2tog, double yo, ssk, k2tog, yo, k9, yo, k2tog, k2, ssk, yo, k9, yo, ssk, k2tog, double yo, ssk, k2tog, double yo, ssk. Row 27: K2tog, double yo, ssk, k2tog, double yo, ssk, k2tog, yo, k1, ssk, yo, k7, yo, k2tog, ssk, yo, k7, yo, k2tog, k1, yo, ssk, k2tog, double yo, ssk, k2tog, double yo, ssk. Row 29: K2, k2tog, double y0, ssk, k2tog, double yo, ssk, k10, yo, k2tog, ssk, yo, k10, k2tog, double yo, ssk, k2tog, double yo, ssk, k2. Row 31: K3, double yo, sssk, k3tog, double yo, ssk, yo, k9, yo, k2tog, ssk, yo, k9, yo, k2tog, double yo, sssk, k3tog, double yo, k3. Row 33: K2tog, double y0, ssk, k2tog, double yo, ssk, k11, yo, k2tog, k2, ssk, yo, k11, k2tog, double yo, ssk k2tog, double yo, ssk. Row 35: K2tog, double yo, ssk, k2tog, double yo, ssk, yo, ssk, k9, yo, k2tog, k2, ssk, yo, k9, k2tog, yo, k2tog, double yo, ssk, k2tog, double yo, ssk. Row 37: K2, k2tog, double y0, ssk, k5, ssk, double yo, k2tog, k3, yo, k2tog, yo, ssk, k2tog, yo, ssk, yo, k3, ssk, double yo, k2tog, k5, k2tog, double yo, ssk, k2. Row 39: K3, double yo, ssk, k2tog, yo, k2tog, k7, yo, k2tog; [k2tog, double yo, ssk] 2 times; ssk, yo, k7, ssk, yo, ssk, k2tog, double yo, k3. Row 41: K2tog, double yo, ssk, k2tog, yo, k9, yo, k2tog, k1; [yo, ssk, k2tog, yo] 2 times; k1, ssk, yo, k9, yo, ssk, k2tog, double yo, ssk. Row 43: K2tog, double y0, ssk, k2tog, double yo, k2tog, k5, yo, k2tog, k1; [k2tog, double yo, ssk] 3 times; k1, ssk, yo, k5, ssk, double yo, ssk, k2tog, double yo, ssk. Row 45: K2, k2tog, double y0, ssk, k5, yo, k2tog, k1; [k2tog, double yo, ssk] 4 times; k1, ssk, yo, k5, k2tog, double yo, ssk, k2. Row 47: K2, k2tog, yo, k1, yo, ssk, k1, yo, k2tog; [k2tog, double yo, ssk] 6 times; ssk, yo, k1, k2tog, yo, k1, yo, ssk, k2. Row 49: K2tog, double y0, ssk, yo, ssk; [yo, ssk, k2tog, yo] 8 times; k2tog, yo, k2tog, double yo, ssk. Row 51: [K2tog, double yo, ssk] 11 times. Rows 53 and 55: K2; [k2tog, double yo, ssk] 10 times; k2. Rows 57 and 59: [K2tog, double y0, ssk] 11 times.
Flower Power
by TennySnedeker
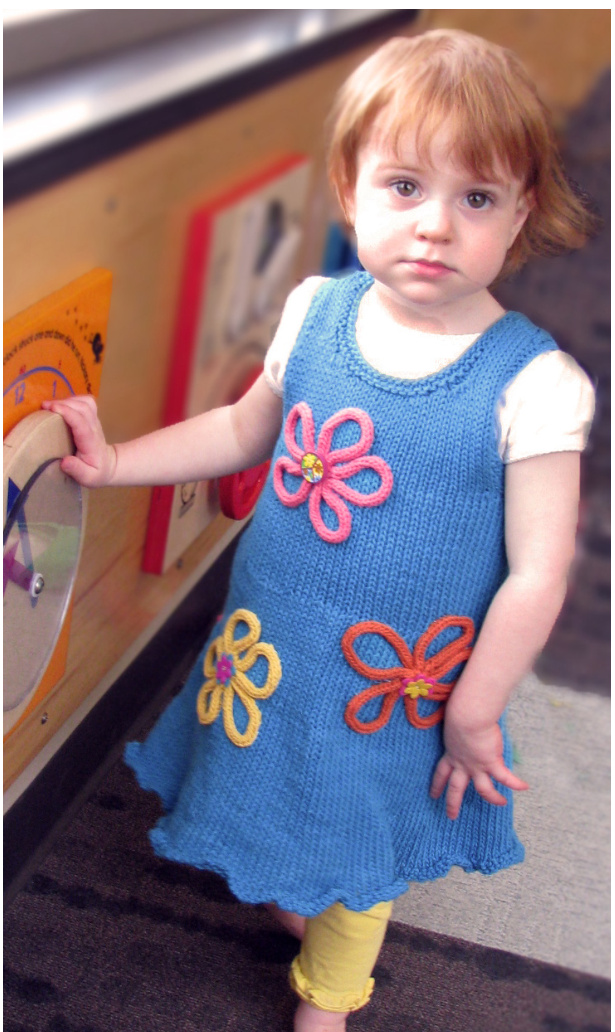
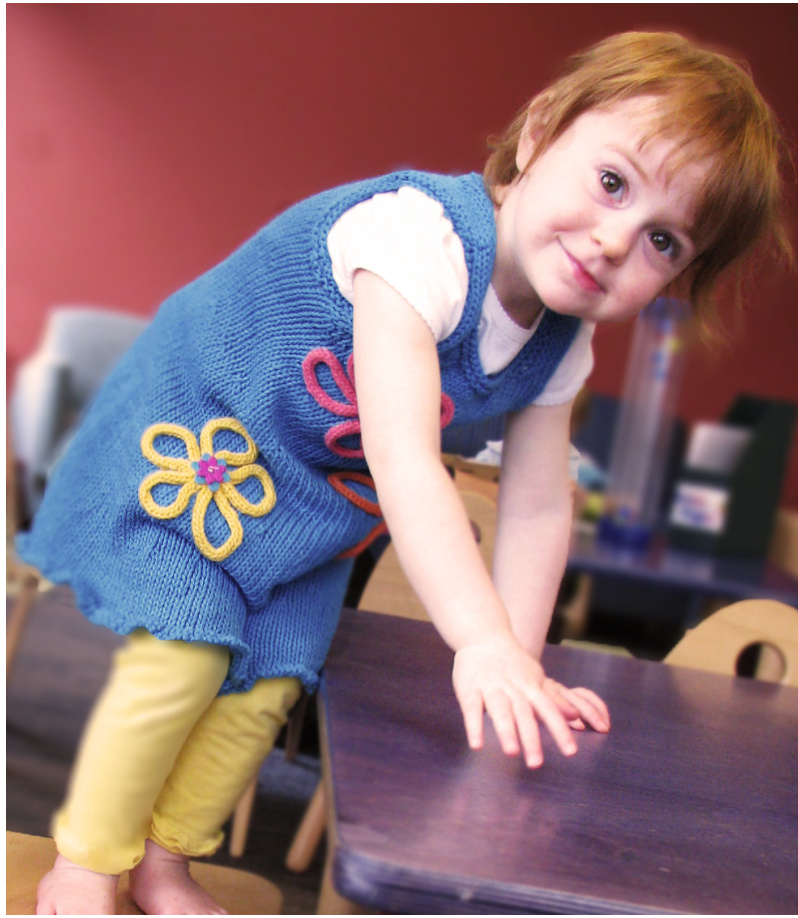
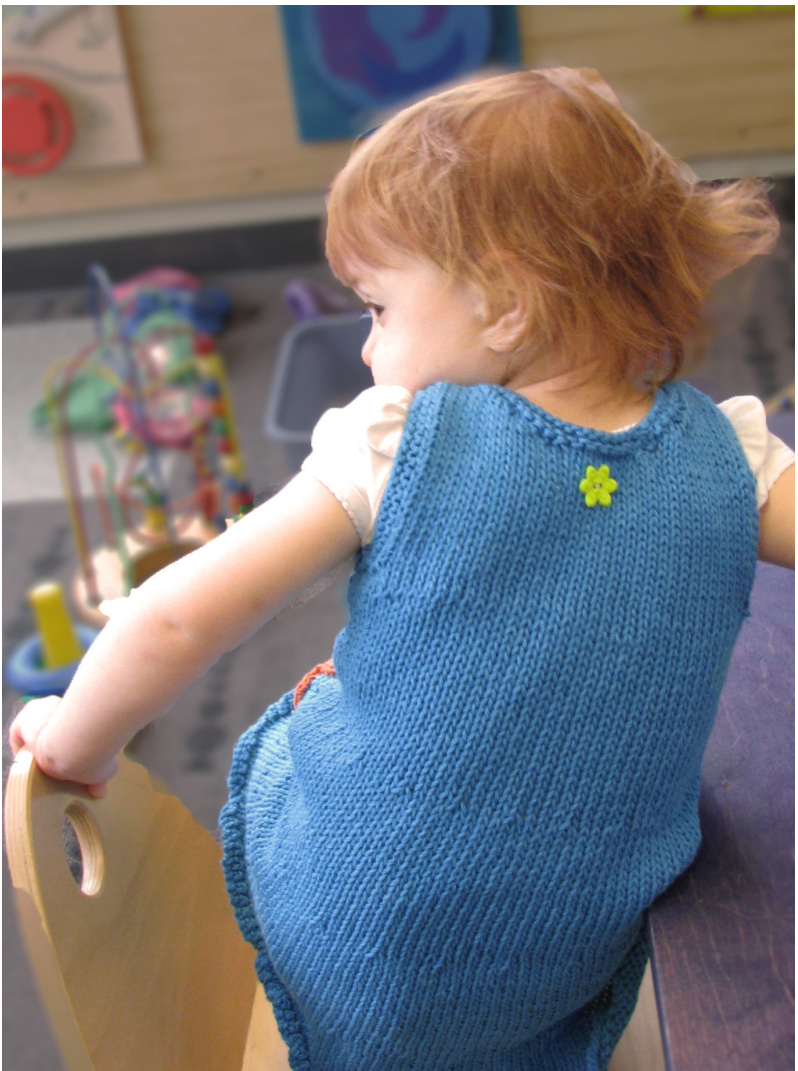
Big, bold I-cord daisies on a bold, bright background are reminiscent of the flower power craze of the 7os, and make a fun dress or tank top for the summer. The recommended yarn is an easy-care cotton/ acrylic blend for a wear-everyday-dress. Make the shorter length for a tank top to wearwithshorts.
PATTERN NOTES
This dress is worked in the round from the bottom up and divided at the armholes, so there are no seams tosew. Gauge is not critical for the skirt of the dress (worked on the US10 needles), but should be maintained when working the bodice of the dress Skill level: Beyond beginner; circular knitting, I-cord Sizes: $3\mathrm{m}$ 一$6\mathrm{m}$ $12\mathrm{m}$ $18{-}24\mathrm{m}$ , 3-4, 5-6, 7-8] Shown in $12\mathrm{m}$ Finished measurements: Chest: 18 [19, 20, 21, 22, 24, 26]" Length to hem: approx 15.5[17.5, 19, 21, 23.5, 26.75, 29.75]" Gauge: On US 8 $\left(5\mathrm{mm}\right)$ , 18 stitches and 25 rows; on US 10 (6mm) 16.5 stitches and 23 rows; all over $4^{\circ}$ $\mathrm{[0cm)}$ worked in stockinette stitch (see Pattern Notes) Yarn: Berroco Weekend, $75\%$ acrylic, $25\%$ Peruvian cotton [205 yds/189 m per $3.5\ \mathrm{oz}/100\mathrm{gm}$ skein): MC 5942, Cerulean: 2[2, 2, 2, 3, 3, 4] skeins For fowers: 1 skein each of 5948 Nectarine, 5921 Banana, 5946 Phlox, or scraps of other yarn or embroidery foss for the I-cord fowers. Needles: US 10 ( $\left(\mathsf{G m m}\right)$ $24^{\circ}$ circular needles, US 8 $\left(5\mathrm{mm}\right)$ 16” circular needles, US 6 ( $\left[4\mathrm{mm}\right]$ dpns , or sizes needed to obtain gauges Supplies: Yarn needle, sewing needle and thread (to attach fowers and buttons to dress), as many buttons as there are fowers (for the center) (on the US 8 needles) in order to ensure proper fit.
INSTRUCTIONS
DRESS
Skirt
Using US 10 circular needle and MC yarn, CO 284 [300, 316, 330, 346, 378, 410) sts. Join without twisting.
Round 1: Purl.
Round 2: K2tog across. (142[150,158,165,173,189,205] sts) Work even in St st; at the same time, workadecreaseround3timesasfollows: $\mathbf{1^{st}}$ Decrease Round: Work on Round 13[15, 17, 18, 21, 23, 26] as described for corresponding size: Size 3m: $^{*}[\mathsf{K}5,$ k2tog] 3 times, k4, k2tog; rep from \* 4 more times; k5, k2tog. (121 sts) Size 6m: \*[K5, k2tog] 4 times, k4, k2tog; rep from \* 3 more times; [k5, k2tog] 2 times. (128 sts) Size 12m: [K5, k2tog, k4, k2tog] 10 times; [k5, k2tog] 4 times.(134 sts) Size 18-24m: \*[K5, k2tog] 7 times, k4, k2tog; rep from \* to end of round. (141 sts) Size 3-4: [K5, k2tog, k4, k2tog] 9 times, [k5, k2tog] 8 times.(147 sts) Size 5-6: [K5, k2tog] 27 times. (162 sts) Size 7-8: $*[\mathsf{K}5,$ k2tog] 5 times, k4, k2tog; rep from \* to end of round. (175 sts) Work even in St st until the $2^{n\mathtt{d}}$ decrease round. 2nd Decrease Round: Work on Round 25 [29, 32, 34, 40, 45, 51) as described for corresponding size: Size 3m: K5, k2tog, [k4, k2tog] 19 times. (101 sts) Size 6m: $^{*}\mathsf{K}5$ , k2tog, [k4, k2tog] 9 times; rep from \* 1 more time; k4, k2tog. (107 sts) Size 12m: $*|K5$ ,k2tog, [k4, k2tog] 10 times; rep from \* 1 more time. (112 sts) Size 18-24m: $*|K5$ ,k2tog, [k4, k2tog] 6 times; rep from \* 2 more times; [k4, k2tog] 2 times. (118 sts) Size 3-4: $^{*}\mathsf{K}5$ ,k2tog, [k4, k2tog] 7 times; rep from \* 2 more times. (123 sts) Size 5-6: [K4, k2tog] 27 times. (135 sts) Size 7-8: K5, k2tog, [k4, k2tog] 28 times. (146 sts) Work even in St st until the $3^{\mathsf{r d}}$ decrease round.
3rd Decrease Round: work on Round 37 [43, 47, 50, 59, 67, 76) as described for corresponding size: Size 3m: K4, k2tog; [k3, k2tog] 19 times. (81 sts) Size 6m: $\times\mathsf{K4}_{\phantom{,}}$ , k2tog, [k3, k2tog] 9 times; rep from \* 1 more time; k3, k2tog. (86 sts) Size 12m: $\ast\mathsf{K}4$ ,k2tog, [k3, k2tog] 10 times; rep from \* 1 more time. (90 sts) Size 18-24m: $\ast\mathsf{K4}.$ ,k2tog; [k3, k2tog] 6 times; rep from \* 2 more times; [k3, k2tog] 2 times. (95 sts) Size 3-4: $\ast\mathsf{K}4$ , k2tog; [k3, k2tog] 7 times; rep from \* 2 more times. (99 sts) Size 5-6: [K3, k2tog] 27 times. (108 sts) Size 7-8: K4, k2tog; [k3, k2tog] 28 times. (117 sts) For all sizes, continue as follows: Change to Us8 circular needle and work even in St st until work measures 11.25 [13, 14.25, 15.75, 18, 20.75, 23.25)", 0r desired length to underarm shaping. Divide for front and back: Next row: K38 [41, 43, 45, 47, 52, 56], BO 4 [4, 4,4, 4, 4, 6], K40 [42, 44, 46, 48, 53, 57], B0 4 [4, 4, 4, 4, 4, 6].
Front Bodice
Working in rows, continue as follows: Work even in St st, dec 1 st at each end of every RS row $2\ [\ 2,\ 2,\ 1,\ 2,\ 2,\ 3]$ times, until armhole measures 2.25 [2.5, 2.75, $3.25,\,3,\,3.5,\,4]^{\prime\prime},$ ending on ws row. There are 32 [35, 37, 40, 41, 46, 47] sts rem for front.
Front Neck Shaping
Knit across first 14 [14, 15, 17, 17, 19, 20] sts, place next 6 [7, 7, 7, 8, 9, 9] on a holder for neck; join new ball of yarn and work last 14 [14, 15, 17, 17, 19, 20] sts. Working both sides at the same time, BO 2 sts at neck edge twice, BO 0 [0, 0, 0, 0,
1, 1] sts at neck edge once, dec 1 st at neck edge of every row 2 times until there are 7 [7, 7, 9, 9, 10, 10] sts remaining. Work even until armhole measures 4.25 [4.5, 4.75, 5.25, $5.5,\,6,\,6.5)^{\prime\prime}$ Place shoulder sts on holder for a three needle bind-off with back shoulder sts in "Finishing".
Back Bodice
Work as for front. At end of armhole shaping (before shaping the neck), there will be 34 [36, 38, 41, 42, 47, 48) sts rem for back. Proceed for shaping back neck in same manner as front neck shaping.
FINISHING Shoulders
Place shoulder sts for left shoulder back on needles; hold front and back with right sides facing, and work a three-needle bind-off. Repeat with the second shoulder.
Neckband
Using US 8 circular or dpns, and beginning at right back neck edge, pick up sts from back neck; pick up sts evenly along back and front shoulders [approx 3 sts for every 4 rows]; pick up sts from front neck, and pick up evenly along left front and back shoulder sides. Join to work in the round. Round 1: Purl. (1 garter ridge worked) Round 2: Knit. Bind off in purl.
Armholes
Using US 8 dpns, and beginning at underarm, pick up sts evenly around (approx 3 sts for every 4 rows). Round 1: Purl. (1 garter ridge worked)
Round 2: Knit.
Bind off in purl. Repeat for other armhole.
Daisies
Using one of the contrasting colors and US 6 dpns, CO 3 sts. Work I-cord until length is long enough to make a daisy shape of desired length. Bind off. Use sewing thread to sew I-cord into a daisy shape, then sew to dress. Sew a pretty button in the center of each daisy.
TANKTOPVARIATION
To make a tank top, work as for dress, but space dec rnds as follows: Work $1^{\mathrm{st}}$ decrease round at Round 11 [12, 13, 14, 15, 17, 19]. Work $2^{\mathsf{n d}}$ decrease round at Round 20 [22, 22,27, 29, 33, 36]. Word $3^{\mathsf{r d}}$ decrease round at Round 29 [32, 31, 40, 43, 49, 53]. Work from here on as for dress. Jenny has been sewing and knitting children's garments since 1996 as a way toprovide quality clothing at affordable prices. As a designer, she is combining her love for sewing and knitting by incorporating sewing elements into her knitted patterns. Visit on www. cutiepiefashions.com or on www.ravelry. com/people/CutiePieFashions.

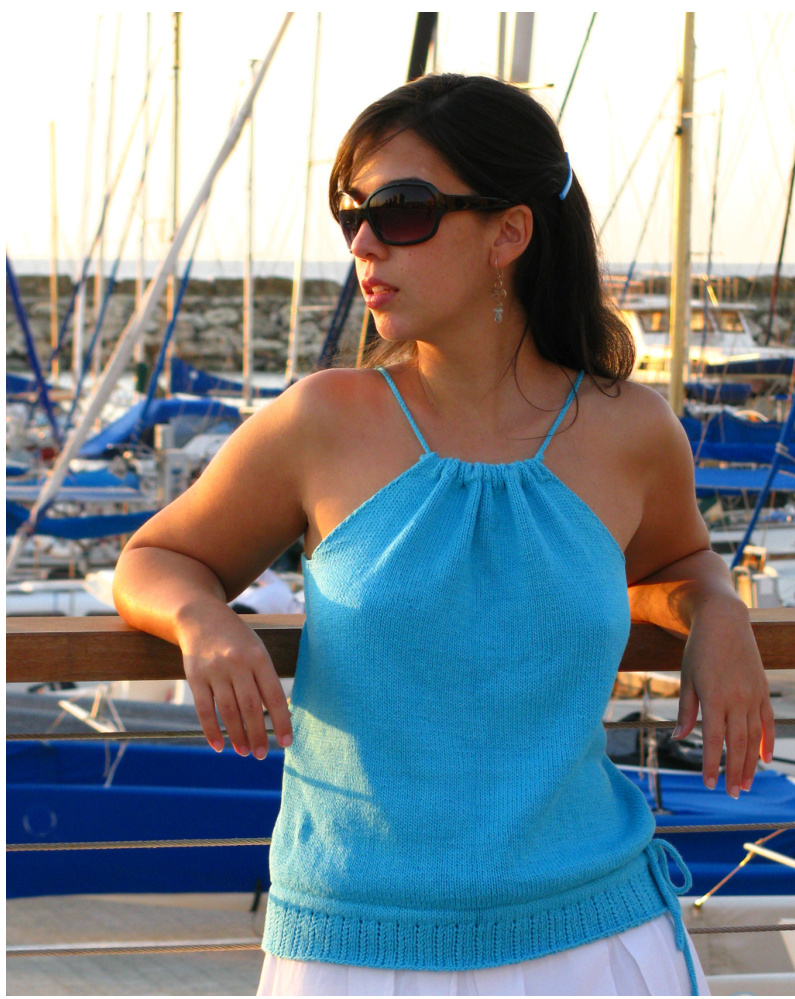
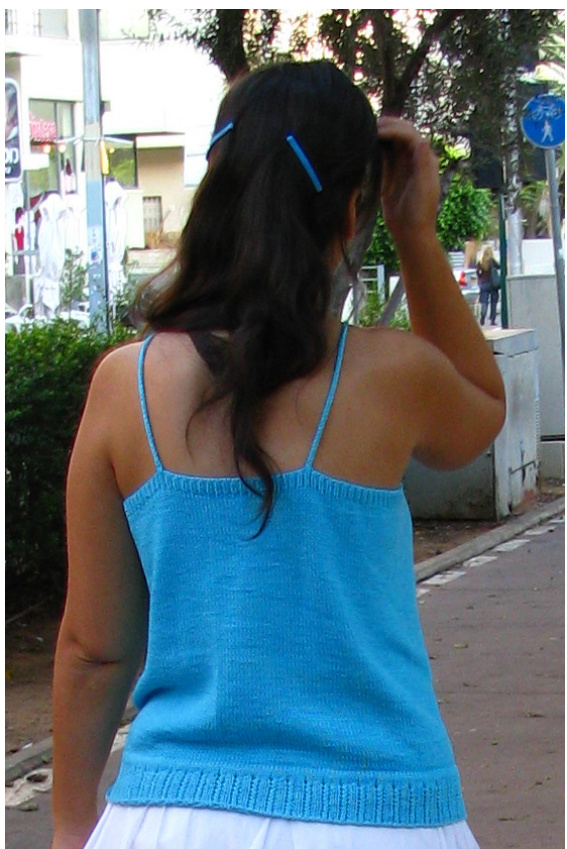
I got this yarn in a swap. It's the kind of yarn I would never have bought for myself, but surprisingly enough, it looked good next to my face. With such a vibrant color, I'll probably only wear it when I'm away from my natural habitat and where people don't know me, when I'm free to be whoever I want to be: when I'm on holiday somewhere else! So the yarn had to become a "holiday" garment—a beautiful reminder me of a stroll along the beach in the sunset, or a yachtcruise.
Skill level: Beyond Beginner
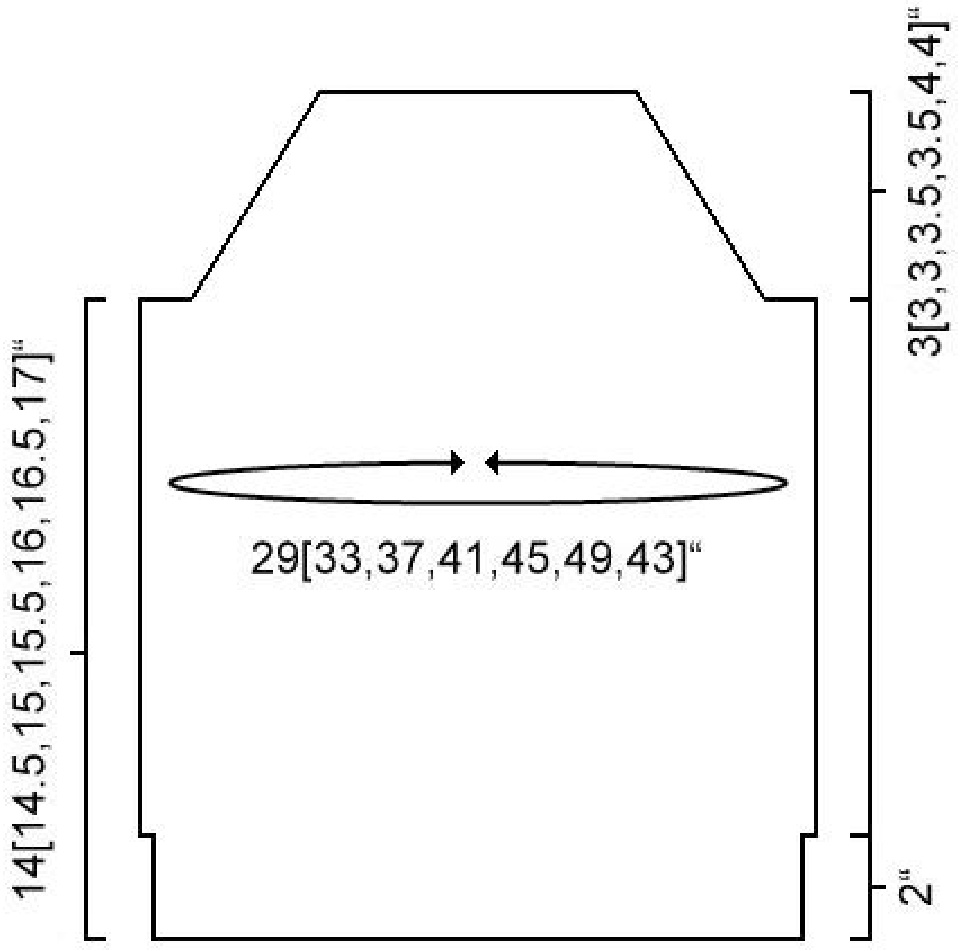
Sizes: XS [S, M, L, 1X, 2X, 3X]. Model shown in size M. Finished measurements: Chest: 29 [33, 37, 41, 45, 49,53]”" Length to armpits: 14[14.5, 15, 15.5, 16, 16.5, 17]" Gauge: 24 stitches and 32 rows over $4^{\circ}$ $\left[10\mathrm{cm}\right)$ instockinette stitch Yarn:BBB Filati Sbrillo $[70\%$ cotton, $30\%$ rayon; $186\;\mathrm{yd}/170\;\mathrm{m}$ per $50\mathrm{g}$ skein]; color: 530; 5 [6, 6, 7, 7, 8, 9] skeins. Suggested yarn substitution: Knit Picks Shine Sport $[60\%$ Pima Cotton, $40\%$ Modal; 110 yd/101 m per $50\mathrm{g}$ skein] Needles: US 2 $(2.75\mathrm{mm})$ circular, $32^{\circ}$ (or longer for larger sizes), US 4 $(3.5\mathrm{mm})$ circular, $32^{\circ}$ (or longer, for larger sizes) or size you need to obtain gauge, US 4 $(3.5\mathrm{mm})$ dpns, for I-cords Supplies: Tapestry needle; 3 stitch markers, one of them in a different color (for end of round); 2 locking stitch markers or safety pins; 2 stitch holders or safety pins; waste yarn, enough to hold an entire round of stitches Worked in the round over a multiple of 4 sts:
Row 1: K1, yo, sl1, k1, psso, k1. Row 2: K1, k2tog, yo, k1.
I-cord
Using a dpn, CO 3 sts. K all sts. Next Row: Without turning the work, slide all stitches to the other end of the needle. Bring the yarn around the back of the work and knit the stitches again. Repeat this row until I-cord is the desired length.
PATTERN NOTES
The top is worked in the round up to the armholes, with the exception of the drawstring casing at the hip. After the back is bound off, the rest of the front is worked back and forth. The back ribbing is worked with a smaller needle while the front is worked with a larger needle, simultaneously. This technique is a little like knitting in the round with two circulars, and should be intuitive once you've started. The drawstring casing may be a little challenging for some knitters. If you'd like an even easier knit, you can substitute the casing with a [yo, k2tog] round, then string the I-cord through the eyelets.
INSTRUCTIONS
Lace edging
With smaller needle, lo0sely C0 176[200, 224, 248, 272, 296, 320] sts. Join for working in the round, being careful not to twist. Place marker for end of round. Work lace pattern until piece measures $z^{\prime\prime}$ With larger needle, knit one round.
Drawstring casing
Place 2 sts on holder. With a second ball of yarn (do not break the first one) knit to 2 sts before marker. Place remaining 2 sts on holder. Turn work. Work back and forth in Stockinette (knit on RS, purl on WS) for 5 rows (end on WS). Place all stitches on waste yarn. Break yarn. With RS facing, replace first 2 held stitches on needle and k2. Using backward loop cast-on, CO 172[196, 220, 244, 268, 292, 316] sts. Being careful not to twist, knit 2 last held sts. Resume end of round marker. Knit 6 rows in the round. K2, \*knit together 1 st from needle and one held st; rep from \* until there are no held stitches left, k2. (176[200, 224, 248, 272, 296, 320] sts)
Front
From this point, the entire is worked flat with the larger needle in stockinette.
Body
Work in stockinette until piece measures 13.5[14, 14.5, 15, 15.5, 16, 16.5] inches from CO edge. Next row: Decrease 1 st on each side of piece (2 sts decreased). Repeat once more. (72[84, 96,108,120, 132, 144] sts)
Back ribbing
Set-up round: K 82[94, 106, 118, 130, 142, 154] sts and place marker. Switch to smaller needle, \*sl1, p1; rep from \* for 100[112, 124, 136, 148, 160, 172] sts - this will place you 6 sts past end-of-round marker; place marker. These two new markers note the beginning and end of back ribbing.
The next section will be worked with two needles simultaneously: larger for the front and smaller for the ribbing.
Decrease 1 st at beginning of every row until front measures 3[3, 3, 3.5, 3.5, 4, 4] inches from back ribbing BO. At this point, try on the top (you can leave the needle in place and use it to tug on the top stitches). The finished top will be about .75 inches longer than it is now. Mark the previous row on both sides using locking stitch markers or safety pins. Work flat in stockinette for an additional 1.5 inches. BO all stitches. Next round: With larger needle, knit to marker; with smaller needle, $\ast\mathsf{k1}$ , p1; rep from \* to end of ribbing marker (6 stitches after end of round marker). Repeat this round 4 more times.
I-cords
Using dpns, make two I-cords, 35[35, 35, 35,40, 40, 40] and 42[46, 50, 54, 58, 62, 66] inches long. With larger needle, knit to ribbing. With smaller needle, tightly BO all ribbing in pattern. With larger needle, knit to end.(76[88, 100, 112, 124, 136, 148] sts)
FINISHING
With tapestry needle, sew top of front to the inside, onto the marked row, creating a casing at the top edge of the front of the garment. Thread the shorter I-cord through this casing, and pull tightly on both ends to gather together (you might want to sew the ends of the casing to the I-cord, to prevent it from moving). Do not sew ends of I-cords to back of shirt until piece is blocked, as it might stretch. With top turned inside-out, place the longer I-cord inside the lower casing, and sew the open edge of the casing to the last row of lace. After blocking, adjust length of strap and sew ends of straps to back of shirt, or alternatively, tie them around your neck. Galia Lael knits, designs, and spins in sunny Israel, where she dreams of a winter cold enough to actually wear all her gorgeous hand knits. When she's not knitting, she sells her handcrafted spindles at SpindleDesigns.etsy.com.
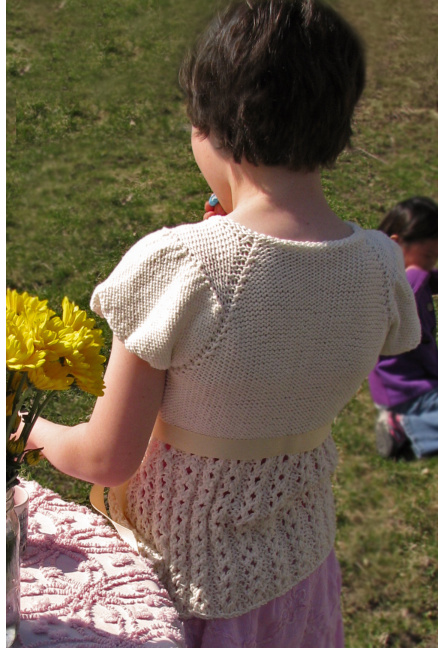
Mi Amorita
by Rachel Dickman
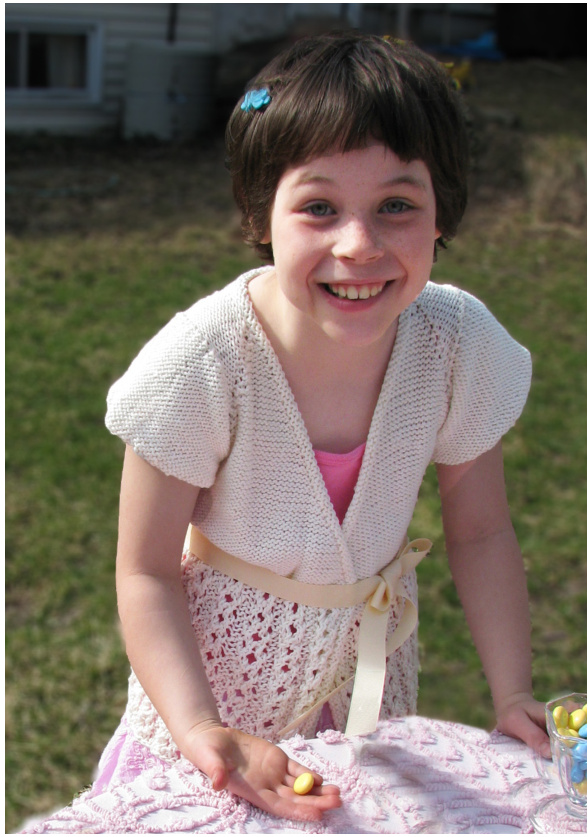
ItneverfailsaroundherethatafterI finish something for myself, my girls are all about getting it in their size. They manipulate my every emotion by telling me that there's "love in every stitch" (totally swiped from SpongeBob) and they'll wear it every day (which I know is not true). Still, I can't resist those little faces, so here is the Four Season Cardigan shrunk down to kid sizes. I changed the neckline a bit so it would at least have a fighting chance of staying on those little shoulders.
PATTERN STITCHES
Italian Chain Rib Pattern
Source: Barbara G. Walker's $\"_{\mathsf{A}}$ Treasury of Knitting Patterns" Row 1 (Ws): K2, \*p4, k2, rep from \* to end of row. Row 2 (RS): P2, \*k2tog, (YO) twice, ssk, Skill lvel: Advanced Beginner Sizes: XS [S, M, L, XL] Finished measurements: Chest: 21 [23, 25, 27, 28]" [Note: The sweater is designed to be worn with minimal ease, so go up to the nextsizeifyourchildisinbetweenmeasurements.] Gauge: 18 stitches and 24 rows over $4^{\circ}$ (10cm) in stockinette stitch Yarn: Classic EliteBam Boo, $100\%$ bamboo(77yardsh $\mathbf{\tau}^{\left\lceil50\right\rceil}\mathbf{g}$ skein); Shade 4916 White; 8 [9, 10, 10, 12] skeins Needles: US 7 $\mathrm{4.5~mm})$ dpns, US 7 $(4.5\;\mathrm{mm})$ circular needle, US 8 $\left(5\;\mathrm{mm}\right)$ circular needle, or sizes needed to obtain gauge. Supplies: Yarn needle; stitch markers; waste yarn for holding sleeve stitches; outside closure, can be a length of $1^{\,\circ}$ ribbon, button, or anything you wish, snap for inside closure. p2, rep from \* to end of row. Row 3: K2, $\ast_{\mathsf{p1}}$ , purl into front of $1^{\mathrm{st}}\;{\mathsf{y o}},$ purl into back of $2^{\mathsf{n d}}$ yo, p1, k2, rep from \* to end of row. Row 4: P2, $^{*}\mathsf{y o}_{I}$ $\mathsf{s s k},$ k2tog, yo, p2, rep from \* to end of row.
PATTERN NOTES
·Please remember to read all instructions before you begin; you will be performing neck shaping and raglan shaping simultaneously. When choosing a size for a child, pick a size that is closest to their actual chest measurement. If they are between sizes, go up to the next size.
CARDIGAN
With circular needle, CO 1 st for right front, pm, C0 7[7, 7, 9, 11] sts for right sleeve, pm, C0 16[18, 20, 22, 25] sts for back, pm, C0 7[7, 7, 9, 11] sts for left sleeve, pm, and CO 1 st for left front. (32[34, 36, 42, 49] sts)
Shape Raglan and Neck
Row 1 [ws]: Kfb, sm, kfb; k across sleeve to next marker; kfb, sm, kfb; k across back to next marker; kfb, sm, kfb; k across sleeve to next marker; kfb, sm, kfb. (40[42, 44, 50, 57] sts)
Row 2 [RS]: P all stitches.
Row 3: Kfb, k across right front to marker; kfb, sm, kfb; k across sleeve to next marker; kfb, sm, kfb; k across back to next marker; kfb, sm, kfb; k across sleeve to next marker, kfb, sm kfb, k to last st, kfb. Row 4: P all stitches. Repeat Rows 3 and 4 and additional 5[5, 6, 6, 6] times more for a total of 7[7, 8, 8, 8] increase rows.(100 [102, 114, 120, 127] sts )
Puff Sleeve
Create the puff sleeve now by working a ruffle stitch in the Sleeve Increase Row, followed by a "plain" row in the sleeve section. Note: As you work the next 2 rows in the sleeve sections, you are also performing one more repof Rows 3 and 4 for a total of 8[8, 9, 9, 9] raglan increases. Sleeve Increase Row [ws]: Kfb, k across right front to marker; kfb, sm, kfb; $\ast\mathsf{k1}$ , m1; rep from \* across sleeve to 1 st before next marker; kfb, sm, kfb; k across back to next marker; kfb, sm, kfb; $\ast\mathsf{k1}$ m1; rep from \* across sleeve to 1 st before next marker; kfb, sm, kfb; k across front
Next Row [RS]: P all sts. You will now have 42[42, 46, 50, 54] sts in each sleeve section.
Finish Raglan and Neck Shaping
Repeat Rows 3 and 4 an additional 8[9, 9, 10, 10] times more for a total of 16[17, 18, 19, 19] raglan increases and 15[16, 17, 18, 18] neck increases (there was no neck increase on the first row, just a raglan increase). (228[240, 256, 276, 287] sts) In the next 2 rows, you will be removing the sleeve sections from your needle by placing the stitches on waste yarn, then joining the fronts to the backs at the underarms. In the process, you will be removing all markers. Sleeve Removal Row [ws]: Kfb, knit to first marker; remove marker, place next 58[60, 64, 70, 74] sts (all sts to second marker) on waste yarn for sleeve, remove marker; k to third marker; remove marker, place next 58[60, 64, 70, 74] sts 0n waste yarn for sleeve, remove marker; k to last st,kfb.(114[122, 130, 138, 141] sts) Next Row [RS]: P all sts. In this row, you join the fronts to the backs at the underarms. Note: At this point, you can place the entire sweater on scrap yarn to try on, if you wish to do so. Work even in stockinette stitch through the body for approximately 12[16, 16, 20, 24 ] rows, performing the following neck shaping increase row every ws row. (126[138, 146, 158, 165] sts) Neck Shaping Increase Row [wS]: Kfb, k all sts to last st, kfb. Work even in stockinette stitch for another $1^{\prime\prime}$ (or the width of the ribbon you've chosen). If you've chosen a button, 1" should be fine. Ribbing Set-Up Row [RS]: P all sts, and increase/decrease $2[2,\,0,\,0,\,-1]$ stsevenly across row.(128[140, 146, 158, 164] sts)
Ribbing
Change to larger needle (this is so the ribbing part of the sweater doesn't pull). Work Italian Chain Ribbing for 6[7, 8, 10, $12]^{\prime\prime},$ or desired length. BO all stitches loosely.
Sleeves
With sweater turned inside out (WS facing), transfer held sts of one sleeve to double-point needles. Join yarn and k all sleeve sts until piece measures $0.5[0.5,0.5,\,1,\,1]^{\prime\prime}\circ\Gamma$ desired sleeve length. Sizes XS[M, L] - Decrease Row [wS]: K2, $\ast\mathsf{k1}$ , k2tog; rep from \* to last 2 sts, k2. (40[44, 48] sts) Size S - Decrease Row [ws]: $\ast\mathsf{K}1$ k2tog; rep from \* to end of row. (40 sts) Size XL - Decrease Row [ws]: K3, $\ast\mathsf{k}1$ k2tog; rep from \* to last 4 sts, k4. (52 sts) All sizes: Knit 2 rounds in K2, P2 ribbing and BO all sts loosely in pattern.
FINISHING
Starting at the bottom of the right front, pick up stitches at a 2/3 ratio along the edge, pick up at a 1/1 ratio along the top of sleeve and back of neck and then back to a 2/3 ratio for the left front. Row 1 [wS] - Knit all sts. Row 2 [RS]- Purl all sts. Row 3 [wS] - BO all sts. Weave in all ends. Block as desired. If using a ribbon for closure, fold ribbon and sweater in half to find the center. Referring to the photo, backstitch the ribbon to the center back of sweater, directly above the start of the ribbing. Try the sweater on and mark on the inside where the snap should be sewn. Wrap ribbon around sweater to the front, without pulling and sew to the right front; sew the left side ribbon to the sweater at the underarm. Place sweater on your amorita and let them feel the love! From Rachel: Roses are red, violets are blue, I do love to share my knitting with you!
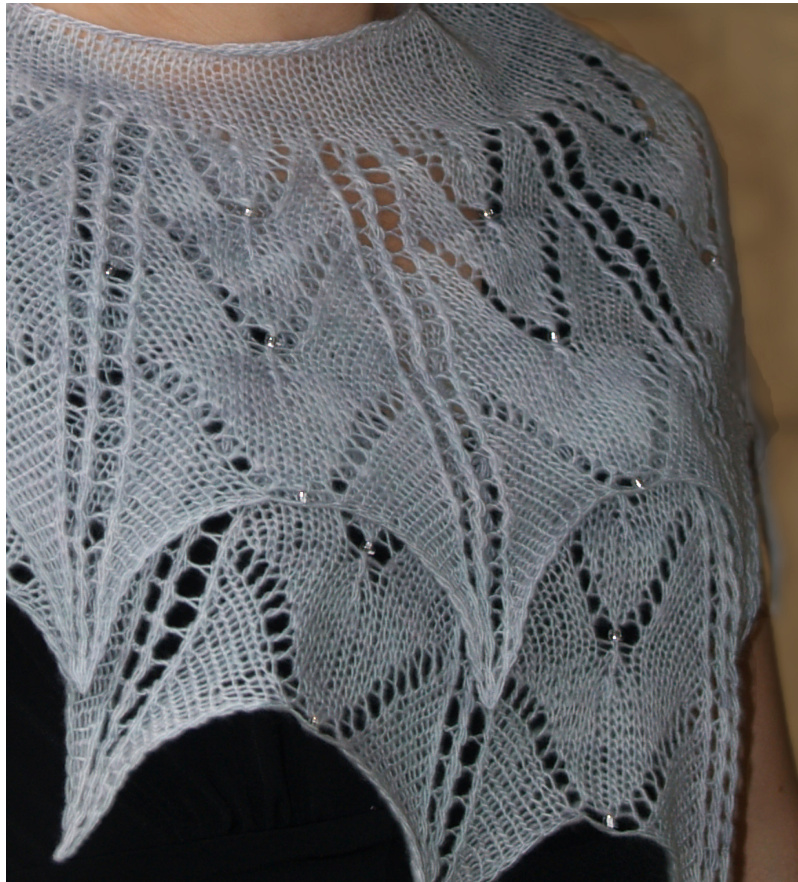
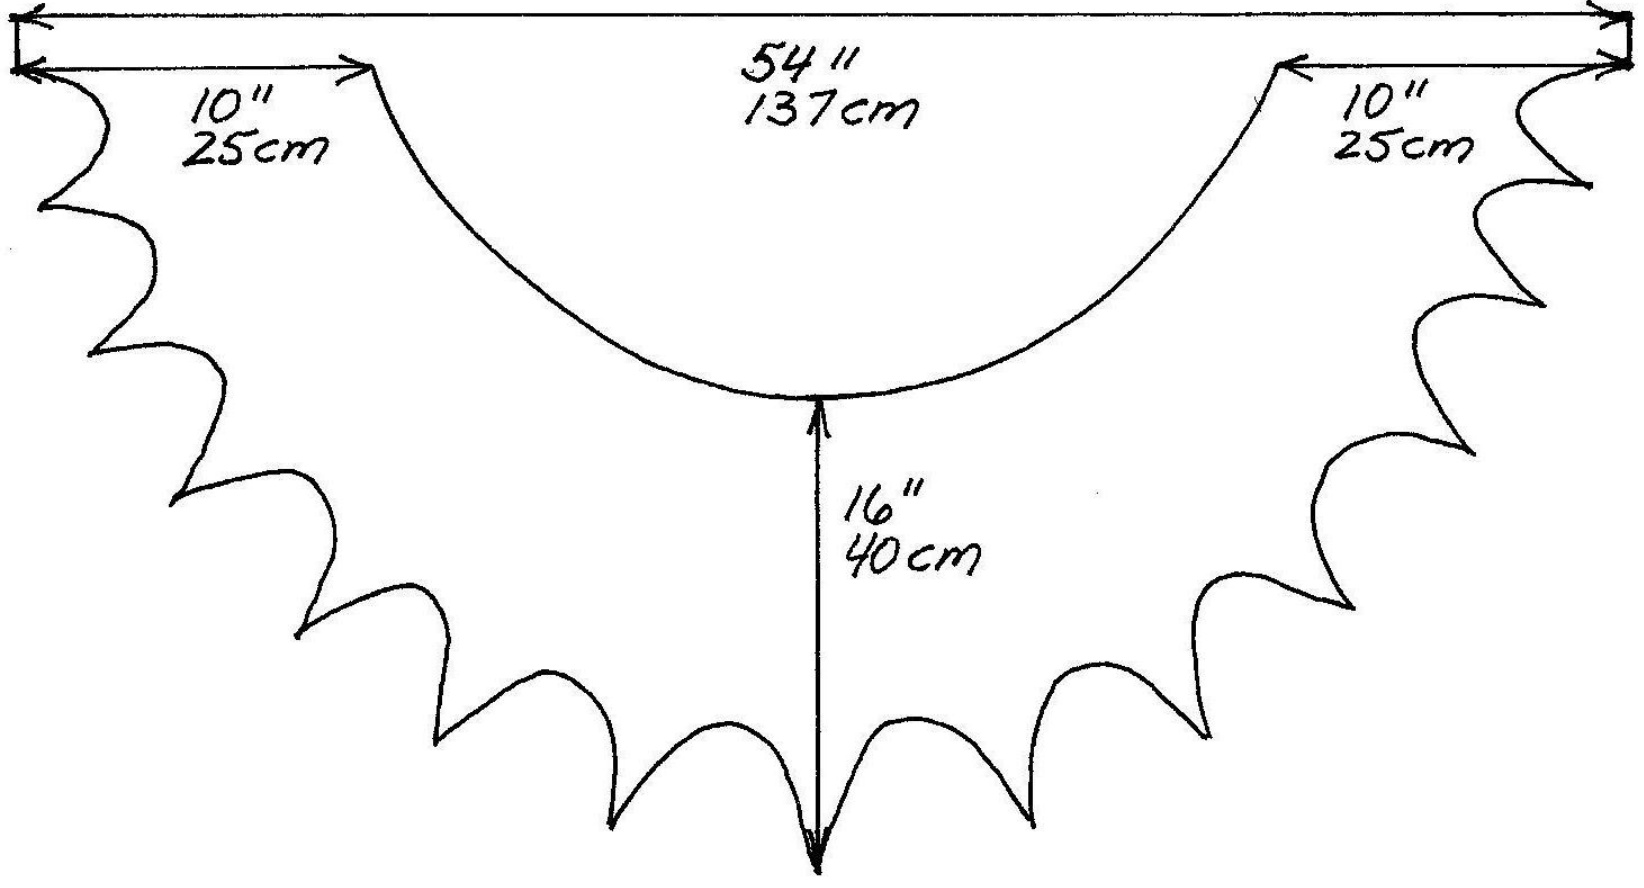
Pavonia by Susanna IC
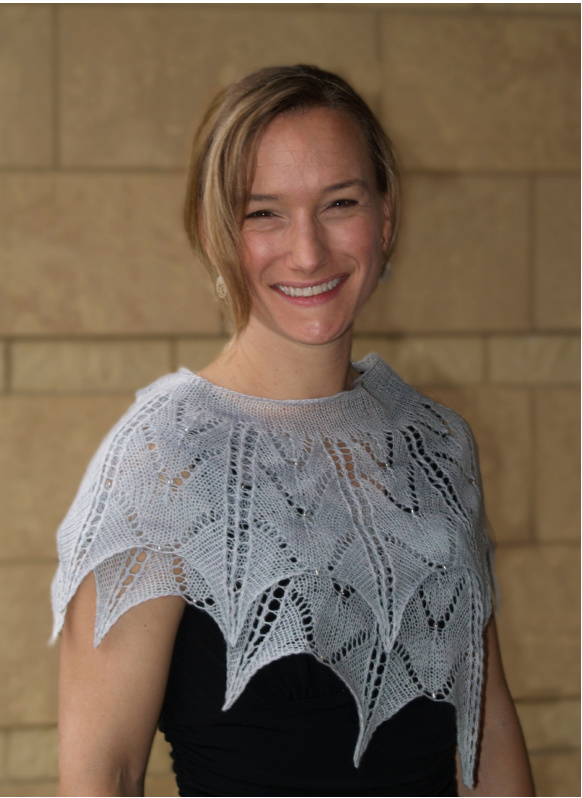
The wings of butterflies and moths with their fragile beauty inspire this design. I wanted to capture their delicate qualityandIbelievethatthislace patternexpresses that. Theyarn color is reminiscent of the silvery moonwhile the beads sparkle like the first stars in an evening sky. The shawlette's crescent shape helps it stay in place more readily than traditional triangular shawls and its smaller dimensions provide a weightless little cover up for summer dresses. Knitted out of a singleskeinof Malabrigo Lace, with all reverse rows purled and the beads optional,Pavoniais anidealquickproject for any knitter, even one new to lace knitting.
SPECIAL ABBREVIATIONS
Bead - place bead: Insert the crochet hook through the hole in the bead and slide the bead up onto the hook. Pick the stitch that is about to be knit off the left Skill level: Adventurous; lace, chart reading Finished measurements: $16^{\circ}$ wide (at the center point) by $54^{\circ}$ long (41cm by $137\mathrm{cm})$ Gauge: 16 stitches and 24 rows over $4^{\circ}$ $10\mathrm{cm})$ in stockinette stitch Note: Correct gauge is not critical for this project, but your final measurements and yardage requirements may vary if your gauge is different. Yarn: Malabrigo Lace, $100\%$ Baby Merino Wool (470 yd $/\mathrm{~}430\mathrm{~m~}$ per $50\;\mathrm{g})$ : Color Polar Morn, 1 skein Needles: US 7 $(4.5\mathrm{mm})$ $32^{\circ}$ circular needle, or size needed to obtain gauge Supplies: Tapestry needle, blocking pins, (optional) $42\;4\mathrm{mm}$ beads, (optional) steel crochet hook (for bead placement) [Hook should easily fit through bead holes.] needle with the hook, slide the bead down onto the stitch, slip the stitch back to the left needle and knit it. Cdd - Centered double decrease: Insert right needle knit-wise into the next two stitches, slip the stitches together off the left needle. Knit the next stitch. With left needle, pass the two slipped stitches over the knit stitch and off the needle.
INSTRUCTIONS
CO 341 sts lo0sely. Follow the Pavonia lace chart (Rows 1-41), working the designated pattern repeat 14 times across each row. All even-numbered (WS) rows are purled. After completing Row 41 of the lace chart, purl Row 42, then proceed to Short Row Shaping. Row 1: K2, [yo, k1, yo, ssk, k9, yo, Bead, yo, k9, k2tog] 14 times; [yo, k1] 2 times; k1.
Row 2 and all even-numbered rows (ws): Purl.
Row 3: K2, [yo, cdd, yo, ssk, k8, yo, k3, yo, k8, k2tog] 14 times, yo, cdd, yo, k2. Row 5: K2, [yo, cdd, yo, ssk, k7, yo, k5, yo, k7, k2tog] 14 times, yo, cdd, yo, k2. Row 7: K2, [yo, cdd, yo, ssk, k6, yo, k7, yo, k6, k2tog] 14 times, yo, cdd, yo, k2. Row 9: K2, [yo, cdd, yo, ssk, k5, yo, k9, yo, k5, k2tog] 14 times, yo, cdd, yo, k2. Row 11: K2, [yo, cdd, y0, ssk, k4, yo, k11, yo, k4, k2tog] 14 times, yo, cdd, yo, k2. Row 13: K2, [yo, cdd, y0, ssk, k3, yo, k13, k3, k2tog] 14 times, yo, cdd, yo, k2. Row 15: K2, [yo, cdd, y0, ssk, k2, yo, k6, cdd, k6, yo, k2, k2tog] 14 times, yo, cdd, yo, k2. Row 17: K2, [yo, cdd, yo, ssk, k1, yo, k6, cdd, k6, yo, k1, k2tog] 14 times, yo, cdd, yo, k2. Row 19: K2, [yo, cdd, y0, ssk, k7, yo, Bead, yo, k7, k2tog] 14 times, yo, cdd, yo, k2. Row 21: K2, [yo, cdd, yo, ssk, k6, yo, k3, yo, k6, k2tog] 14 times, yo, cdd, yo, k2. Row 23: K2, [yo, cdd, yo, ssk, k5, yo, k5, yo, k5, k2tog] 14 times, yo, cdd, yo, k2. Row 25: K2, [yo, cdd, y0, ssk, k4, yo, k7, yo, k4, k2tog] 14 times, yo, cdd, yo, k2. Row 27: K2, [yo, cdd, y0, ssk, k3, yo, k9, yo, k3, k2tog] 14 times, yo, cdd, yo, k2. Row 29: K2, [yo, cdd, yo, ssk, k2, yo, k4. cdd, k4, yo, k2, k2tog] 14 times, y0, cdd, yo, k2.
Row 31: K2, [yo, cdd, yo, ssk, k1, yo, k4, cdd, k4, yo, k1, k2tog] 14 times, yo, cdd, yo, k2. Row 33: K2, [yo, cdd, y0, ssk, k5, yo, Bead, yo, k5, k2tog] 14 times, yo, cdd, yo, k2. Row 35: K2, [yo, cdd, y0, ssk, k4, yo, k3, yo, k4, k2tog] 14 times, yo, cdd, yo, k2. Row 37: K2, [yo, cdd, y0, ssk, k3, yo, k3, yo, k3, k2tog] 14 times, yo, cdd, yo, k2. Row 39: K2, [yo, cdd, yo, ssk, k2, yo, k2, cdd, yo, k2, k2tog] 14 times, yo, cdd, yo, k2. Row 41: K2, [yo, cdd, yo, ssk, k1, yo, k2, cdd, k2, yo, k1, k2tog] 14 times, yo, cdd, yo, k2. Work Row 42 (purl across row), then proceed to Short Row Shaping.
Short Row Shaping
K 109 sts, turn work. P 15 sts, turn. K14, ssk to close gap, k 6, turn P 20, p2tog to close gap, p 6, turn. Cont as est, until only the edge sections are left on each side; ssk, k remaining sts on left edge, turn. P to other edge, closing the gap with p2tog, zero stitches remain on left needle, turn. BO as follows: \*p2tog, return st to left needle; rep from \* to end of row. as shown. Start with the two short sides followed by the lace center point, then pin out the rest of the points along the edge. When completely dry, remove pins and trim yarn tails.
FINISHING
Weave in all ends, but do not trim the tails. Soak shawl incoolwater for at least 20 minutes. Gently squeeze out the excess water. Block to measurements and shape SusannaIc currentlylives in Germany with her husband, two sons, eleven fish and countless balls of yarn. She has an extensive background in studio arts and art history, which inspires much of her
ds /\~--\ Jo uosod peun un ,uos ou aneiu! sanenbs papeus ...
(wos\* Aupunoyux mmm) lazens!A uy u! paea
Tulia Girl
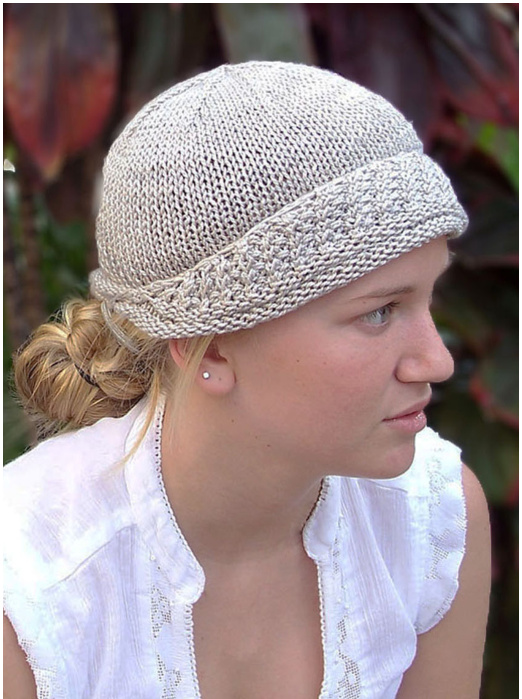
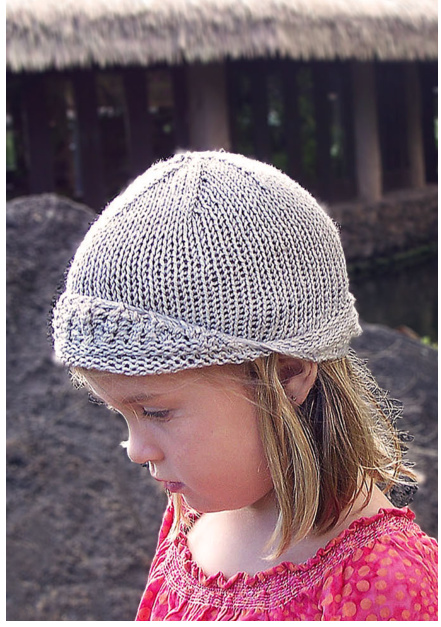
yTristana Fernandez Tulia means the quiet, calm one. She is observing the world around her. This cloche has a vintage romantic look with a brim that is rounded to frame and flatter theface.
PATTERN NOTES
Tulia Girl starts by working the back ruffle piece in rows, and then a provisional cast-on is used to start the cap, which is then worked in the round. When the cap is finished, the live stitches from the provisional cast on are picked up to work the brim of the hat in rows. The entire hat may be worked with two circular needles; optionally, dpns may be used for the shaping of the crown.
INSTRUCTIONS
Back Ruffle Skill level: Beyond Beginner; provisional cast-on Sizes: Child's S/M [Child's M/L, Adult S/M, Adult M/L] Finished measurements: Circumference: 11 [14, 18, 20]" unstretched, up to 16 [19, 22, 23]” stretched. Cap height: 5 [5.5, 6, 6.5]" Gauge: 20 stitches and 24 rows over $4^{\circ}$ $10\;\mathrm{cm})$ in stockinette stitch Yarn: Hand Maiden Silken, $100\%$ silk $(275\;\mathrm{yd}/250\mathrm{m}$ per $100\mathrm{g}$ skein); Color: Smoke, 1 skein Needles: US 7 $(4.5\mathrm{mm})$ dpns or two circular needles, or size needed to obtain gauge Supplies: 2 stitch markers, waste yarn, yarn needle CO 5sts Row 1 (RS): Kfb in every st. (10 sts) Row 2 (Ws): P1, pfb, p to last 2 sts, pfb, p1. (12 sts) Row 3: Kfb in every st (24sts) Row 4: P1, pfb, p to last 2 sts, pfb, p1. (26 sts) Row 5: P13, turn work; k13, turn; p to end; turn; k13, turn; p13, turn; k to end. Row 6: Knit. Row 7: Purl. Row 8: Knit. Row 9: K13, turn; p13, turn; k13, turn; p13, turn; k12, k2tog, k to end, turn; p12,turn; k12, turn; p12, turn; k12, p11, p2tog, p to end.(24 sts)
Cap
With RS facing, PM, and then with waste yarn, C0 26 [36, 46, 56] sts. You will have 50 [60, 70, 80] sts on the needle. PM and join the round, making sure that you are joining with the RS out. With main yarn, knit 3 rounds. Purl 3 rounds. Knit 26 [29, 32, 35] rounds. You will have worked 32 [35, 38, 41] rounds.
Shaping the Crown (All Sizes)
Round 1: $\ast\mathsf{K}8$ , k2tog; rep from \* to end of round.(45 [54, 63, 72] sts) Rounds $\mathbf{2},\,4,\,6,\,8,$ and 10: Knit. Round 3: $\ast\mathsf{K}7$ , k2tog; rep from \* to end of round. (40 [48, 56, 64] sts) Round 5: $\ast\mathsf{K}6,$ . k2tog; rep from \* to end of round.(35 [42, 49, 56] sts) Round 7: $\ast\mathsf{K}5$ , k2tog; rep from \* to end of round.(30[36, 42,48] sts) Round 9: $\ast\mathsf{K}4$ , k2tog; rep from \* to end of round.(25 [30, 35, 40] sts) Round 11: $\ast\mathsf{K}3$ , k2tog; rep from \* to end of round.(20 [24, 28, 32] sts) Round 12: $\ast\mathsf{K}2$ , k2tog; rep from \* to end of round.(15 [18, 21, 24] sts) Round 13: $\ast\mathsf{K}1$ , k2tog; rep from \* to end of round. (10 [12, 14, 16] sts) Round 14: \*K2tog; rep from \* to end of round. (5 [6, 7, 8] sts) Cut yarn and thread through rem sts.
Brim
Pick up live sts from the waste yarn: 26 [36, 46, 56] sts With Ws of cap facing you, begin working the brim in rows: Row 1: Kfb, k3tog; \*kfb, rep from \* to last 4sts; k3tog, kfb. Row 2: K3tog, \*p2tog, k2tog, rep from \* to last 3sts; keeping in patt, either k3tog or p3tog. Row 3: Kfb, k3tog, \*kfb, rep from \* to last 4sts, k3tog, kfb. Row 4: P3tog, \*k2tog, p2tog, rep from \* to last 3sts; keeping in patt, either k3tog 0r p3tog.
For child sizes: Repeat Rows 1-4 one more time For adult sizes: Repeat Rows 1-4 and additional 4 times. BO as follows: $\mathsf{K1},\,^{\ast}\mathsf{k1},$ , slip sts back to left needle, k2tog, rep from \* until all sts are bound off.
FINISHING
For the ruffle: Sew the loose end through the center of the ruffle towards the cap and pull it slightly to gather the yarn. Weave in the loose end. Weave in all other loose ends. When Tristana couldn't use her sewing machine during her three hour commute to and from work, she turned to knitting. Tristana has been knitting for about 11yrs, sewing and dyeingfibersfor morethan25 years, and spinning for one year. She can be found on Etsy www.contessascloset. etsy.com or her blog www.thecontessaslife. blogspot.com and on Ravelry as Tristanasew.
Panda and Zebra
by Susan B. Anderson
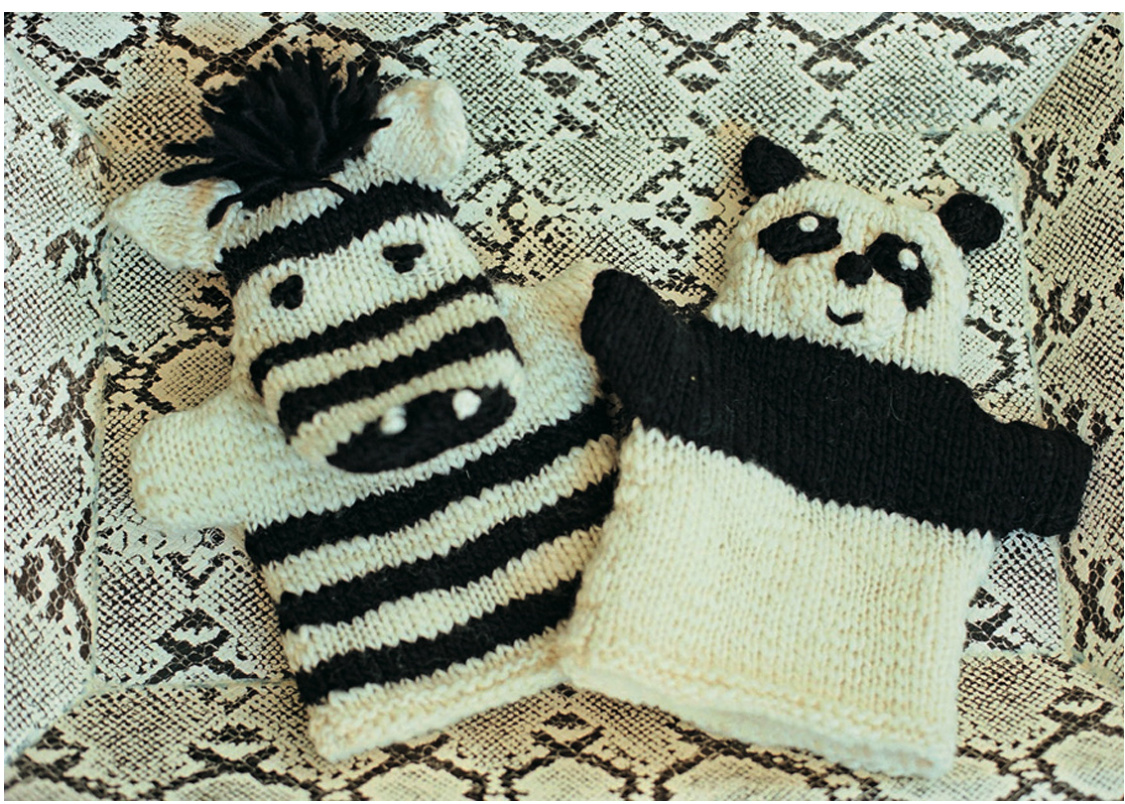
When I sat down to devise some puppets for [the Itty Bitty Toys] collection, I looked around my studio for the perfect yarn to use and immediately my eyes went straight to two skeins of Manos Del Uruguay, one of my favorite yarns. Because one skein was white and the other black, I started thinking of black and white animalsand a panda and a zebra filled the bill perfectly! These incredibly easy and quick puppets are knit back and forth on larger-size needles. I lined the puppets with a natural wool feece, but you could use a different fabric to line them or you could leave out this step completely. Your kids' imaginations will run “wild" with these two lovable companions. Pattern and photo courtesy of Susan B. Anderson and Artisan Books. All rights reserved. Skill level: Adventurous Beginner Finished measurements: 912 inches tall and 812 inches wide
Gauge: 4st/inch in st st
Yarn: Manos Del Uruguay Handspun Semi Solids $100\%$ kettle-dyed wool; 138 yards/100 grams), 1 skein each in Natural 14 and Black 08 Needles: U.S. size 9 24-inch circular or straight needles, or size needed to obtain gauge
Supplies:
Two 9- x-12-inch squares per puppet of natural-colored wool felt for lining, or fabric of your choice (optional) Sewing needle and matching thread (optional) Pins (optional) Scissors Tape measure or ruler Yarn needle Small amount of fberfill Crochet hook for zebra mane front and back (make 2) With Natural, cast on 26 stitches. Knit 2 rows. Change to working in stockinette stitch (knit 1 row, purl 1 row) until the front measures 4 inches from the cast-on edge, ending with a purl row. Switch to Black. Continue on to create the arms: Next row: Knit to the end of the row, do not turn, cast on 6 stitches using the backward-loop method (32 sts). Turn. Next row: Purl to the end of the row, do not turn, cast on 6 stitches using the backward-loop method (38 sts). Turn. Continue to work in stockinette stitch until the arms measure 2 inches from the start of Black, ending with a purl row. Next row: bind off 8 stitches, k to end (30 sts remain) Next row: bind off 8 stitches, p to end (22 sts remain) Switch to Natural. Continue on to create the head: Row 1: k1, ssk, k to last 3 sts, k2tog, k1 (20 sts remain) Row 2: purl Row 3: repeat row 1 (18 sts remain) Row 4: purl Continue in stockinette stitch until the head section measures 21/4 inches. End with a purl row. Decrease rows (for the top of the head) Row 1: k1, ssk, k to last 3 sts, k2tog, k1 (16 sts remain) Row 2: purl Rows 3-6: repeat rows 1 and 2 two times more (12 stitches remain) Bind off. Cut the yarn and pull through the remaining stitch. Align the edges of the front and back pieces, purl sides facing. Lay flat, and with a length of Natural threaded on a yarn needle, use mattress stitch to sew together around all edges except the bottom. Weave the ends to the inside and trim.
Ears (make 2)
With Black, cast on 8 stitches. Row 1: knit Row 2: purl Rows 3 and 4: repeat 1 and 2 Row 5: k2tog, repeat to end of row (4 sts remain) Row 6: purl Row 7: k2tog, repeat to end of row (2 sts remain) Cut the yarn, leaving an 8-inch-long tail, and thread on a yarn needle. Pull through the remaining stitches, gather up tightly, and stitch to secure. Fold the ear in half with the purl sides together. Whipstitch the side seam from the tip to the base, using a tail. Whipstitch the ears to the top of the head, using the photograph as a guide. Weave the ends to the inside and trim.
Snout
With Natural, cast on 5 stitches. Row 1: kfb, k3, kfb (7 sts) Row 2: purl Row 3: kfb, k5, kfb (9 sts) Row 4: purl Row 5: knit Row 6: purl Row 7: ssk, k5, k2tog (7 sts remain) Row 8: purl Row 9: ssk, k3, k2tog (5 sts remain) Bind off purlwise. Stuff lightly and whipstitch to the face, using a length of Natural threaded on a yarn needle.
Nose
With Black, cast on 1 stitch loosely. Row 1: kfb until 3 stitches are on the right needle (3 sts) Row 2: knit Row 3: purl Row 4: knit, do not turn, pass the second and third stitches over the first stitch and off the needle (1 st remains) Cut the yarn, leaving a 6-inch-long tail, and thread on a yarn needle. Gather up the edges by taking a few stitches to create a ball, and stitch to secure. Whipstitch to the center of the nose piece.
Eyes
Black Eye Patch (make 2)
With Black, working back and forth, cast on 3 sts. Row 1: kfb, k1, kfb (5sts) Row 2: purl Row 3: knit Row 4: purl Row 5: ssk, k1, k2tog Bind off, Whipstitch to the face using a yarn needle and one of the tails. Weave in the ends to the inside. Cut a 12-inch-long length of Natural and thread on a yarn needle. Make two French knots for the eyes. Weave ends to the inside.
Lining (optional)
Lay the puppet on top of 2 layers of wool felt and pin in place. With scissors, cut out the wool felt about 1/8 inch smaller than the puppet and remove the pins. With the wool felt pieces held together and a sewing needle and matching thread, whipstitch around all edges except the bottom. Place the sewn lining inside of the puppet, wrong sides facing, and tack down the lining at the tips of the hands and the top of the head with a few stitches, using the sewing needle and thread. whipstitch the bottom edge of the lining to the bottom edge of the puppet with the thread and needle.
Zebra
Front and back (make 2)
With Natural, cast on 26 stitches and begin stripe pattern. Knit the first two rows, then switch to stockinette stitch (knit 1 row, purl 1 row) for the rest of the project.
Stripe pattern
Rows 1-4: Natural Rows 5-8: Black Repeat rows 1-8 two times more. Continue only in Natural for the arms, and work the same as for the Panda through the bind-off rows. Switch to Black and continue in stripes, alternating every 4 rows and complete the head the same as for the Panda.
Face and snout (make 1)
With Black, cast on 12 stitches. Row 1: k1, m1, k to last stitch, m1, k1 (14 sts) Row 2: purl Row 3: repeat row 1 (16 sts)
Ears (make 2)
With Natural, cast on 14 stitches. Work in stockinette stitch until the ear measures 1 inch from the cast-on edge.
Decrease rows
Row 1: k1, ssk, k3, k2tog, k3, k2tog, k1 (11 sts remain) Row 2: purl Row 3: k1, ssk, k1, k2tog, k2, k2tog, k1 (8 sts remain) Row 4: p1, p2tog, p2, p2tog, p1 (6 sts remain) Row 5: k1, ssk, k2toq, k1 (4 sts remain) Row 4: purl Switch to Natural. Row 5: repeat row 1 (18 sts) Row 6: purl Row 7: knit Row 8: purl Switch to Black. Rows 9-12: stockinette stitch Switch to Natural. Rows 13-16: stockinette stitch Switch to Black. Rows 17-20: stockinette stitch Switch to Natural. Rows 21- 28: stockinette stitch Switch to Black. Rows 29-32: stockinette stitch Switch to Natural. Rows 33 and 34: stockinette stitch Row 35: k1, ssk, k to the last 3 stitches, k2tog, k1 (16 sts remain) Row 36: purl Switch to Black. Row 37: repeat row 35 (14 sts remain) Row 38: purl Row 39: repeat row 35 (12 sts remain) Row 40: purl Bind off. Cut the yarn and weave through the remaining stitch. Row 6: p2tog twice, do not turn, pass the first stitch over the second stitch and off the needle. Cut the yarn, leaving a 6-inchlong tail, and thread on a yarn needle. Fold the ear in half with the purl sides together and whipstitch the open side closed from the base to the tip. Set aside.
Lining (optional)
Make the lining the same as for the Panda, but don't sew the pieces together yet. In addition to cutting the lining for the front and back, also pin down the face and snout piece on 1 layer of the wool felt and cut out a lining for it. Set aside.
Finish the front and back
Lay the front and back of the knitted pieces on top of each other, with purl sides facing. With a length of Natural threaded on a yarn needle, use mattress stitch to sew the side seams together to where the head starts. Fold the front of the head forward to rest on the body, using the illustration as a guide. This is now the bottom of the snout. Leave the back of the head as is. Lay the face and snout piece on top of the folded front and align with the back of the head, purl sides together. Thread a length of Natural on a yarn needle and use mattress stitch to sew the face and nose piece to the bottom of the nose and the back of the head. After the head and nose are sewn together, whipstitch the ears to the head, using the photograph as a guide.
Nostrils and eyes
With Natural and a yarn needle, make 2 French knots at the tip of the nose for the nostrils. With Black and a yarn needle, take 2 straight stitches with 4 wrap stitches and a French knot underneath for each eye. Weave all ends to the inside and trim.
Finish the lining
With a sewing needle and matching thread, whipstitch the front and back pieces together from the lower edges up to the base of the head. Fold the front piece forward for the bottom of the snout and lay the cutout face and snout piece on top so it lines up evenly. Pin in place. Continue to whipstitch the head and nose pieces together. The lining is the same shape as the puppet. Lightly stuff the head of the lining with fiberfill, and with a needle and thread stitch with a running stitch to hold the stuffing in place. Leave the snout open so that the puppeteer can put his or her fingers into it. Place the lining in the puppet, making sure that the nose of the lining is pushed into the nose of the knitted front. Tack down at the tip of the hands, the end of the snout, and the top of the head with a few stitches with the sewing needle and thread. with the sewing needle and thread, whipstitch the bottom edge of the lining to the bottom edge of the puppet. Weave the ends of the thread to the inside and trim.
Mane
With Black, cut 96 3-inch strands. Holding two strands together at a time, use to make fringe. With a crochet hook and the lengths folded in half, pull the looped end through and then pull the ends through the loop. Pull up tight. Fringe is through three stitches in a row between the ears, then continue in a straight line down through the stripe section on the back of the head. The sample has 16 rows with three fringes per row.


