Afghan Project for Schools and other groups
The attached document was originally intended for UK schools but the methods are equally useful to any knitters wanting to work together on a project. It was originally produced in booklet form and has been used in many countries around the world. It was written with children in mind and has proved to be equally acceptable to adults. For six years free yarn was provided for UK schools but that offer is no longer available. The main aim of the booklet was to use mathematics in a ‘nonthreatening? way so, in addition to the knitting information, it also includes ideas for use in mathematics lessons. To see some ofthe afghans made in schools, and to read about teachers? experiences, go to http://www.woollythoughts.com/schools/index.html To see the work of the Cheshire Women's Institute, based on the same booklet, go to http://www.woollythoughts.com/cheshire.html You may make as many copies of this booklet as you want but please ensure that our names and website address remain with it.
Pat Ashforth & Steve Plummer
www.woollythoughts.com
Tilting At Windmills designedby Pat Ashforth and Steve Plummer Instructions for a knitted afghan, or wall-hanging to be made by a group. Includes suggestions for Maths lessons
British Hand Knitting Confederation This version of
Tilting at Windmills
was specially designed for schools and other groups of young people wishing to produce an afghan, or wall-hanging, as a group project. It was designed by us and we are prepared to give support to any group wanting to make an afghan. We can be contacted at: 166 Keighley Road, Colne,Lancs. BB8 OPJ O1282 864273 (24 hour answering machine - leave a message) pat@woollythoughts.com Members of the British HandKnitting Confederation are willing t0 provide free materials for appropriate groups of young people. Talk to us about your requirements and we wilil pass on the information. The designs in this booklet are deliberately shown only in shades of grey. We would like you to decide on your own colours though we do make some suggestions which you might choose to follow. In our, experience, a preconceived idea of colours can be very restricting. However, if you would like to see a colour version of this, and many other afghans, visit: www.woollythoughts.com Pat Ashforth and Steve Plummer May 2000 WHAT IS AN AFGHAN? An afghan is a small blanket or throw which can be used for warmth or decorative purposes. They are very popular in US and gradually gaining in popularity in this country. Our afghans have some added bonuses. Firstly, they double as wall-hangings, so they can be prominently displayed. Secondly, they all have a mathematical meaning so could be used as the basis of Maths lessons, either during the construction, Or afterwards. They are still very attractive to those who have no interest in the Maths involved.

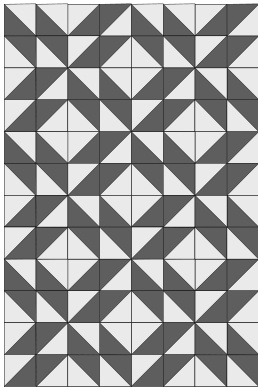
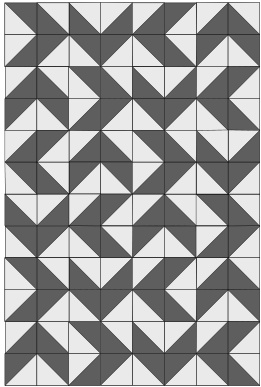
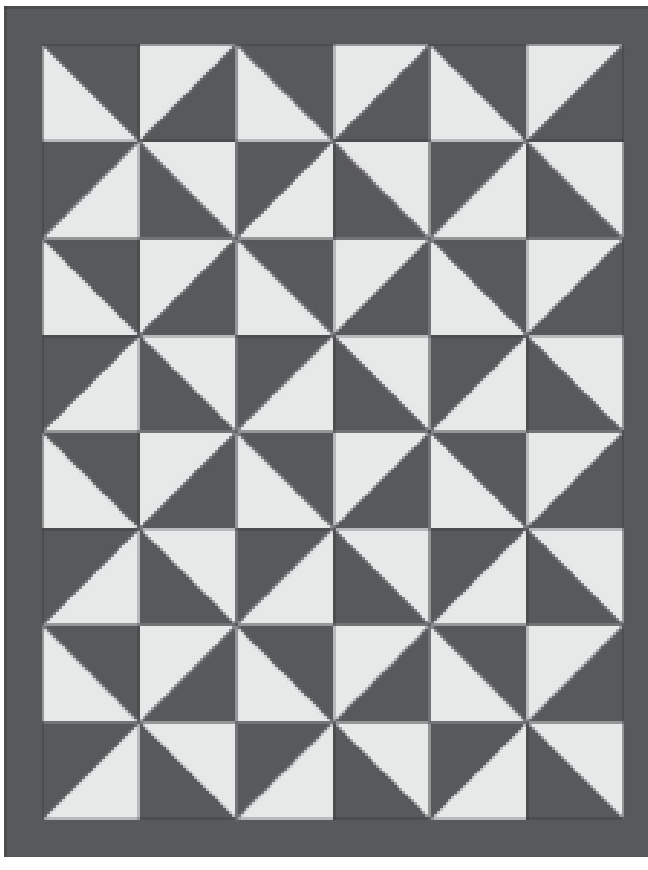
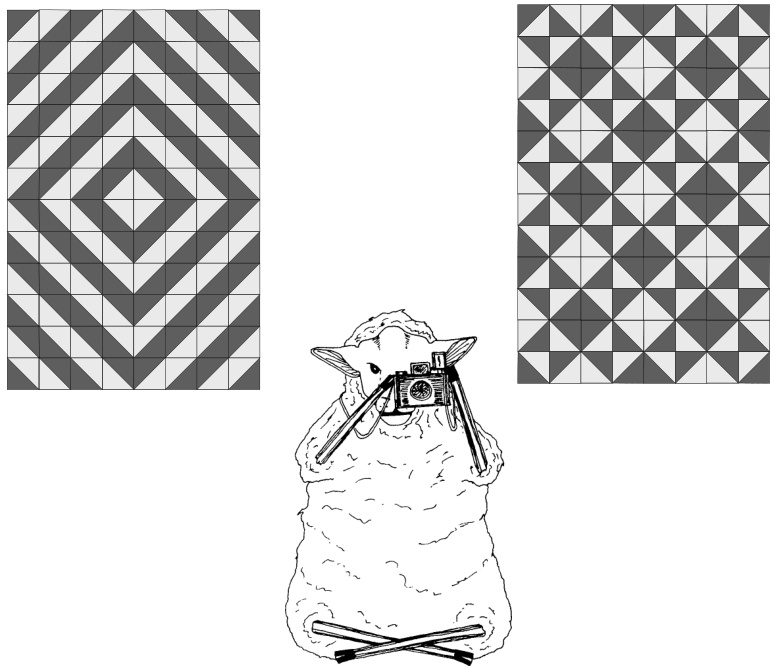
WHAT DOESTHISPARTICULAR AFGHAN SHOW? Tilting at Windmills is a rectangle made from 4& similar squares. Each square is half one colour and half another. The cover picture shows a very simple arrangement of the squares but the same squares could be put together in many different ways. There is a great deal of Maths work, related to shape, to be derived from the construction of this afghan. You could choose to make a different number of squares and make an alternative si3e of rectangle. IS IT EASY TO MAKE?

This design is almost foolproof - even when being made by a group of assorted youngsters. It is entirely in garter stitch and uses very simple techniques throughout. The most difficult part is putting the pieCes together when they are all finished. This can usually be done by a teacher or willing parent.
WHATWILLI NEED? Enthusiastic knitters! Yarn and appropriate needles. Someone to assemble the afghan and, if it is to be used as a wall-hanging, to add a border and a means of hanging. A pole, and a wall-space for hanging.
WHAT KIND OF YARN DOI NEED? Almost anything as long as it is all of the same weight (e.g. all Double Knitting or all Aran) We recommend Aran weight yarn, as the knitting grows quickly and is not too heavy. Double Knitting gives a nice soft afghan but takes a long time to make. Chunky is heavy and more difficult for some children to work with. You are making Shape 7. The completed afghan will be washable but you should still bear in mind that it is likely to get dirty if handled frequently. HOW MUCH YARN WILLI NEED?
fai CAN
<hit o Couor。 +h。 cioo routont it +o b。 +hoh t. (hlt a square the slse you want tt tooe, then wegn tt. fou wl heed fairly accurate scales for this. If you haven t got any, as our local Post Office to weiqh it for you. You will need 24 times histoiahtineochcolous'
WHATSIZENEEDLESSHOULDIUSE?
Some people are tighter knitters than others so will need different si3e needles. They should use whatever feels most comfortable and produces a firm texture, without the afghan being hard. Have a range of si3es available. For Aran yarns they are most likely to use 4 mm or 4.5 mm but may need larger, or smaller than these. Any length needles can be used as there will never be a large number of stitches on the needle. The person assembling the pieces will need a circular needle if borders are to be added. The si3e of this will also depend on the knitter. The assembler may also need a large needle, for casting off. This should be two or three si3es larger than the circular heedle.
HOW DO WE BEGIN?
Decide on the si3e of the squares you want to make. If you use the layout on the cover, the finished afghan will be a little over six times the width, and eight times the height, of your square. The squares can be fitted into different rectangles. There are many different shaped rectangles that you could make though some of them would only be suitable as a wall-hanging. For example you could make 4 x 12 or 3 x 16 from the same squares. Make a template for the si3e of square you have chosen. Draw a diagonal on the template.
WHY DO WE NEED A TEMPLATE? This is one of the ways to ensure that all the squares will fit together perfectly. The template will be used for all measuring Once the knitting is started. This is likely to be far more accurate than relying on the measuring skills of the knitters. You may want to get each knitter to make their own template but these must be checked against the original to make sure they are accurate. The templates wil last better if they are on card, rather than paper. Alternatively, if the knitters are always in the same room, stick a template onto the work surface so there is no chance of it being distorted.
Foolproof tip
When the knitting is measured it should be laid down on the template, never stretched to fit.
All squares are worked diagonally, starting from one stitch. This is different from the methods you will find in many knitting books but it gives you a mathematically Perfect square and you may want to use some properties of the square in your Maths work. You are making Shape 12. Make a slip knot and knit into it twice (once in the front, once in the back). Znd row: Knit the first stitch, knit twice into the second. 3rd row: Knit the first two stitches, knit twice into the last. 4th row: Knit to the end, knitting twice in the last stitch. You should now have a small triangle. Repeat 4th row until the triangle fits the template up to the diagonal line. Every two rows will add one ridge to the triangle. Different knitters will need different numbers of rows and will have different numbers of stitches on the needle at the widest point of the square. The numbers of stitches and rows are unimportant. When the triangle is the correct si3e, change to the Second colour and knit one row. (See mathematical note) Continue knitting but knit together the last two stitches of every row, instead of increasing. The second half of the square will start to taper to a point to match the first half. When two stitches remain, knit them together and fasten off, by pulling the end of the yarn through the stitch.
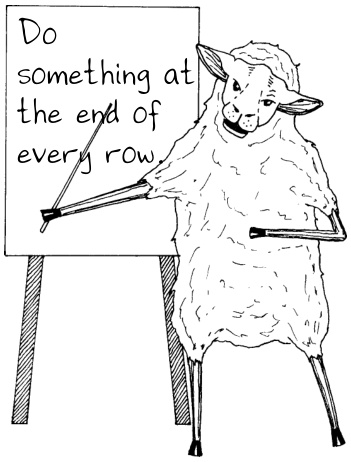
Foolproof tip
Knitters should get into the habit of^doing something′ at the end of every row. In the first half they are gaining a stitch at the end of each row, on the second half they are losing a stitch on each row.
Mathematical Note
The instructions do not give a mathematically perfect square. It will have two similar halves, rather than two triangles with one row difference. This method makes the squares easier to join in this particular design.
To make a perfect square omit ^knit one row', after the colour change.

HOW MANY SQUARES DO WE NEED?
The original had 48 similar squares. You may have decided on a different number.
HOW DOI ARRANGE THE SQUARES? This could be the most difficult part of the task. There are thousands of possibilities. You may decide to impose restrictions on the design. Here are some examples: No dark shapes can touch It must have reflection symmetry There must be a patterned border When the decision is made, the squares have to be joined.
HOW DOI JOIN THE SQUARES? Place two squares face to face and oversew along the edge where they should join. When the squares have been made by different people the edges may not match up exactly. Wherever possible stitch through matching knobbles in each piece but do not try to force the knobbles to line up. Stitch a little way into the edge of the shape and do not pull tight. Ensure that the pieces will always lie flat when opened up. Join the squares in strips, then stitch the strips together in the same way, taking special care at the corners. There can be as many as eight triangles at a point and they must be matched neatly.
HAVEI FINISHED? If you only want to use the item as an afghan, you could stop now. If you want a wall-hanging there is still more to do.
HOW DOI ADD BORDERS ? Our favoured method is to. pick up stitches all along one edge and work the required number of rows, increasing in the last stitch of every row to make a mitred corner. Cast off loosely, using a larger needle. Repeat on the other edges. The borders are best worked by one person. The same number of stitches should be picked up from the edge of every small square. The easiest way to determine the number of stitches is for the assembler to have worked one of the original squares and made a note of the number of stitches at the widest part of the square. This number should be divided by 1.4 to give the number of stitches to be picked up along the edge of each small square.
HOWDOESITBECOMEAWALL-HANGING?
On the top edge you need an extra piece of knitting to form a channel for the pole. After working the border for the top edge, do not cast off. Continue knitting as before but decreasing at the end of every row. Knit enough extra rows that when they are folded over there will be enough room to put a pole through. Cast off loosely. Fold this extra piece to the back of the work and slip stitch in place, all along. Screw a hook into each end of a pole, Such as a broom handle, and insert the pole into the channel.
OK.1 KNOW HOWTOMAKE IT-BUT WHERE DOES THE MATHS COME IN? The opportunities will vary according to the age and abilities of the knitters. This list is by no means exhaustive but should give you some starting points. Choose whichever seem most appropriate. Establish the si3e of the squares to be made, from knowing the afghan si3e required, or work out the si3e of the finished afghan, from knowing the si3e of one square. Calculations for the amounts of yarn needed. Draw and measure templates for ensuring that all squares are exactly the same si3e. Calculate the number of stitches needed for the borders. This derives from Pythagoras’'Theorem. If each side of a square is a unit of 1, the hypotenuse of the square is the square root of 2, which is approximately 1.4. Calculate the number of stitches in a square. The answer will vary between knitters. The number for the first half of the Square is 1 + 2 + 3+ 4 +....+ number at the widest point. These are triangular numbers. In the Second half of the (mathematically perfect - See Mathematical Note) square the first row is one less than the number at the widest point, the next is one less than that, the next one less and so on. The two consecutive triangular numbers add together to give a square number. Find all the rectangles which could be made from a given number of squares. Using two of the squares and concentrating on the dark shapes, find all the different shapes that can be made when the squares are put together. Repeat with three, then four squares. Symmetry. Reflection. Rotation. Repeated patterns.
When you've finished, we'd like to see a picture of your work and hear about what you did.