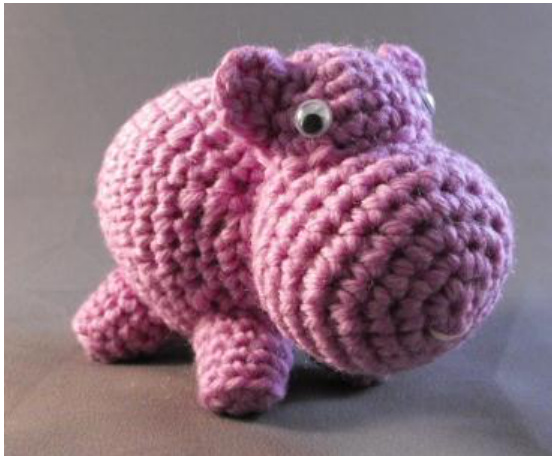
Hippo Hippo Hippo Crochet Pattern by Jean Herman
Materials: 3.5mm crochet hook, acrylic yarn, pink embroidery thread, tapestry needle, large needle for assembly, plastic eyes with safety backing or (wiggle eyes & fabric glue), polyfil Wiggle eyes and polyfil are available online at Michael's Craft Store Plastic eyes are available online at GlassEyesOnline.com Email Address for questions: knitblue19@gmail.com Please address subject line with "Question for Crochet Pattern" in your email so that I can easily find your email and address asap. Thank you.
HEAD
R1: Ch 2, 5 sc in second ch from hook R2: 2 sc in each sc around (10 sts) R3: 2 sc in next sc, sc 1 (15 sts) R4: \*2 sc in next sc, sc 7\* repeat 1 time (17 sts) R5-R6: Sc17 Fasten off with a long tail for assembly. EARS (2x) R1: Ch 2, 5 sc in second ch from hook (ensure tail is long enough to tuck back into the ear when finishing) Fasten off with a long tail for assembly.
SNOUT
R1: Ch 2, 6 sc in second ch from hook R2: 2 sc in each sc around (12 sts) R3: \*2 sc in next sc, sc 1\* repeat 6 times (18 sts) R4: \*2 sc in next sc, sc 2\* repeat 6 times (24 sts) Created by Jean Herman - 2009 R5: \*2 sc in next 2 sc, sc 10\* repeat 1 time (28 sts) R6:Sc 28
SNOUT continued..
R7: \*Dec 2, sc 10\*, repeat 1 time (24 sts) R8:Sc 24 R9: \*Dec 1, sc 2\*, repeat 6 times (18 sts) R10-R11: Sc 18 Fasten off with a long tail for assembly.
BODY
R1: Ch 2, 6 sc in second ch from hook R2: 2 sc in each sc around (12 sts) R3: \*2 sc in next sc, sc 1\* repeat 6 times (18 sts) R4: \*2 sc in next sc, sc 2\* repeat 6 times (24 sts) R5: \*2 sc in next sc, sc 3\* repeat 6 times (30 sts) R6: \*2 sc in next sc, sc 4" repeat 6 times (36 sts) R7-R13: Sc 36 R14: \*Dec 1, sc 4\*, repeat 6 times (30 sts) R15: Sc 30 R16: \*Dec 1, sc 3\*, repeat 6 times (24 sts) R17: \*Dec 1, sc 2\*, repeat 6 times (18 sts) R18: \*Dec 1, sc 1\*, repeat 6 times (12 sts) Fasten off. LEGS (4x) R1: Ch 2, 5 sc in second ch from hook R2: 2 sc in each sc around (10 sts) R3: Sc 10 on outer stitch R4 -6: Sc 10 Fasten off with yarn long enough to assemble leg to the body. TAIL R1: Ch 6 (need long tail to assemble...begin first chain after long tail of yarn) R2: Sc 5, beginning with second chain from hook R3: Sc 3, beginning with second chain from hook, slip last stitch Fasten off with a long tail and tuck in tail, cut off excess.
Assembly
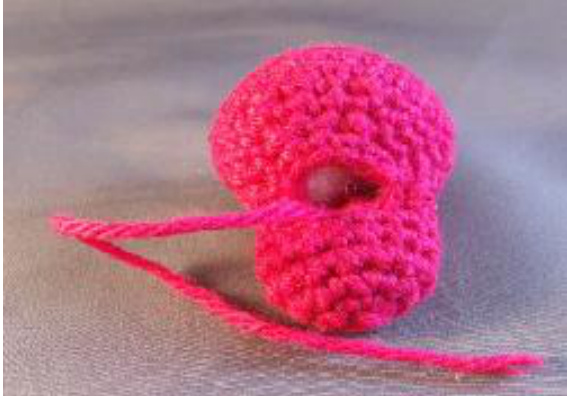
Snout
Stuff the snout really tight and full. Ensure that the tail is falling either to the left or right of the snout. This will help you see the sides of the snout. Stuff more to the left and right side of the snout to give it a wider look. Earlier you increased the sides to help give it that wider look.
Head
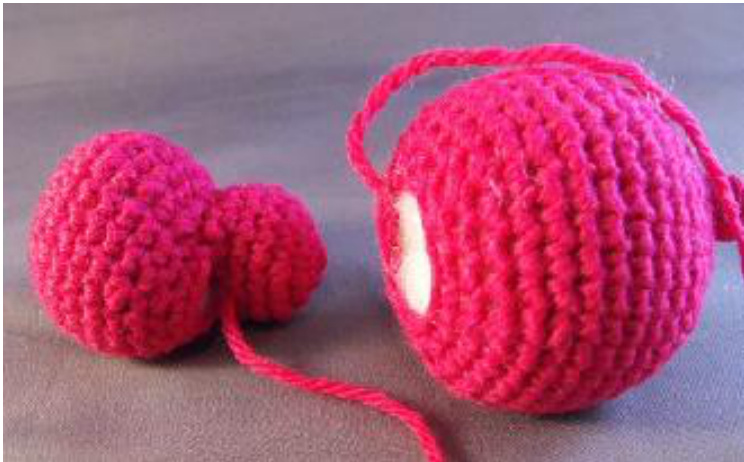
If using plastic eyes with safety backing, attach eyes to the head first. Then assemble the head to the top of the snout. The back of the head will be whip stitched to the last row on the snout and the front of the head will be laying over row four from the bottom of the snout. See picture for reference. Stuff the head with polyfil and continue stitching all the way around the head to the top of the snout. However, don't stitch the front of the head, past four rows on the snout. That will give the head a flatter and wider look.
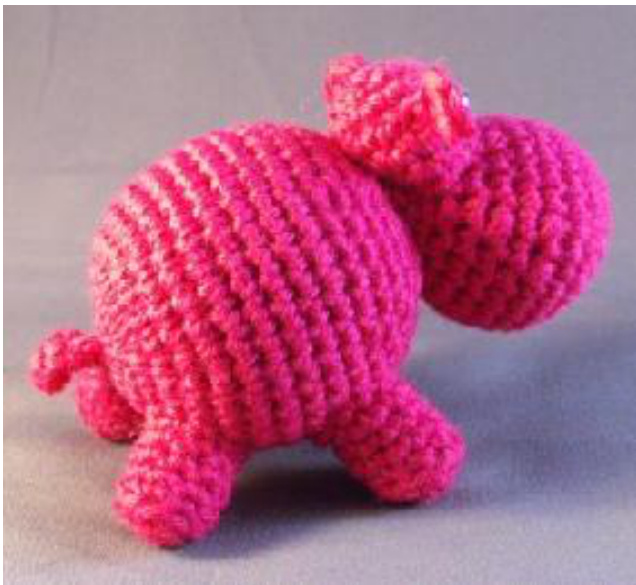
Back of head and snout, once the head is stuffed and sewn on, you should still have the opening of the snout available to assemble to the body because the head was sewn on top of the snout's first four rows. See picture below for a clearer vision of assembling the snout and head together. Glue eyes on the head, if using wiggle eyes. Place the eyes with about five or six stitches in between each eye. Embroider a smile! @ Ears Assemble ears by threading the fastened off tail through one chain on the each side of thehead. Body Assemble the head to the body. The opening for the head will be much tighter, now that you have sewn the head to the snout. Carefully sew the completed head to the body. As you make each stitch, make sure the head is facing forward, while sewing all the way around. Sometimes when you stitch the head onto the body it may not be straight, unless you check it with each stitch all the wayaround.
Attach back of snout opening to the body. Tail Assemble the tail to the back of the body. Legs Assemble the legs to the body. Adjust them so that the hippo stands without tilting over. Final picture with all pieces assembled.
Abbreviations: sc - single chain, dec - decrease, sts - stitches Created by Jean Herman - 2009


