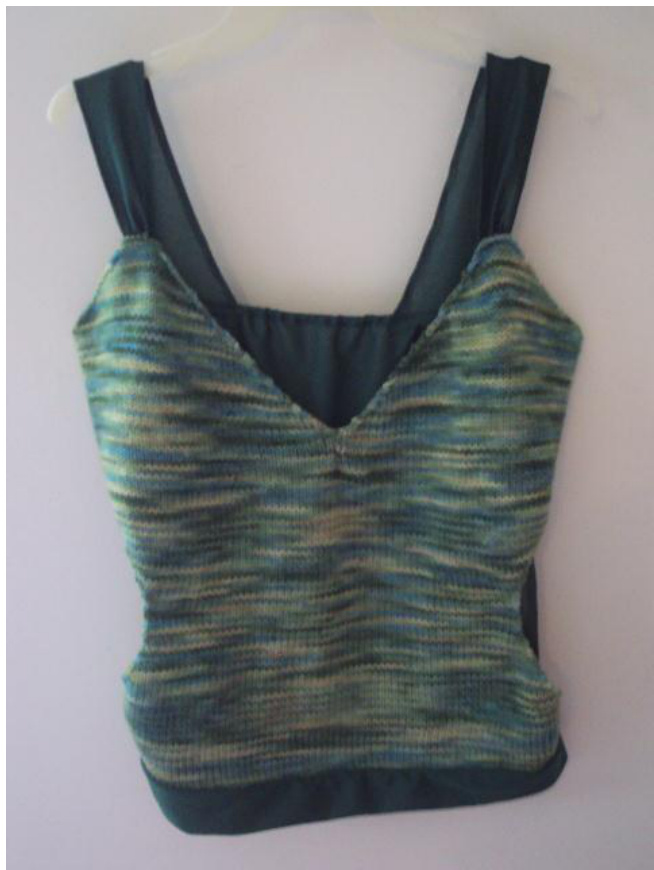
Hourglass Tank
Materials:
· Bohemia Fibers Gypsy DK yarn, 100% Merino Superwash Wool, 230 yards US 7 needles Stitch holder ?Tapestry needle One yard of coordinating fabric of your choice (preferably something lightweight and a little stretchy) Thread to match Straight pins and a sewing needle Sewing machine ·1/8" elastic band Elastic thread (optional) Gauge: 4 %2 st x 6 rows = 4" x 4" Pattern notes: worked flat, bottom-up, negative ease. A word on measurements. I designed this pattern to fit me, which is a large. I have not configured the pattern for smaller sizes, yet. When you take your measurements, measure the circumference around your hips and bust area; also measure the bust width itself from side to side below the armpit. Measure the width of your abdomen where you want the narrowest part of the hourglass shape to span across and the length from the end of your breasts up to the height of your armpit. When adjusting the pattern for smaller sizes, these measurements will be important when knitting the front of the shirt and the measurements for the back panel. Use the yarn gauge to adjust the number of stitches per row and the number of rows. CO 90 sts. Knit in Stockinette for 12 rows or until piece measures 2". Continuing in St, begin the decrease starting on the FS. \*K2tog, knit to the last 2 sts, k2tog. P2tog, purl to last 2 sts, p2tog.Repeat from \* until you have 80 sts remaining. \*K2tog, knit to the last 2 sts, k2tog. (end decrease) Next row, purl all sts. Repeat from \*\* Until you have 60 sts. Knit in St until piece measures about 6 %" long. (Begin increase) \*kfb, knit to last 2 sts, kfb. Next row, pfb, purl to last 2 stitches, pfb. Repeat from \* until you have 76 sts ending with a Fs row. \*\*Kfb, knit to last 2 sts, kfb. Next row purl all sts. Repeat from \*\* until you have 92 sts. \*\*Kfb, knit to last 2 sts, kfb. Next row: pfb, purl to last 2 stitches, pfb. Repeat from \*\*\* until you have 114 sts ending with a FS row. Purl 57. Place remaining 57 sts on a stitch holder. Begin left cup (FS). \*K2tog, knit to the end of row. Next row purl all sts. Repeat from \* until you have 53 sts ending with a Ws. \*\*K2tog, knit to last 2 sts, k2tog. Next row purl all sts. Repeat from \*\* until you have 43 sts ending with a Ws. \*\*\*K2tog, knit to last 2 sts, k2tog. Next row, p2tog, purl to last 2 sts, p2tog. Repeat from \*\*\* until you have 7 sts ending with a ws row. BO.
Begin right cup.
Purl across the 57 stitches on the stitch holder. To begin the decrease rows on the right cup follow the left cup directions in reverse. So for the first row you will k56, ktog. 2nd row: p56. BO with 7 sts remaining. Now that all the knitting is complete, you can begin construcfion of fhe back panel, straps, and bottom edge. The back panel for the hourglass top has a trapezoidal shape. The bottom width will equal half the circumference of your hip measurement; the top width will equal the circumference of your bust measurement - the finished width of the bust on the knitted front panel. The length of the back panel should equal the distance of the bottom of the front up to the top of the straight edge as the cups slope upward. Before cutting any material, measure an extra /4" on all sides to allow for the seams when you sew. Measure and mark off your cutting edges based on the guideline above. Cut out your back panel. Fold over and pin down a %4" edge on the sides of the back panel. \*Tip: when pinning down the fabric, place the straight pins perpendicular to the edge of the material. Sew both side edges. Fold over and pin down %4" on the top edge. when sewing top edge, be careful to keep the stitches as close to the edge of the fabric, so an elastic band can be run all the way through in the next step. Using a very small safety pin, attach it to the end of a 1/8" elastic band. If you don't have a safety pin this small, you can feed the elastic through without one. Insert the safety pin into and under the sewed edge (as if it's a tube) and inch the safety pin through until it comes out the other side. Leave about an inch hanging out on this end and sew it in place. Before sewing the other end, pull the elastic tight and pin or hold it tight as you sew it in place. Trim off the excess elastic at both ends.
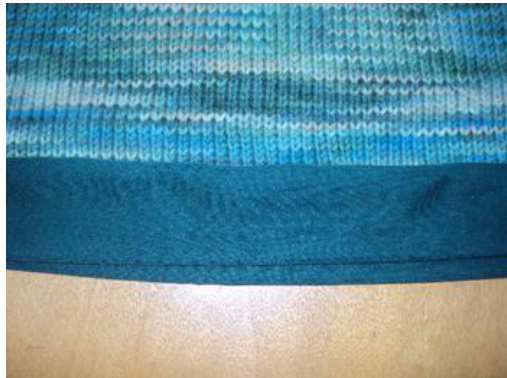
Bottom edge
Measure and cut 2 strips of fabric 20 V2" wide (or half of your hip circumference + %2" to allow 1/4" for sewed edges) x 4 %2" long. Fold each strip in half along the width for a 2 %2 "long x 20 %2" wide piece. Pin the edges together where the fabric comes together and sew.
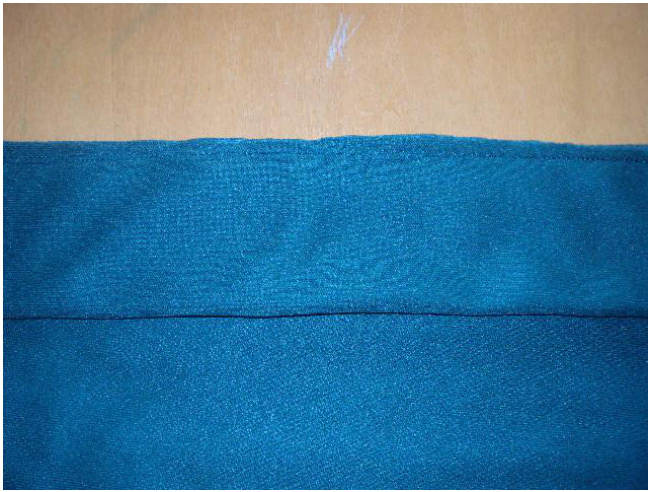
Take one of the bottom edge pieces and lay it upside down on the bottom of your back panel of your fabric (right side up) so the cut edges are together. Place straight pins to hold in place and sew the edge '%" in from the edge. when you fold the bottom edge down after sewing it will look like this.
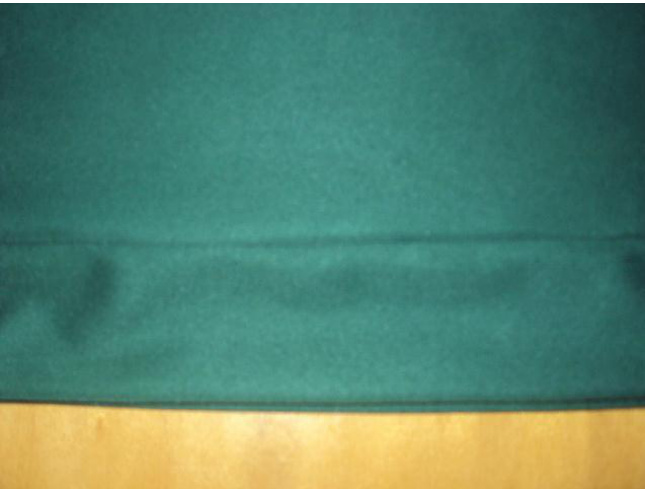
Repeat this step again for the knitted front side. Make sure the bottom edge piece is upside down on the front side of your knitting at the bottom edge. Place the pins with the knitting on top so the sewing machine does not snag the yarn while sewing. \*Tip: If you are uneasy running your knitting through a sewing machine, practice on an old swatch and some scrap fabric. This is not as scary as it sounds, trust me. Sew a seam /4" in from the edge (knitted side up). when you are done, it will look like this.
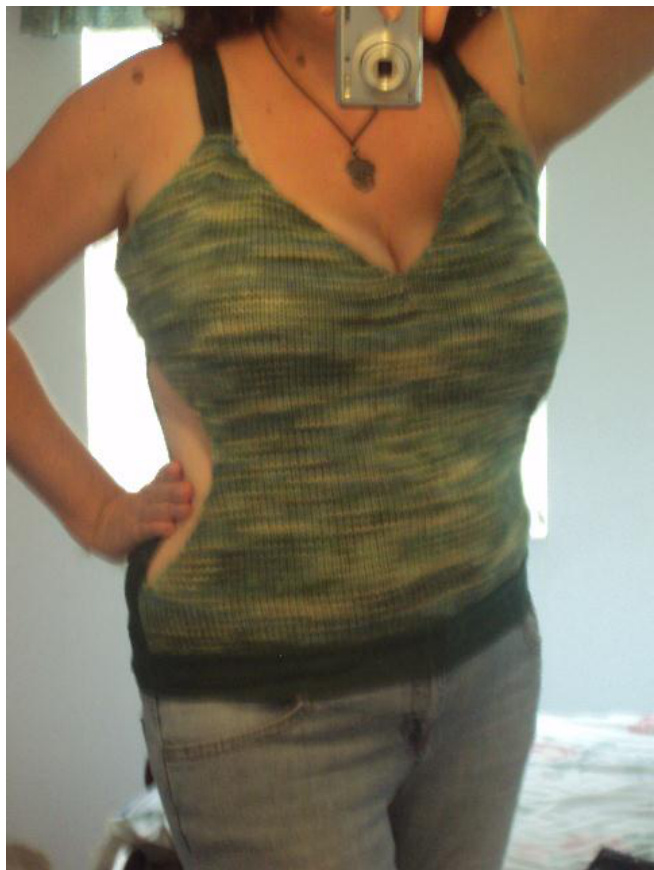
Now it's time to sew the front to the back. You're almost there! Laying the front sides of the knitted and back panel pieces together, line up the sides (one at a time). Pin the straight sides below and above the hourglass shape. Sew one side at a time, as the finished widths at the top will be different due to the greafer width of fhe bust.
Straps.
Cut 2 strips of fabric 2 %2" wide x 15 V2" long. Fold over and pin down a '" edge on the long sides and sew. Take a needle and thread and with a knot tied at one end, loosely stitch along the short edge '%4" in and pull slightly to gather the fabric. Pin the gathered end of the strap to the front side of the shirt at the peak of one of the cups. I find it is easier to sew this on by hand because the gathers kept getting caught on the machine. Repeat for other strap. Laying your shirt backside up on a table, fold the free ends of the straps over and pin in place where you want your straps to be. \*Tip: you may want to try the shirt on at this point to make sure the length of the straps is right for you and that the straps are nicely spaced. If you are happy with the strap placement, sew them in place, and trim off any excess.
And that's it!
If your shirt needs some extra fitting. you may want to use some elastic thread and a tapestry needle to weave into the edges on the wrong side of your knitting along the hourglass shaped sides and along the "v" of the bust line. This will make the shirt a little stretchy in these areas and add a little snugness.