Description
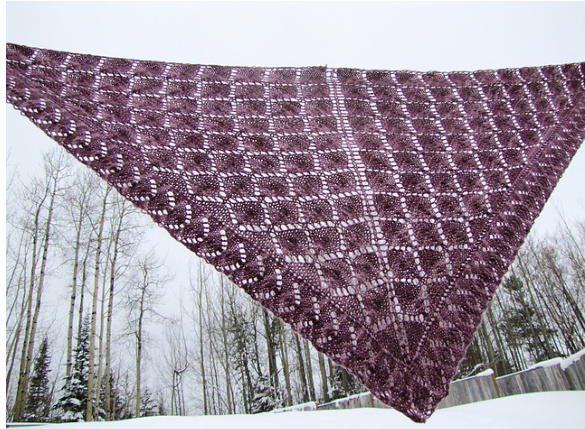
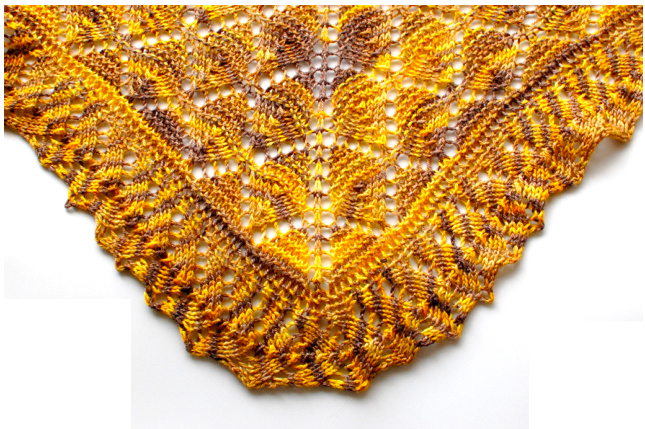
This quick-to-knit triangle lace shawlette is simple and elegant with its lovely, knit-on lace edging.
Needles
Size US 5/3.75 mm Knitting Needles, or size needed to get gauge.
Yarn
One 100 gram ball of Chameleon Colorwork's Bambino [60% Merino, 30% Bamboo, 10% Nylon]. 400 yards/367 meters. Total yardage: 324 yards/297 meters.
Gauge
16 stitches and 20 rows over 4 inches in Main Body Stitch Finished Pattern Measurements 49 inches wide by 18 inches long after blocking.
Supplies
Removable stitch marker, yarn needle (for weaving in ends), blocking aids (optional)
Abbreviations
Pattern Notes
This shawl is constructed of a main body with a knit-on lace edging. The body is constructed in a traditional triangle method, beginning with Chart A, then moving to Chart B after there are 25 sts. The knit-on edging begins with Edge Chart, working to the marked center stitch of the body. Short rows are used to shape the edging around the center point of the body. Written instructions are provided for all charts, so you may work from the charts or the written instructions. For more information on knitted lace triangle construction, see http://www.fickleknitter.com/archives/2009/12/knitted -lace-triangle-construction-by-michelle-miller.htm
Chart A
Row 1 (RS): Cast on 5 stitches. (5 sts) Row 2 and all even-numbered WS rows to Row 12: Purl. Row 3: K1, \*yo, k1; rep from \* to end. (9 sts) Row 5: K1, [yo, k3, yo, k1] twice. (13 sts) Row 7: K1, [yo, k5, yo, k1] twice. (17 sts) Row 9: K1, [yo, k7, yo, k1] twice. (21 sts) Row 11: K1, [yo, k9, yo, k1] twice. (25 sts) Place stitch marker to the right of the center stitch. Slip the center stitch marker every row as you knit the shawl. Begin working Chart B, continuing at Row13.

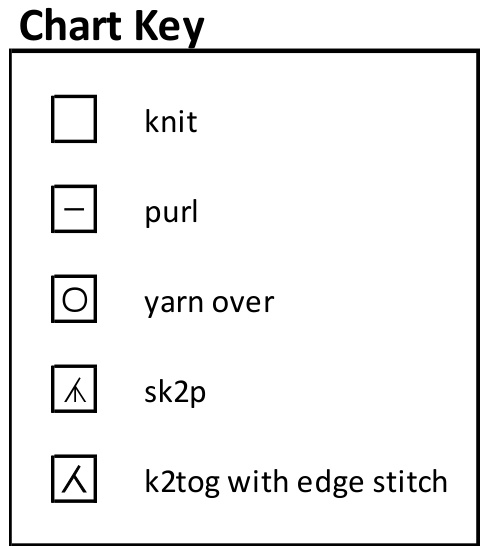
yo = yarn over. k = knit. p = purl. sk2p = slip 1, k2tog, psso. st(s) = stitch(es). RS = right side. WS = wrong side. Shop.fickleknitter.com
Chart B
The main body pattern repeat is indicated by the red-bordered sections on Chart B, and is shown in the written instructions below in bold and enclosed in brackets. Repeat bold, bracketed instructions once through Row 22, twice through Row 22 on the second repeat, three times through row 22 on the third repeat, four times through Row 22 on the fourth repeat and so on while working Chart B ten times ending with Row 22 and there are 225 sts. Then begin the knit-on edging using Edge Chart. All wrong side rows are purled. Row 13 (RS): K1, yo, k1, [yo, k3, sk2p, k3, yo, k1], yo, k1, yo, [k1, yo, k3, sk2p, k3, yo], k1, yo, k1. (29 sts) Row 14 and all even-numbered (ws) rows to Row 22: Purl all stitches. Row 15: K1, yo, k3, [yo, k2, sk2p, k2, yo, p3], yo, k1, yo, [p3, yo, k2, sk2p, k2, yo], k3, yo, k1. (33 sts) Row 17: K1, yo, k5, [yo, k1, sk2p, k1, yo, p5], yo, k1, yo, [p5, yo, k1, sk2p, k1, yo], k5, yo, k1. (37 sts) Row 19: K1, yo, k7, [yo, sk2p, yo, p7], yo, k1, yo, [p7, yo, sk2p, yo], k7, yo, k1. (41 sts) Row 21: K1, yo, k9, [p10], yo, k1, yo, [p10] , k9, yo, k1. (45 sts) Stitch Counts after Chart B Repeats (45, 65, 85, 105, 125, 145,165, 185, 205, 225) Stitches.
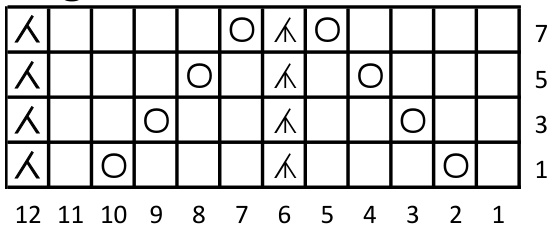
Edge Chart
Without breaking yarn and using the knitted caston method, cast on 12 sts. Work Edge Chart, knitting last edge stitch together with one stitch from main body stitches on all odd rows.Repeat Edge Chart until one stitch before stitch marker is reached, then complete the Short Row Center. Purl all WS rows, slipping the first stitch of each purl row. Row 1: K1, yo, k3, sk2p, k3, yo, k1, k2tog with edge stitch. Row 2 and all even-numbered rows (ws) to Row 8: Slip the first stitch and purl all remaining sts. Row 3: K2, yo, k2, sk2p, k2, yo, k2, k2tog with edge stitch. Row 5: K3, yo, k1, sk2p, k1, yo, k3, k2tog with edge stitch. Row 7: K4, yo, sk2p, yo, k4, k2tog with edge stitch.
Short Row Center
Work to one stitch to the right of stitch marker (ending with Row 6 of 28th repeat) and work Short Row Center instructions. Row 7 (RS): K4, yo, sk2p, yo, k4 TURN. Row 8 (WS): P11. Row 1 (Rs): K1, yo, k3, sk2p, k3, yo, k1, k2tog with edge stitch, remove marker. Row 2 (Ws): Slip 1, p11. Row 3 (RS): K2, yo, k2, sk2p, k2, yo, k2, k2tog with edge stitch. Row 4 (WS): Slip 1, p11. Row 5 (Rs): K3, yo, k1, sk2p, k1, yo, k3, TURN. Row 6 (WS): P11. Row 7 (RS): K4, yo, sk2p, yo, k4, k2tog with edge stitch. Row 8 (Ws): Slip 1, p11. Continue on as before on Edge Chart. Work until alfl main body stitches are consumed. Purl one row more and bind off remaining stitches, weave in ends, and block. Note for Chart A: All wrong side rows are purled. Work Chart A increases with a yo on each edge and on each side of the center st until there are 25 sts, then begin Chart B.
Chart A
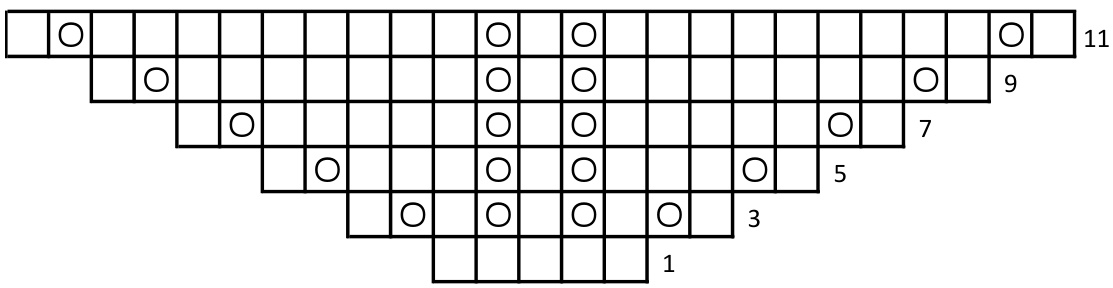
Note for Chart B: The main body pattern repeat is indicated by the red-bordered sections on Chart B. Work the red-bordered instructions once through Row 22, twice through Row 22 on the second repeat, three times through row 22 on the third repeat, four times through Row 22 on the fourth repeat and so on while working Chart B ten times ending with Row 22 and there are 225 sts. Begin the knit-on edging using Edge Chart. All wrongsiderows arepurled.
Chart B

Note for Edge Chart: Without breaking yarn and using the knitted cast-on method, cast on 12 sts. Work Edge Chart, knitting last edge stitch together with one stitch from main body stitches on all odd rows. Repeat Edge Chart until one stitch to the right of stitch marker is reached, and then complete the Short Row Center written instructions. Purl al WS rows, slipping the first stitch. After short row center, continue on as before on Edge Chart. Work until all main body stitches are consumed. Purl one row more, bind off remaining stitches, weave in ends and block
Edge Chart
@ Copyright 2011, Michelle Miller. All rights reserved. To contact Michelle please email fickleknitterdesign@yahoo.com or visit http://www.shop.fickleknitter.com.


