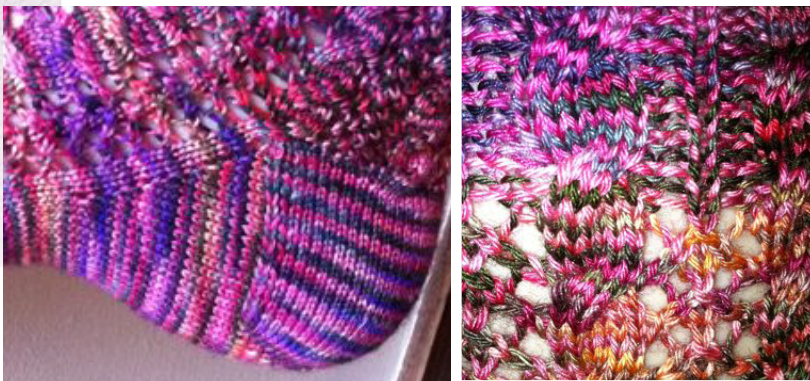
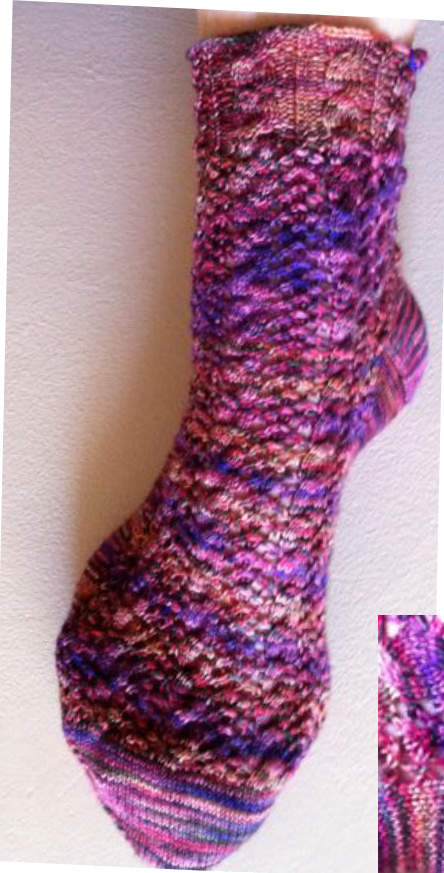
Soliloquy Twist Sock
This pattern combines some unusual design features: ,knitted toe-up Ifeaturing a heel flap and gusset (very unusual in a toe-up sock) combination of cables and lace Because the lace/cable pattern is relatively simple, it lends itself to be knitted with variegated or multicoloured as well as semi-solid yarns.
Aboul chis pattern
Difficulty: Measurements: Intermediate The pattern can be adjusted to any size from adult size 4 all the way up to a 12 Up to 100 gr of Soliloquy sock yarn Approx. 400 m 40 sts and 56 rows measure 10 x 10 cm. in st.st one set of five 2.0 mm dpn's (if necessary use bigger or smaller to achieve the right gauge) Optional: 2 stitch markers Materials: Metreage: Tension: Notions:
Abbreviations
st = stitch, sts = stitches, rep. = repeat, K = Knit, P = Purl, PM = place marker, SM = Slip marker, S = Slip, YO = Yarn over, PSSO = Pass Slipped St Over the knitted st, SKPO = Slip 1 st knitwise, K1, then Pass the slipped st Over the knitted st K2tog = Knit 2 sts together, K3tog = S1-K2tog-PSSO, W&T = yarn forward, S1, yarn back, turn work, Sws = Slip Wrapped St, KWS = Knit Wrapped St, KW = Knit Wrap, PwS = Purl Wrapped St, PW = Purl Wrap, 6 st cable = place 3 sts on cable needle behind work, K3, K3 from cable needle.
Paltern
Toe
Using Judy's magic cast-on method\*\*, cast on 24 sts and divide sts over 4 needles (magic cast-on does not require the toe to be grafted). If you don't want to do the magic cast-on, then do a provisional cast-on of 24 sts using some waste sock-yarn. Divide the sts over 4 needles, join in the round. and start kniting with Soliloquy, leaving a tail of approx. 20 cm (8 in), which you will Use to graft the toe together once you have finished knitting the sock. R(ound) 1: \*K2, M1, K8, M1, K2, PM, rep. from \* (placing markers is optional) R2: K, slipping markers from left to right needle when you get to them R3: \*K2, M1, K to 2 sts from the marker, M1, K2, SM, rep. from \* R4: as row 2 Repeat the last 2 rounds until you have 80 sts on the needles. Then repeat the first half of round of R3, giving you 42 sts on needles 1 and 2 and K the 2nd half of the round, giving you 40 sts on needles 3 and 4. The first section of the round (with 42 sts) will become the top of the foot, knitted in the lattice and cable pattern. The second section of the round (with 40 sts) will become the sole of the foot, knitted in St.st.
FOOT
Start the lace pattern (chart on next page)
Kitchener stitch
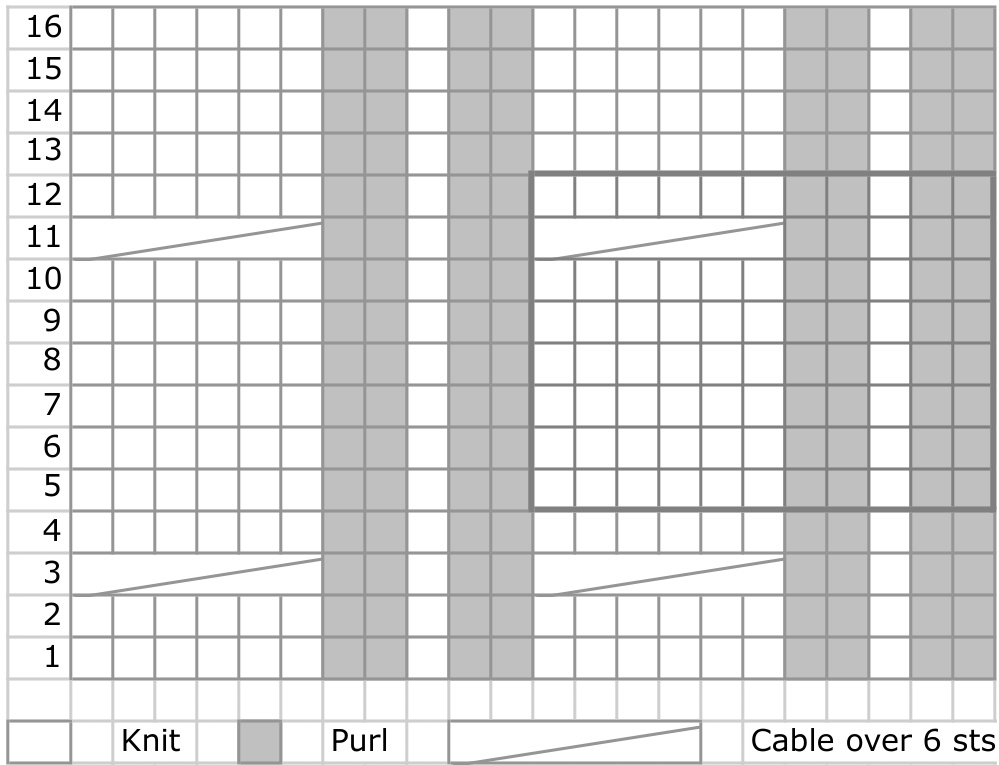
This is often referred to as "real grafting". Because, when done properly, your grafting yarn resembles a row of proper knitting stitches. And since you are sewing together 2 lines of stitches (not side by side but "head to head", as along a shoulder line or the toe of a sock), weaving the grafting yarn through them as if it were a line of knitting stitches ensures that the sewing line completely blends in. Using the yarn that you have been knitting with, cut off a nice length (for a short graft of about 5 cm - 2 in - , a strand of 20 cm - 8 in - will do). Take a nice chunky darning needle and slide your end of yarn through it. Now follow the next steps: 1. (if your sts have not been cast off yet, e.g. in the case of a sock) Transfer your stitches onto 2 needles, one with the stitches that will sit on top of the foot, the other with the stitches from the sole. The needles will sit parallel, snugly side by side. Hold the needle that has the last stitch you knitted on it closest to you, as that will be the first needle you will work with. (if your sts have been cast off, e.g. in the case of a shoulder line) Lay down the 2 pieces you are going to graft together flat and end to end, so the sts you are going to graft are facing each other. 2. Starting with the last stitch you knitted (or: at one end of your shoulder), slide the darning needle into the last stitch as if you were going to knit it, but instead, push the needle all the way through and drop the knitting stitch from the needle. 3. Now pass the darning needle through the next stitch on the same knitting needle (or same shoulder panel) but coming through from behind, I.e. as if you were to purl that stitch. Keep the stitch on the needle. 4. Pass the darning needle through the first stitch on the back needle (or other shoulder panel) as if you were to purl that stitch. Drop the stitch off the needle. As you are working, don't pull the working thread too tight. 5. Pass the darning needle through the second stitch on the back needle (or same shoulder panel) as if you were to knit that stitch. Keep the stitch on the needle. 6. Repeat steps 2—5 until all the stitches have been grafted together. If the yarn you've woven through is too loose, it'll look like big knitting stitches, carefully pull it a bit tighter by working the yarn through the loops of your grafted stitches, one at a time. Weave in the end of your yarn. Written out cuff chart: R1 - 6: SM, [P2, K1, P2, K6] x 8 R7: SM, [P2, K1, P2, 6 st cable] x 8 R8: as R1 Repeat these 8 rounds 3 times (24 rounds). Knit rows 1 - 3 once more.
Finishing
Cast off all sts as follows: Working every st the way it presents itself, start casting off, and m1 after every 4th st. Continue casting off as normal. The extra sts you make (which then get cast off like all the others) ensure a supple cast off edge to your cuff. Toe: if you've used the Magic Cast-on, you only have to weave in the end. If you've used a provisional caston, remove the waste yarn and transfer the live sts this creates onto 2 needles, one holding the sts that run on top of the foot and one holding the sts that go on to become the sole. Holding the needles parallel, use the Kitchener stitch instructions on page 6 to graft the toe together. Weave in all ends. TIP: if you split the end of the yarn into 2 strands, it is easier to weave them in invisibly and very securely as they are less bulky to work with and can each be woven in in separate directions.
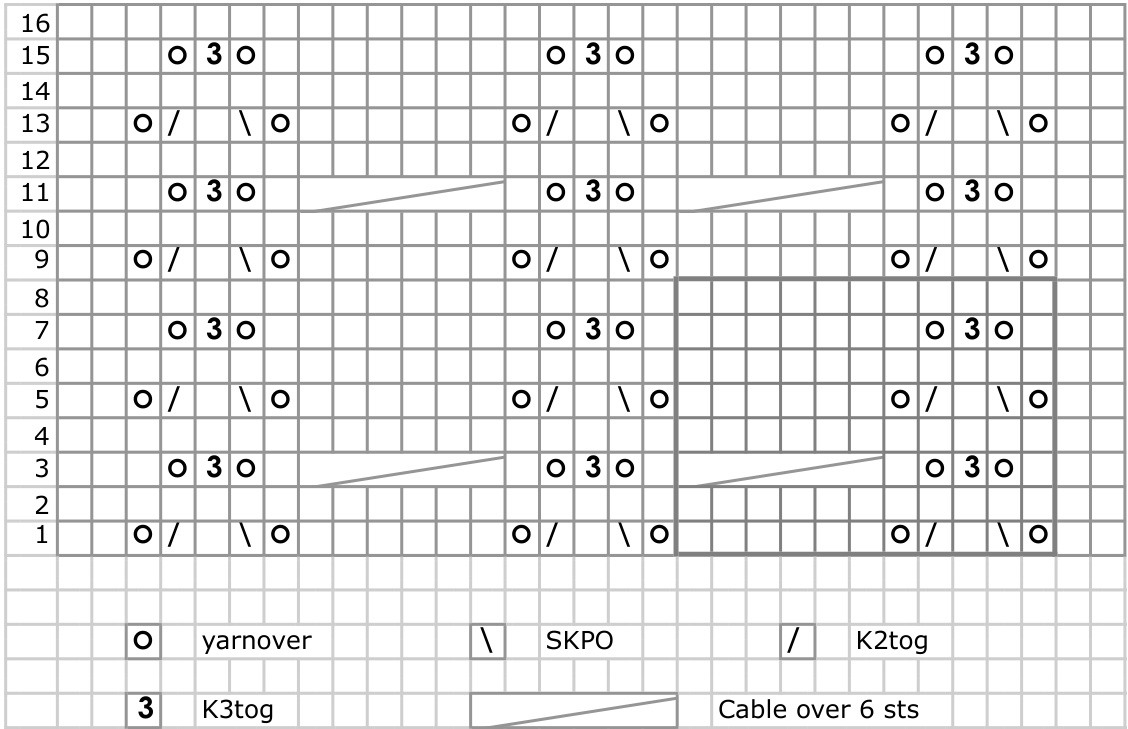
For every complete round, knit the chart (which includes the 2 K sts at each end) up to the marker, SM, then K the rest of the round. It helps to move 3 sts from needle 2 over to needle 1, so the 2nd cable forms the last sts on needle 2. Written out chart: R1: K2, \*YO, SKPO, K1, K2tog, YO, K6, repeat from \* twice, YO, SKPO, K1, K2tog, YO, K2, SM, K40, SM R2 and all even rounds: K, slipping markers as you get to them R3: K2, \*K1, YO, K3tog, K1, 6 st cable, repeat from \* twice, K1, YO, K3tog, YO, K3, SM, K40, SM R5: as round 1 R7: K2, \*K1, YO, K3tog, YO, K1, K6, repeat from \* twice, K1, YO, K3tog, YO, K3, SM, K40, SM Repeat rounds 1 - 8 until the total length of your knitting (measured from the tip of the toe) measures 7.5 cm (3 in) less than the total length of the foot you are knitting the socks for. Continue knitting the top of the foot in the lace/cable pattern, while starting the gusset as follows:
HEEL
R1: work pattern across foot, Sm, K2, M1, K to 2 sts from next marker, M1, K2, SM R2: work pattern across foot, Sm, K rest of round, SM Repeat these 2 rounds until you have increased 10 sts on either side (i.e. a total of 20 rounds). You have now knitted the heel gusset. Mark where you are in the 8 round repeat as you will continue the pattern from where you got to after rounding the heel. (e.g. if the last round you've just knitted was round 5, then you will start with round 6 after rounding the heel). You will now knit the last little section that makes up the sole of the sock. R1: work the chart across the top of the foot, SM, K44, w&T Row 2: SWS, P28, W&T Row 3: Sws, K to 1 st before the lat wrapped st, w&T Row 4: Sws, P to 1 st before the last wrapped st, w&T Repeat these last 2 rows until you purl 18 on a returning row Next row: SwS, K18, [Kws, KW] x 6, K1 st from the gusset, turn Next row: S1, P30, [PwS, PW] x 6, P1 st from the gusset, turn (44 sts) These 44 sts form the back of the heel, you will attach it to the gusset by picking up the gusset sts 1 by 1 as you knit the heel, as follows: Row 1: S1, K42, S1,K1 st from the gusset,PSSO, turn Row 2: S1, P42, P last st tog with 1 gusset st, turn Repeat these 2 rows until you have picked up all 10 gusset sts on either side (20 rows) You have finished the heel and start knitting in the round again for the leg section of the sock. You start knitting the lace/cable pattern in the round from round 2 as described on the next page
LEG
R1: Sm, M1, work chart from where you got to, Sm, M1, K to end,sm R2: work chart, but instead of repeating the 11 sts 3 times, you repeat them 8 times. Remove the marker that's halfway through your round and redistribute the sts so that each needle has 22 sts on it, finishing with a cable. Written out chart instructions: R1: Sm, M1, work the next pattern round from where you got to before turning the heel (see page 2), knitting the 11 st repeat 8 times instead of 3 times (or just knitting st. st. if it's an even round), removing the mid-round marker and omitting the 40 sole sts. Continue the 8 round repeat until the desired length, finishing with a round 4.
Cuff
Work the following 8 round chart, starting with round 5 and repeating it 3 times, then working 2 more rounds (26 rounds).