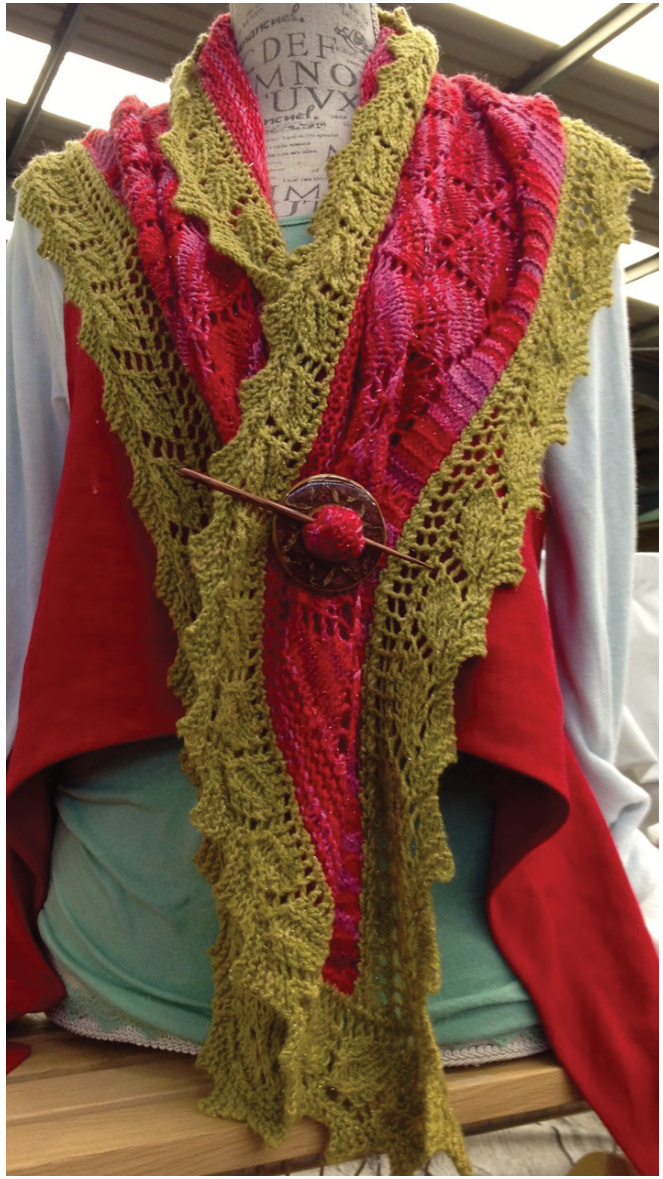
Leafy Lace shoulder shaul
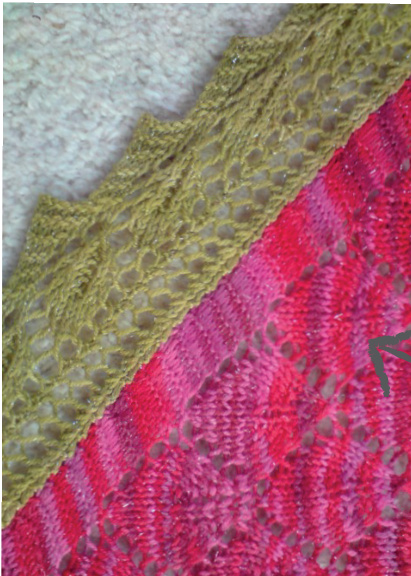
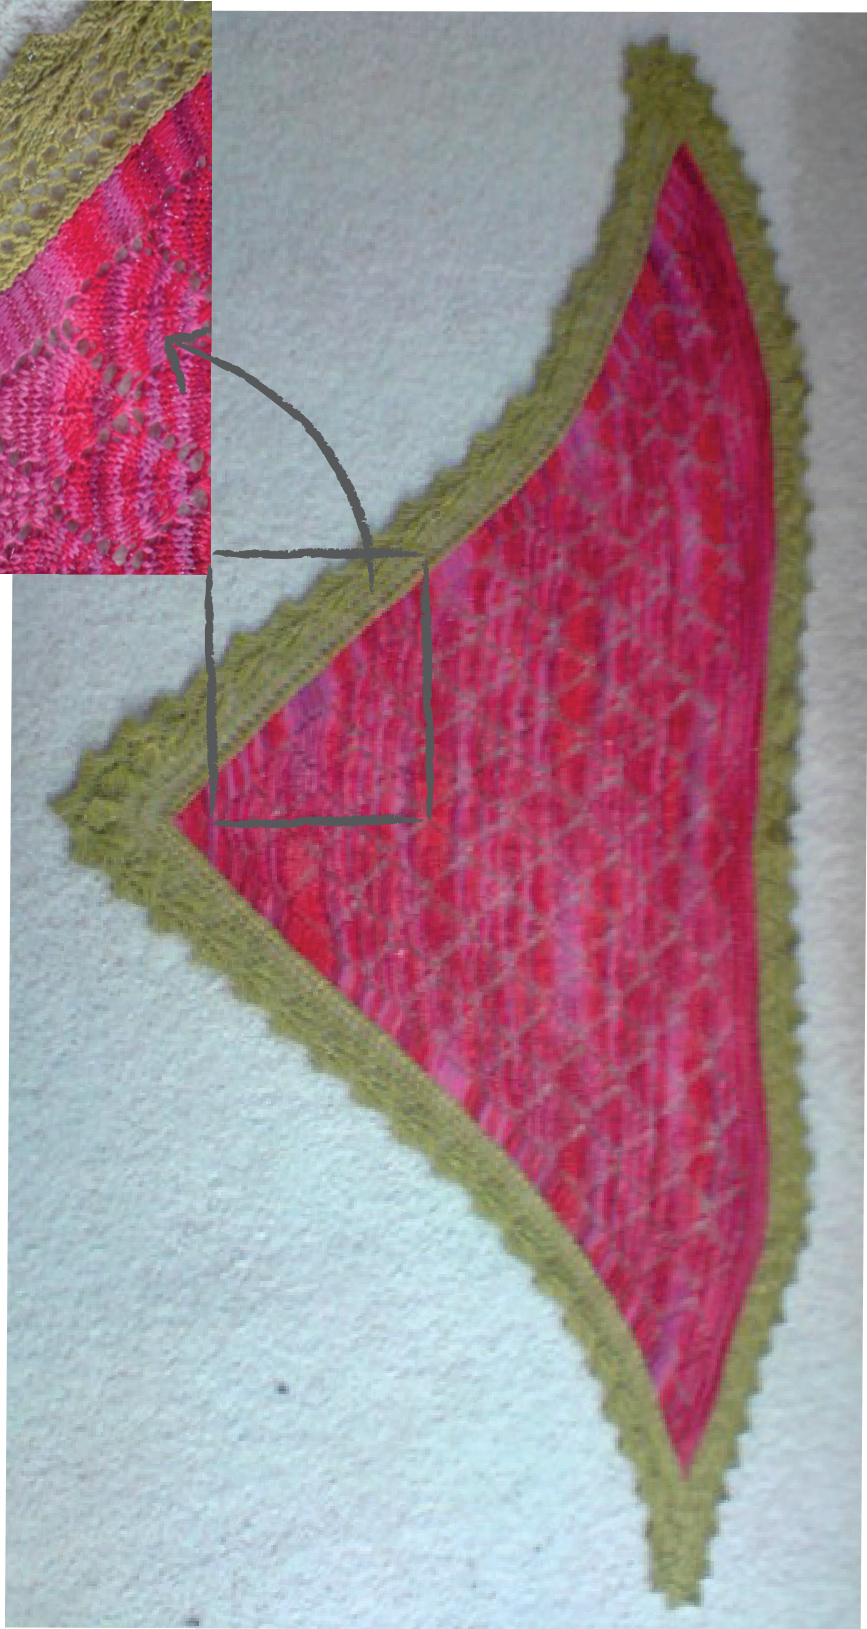
This shawl combines two different leaf-motifs; one for the centre panel and one for the edge. The centre panel is knitted from the bottom tip up, the edge is knitted onto it afterwards. The shawl in the picture shows different colours for the main body and the edge, but this design is equally effective when knitted in one shade throughout and popular as a Wedding Shawl knitted in un-dyed yarn.
Materials:
Aboue ehis paltern
Difficulty: Intermediate Measurements: Depending on yarn and needles used; when using Soliloquy AlpacaBoo and 4.5mm needles: 170 cm (67") x 70 cm (25") Metreage: Tension: Soliloquy Sock Lace (lo0 gr for the centre panel, 50 gr for the edge) or a medium weight 4-ply (100 gr for the centre, 75 gr for the edge) Approx. 700 m (2 hanks of sock yarn) if you want to achieve a very similar size to the shawl in the pic: 10x10 cm = 20 sts x 28 rows One circular needle, 4.5 mm (80 cm long) Notions:
Abbrevialions
st = stitch, sts = stitches, K = knit, P = purl, YO = yarn over, RS = right side, WS = wrong side, M = make, K2tog = knit 2 sts together, SSK = slip1, slip1, knit 2 slipped sts tog, SK2P = slip, knit 2, pass slipped st over
A bie more aboue lhe motifs
The centre triangle is knitted in a "cherry leaf" pattern. This motif was first published in 1891 in a monthly publication Called "weldon's Practical Knitter". It was oroginally knitted with a much finer yarn, on 2.75 mm needles. As so many lace motifs do though, it translates very well across a wide variety of both needle sizes as well as yarns, from the finest silk lace to the bulkiest of chunky yarns. Since it is knitted from the central bottom tip upwards, the number of 10 row repeats can just be increased or decreased depending on the yarn and needles used and the desired size. The edging is a variation on the lace edging that first appeared in Barbara G. Walker's Second Treasury of Knitting Patterns (p. 362). It has been published since and is commonly referred to as Beech Leaf edging. I have modified it by decreasing the original wide border of open lattice work to a double row along the sides of the shawl and a single row along the top. This makes for a better integration between the beech and cherry leaves.
Palterh
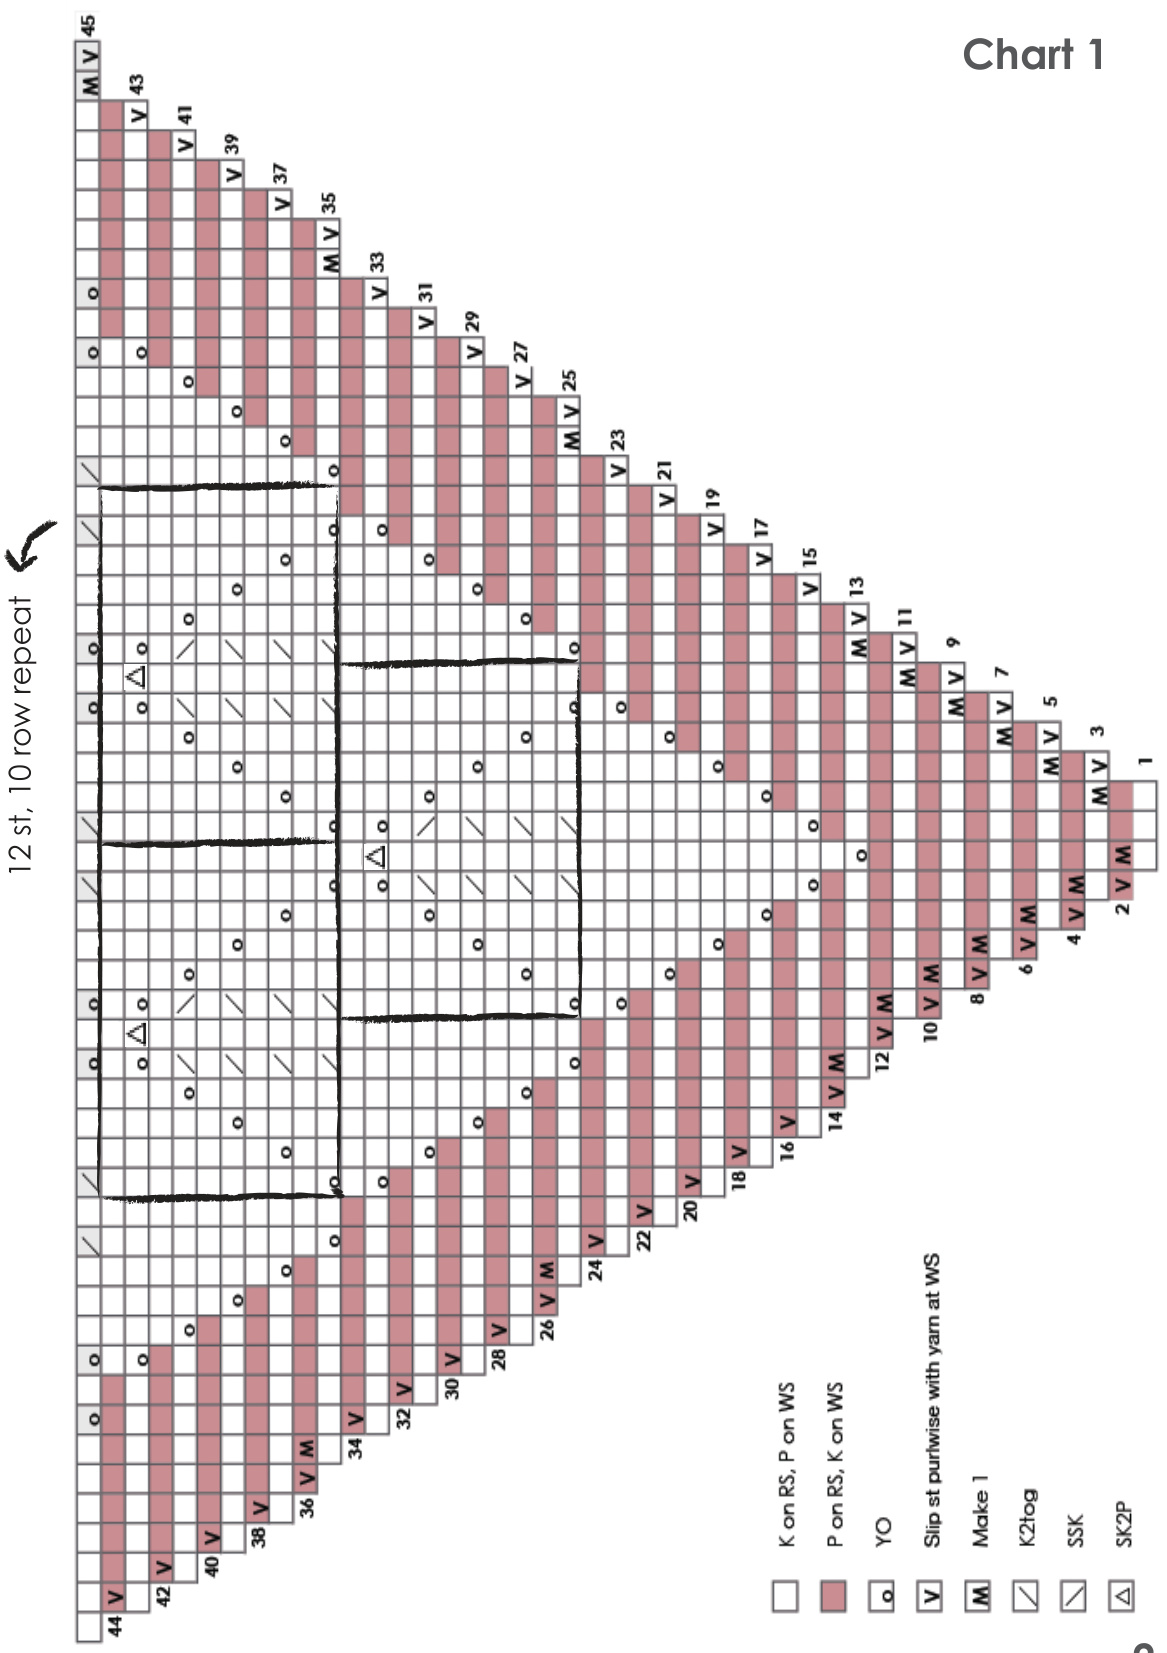
Centre triangle
Cast on 3 sts onto your circular needle. Work rows 1 - 44 of Chart 1. As you will be able to see, the pattern is made up of a 10 row, 12 stitch repeat. Every 10 rows you add one additional 12 st repeat. Continue this 10 row repeat for a total of 14 times, ending with 195 sts. K 14 rows. Loosely cast off all sts.
Finishing
Weave in any ends. Block your shawl by wetting it, then pinning it out on a blocking board (or a carpet or rug). Leave to dry. Step back and admire. Now deal wih the urge to show the entire world the results of your hard work and make yourself a drink (whether it's a cup of tea or something stronger is entirely up to you).
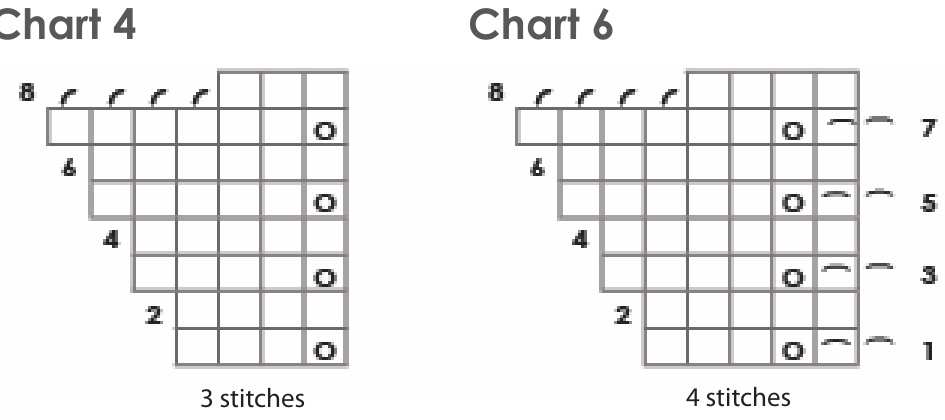
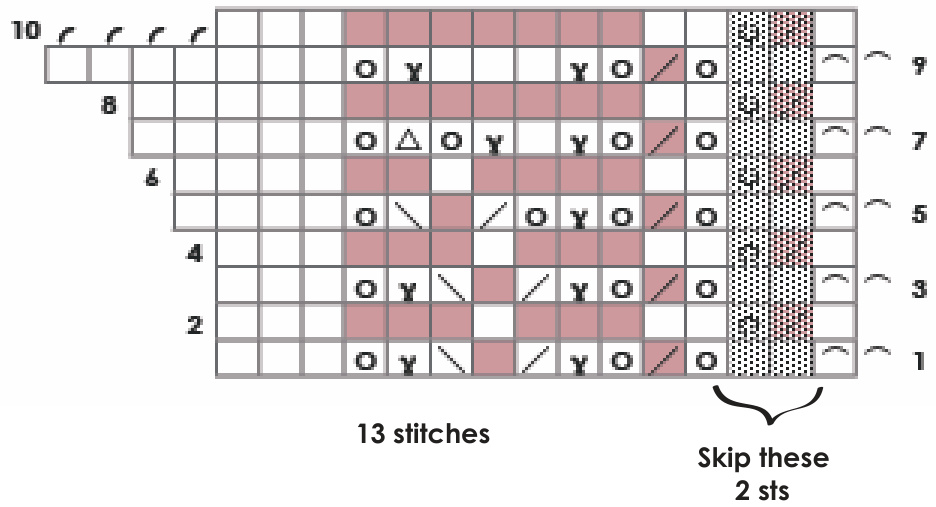
For meaning of all symbols see Chart 2
Chart 5
Knit the first st on your needle tog with the first st on your stitchholder. Proceed with the rest of Chart 5. Knit the first st of every uneven row tog with the next st on the stitch holder. Repeat Chart 5 until you have knitted all sts from the stitch holder. Proceed by picking up and knitting tog every st along the cast off line along the top of the centre triangle with the 1st st of every uneven row. This will make the top border slightly more generous than is strictly necessary, which contributes beautifully to its drape when worn, allowing it to fold over like a shawl collar. Repeat the chart until you reach the end of the cast off edge of the centre triangle (with 195 cast off sts along the top of the centre triangle, you'll be able to knit Chart 5 39 times). Beyond this, use the cast on edge of the start of the side border to pick up sts and knitting them tog with the edge of your top border (2 more repeats of Chart 5). You should now have the last 3 sts of the side border left (the ones that form the jagged edge). K along the 13 sts on your needle and turn. You will work only the first 3 sts now to knit one little triangle to round the corner. The other 9 sts will remain on your needle. Row 1 (wS): K3, turn Row 2 (RS): M1, K3 Row 3: K4, turn Row 4: M1, K4 Row 5: K5, turn Row 6: M1, K5 Row 7: K6, turn Row 8: M1, K6 Row 9: Cast off 4 sts, K 3, then K one more sts (from the 10 sts you have kept on the needle) With these 4 sts, K 2 repeats of Chart 6, knitting the first link stitch tog with one of the remaining 9 sts on your needle. You now have the 4 jagged edge sts and 1 still waiting to be knitted tog. Pass the waiting st onto your left needle and Knit it tog. with the 1st of your 4 sts. K2tog, K1. Now line up these remaining 3 sts with the 3 cast on sts of the side border and graft them together to form a continuous jagged edge.
Border
The border is knitted onto the centre triangle by knitting the first stitch of every uneven row together with each edge stitch of the centre triangle (since for the centre triangle you slipped the first st of every row, you have only 1 edge st on either side for every 2 rows knitted). On the edge charts, this first stitch is indicated by the small arch next to the uneven row numbers. Cable cast on 15 sts. Remember to use your second colour if you are knitting a two-tone shawl, like the one in the picture. Start Chart 2, the first st being the stitch you knit together with the edge of the centre triangle. Start in the top right corner of the centre triangle, so you will be working down the right side edge of the centre triangle first. If you have knitted 14 repeats in the centre triangle, you will repeat the 10 row edging chart 17 times. For every extra repeat in the centre triangle, you'll knit an extra repeat of the edging chart (so a shawl with 20 repeats in the centre triangle will need 23 repeats of Chart 2). Regardless of the total number of repeats, this will take you to 4 edge sts from the bottom point of your Centre triangle.
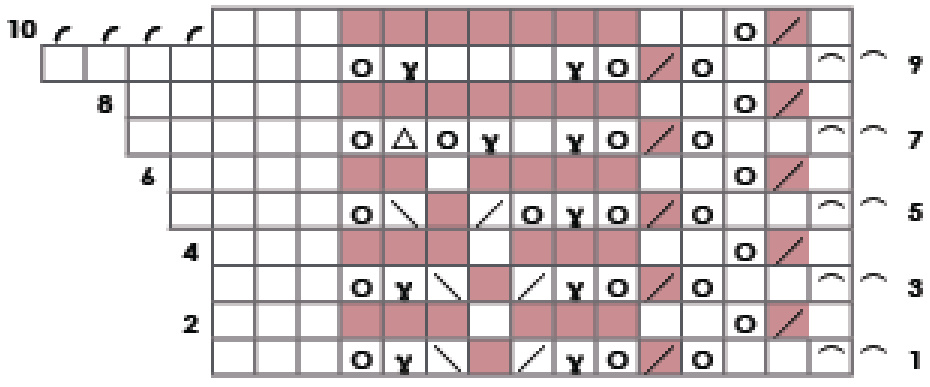
Chart 2

Proceed by knitting 4 repeats of Chart 3. Chart 3 is an adaptation of Chart 2, which includes short rowing to accommodate the fact that you are rounding a corner.
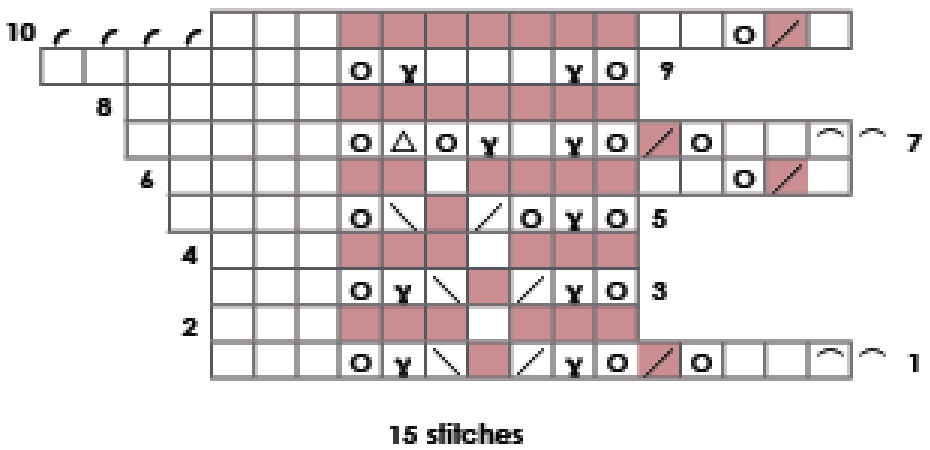
Chart 3 For meaning of symbols see Chart 2 trehrlnepeaifalfhewyste You now have 3 sts left on your needle. With these 3 sts, work Chart 4 twice. This will give you a continuation of the jagged edge along with what will become the start of your knitting of the top border. Keeping the 3 sts that are left on the needle, pick up and knit 10 sts along the straight (= right) edge of the 16 rows you have just knitted, ensuring to space them out evenly. This brings your knitting back to the top left corner of the centre triangle. You will now proceed to knit the top border of the shawl (Chart 5). You can see that the only difference between Chart 2 and 5 is the omission of 2 stitches that contribute to the lattice motif (shaded on Chart 5).


