Finishing
Weave in all loose ends or cast on the next sock first to avoid "'second sock syndrome"!
Kitcheher stitch
This is offen referred to as "real grafting". Because, when done properly, your grafting yarn resembles a row of proper knitting stitches. And since you are sewing together 2 lines of stitches (not side by side but "head to head", as along a shoulder line or the toe of a sock), weaving the grafting yarn through them as if it were a line of knitting stitches ensures that the sewing line completely blends in. Using the yarn that you have been knitting with, cut off a nice length (for a short graff of about 5 cm - 2 in - , a strand of 20 cm - 8 in - will do). Take a nice chunky darning needle and slide your end of yarn through it. Now follow the next steps: 1. (if your sts have not been cast off yet, e.g. in the case of a sock) Transfer your stitches onto 2 needles, one with the stitches that will sit on top of the foot, the other with the stitches from the sole. The needles will sit parallel, snugly side by side. Hold the needle that has the last stitch you knitted on it closest to you, as that will be the first needle you will work with. (if your sts have been cast off, e.g. in the case of a shoulder line) Lay down the 2 pieces you are going to graft together flat and end to end, so the sts you are going to graft are facing each other. 2. Starting with the last stitch you knitted (or: at one end of your shoulder), slide the darning needle into the last stitch as if you were going to knit it, but instead, push the needle all the way through and drop the knitting stitch from the needle. 3. Now pass the darning needle through the next stitch on the same knitting needle (or same shoulder panel) but coming through from behind, I.e. as if you were to purl that stitch. Keep the stitch on the needle. 4. Pass the darning needle through the first stitch on the back needle (or other shoulder panel) as if you were to purl that stitch. Drop the stitch off the needle. Don't pull the working thread too tight as you go. 5. Pass the darning needle through the second stitch on the back needle (or same shoulder panel) as if you were to knit that stitch. Keep the stitch on the needle. 6. Repeat steps 2—5 until all the stitches have been grafted together. If the yarn you've woven through is too loose, it'llook like big knitting stitches, carefully pull it a bit tighter by working the yarn through the loops of your grafted stitches, one at a time. Weave in the end of your yarn.
soliloquy Top-douh
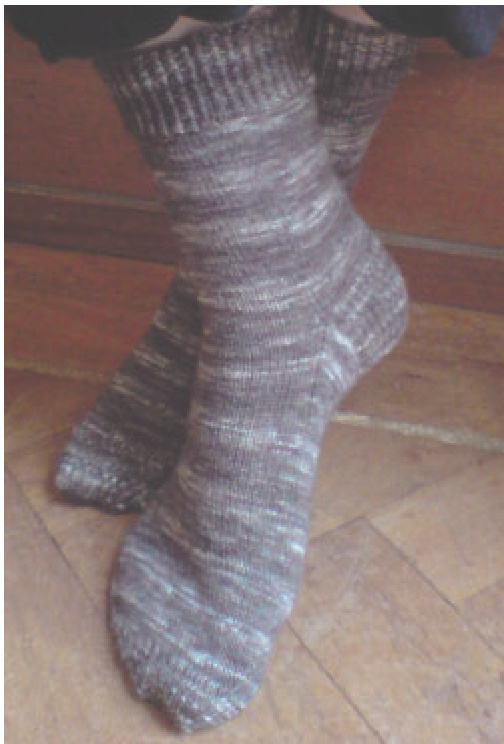
A basic sock pattern with a reinforced heel and toe using extra fine sock yarn.
About this paltern
Difficulty: If you've knitted socks before: easy If these are your first socks: intermediate
Measurements:
18 cm in the round for size 3 - 8, 20 cm in the round for size 9 & up.
Materials:
up to 100 gr. of Soliloquy sock yarn (60 gr is enough for a size 9 pair) Metreage: Approx. 400m. Tension: 40 sts and 54 rows = 10 x 10 cm. in stocking stitch Notions: one set of 2.0 mm dpn's (if necessary use bigger or smaller to achieve the right gauge) Optional: 1 stitch holder and 2 stitch markers
Abbrevialions
st = stitch, sts = stitches, RS = Right Side, WS = Wrong Side, K = Knit, P = Purl, S = Slip, K2tog = Knit 2 sts together, P2tog = Purl 2 sts together, SKPO = Slip 1 st knitwise, K1, then Pass the slipped st Over the knitted st SM = Slip Marker, PM = Place Marker
Stitches
Stocking stitch: (st.st.) K on RS, P on wS Reinforced Stocking Stitch: on RS row: K1, S1, on WS row: P Rib: K1, P1
Paltern
Cuff
Cast on 72 (80) sts divided over 4 needles - 18 (20) sts per needle Rounds 1 - 20: Rib
Leg
Round 21 onwards: K Knit to a total height of approx. 20 cm (8") or to your own preferred height - the point where you start the heel is just about where your ankle sticks out on the outside of your leg.
Heel flap
The heel is knitted with only half the sts, i.e. 2 needles only (36 or 40 sts) . The other half of the sts form the bridge across the foot (commonly known as the instep of the sock). Leave these on the needles OR transfer them to a stitch holder OR onto a spare piece of yarn in a contrasting colour. Row 1: S1, [K1, S1] x 17 (19), K1, turn Row 2: S1, P35 (39), turn Continue in st.st. on these 36 (40) sts for 34 (38) more rows
Turn heel
Row 35 (39): S1, K20 (22), SKPO, K1, turn Row 36 (40): S1, P7, P2tog, P1, turn Row 37 (41): S1, K to 1 st before the gap, SKPO, K1, turn Row 38 (42): S1, P to 1 st before the gap, P2tog, P1, turn Rep. last 2 rows until all the sts have been worked - 22 (24) sts Next row: K the 22 (24) sts, then pick up and knit 20 sts from the heel flap, [place a stitch marker if you find it useful], knit the sts on needles 3 and 4 (transfer them onto the needles first if they were on a stitch holder or a spare piece of yarn), [place another stitch marker], pick up and knit 20 sts up the other side of the heel flap, then knit 11(12) more sts (i.e. halfway through the sts that form the bottom of the heel). Note: needles 1 and 2 have 31 (32) heel sts each on them and needles 3 and 4 have 18 (20) sts each on them. From this point, you'll be knitting in the round again. Please note that a round now starts between needles 1 and 2, on the midline that runs under the foot.
Gusset
Next round: K to 3 sts before the Ist stitch marker, K2tog, K1, K across needles 3 and 4 (to the 2nd stitch marker), K1, SKPO) K to end of round. Next row: K Repeat these last 2 rounds until you have 18 (20) sts on each needle = 72 (80) sts across all needles
Foot
At this point, you may want to remove the markers until you need them again for the toe section. Continue knitting round until you reach the desired length, which is the measurement of the foot from heel to the tip of the big toe, minus 5 cm (2"). Finish the last round early, at the beg. of needle 1
Reinforced, asymmetrical Toe Left foot
R (round) 1: \*[K1, S1] x 18 (20), PM, repeat from \* R 2: K R 3: K1, S1 R 4: K to 3 sts from marker, K2tog, K1, SM, K1, SKPO, K to end R 5: SM, K2, [S1, K1] to 3 sts from marker, K2tog, K1, SM, K1, SKPO, S1, [K1, S1] to end R6: SM, K1, SKPO, K to last 3 sts from marker, K2tog, K1, SM, K1, SKPO, K to last 3 sts from marker, K2tog, K1 R7: \*SM, K2, [K1, S1] to 2 sts before marker, K2, repeat from \* Repeat the last 4 rounds until there are 32 sts left in total. Remove markers and graft the sts tog using the Kitchener Stitch (see back page). Right foot K 36 (40) sts. (to the other side of the foot). This point will now be your start of round. Proceed with R1 from the left foot and follow the same instructions.


