KNIT
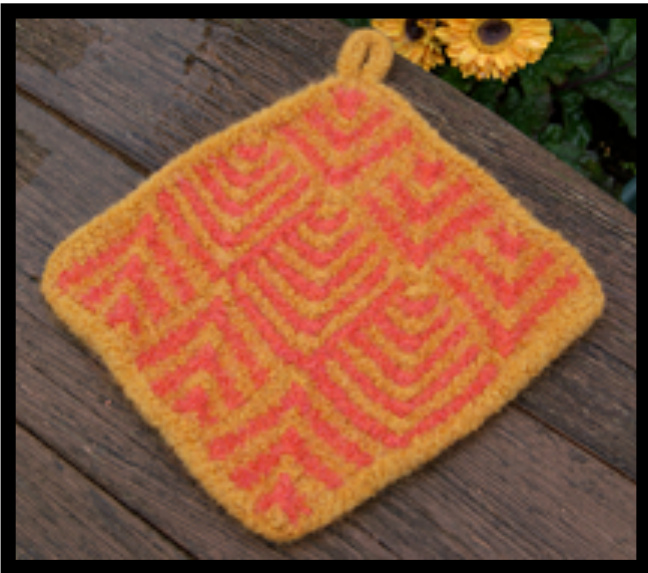
Fulled Domino Potholder
Finished Size: approx. 22 cm (8.5")
YARN used for the Model
2 colours of aran-weight 100% wool for a heavy potholder OR 2 colours of worsted-weight 100% wool to make a thinner potholder
NEEDLES
Aran-weight yarn - 6 mm DPN Worsted-weight yarn - 5.5 mm DPN
Abbreviations:
BO bind off co cast on K knit LHN left hand needle M1 make 1 P purl PM place marker rep repeat RHN right hand needle rnd round SM slide marker st stitch If you have any questions about the instructions in this pattern, please write me at mycatknits@hotmail.com!
Copyright by
Skill Level:
Intermediate
Yarn Suggestions: Aran-weight - Marks & Kattens Eco, Cascade Yarns Peruvia Worsted-weight - Patons Classic Wool, Cascade Yarns Cascade220
Special Instructions:
Slipping 1st stitch of the row: Slip the stitch knitwise Centred Double Decrease (CDD): RS (knit) Rows - slip 2 stitches together knitwise, knit the next stitch, pass both slipped stitches over the knit stitch - centre stitch ends up on top of the other 2 stitches WS (purl) Rows - WyIF, sl 2 sts knitwise one at a time, sl both sts back to LHN, insert RHN through back loops purlwise and slip back to RHN, P1, P2SSO Tips re Domino Knitting: always cast-on using the Knit Cast-on method (not a long-tail method) always slip 1st stitch of row knitwise - except on Row 1 slip 1st stitch even when you're changing colours (it looks odd initially..but it works out okay!) always purl the last stitch of the row when working in garter stitch, decrease on RS rows only change colours on RS rows only do not cut the MC or CC when you're finished with it - carry the colour up the side of the square always do your PU&K (pickup & knit) with right side facing you when doing the PU&K, always catch the complete stitch (i.e. 2 strands) when working along the side of a piece and only 1 strand when picking up on the CO or BO edge picking up along the edge where you "carried" your colours: domino experts tell you to catch the 3rd strand (the carried yarn) as well; I prefer to make a flatter seam so I pickup only 2 strands - this obviously falls under the heading of "personal preference" This potholder consists of 3 columns of mitre squares - each column has 3 squares with centred double decreases that slant to the right on the finished product. The centre column is garter stitch; the 2 outer columns are knit in stocking stitch.
| 7 ↑ | 3 ↑ | 6 ↑ |
| 8 个 | 2 5 ↑ ↑ | |
| 9 1 ↑ | ↑ ↑ | 4 |
Page 3
Column 1
With Col A, cast-on 21 sts using the Knit Cast-on method (NOT a long-tail method) Row 1: (WS) With A, K to last st, P1 Row 2: (RS) Sl 1st st KW, introduce Col B (do not cut MC - carry it up the side of the square), K8, CDD, K8, P1 (19 sts rem) Row 3: (WS) Sl 1st st, K to last st, P1 Row 4: (RS) With Col A, sl 1st st, K till 1 st rem before centre st, CDD, K to last st, P1 (17 sts) Row 5: (WS) Sl 1st st, K to last st, P1 Row 6: (RS) With Col B, sl 1st st, Ktill 1 st rem before centre st, CDD, K to last st, P1 (15 sts) Row 7: (WS) Sl 1st st, K to last st, P1 Row 8: (RS) With Col A, sl 1st st, K till 1 st rem before centre st, CDD, K to last st, P1 (13 sts) Row 9: (WS) Sl 1st st, K to last st, P1 Row 10: (RS) With Col B, sl 1st st, K till 1 st rem before centre st, CDD, K to last st, P1 (11 sts) Row 11: (WS) Sl 1st st, K to last st, P1 Row 12: (RS) With Col A, sl 1st st, K till 1 st rem before centre st, CDD, K to last st, P1 (9 sts) Row 13: (WS) Sl 1st st, K to last st, P1 Row 14: (RS) With Col B, sl 1st st, K till 1 st rem before centre st, CDD, K to last st, P1 (7 sts) Row 15: (WS) Sl 1st st, K to last st, P1 Row 16: (RS) With Col A, sl 1st st, K1, CDD, K1, P1 (5 sts) Row 17: (WS) Sl 1st st, K to last st, P1 Row 18: (RS) With Col B, sl 1st st, CDD, P1 (3 sts) Row 19: (WS) Sl 1st st, K1, P1 Row 20: (RS) With Col A, CDD (1 st) - do NOT cut either strand of yarn The # of stitches to knit before the Centred Double Decrease is not specified after Row 3 - this number will change on every row. Learn to recognize the centre stitch of the square, and you'll know where to work the CDD every time.
Square 2:
With RS of Square 1 facing you, with Col A, pickup & knit 9 sts along side of Square 1, pickup & knit 1 st in corner of Square 1, CO 10 sts (21 sts). Work Basic Mitre Square, introducing Col B onRow 2.
Square 3:
With RS of Square 2 facing you, with Col A, pickup & knit 9 sts along side of Square 2, pickup & knit 1 st in corner of Square 2, CO 10 sts (21 sts). Work Basic Mitre Square, introducing Col B onRow 2. Cut both strands. Page 4
Column 2
Square 4:
With Col B, cast-on 10 sts, pickup & knit 1 st in bottom right corner of Square 1, then pickup & knit 10 sts along side of Square 1 (21 sts). Work Basic Mitre Square, introducing Col A on Row 2.
Square 5:
With RS of Square 4 facing you, with Col B pickup & knit 9 sts along side of Square 4, pickup & knit 1 st in the intersection of the 3 squares, pickup & knit 10 sts along side of Square 2 (21 sts). Work Basic Mitre Square, introducing Col A on Row 2.
Square 6:
With RS of Square 5 facing you, with Col B pickup & knit 9 sts along side of Square 5, pickup & knit 1 st in the intersection of the 3 squares, pickup & knit 10 sts along side of Square 3 (21 sts). Work Basic Mitre Square, introducing Col A on Row 2. Cut both strands.
Column 3
Rotate the piece so you're picking up along the other long edge of Column 1.
Square 7:
With Col B, cast-on 10 sts, pickup & knit 1 st in bottom right corner of Square 3, then pickup & knit 10 sts along side of Square 3 (21 sts). Work Basic Mitre Square, introducing Col A on Row 2.
Square 8:
With RS of Square 7 facing you, with Col B pickup & knit 9 sts along side of Square 7, pickup & knit 1 st in the intersection of the 3 squares, pickup & knit 10 sts along side of Square 2 (21 sts). Work Basic Mitre Square, introducing Col A on Row 2.
Square 9:
With RS of Square 8 facing you, with Col B pickup & knit 9 sts along side of Square 8, pickup & knit 1 st in the intersection of the 3 squares, pickup & knit 10 sts along side of Square 1 (21 Sts). Work Basic Mitre Square, introducing Col A on Row 2. Cut both strands. Page 5
Applied I-Cord Border
With DPN, CO 3 sts using the knit cast-on method. Pickup & knit 1 st in corner of the potholder, slide all sts to the other end of the DPN, K2, K2togTBL, \*pickup & knit 1 st in next st on edge of potholder, slide sts to other end of DPN, K2, K2togTBL: rep from \* until you reach the end of this side of the potholder, pickup & knit an extra st in the corner, slide all sts, K2, K2tog TBL Rep from on the next 3 sides. When you've worked all the way around the potholder, make the loop by knitting 9 cm (3.5") of 3-st I-cord. Bind off the 3 sts. Sew bind-off sts to the cast-on sts of the applied I-cord.


