Meisi
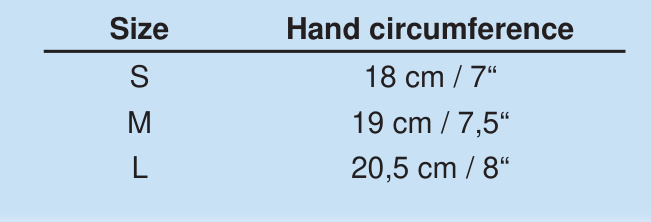
Materials:
383 meters / 419 yards of fingering weight yarn (shown in Wollmeise $100\%$ super wash, colorway Neptun), about 100g / 3,5 oZ. $2{,}25\;\mathrm{mm}$ circular needle (or size to get the given gauge) long enough for magic loop Waste yarn Tapestry needle
Gauge:
36 stitches and 48 rows on 10 cm / 4" in stoCkinette stitch. Take time to swatch because getting the correct gauge is essential for well-fitting gloves!
These gloves are knit using the ,magic loop" method, however you can use double pointed needles or two circular needles if you prefer. Just be aware that the instructions often refers to needle 1 and 2 (meaning each half of the total stitch count). Where stitch counts vary depending on the size, the following format is used: S [M, L]. At the beginning of each section (cuff, hand, fingers), the round numbers start anew at 1. Instructions between 2 asterisks need to be repeated to the end of the round. $\mathsf{R G}=$ Instructions for the right glove $\mathsf{L G}=$ Instructions for the left glove
READ THE WHOLE PATTERN BEFORE YOU START KNITTING!
NOTE:SEPARATECHARTSAREPROVIDED FOR EACH SIZE. BE SURE TO USE THE COR- RECT CHART CORRESPONDING TO THE SIZE BEING KNIT.
Cuff Edge
Cast on 65 [70, 75] sts using the long tail cast-on. Separate the sts as follows: RG: 34 [34, 34] sts on needle 1, 31 [36, 41] sts on needle 2 LG: 32 [36, 40] sts on needle 1, 33 [34, 35] sts on needle 2 $\mathsf{R G}+\mathsf{L G}$ Round 1-6: Knit Round 7: $^{\star}\mathsf{k}2$ mBo, $k2^{\star}$
How to make a bobble (mBo):
Row 1: kfb 3 times into the same stitch, turn work Row 2: sl1 purlwise wyif, p5, turn work Row 3: sl1 purlwise wyib, k5, turn work Row 4: sl1 purlwise wyif, p2tog, p1, p2tog, turn work Row 5: sl2 purlwise wyib, k2tog psso both slipped stitches
Round 8-13: Knit
Round 14: Fold the piece in half with knit side out so that the cast-on edge is touching the sts on your needles. Using the right needle, pick up a stitch out of the first cast-on stitch and place it on the left needle. K2tog the cast-on stitch with the live stitch next to it. Size S: Repeat until all cast-on stitches have been picked up / all live stitches have been used up. Work one m1 increase. Size M: Repeat until all cast-on stitches have been picked up / all live stitches have been used up. Size L: Repeat until all cast-on stitches have been picked up / allive stitches have been used up. Decrease one stitch at the end of the round by slipping one already knit stitch over another stitch.

RG:
Work Round 1 of chart 1 (Cuff) on needle 1 and \*k1tbl, p2, k1tbl\* on needle 2 till you finish the last round of the chart.
LG:
Work \*k1tbl, p2, k1tbl\* on needle 1 and chart 1 (Cuff) on needle 2 till you reach the last round of the chart. Work the last round up to stitch 27 of chart 1. Do not work the last 7 sts.
Hand:
RG: Before starting with the hand chart you have to change the beginning of the round by working 7 sts of needle 1 (k1tbl, p2, k2tbl, p2) and shifting them to needle 2. Work Chart 2 (Cable Panel) on needle 1, Chart 3 (Ribbing part 1) on the first 22 sts of needle 2, k2 [6, 10], work Chart 4 (Ribbing part 2) on the remaining 22 sts. When you've completed the last round on Chart 3 and 4, continue in stockinette stitch on needle 2 till you've finished round 29 [32, 35]. Go on working Chart 2 on needle 1. At the same time, proceed on needle 2 as follows: Round 30 [33, 36]: In this round, the sts for the thumb gusset need to be put on hold. On needle 2 transfer 21 [23, 25] sts on a piece of waste yarn, cast on 2 sts using the backward loop method and knit the remaining sts. Round 31 [34, 37]: knit all sts. Round 32 [35, 38]: ssk, knit all the remaining sts. Proceed working Chart 2 on needle 1 and stockinette st on needle 2 until you have completed round 37 [41, 44] of chart 2. Work chart 5 corresponding to your size. At the end of row 6 and in the beginning of row 7 put 15 [16, 17] sts for the pinky on waste yarn and cast on two sts as indicated in the chart. Do NOT work row 9.
Before starting with the hand chart you have to change the beginning of the round by slipping the last 7 sts of needle 2 (k1tbl, p2, k2tbl, p2) onto needle 1.
Work chart 3 (Ribbing part 1) on the first 22 sts on needle 1, k2 [6, 10], work Chart 4 (Ribbing part 2) on the remaining sts of needle 1. Work chart 2 (cable panel) on needle 2. When you've completed the last round on Chart 3 and 4, continue in stockinette stitch on needle 1 till you've finished round 29 [32, 35]. Go on working Chart 2 on needle 2. At the same time, proceed on needle 1 as follows: Round 30 [33, 36]: In this round the sts for the thumb gusset need to be put on hold. On needle 1 k25 [27, 29], then transfer 21 [23, 25] sts on a piece of waste yarn, cast on 2 sts using the backward loop method. Round 31 [34, 37]: knit all sts. Round 32 [35, 38]: k 25 [27, 29], ssk Proceed working stockinette st on needle 1 and chart 2 on needie 2 until you have completed round 37 [41, 44] of chart 2. Work chart 6 corresponding to your size. At the end of row 6 and in the beginning of row 7 put 15 [16, 17] sts for the pinky on waste yarn and cast on two sts as indicated in the chart. Do NOT work round 9.
Fingers:
The last round on the charts 5 and 6 indicates which stitches will end up being which finger and mustn't be worked. Yellow: ring finger Red: middle finger Blue: index finger The pinky isn't included as the stitches have already been transferred onto waste yarn. Transfer all sts onto waste yarn (or spare circular needle in the same size you're using or smaller)
RG:
Ring finger: Put 6 [7, 8] stitches from the back of the hand back on needle 1 and 11 stitches from the palm side back on needle 2. Knit the stitches from the back of the hand, cast on 2 stitches using the backward loop method and complete the round by knitting the stitches from the palm side. Continue working these 19 [20, 21] sts in stockinette stitch until the finger is $3\;\mathsf{m m}$ shorter than your ring finger when wearing the glove. Work k2tog to the end of the round (if the total stitchcount is uneven: knit the remaining stitch). Break the yarn and thread it through the remaining stitches twice. Pull tight and weave in the end.
Middle finger:
Put 8 stitches from the back of the hand back on needle 1 and 8 [9, 10] stitches from the palm side back on needle 2. Knit the stitches from the back of the hand, cast on 2 stitches using the backward loop method, knit the stitches from the palm and pick up two stitches from the cast on edge to the ring finger. Continue working these 20 [21,22] sts as described for the ring finger.
Index finger:
Put the remaining 20 [21,22] stitches back on the needle. Knit them/work the estabilshed cable pattern (see Chart 2, red box), then pick up 2 stitches from the cast on edge of the middle finger. Continue working these 22 [23, 24] sts as described for the ring finger.
Put the 15 [16,17] stitches which have been on hold back on the needle, distributing them on needle 1 and 2. Work the stitches on needle 1, pick up 2 stitches from the cast on edge to the ring finger, then work the remaining stitches on needle 2, maintaining the established cable pattern (see Chart 2, red box). Continue working these 17 [18, 19] sts as described for the ring finger.
Ring finger:
Put 9 [9, 9] stitches from the palm back on needle 1 and 8 [9, 10] stitches from the back of the hand back on needle 2. Knit the stitches from the palm, cast on 2 stitches using the backward loop method and complete the round by knitting the stitches from the back of the hand. Continue working these 19 [20, 21] sts as described for the ringfinger.
Middle finger:
Put 8 [9,10] stitches from the palm back on needle 1 and 8 [8, 8] stitches from the back of the hand back on needle 2. Knit the stitches from the palm, cast on 2 stitches using the backward loop method, knit the stitches from the back of the hand and pick up two stitches from the cast on edge to the ring finger. Continue working these 20 [21,22] sts as described for the RG ring finger.
Index finger:
Same as on the right hand. Pinky: Same as for the right hand. Thumb: $(\mathsf{R G}+\mathsf{L G})$ Move the 21 [23, 25] sts back on your needles. The beginning of the round is placed two stitches to the left from the cast on gap. If unsure about the placement, look at the first line of chart 7. Rejoin the yarn and work chart 7 corresponding to your size until the finger is 3mm shorter than your thumb when wearing the glove. Continue as described for the ring finger. Weave in all ends. If there are any holes from where the stitches are picked up, close them by weaving in while wearing the glove.
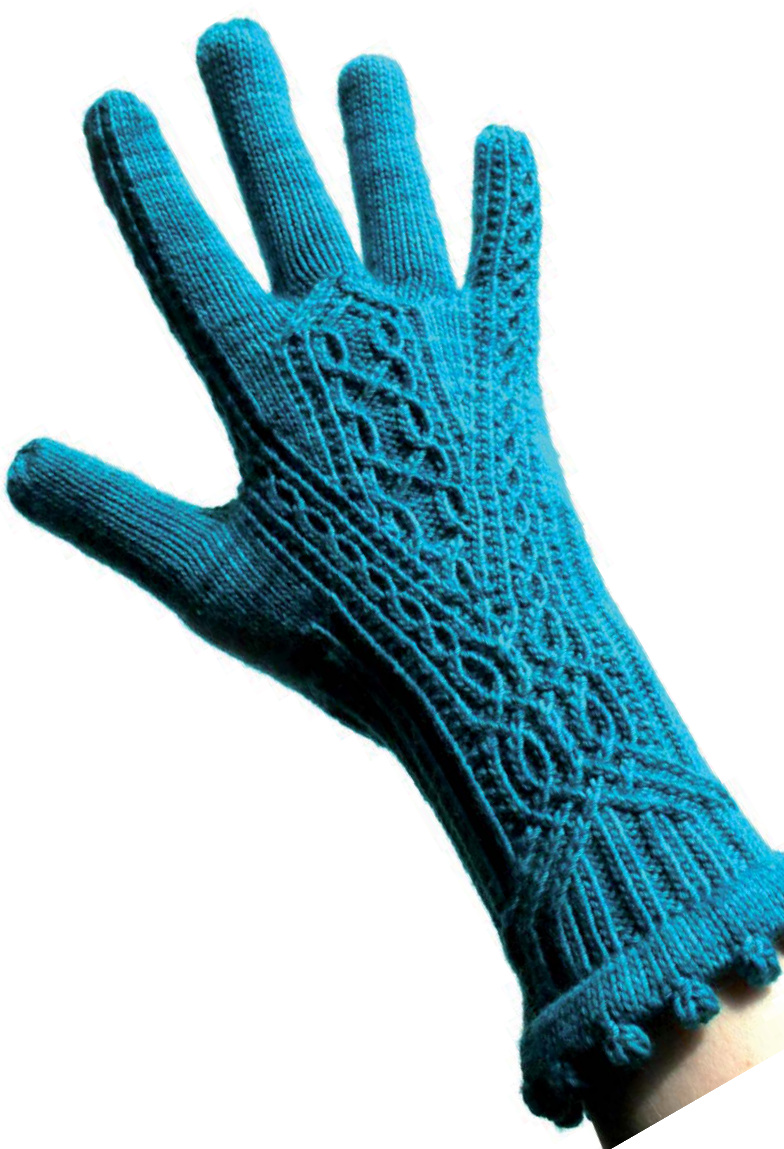
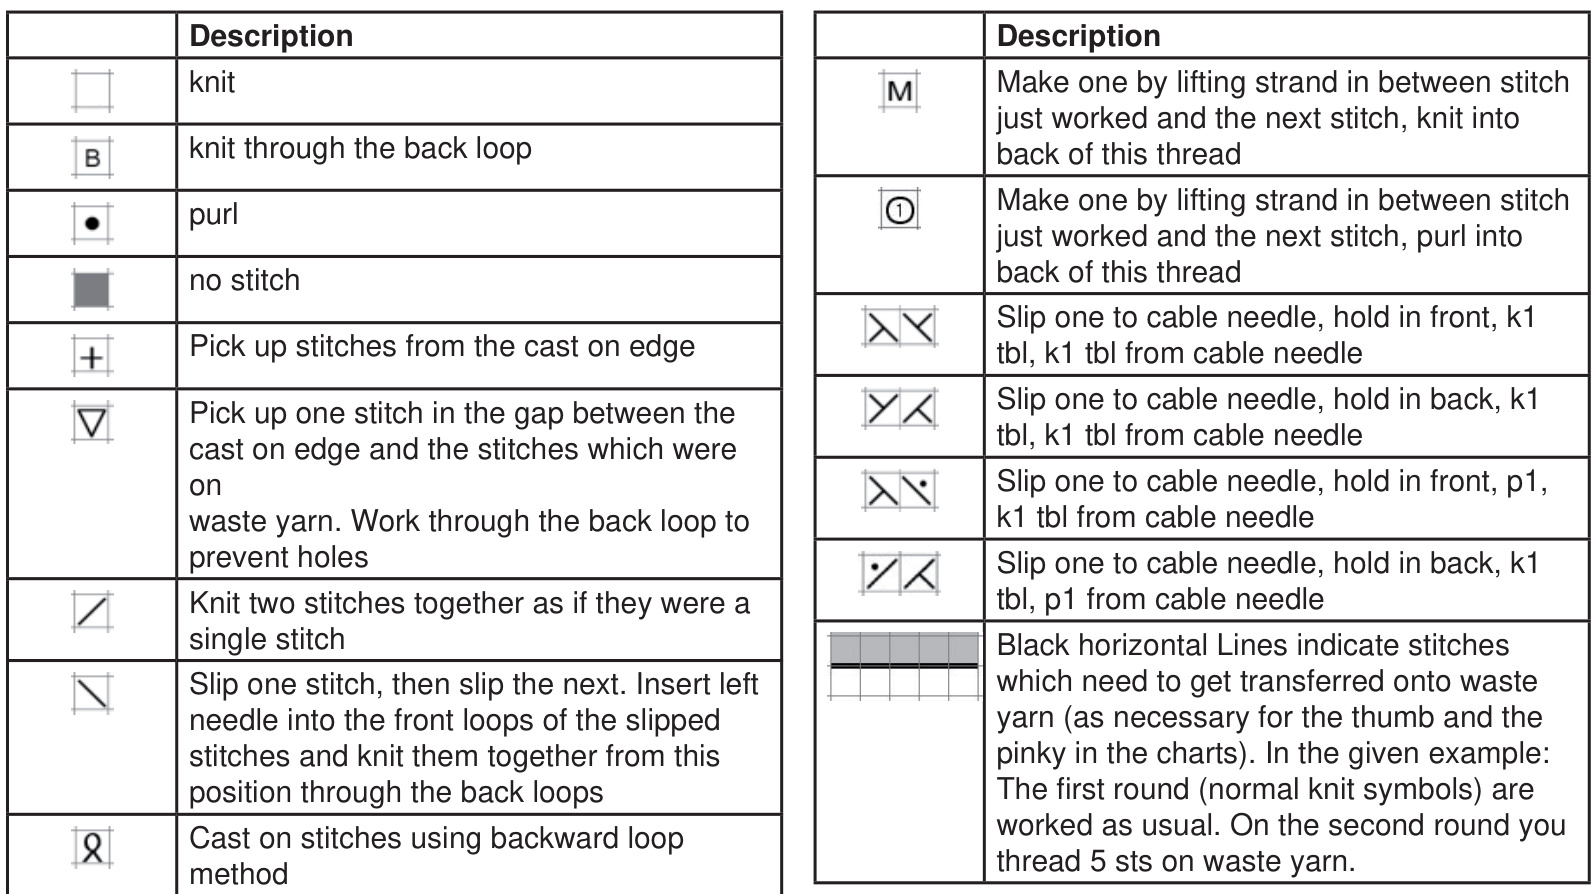
Chart 1 (Cuff)
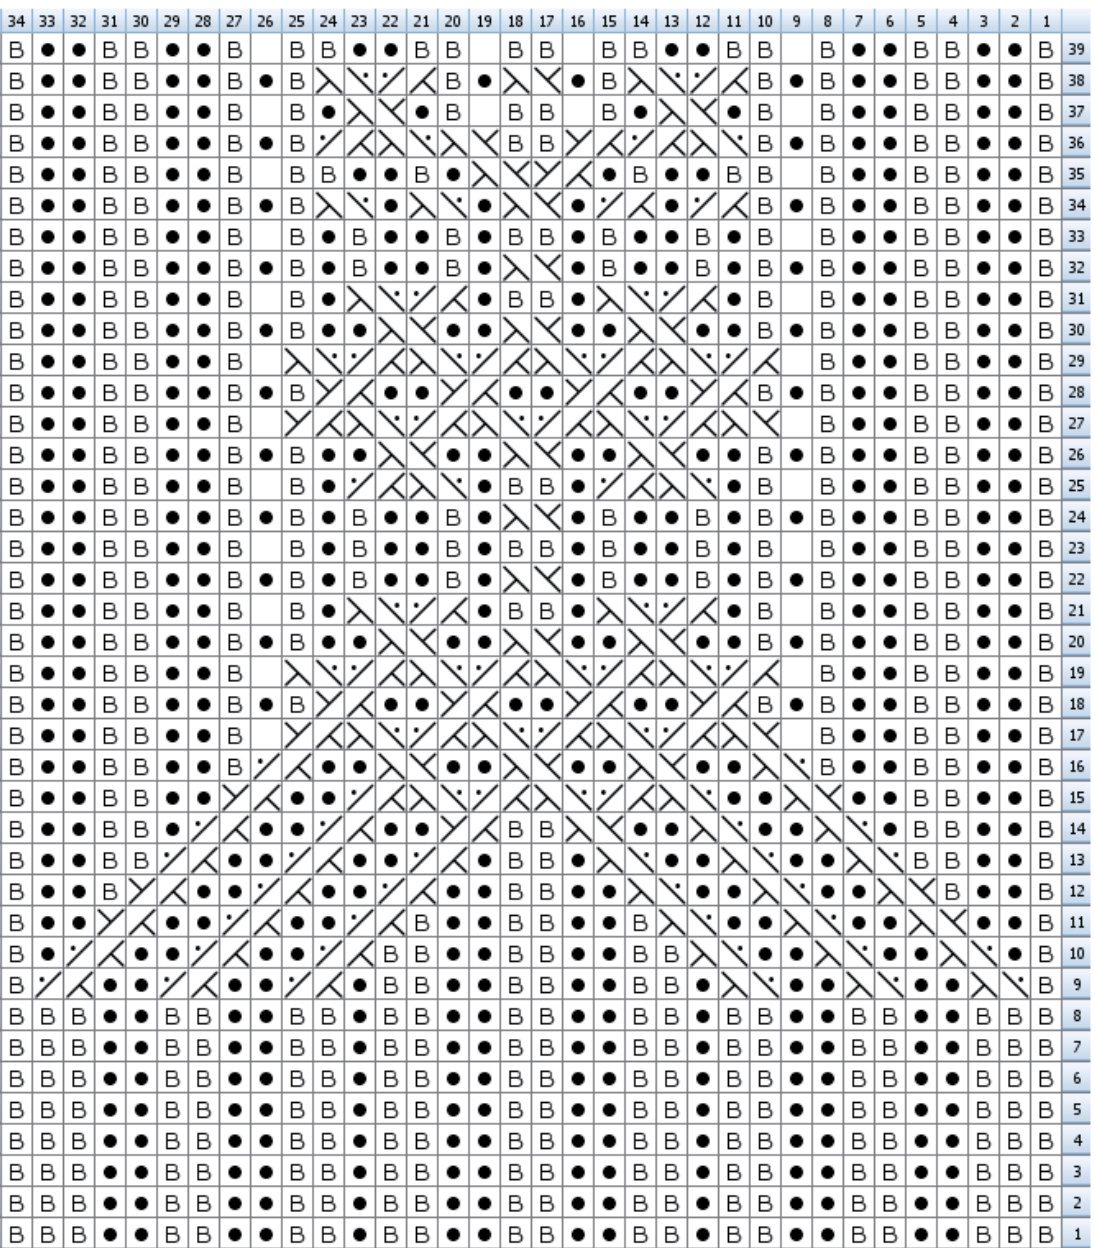
The red box marks the repeat section for the cable columns. Size S: leave out the green and yellow columns and stop after round 37. Size M: leave out the yellow columns and stop arter round 41. Size L: work all the columns and all rounds.
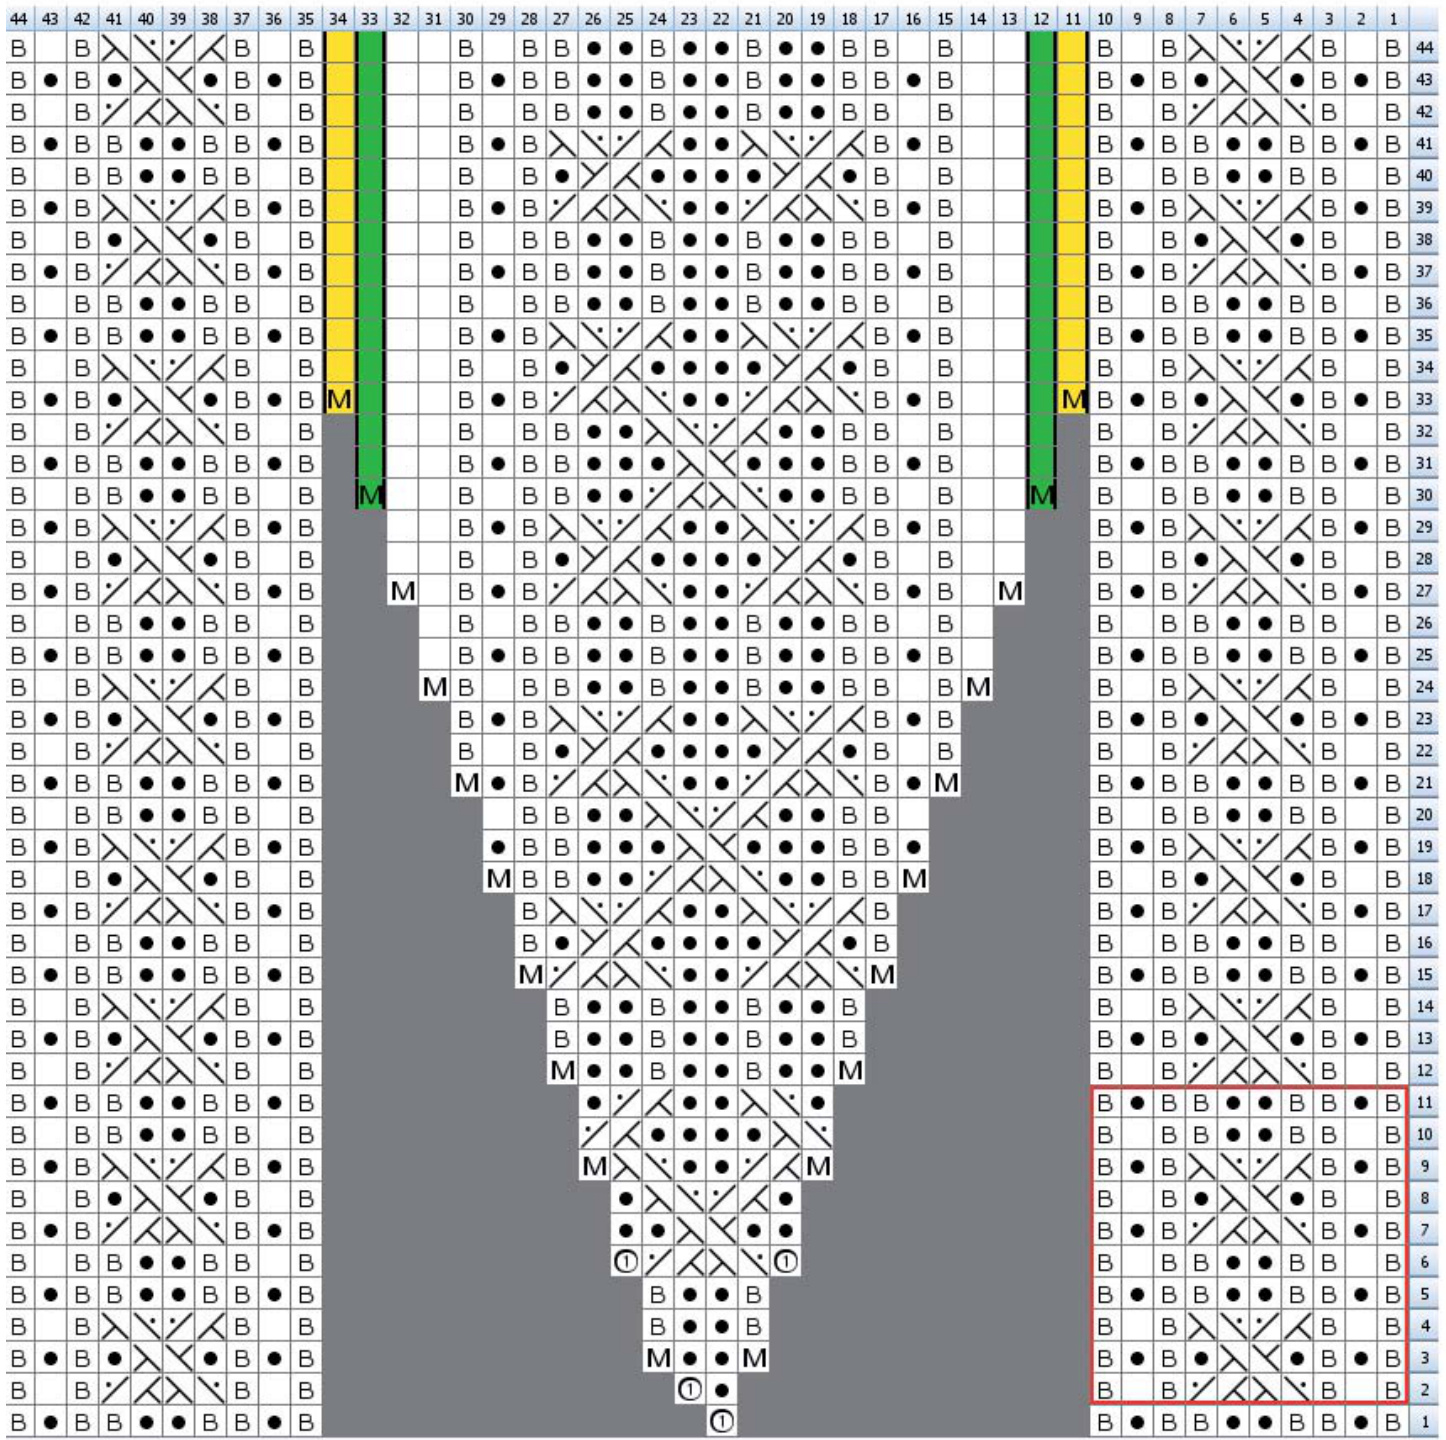
Chart 4 (Ribbing Part 2)
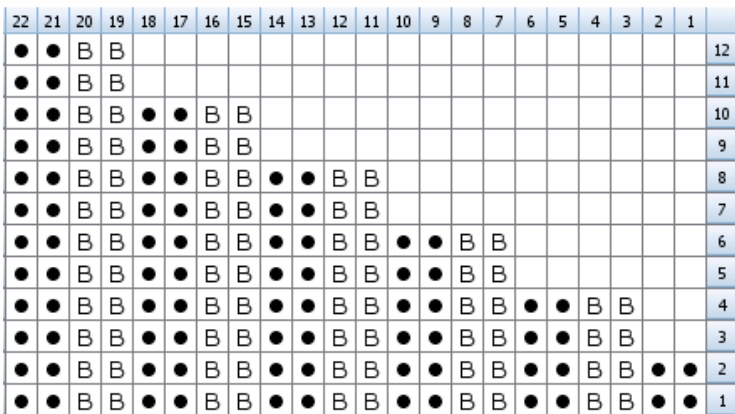
Chart 3 (Ribbing Part 1)
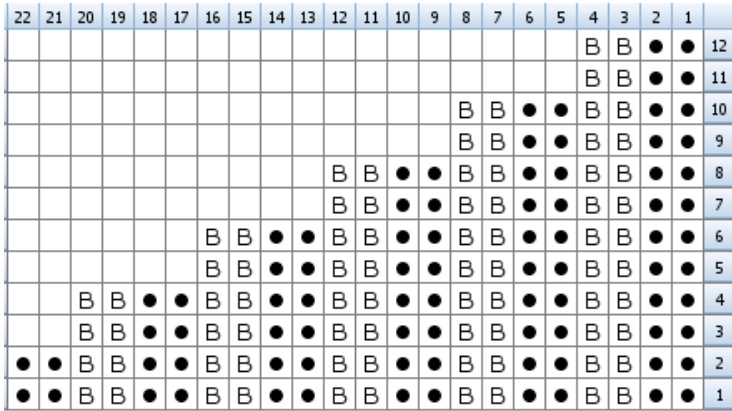
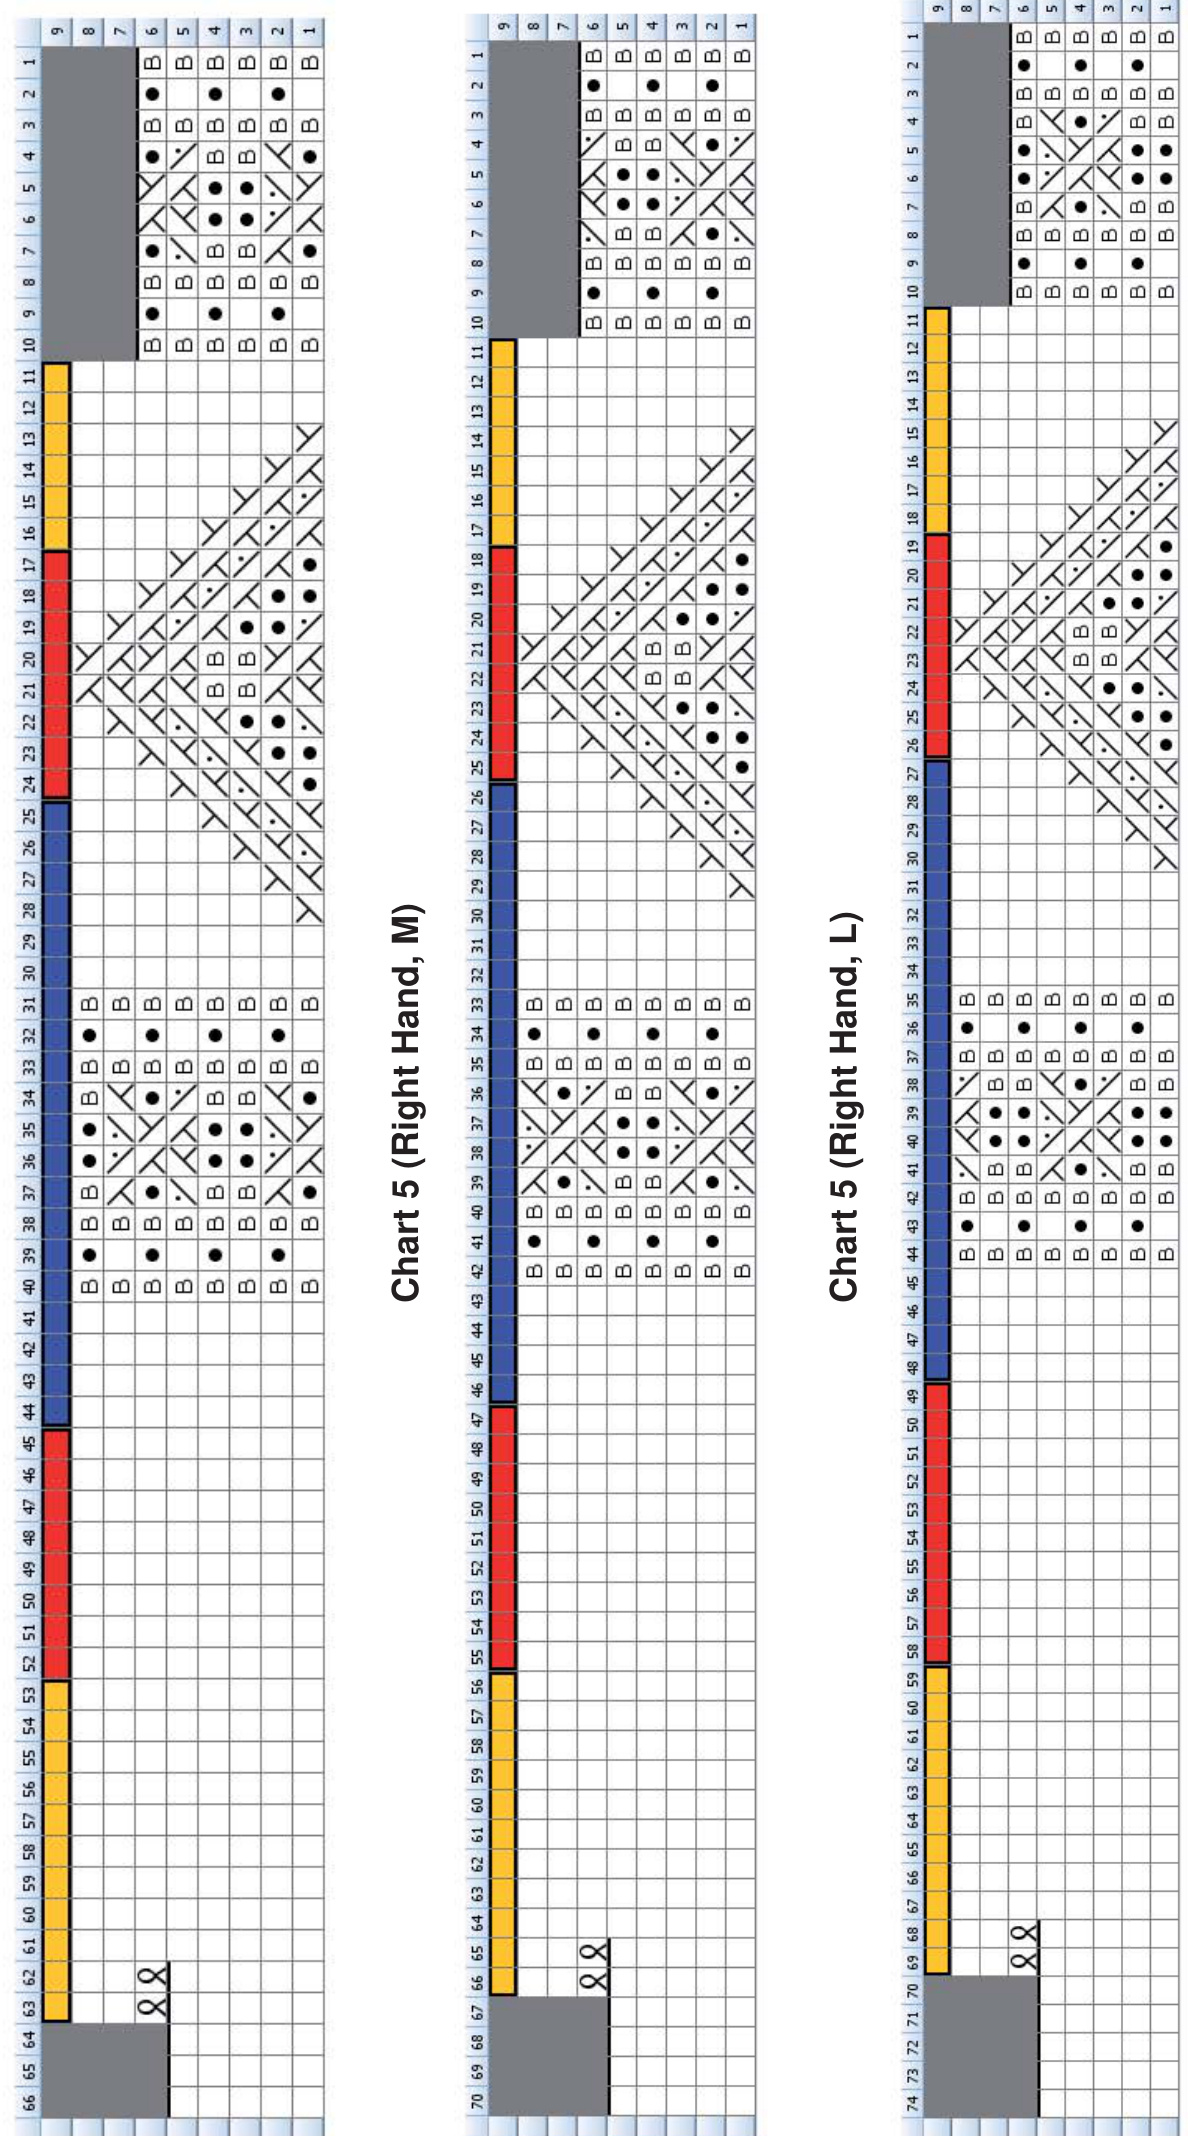
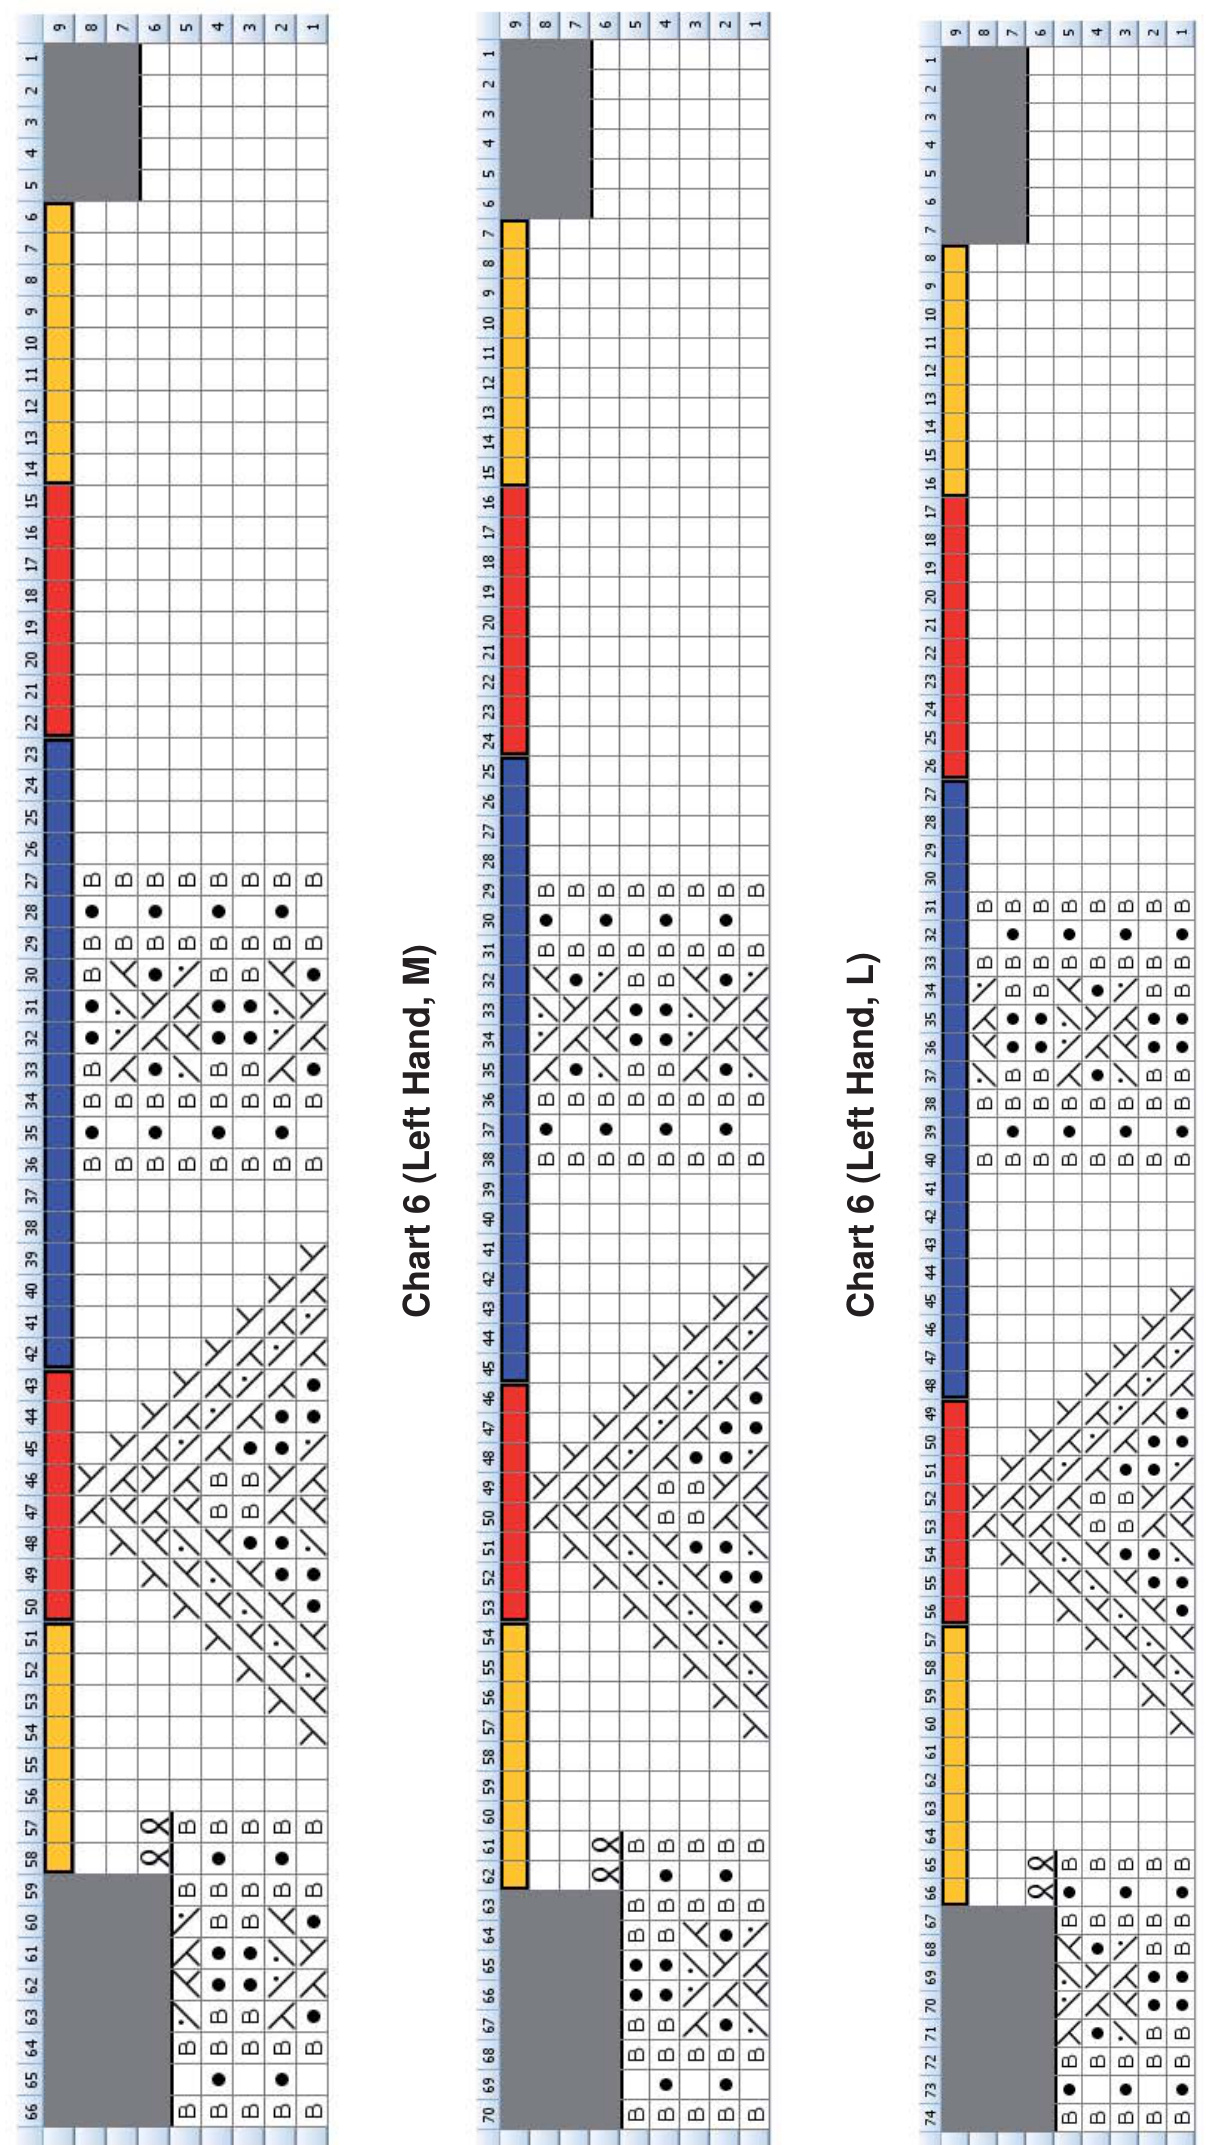
Chart 7 (Thumb size S)

Chart 7 (Thumb size M)

Chart 7 (Thumb size L)

Please note: This pattern is for personal use only. Any commercial use is strictly prohibited. If you have any questions, suggestions or corrections, please get in contact with me (Larisknit@gmx.de / Laris on Ravelry)


