Mateeals
DK or light worsted yarn, 150 - 200 yds ? 4.0mm needles - set of 4 dpns, two circular needles, or one long circular. ·Cable needle Yarn needle for finishing

20 stitches and 24 rows for 4 inches

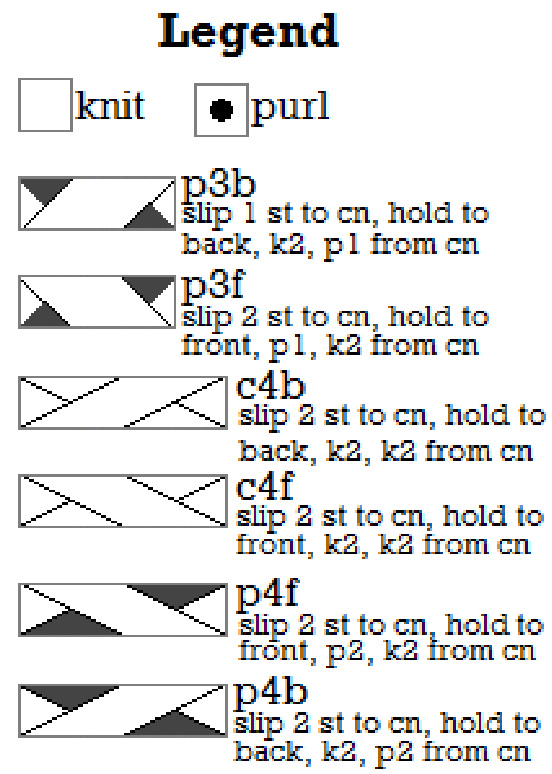
CO 48 stitches and join in the round. If working on circular needles, I recommend keeping the first 27 stitches on the same needle to keep the cable pattern together. That gets difficult on DPNs. Find the stitch distribution that makes you comfortable, just remember to keep the cables together, and to mark the beginning of your round. Set-up round: kl, p2, k2, p9, k4, p9, (k2, p2) to one stitch before end of round, kl. Next round: kl, p2, k2, p3, work Row 1 of Chart 1, p3, (k2, p2) to one stitch before end of round, kl. Continue working in pattern as set to end of Chart 1, keeping a three-stitch purl border on either side of the cable chart and the body of the glove in 2x2 ribbing. When Chart 1 is finished, continue working in set pattern for Chart 2. Work three repeats of Chart 2, and then Row 1-4 once more before beginning the thumb.
Thumb
There are two options for the thumb. The original pattern was written for a thumb slit, which is probably the easiest thumb you've ever done. You can also do a more traditional thumb gusset for a more substantial glove.
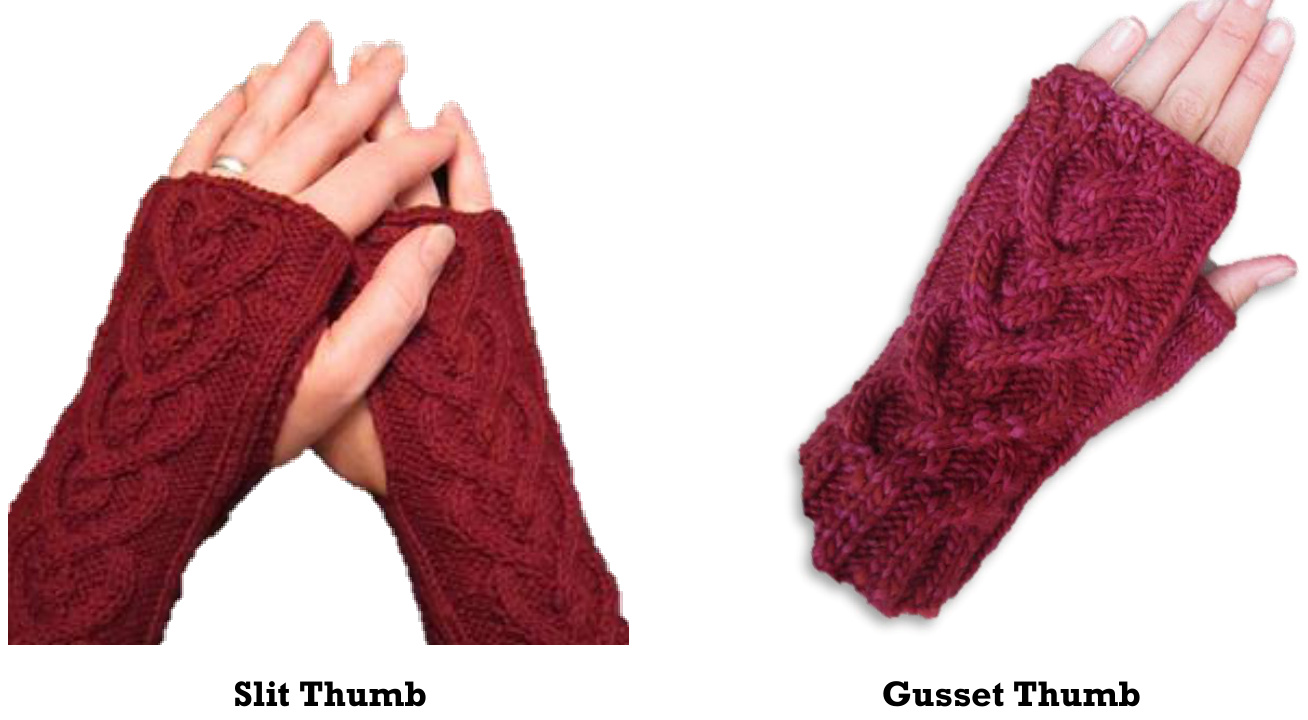
Slit Thumb (Left Hand)
Next round: kl, p2, k2, p3, work Row 5 of Chart 2, p3, (k2, p2) to one stitch before end of round, kl, turn work. From this point until the end of the thumb you will be working flat, turning at the end of each row. Each odd row of the cable chart is the right side, and read right to left. Each even row of the pattern is the wrong side, and read left to right. w: Sllpwise, knit the knits and purl the purls to end of row. Turn wor Next row: Sllkwise, p2, k2, p3, work Row 7 of Chart 2, p3, (k2, p2) to one stitch before end of row, kl, turn work. Continue as set to the end of Chart 2. Work another repeat of Chart 2, continuing to knit back and forth and not in the round, for a total of 15 rows. Next row: kl, p2, k2, p3, work Row 1 of Chart 3, p3, (k2, p2) to one stitch before end of round, kl, join to resume knitting in the round. Next round: kl, p2, k2, p3, work Row 2 of Chart 3, p3, (k2, p2) to one stitch before end ofround,k1. Continue in pattern to end of Chart 3 and bind off in pattern.
Gusset Thumb (Left Hand)
Round l: ml, kfb, p2, k2, p3, work Row 5 of Chart 2, p3, (k2, p2) to last stitch of the round, kl. Round 2: k2, place marker, kl, p2, k2, p3, work next row of Chart 2, p3, (k2, p2) to last stitch of the round, kl. Round 3: m1, k to marker, ml, slip marker, kl, p2, k2, p3, work next row of Chart 2, p3, (k2, p2) to last stitch of the round, k1. Round 4: k to marker, slip marker, kl, p2, k2, p3, work next row of Chart 2, p3, (k2, p2) to last stitch of the round, kl. Repeat Rounds 3 and 4 until there are 14 stitches between the beginning of the round and the marker. This should coincide with Row 8 of the second repeat of Chart 2. Round 1: Slip 14 stitches to holder, remove marker. Cast 4 stitches onto the righthand needle using the backwards loop method, kl, p2, k2, p3, work next row of Chart 2, p3, (k2, p2) to last stitch of the round, k1. Round 2: p4, kl, p2, k2, p3, work final row of Chart 2, p3, (k2, p2) to last stitch of the round, kl. Round 3: p3, k2tog, p2, k2, p3, work first row of Chart 3, p3, (k2, p2) to last stitch of the round, ssk using the first stitch of the next round. Round 4: p2, kl, p2, k2, p3, work next row of Chart 3, p3, (k2, p2) to last stitch of the round, kl.
Binding Off
Round 5: pl, k2tog, p2, k2, p3, work next row of Chart 3, p3, p3, (k2, p2) to last stitch of the round, ssk using the first stitch of the next round. My personal favourite bind-off technique is the lace bind-off. It's loose, versatile, and stretchy enough for fingers and toes. It's also dead simpleto learn and remember. Round 6: kl, p2, k2, p3, work next row of Chart 3, p3, p3, (k2, p2) to last stitch of the round, k1. Repeat Round 6 to the end of Chart 3 and bind off in pattern before going back to the thumb. Slip 14 thumb stitches back onto the needle. Pick up six stitches - one in each corner, and four across the cast-on stitches - and join to knit in the round. Ssk, \*slip stitch back to left-hand needle, ssk, repeat from \* to final stitch. Draw yarn through and fasten off. Round 1: k4, k2tog, k8, k2tog, k4. 18 stitches. Round 2: k to end. Repeat Round 2 for about one inch, or until desired length. Bind off loosely. CO 48 stitches and join in the round. The cable pattern will be at the end of the round this time, so keep the last 27 stitches together. Set-up round: kl, (p2, k2) 5 times, p9, k4, p9, k2, p2, kl. Next round: kl, (p2, k2) 5 times, p3, work Row 1 of Chart l, p3, k2, p2, k1. Continue working in pattern as set to end of Chart l, keeping a three-stitch purl border on either side of the cable chart and the body of the glove in 2x2 ribbing. When Chart l is finished, continue working in set pattern for Chart 2. Work three repeats of Chart 2, and then Row 1-4 once more before again choosing your thumb.
Slit Thumb (Right Hand)
Next round: kl, (p2, k2) 6 times, p3, work Row 5 of Chart 2, p3, k2, p2, kl, turn work. As in the first glove, from this point until the end of the thumb you will be working flat, turning at the end of each row. w: Sllpwise, knit the knits and purl the purls to end of row. Turn wor Next row: Sllkwise, (p2, k2) 6 times, p3, work Row 7 of Chart 2, p3, k2, p2, kl, turn work. Continue as set to the end of Chart 2. Work another repeat of Chart 2, continuing to knit back and forth and not in the round. Next row: kl, (p2, k2) 6 times, p3, work Row 1 of Chart 3, p3, k2, p2, kl, join to resume knitting in the round. Next round: kl, (p2, k2) 6 times, p3, work Row 2 of Chart 3, p3, k2, p2, k1. Continue in pattern to end of Chart 3 and bind off in pattern.
Gusset Thumb (Right Hand)
.: k1, (p2, k2) 5 times, p3, work Row 5 of Chart 2, p3, k2, p2, kfb, ml Round 2: k1, (p2, k2) 5 times, p3, work next row of Chart 2, p3, k3. 2, k2) 5 times, p3, work next row of Chart 2, p3, kl, m1, k to end, m Round 4: k1, (p2, k2) 5 times, p3, work next row of Chart 2, p3, k to end. Repeat Rounds 3 and 4 until there are 15 knit stitches at the end of the round (the original kl and fourteen increased gusset stitches). This should coincide with Row 8 of the second repeat of Chart 2. Round 1: kl, (p2, k2) 5 times, p3, work Row 9 of Chart 2, p3, kl. Slip 14 stitches to holder. Cast 4 stitches onto the righthand needle using the backwards loop method. Round 2: kl, (p2, k2) 5 times, p3, work final row of Chart 2, p3, kl, p4. Round 3: kl, (p2, k2) 5 times, p3, work first row of Chart 3, p3, ssk, p3, k2tog with the first stitch of the next round. Round 4: k1, (p2, k2) 5 times, p3, work next row of Chart 3, p3, kl, p2. Round 5: k1, (p2, k2) 5 times, p3, work next row of Chart 3, p3, ssk, k2tog with the first stitch of the next round. Round 6: kl, (p2, k2) 5 times, p3, work next row of Chart 3, p3, kl. Repeat Round 6 to the end of Chart 3 and bind off in pattern. Slip 14 thumb stitches back onto the needle. Pick up six stitches - one in each corner, and four across the cast-on stitches - and join to knit in the round. Round 1: (k2, k2tog) five times. 15 stitches. Round 2: k to end. Repeat Round 2 for about one inch, or until desired length. Bind off loosely.
Chaet
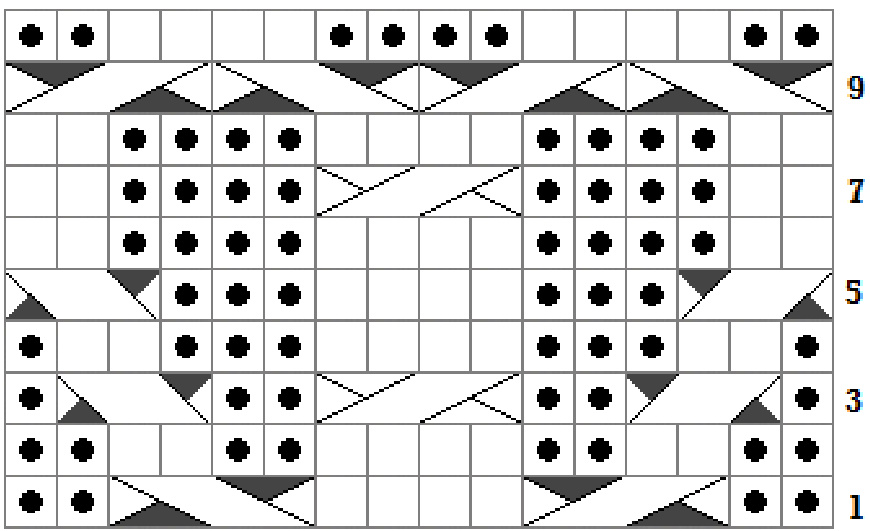
Chart 1
Noter
The 16-stitch cable pattern can be adapted easily into loads of different projects, to inject a bit of love into your knitting. Chart 2 is the basic heart pattern; Charts 1 and 3 are the modifications for the ends, which aren't strictly necessary. This pattern for fingerless gloves can also be easily adapted to be larger or smaller, depending on the
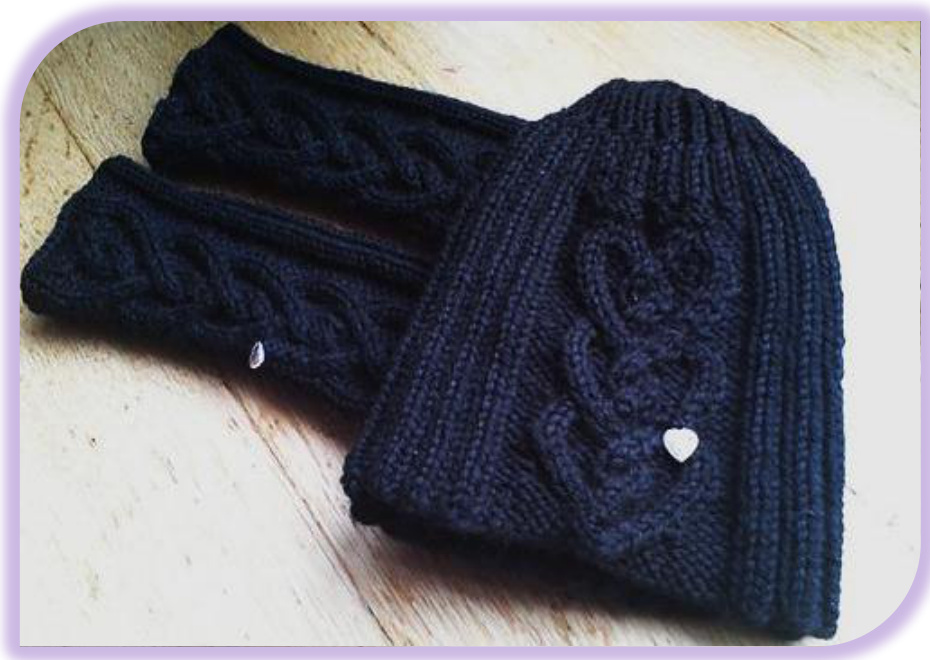
desired length of your gloves or the available yarn. Because of the ribbing panel, the sizing is forgiving. If going up to a worsted or aran weight yarn, use the appropriate needle size and cast on fewer stitches in multiples of four. You can also knit more or less cable motifs. There are three motifs needed to finish the thumb and hand - two repeats of Chart 2 and one of Chart 3. A nice short wristlength glove would be one repeat of Chart 1, two of Chart 2, and one of Chart 3.
This pattern is protected under a Creative Common licence and may not be reproduced or distributed either digitally or through hardcopy. but finished objects made from this pattern can be used or sold at the knitter's discretion. This pattern, as all my patterns, are offered for free - but if you used and enjoyed it, please consider supporting your local cat rescue. This could be with money. supplies, cage blankets, catnip toys, or even just manpower. Help a rescued cat like Pekoe through your local cat rescle organisation (www.petfinder.com/shelters.html), or through Bald and Bully (www.baldandbully.com ). If you're not sure how many motifs you will be able to get out of a ball of yarn, weigh the yarn before you begin. Knit one motif, then weigh the yarn again. This will tell you how much yarn by weight it took to knit one motif. Divide the total amount of yarn by this number to find out how many motifs you can knit. Always leave a generous margin of error, just in case.


This pattern is easy to adapt to any weight of yarn. There are three parts of the pattern: a 16- stitch cable panel, a three-stitch purl border on either side of the panel, a two-stitch knit column to start the ribbing, and the ribbing itself. The 24 stitches needed for the cable panel and border cannot be changed; the changes are made to the ribbing. Step l: Knit a small stockinette swatch with your chosen yarn. Try the recommended needle size for the yarn you're using - 2.5mm needles for sock yarn, or a 5.0mm needle for an aran weight, for example - and play around until you're happy with the drape. The cable pattern will tighten up the fabric, but the ribbing will stretch and loosen it up again. Step 2: Measure your arm about an inch above your wrist to give you Measurement A. Step 3: Measure a one-inch block of your swatch. The number of stitches in one inch is MeasurementB. Step 4: Math! Time to find your number of cast-on stitches. Measurement C is the approximate number of stitches to cast on. Measurement D is how many ribbing stitches you need. (A) (B) (C) The ribbing is made over multiples of 4 stitches. If Measurement D is a multiple of 4, you can go ahead and cast on the number of stitches from Measurement C. If it isn't, round up or down to the nearest multiple of 4. Adding this to 24 will get the number of cast-on stitches required. (D rounded to the nearest multiple of 4) (Number of cast-on stitches) The only other consideration when increasing the number of stitches in the round is how the cable panel is centred on the back of the hand when wearing. In the pattern as written, there is one 4-stitch ribbing repeat between the thumb and the cable panel. You can recentre the cable panel by adding or removing a ribbing repeat to this section.


