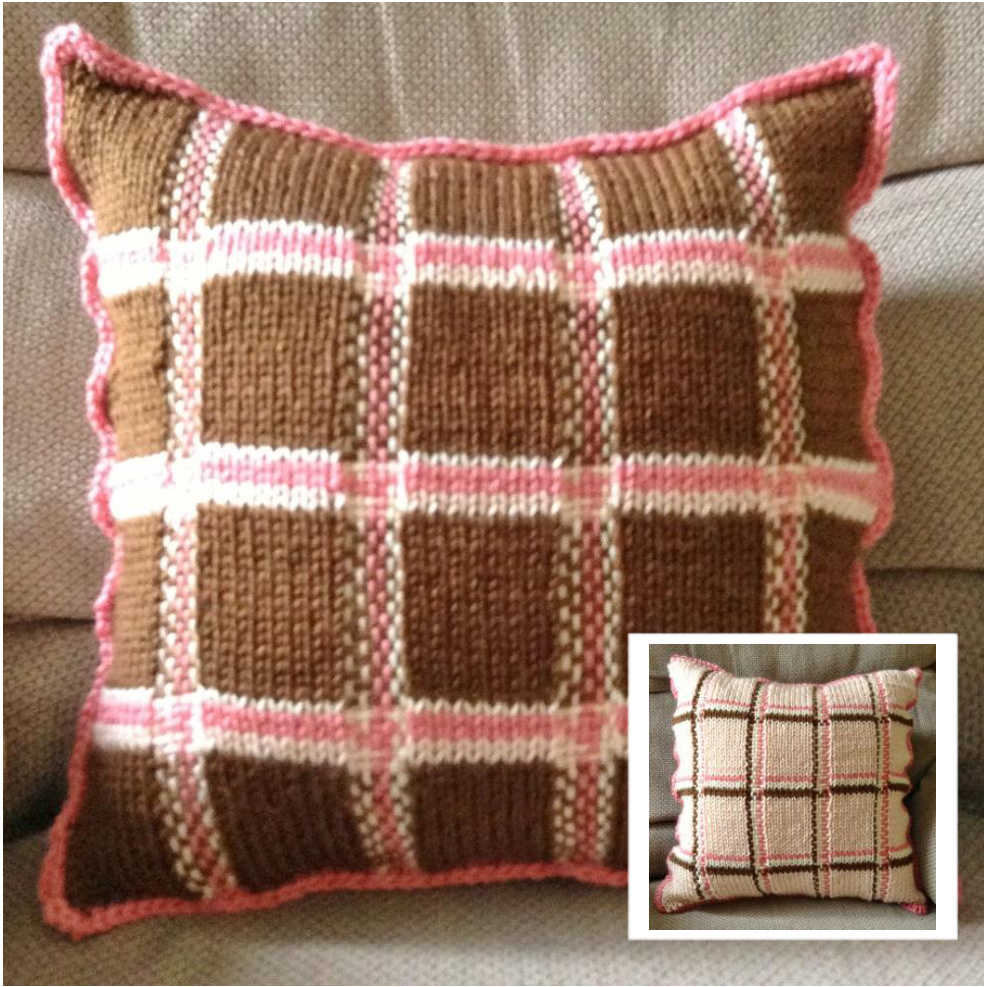
Knit & Weave Pillow (and beyond) Brought to you by Holly Allison
Materials
Worsted weight yarn: 250 yards main color shown in Cascade Yarns Pacific Sienna 40 yards contrast color A shown in Cascade Yarns Pacific Baby Peach 40 yards contrast color B shown in Cascade Yarns Pacific Geranium 40 yards contrast color C shown in Cascade Yarns Pacific Cream Size US 7 or 8 (4.5mm or 5.0 mm) knitting needles Large Eye Tapestry Needle 15" Pillow Form\*\* Optional-16"x16" fabric if only knitting one panel, or two pieces of 16"x10"(see helpful tips) GAUGE\~18 sts per 4" \*Or skip gauge and simply find aform that fits your piece afterfinishing. Note: Your knitted piece will not be square. It will look wrong and too " tall,' but I assure you this will all work out in the end. Cast on 46 stitches using main color-long tail method is recommended. Rows 1-14: Knit in stockinette. Rows 15-16: Knit in stockinette using contrast color A. Rows 17-18: Knit in stockinette using contrast color B. Row 19: Knit using contrast color C. Rows 20-57: Repeat rows 1-19 twice. Rows 58-71: Knit in stockinette using main color, do not break yarn. Bind-Off Instructions-this is where the magic begins! LOOSELY bind off 9 stitches. \*\*Loosely cast on one stitch using the backloop method, then bind off new stitch. Drop the next stitch on your left needle completely. Bind off the next 8 stitches. Repeat from \*\* three times, bind off remaining stitch.

Video tutorial of this bind off method can be found here: https://www.youtube.com/watch?v=DvCbCG5RV31 You now have four dropped stitches in your panel. Don't panic now! You are about to do something oh-so-fun that normally makes knitters cringe with anxiety in most knitted pieces. Pull on the sides of each dropped stitch all the way down-as though you are making a run in pantyhose. I promise your cast on stitch will not fall apart on you! You should have something that looks like so:
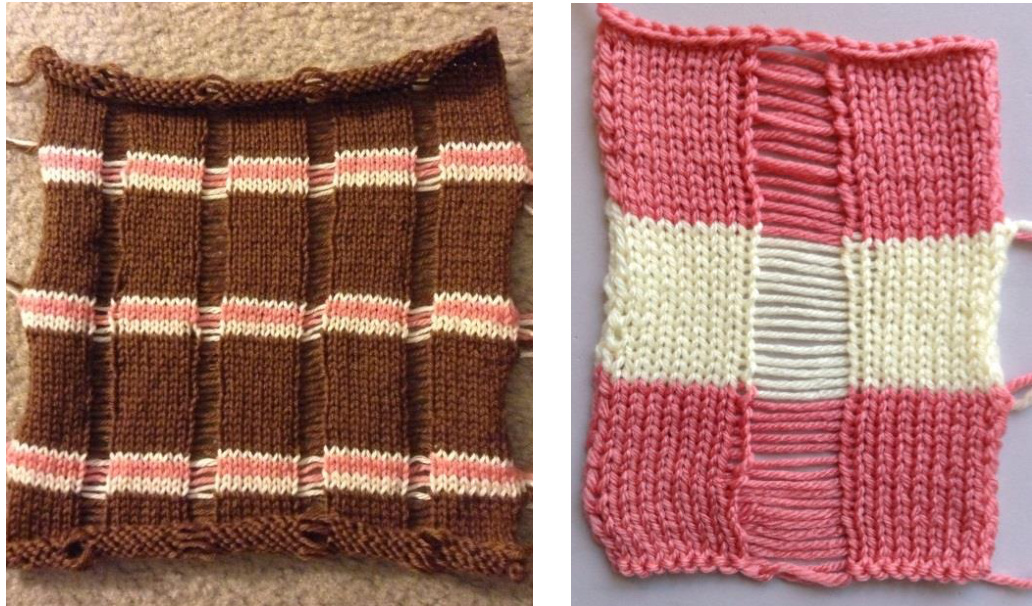
See how much it grows!! Now you are all set to start the weaving process. Thread your tapestry needle with the contrast color A. Using the over-under method, weave your strand the full length of the panel, then weave the same strand back through in an opposite manner, as shown:
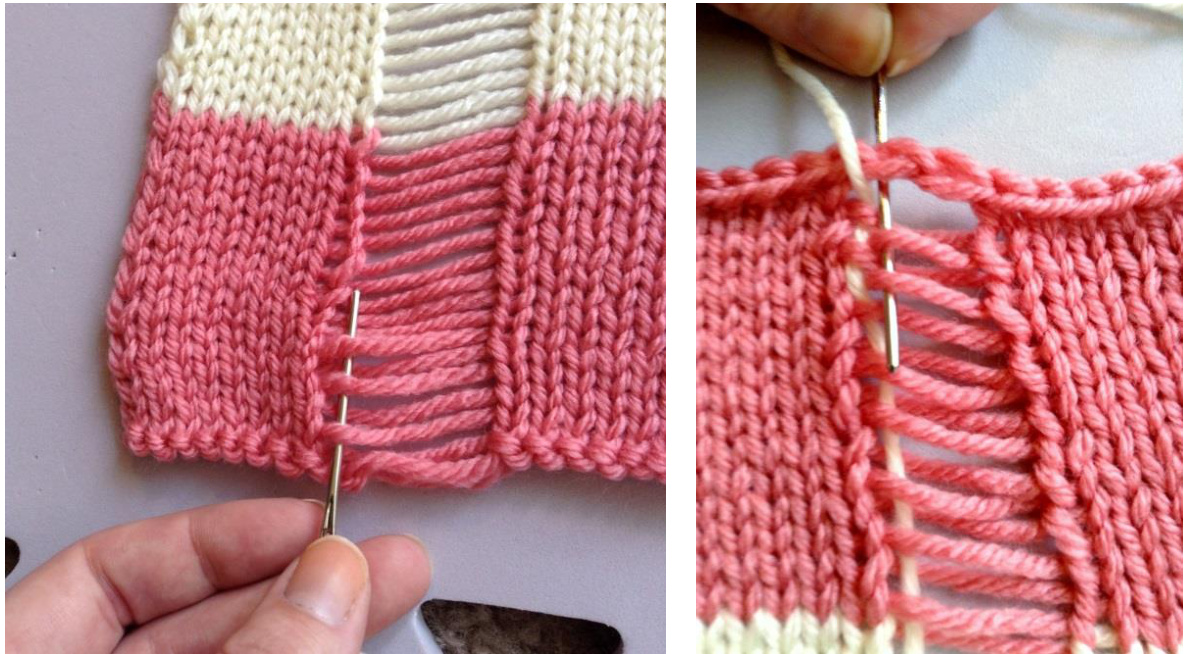
Continue in this manner with two strands of B and two strands of C for six total, or until it looks "full" to you. It usually depends on the yarn brand.
Helpful tips
Carry the color changes up the side by twisting the strands as you go to avoid Weaving in tons of extra ends, being careful not to pull the twists too tightly when starting the new color. Instead of breaking the yarn and re-joining on the single row, knit this using a circular needle and swing the panel around to start knitting the next row! This can be knit in the round, simply cast on 92 and carry the colors up gently twisting the strands as mentioned. If you happen to have two half skeins of coordinating colors, why not make the back panel a "reverse" plaid? For the featured photo, I might consider using Baby Peach as my main color, Sienna for contrast A, Cream for contrast B, and Geranium for contrast C. Off to knit the other side, now that I mention it! If you decide to make one panel and use a fabric back, machine seam it carefully. with the knit piece closest to the presser foot, unless of course you really want to create a mess in the dog teeth and bobbin well. If you choose to make one panel with a fabric back, it is easier to hem one long side of each fabric piece; then seam the pieces to the knitted piece so you have a removable envelope-style cover for cleaning. If you wish to cast on and drop multiple stitches consecutively, (the pink and cream swatch has 2 dropped stitches in the center), I recommend using a larger needle or add an extra cast on stitch to keep it from shrinking at the top. If you wish to weave more than one strand side-by-side of the same color, thread your tapestry needle with a length of yarn that slightly more than measures the number of times you plan to use it. So if my piece measures 15" and I want three strands of a color all woven before switching colors, I would cut about 50" of yarn to weave with to reduce the amount of ends to hide later. When I reach the top or bottom of the piece, I go over the last rung of the ladder and keep weaving. The cream and purple swatch on the next page shows this best. Just be sure to do this loosely so it will not bunch up the nice woven area you just made. Speaking of all those fringe-y ends...if you are making a seamed piece or making a fringed poncho or afghan, then you are already done! If you chose to knit flat and changed colors traditionally, weave in those ends as you normally would. The ends from your woven yarn can be hidden through the wrong side of your Weaving by running the ends through the strands you just finished weaving. This is where you must decide which side is the "right side" of your knitted piece. Don't immediately dismiss that purled side-it looks pretty darn cute with the plaid too! A plain sweater with a single woven strip up the bodice to the right or left of center would look smashing! Just take about an inch's worth of stitches off the total cast on for the garment where you decide to place the weaving. This is YOUR project. Do whatever plaid or striped pattern you desire. Feel free to use this technique to make a scarf, afghan, etc. The dropped stitch ladders general will each give you an extra 1-1 1/2 inches of width depending on what yarn weight you use.
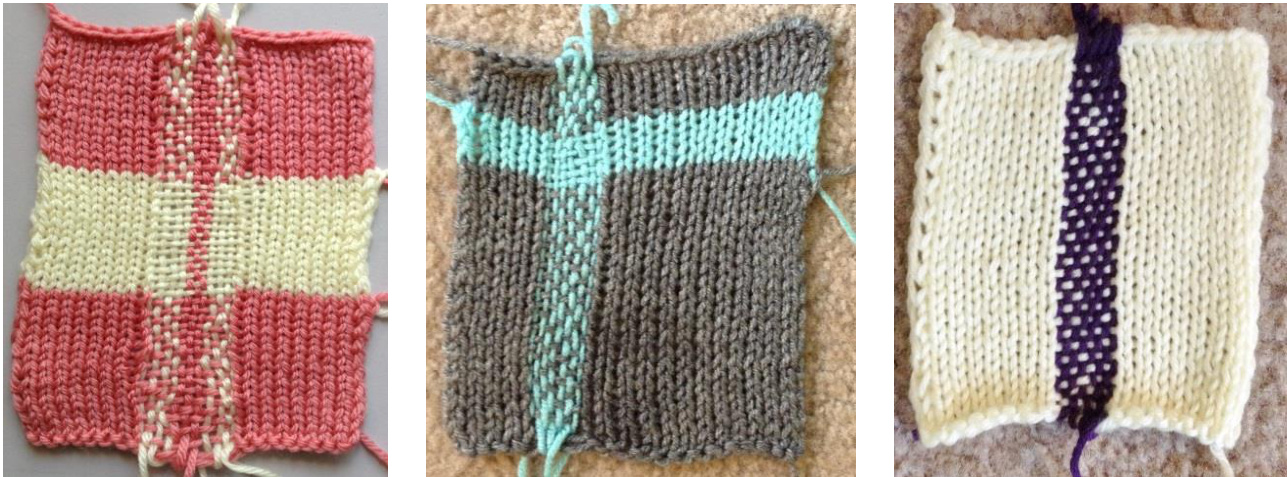
Still need ideas? Here are a few swatches to get the creative juices flowing:
Look for my next pattern, "Knit & Weave Socks" due out in August 2013.
This pattern is not intended for commercial use or sale. You may sell items made from this pattern. Copyright 2013. A special thanks to Miss Grace Williams for showing me this fabulous technique and allowing me to share it with the rest of the world. You may contact me at any time for pattern assistance. Holly Allison aka HollyHobbies on Ravelry or email me directly at haputnat@gmail.com. Enjoy!!! Remember-the only rule in knitting is: HAVE FUN!!!


