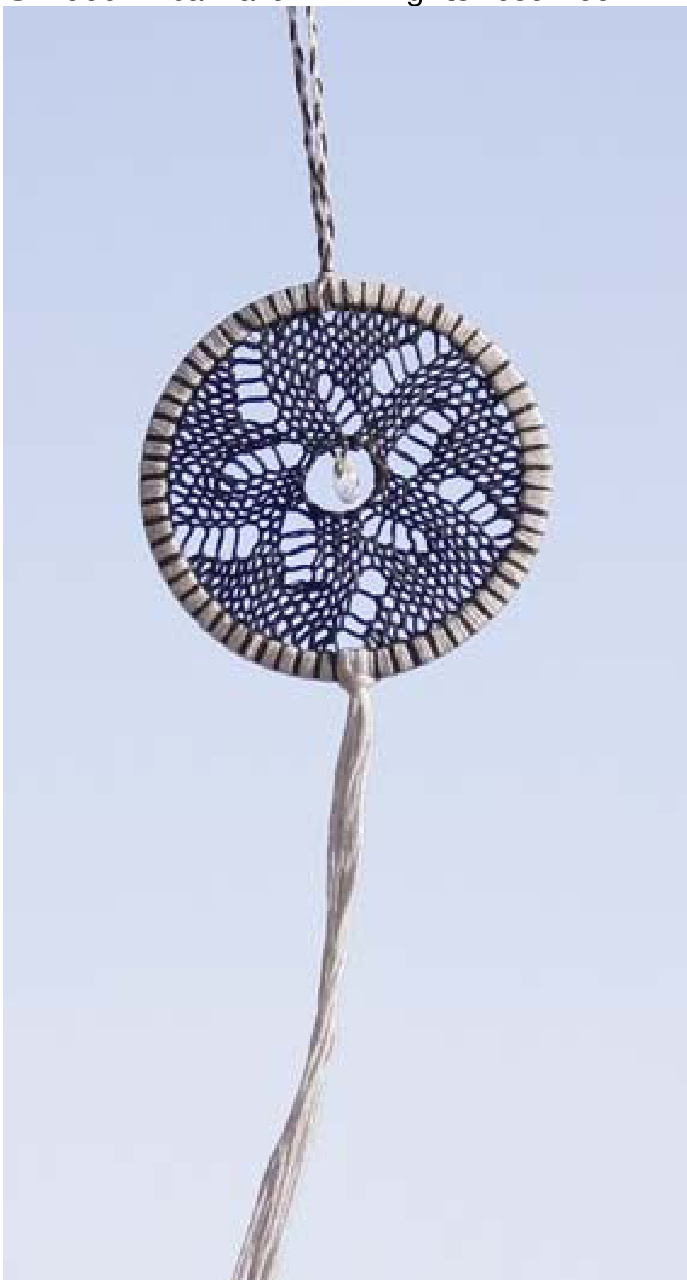
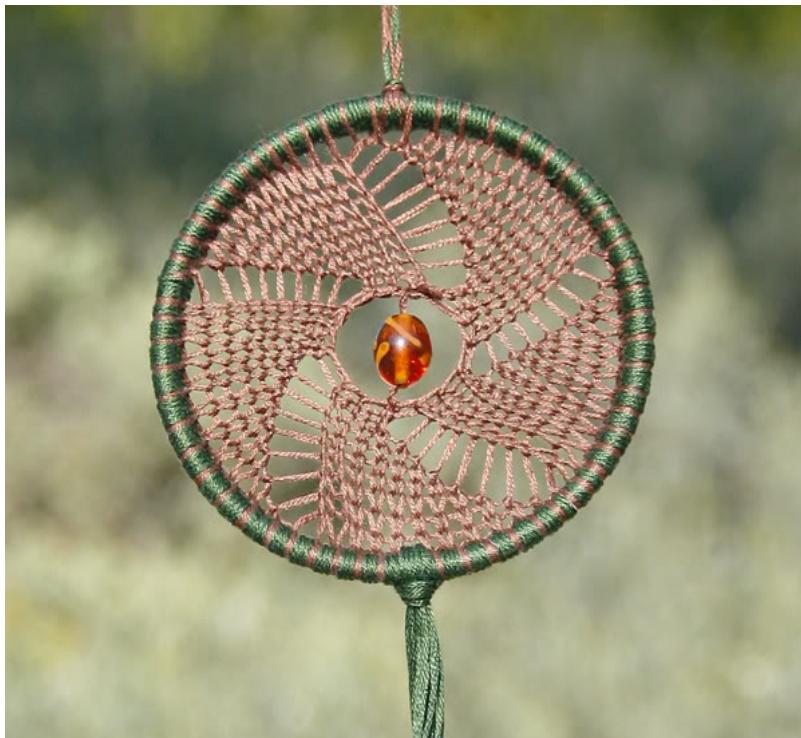
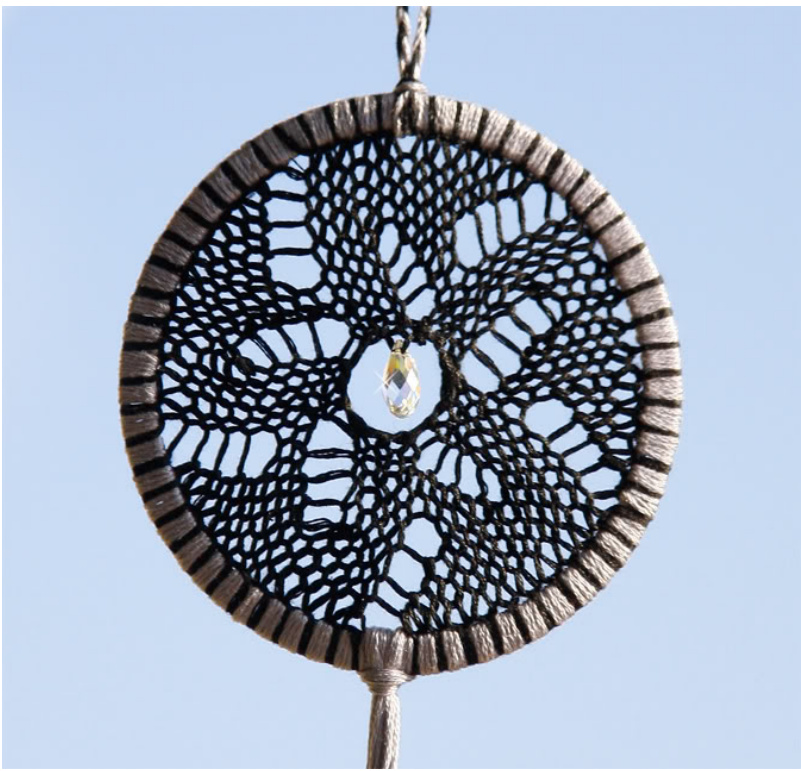
A DREAMCATCHER FOR LEAH
BY ERICA HARBIN
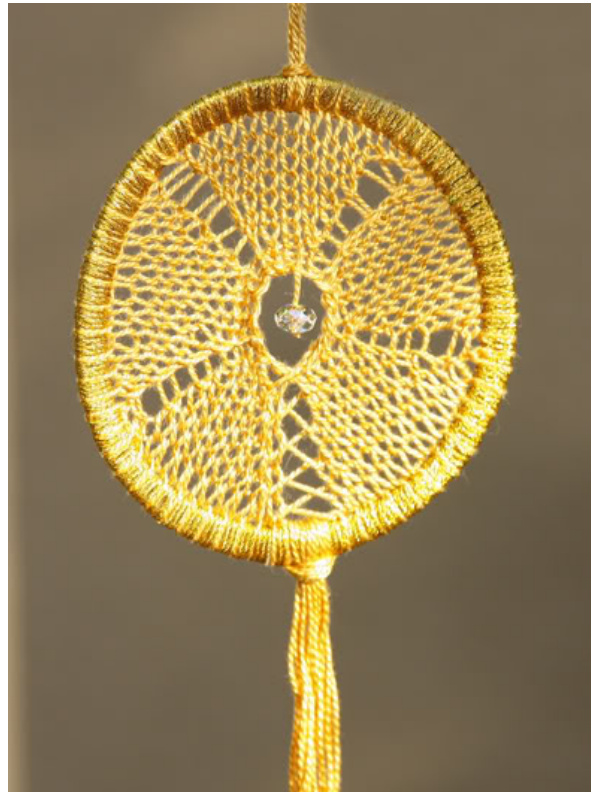
One size: About 4" diameter Finished Measurements: Circle $\bf{\Psi}:=378^{\,\circ}$ diameter without fringe (approx. 12”" long including fringe)
Materials
MC: 1 skein DMC Embroidery Floss(version 1: color 434, version 2: color 838) or 1 skein DMC Pearl Cotton (version 3: color729) CC: 1 skein DMC Embroidery Floss (version 1: color 803, version 2: color 890, version 3: E3852) Note: Embroidery floss, Pearl Cotton, or another yarn of similar weight may be used interchangeably for all three versions. 1 ring with diameter about $37\mathbf{8}^{\,\circ}$ , with an opening so stitches may be slipped on. Suggestions: Large plastic cup with rim diameter $\mathbf{\omega=378^{\circ}}$ Plastic canvas circle (at least $4^{*}$ diameter) Beads, feathers, other decorative material-optional 4 US#3 DPNs 4 US#4 DPNs 4 US#7 DPNs Tapestry needle Scissors for cutting through plastic Sandpaper (for smoothing edges of plastic) Crochet hook (for fringe--optional)
Abbreviations:
DPN: Double-pointed needle MC: Main color CC: Contrasting color CO: Cast on K: Knit YO: Yarn-over sts: stitches Special Skills: Knitting in the round (with few stitches), yarn-overs
Pattern
Notes:
Up to six DPNs in each size may be used foreasier knitting and a more even finished appearance, but four needles work fine as well. .A fairly tight cast-on will create a more desirable appearance in the finished product. Knit the first stitch on each needle more tightly to prevent oversized yarn-overs. Starting with size 3 DPNs makes it a little easier to knit at the beginning, and creates a neater cast-on edge, but is not required. If desired, you may use size 4 DPNs for casting on and rows 1-8.
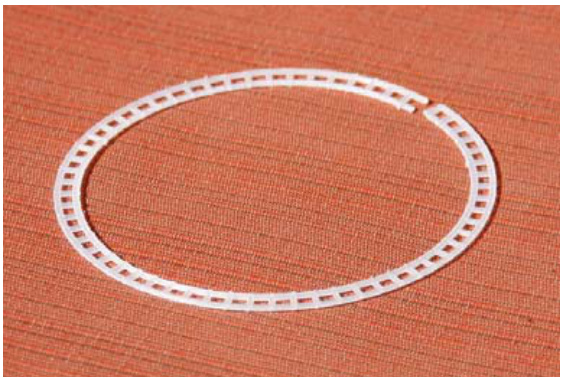
If using a plastic cup, cut through the rim once and then cut around the cup, trimming as close to the rim as possible. If using plastic canvas, measure about $\mathbf{178}^{\,\mathfrak{s}}$ from the center of the canvas and find the circle closest to that point (on a 4.5" plastic canvas circle, this is the $3^{\mathrm{rd}}$ outermost circle); this round of cells bordered by this circle will form the ring of the dreamcatcher. Cut though the rounds of cells on either side of the ring (leaving one round complete and uncut), and trim the excess pieces off to create smooth inner and outer surfaces of the ring. Cut through 1 cell to open the ring, and trim the excess to leave a smooth edge for transferring the stitches onto the ring. Optional: Use sandpaperto make the ring as smooth as possible, so stitches do not get snagged as they are transferred from the needles ontothe ring.
Version l:
Using size 3 needles and MC, CO 15 using the longtail method. Distribute stitches over 3 needles (suggested distribution: 6 sts on the first needle, 3 on the second needle, 6 on the third needle). Join for working in the round. Row 1: Knit around. Row 2: (K3, YO) around. (20 sts) Row 3: Switch to size 4 DPNs as you (K4, YO) around. (25 sts) Row 4: (K5, YO) around. (30 sts) Row 5: (K6, YO) around. (35 sts) Row 6: (K7, YO) around. (40 sts) Row 7: (K8, YO) around. (45 sts) Row 8: (K9, YO) around. (50 sts) Row 9: Switch to size 7 DPNs as you (K10, YO) around. (55 sts) Row 10: (K11, YO) around. (60 sts)
Version 2:
Using size 3 needles and MC, CO 15 using the longtail method. Distribute stitches over 3 needles (suggested distribution: 6 sts on the first needle, 3 on the second needle, 6 on the third needle). Join for working in the round. Row 1: Knit around. Row 2: (K3, YO) around. (20 sts) Row 3: Switch to size 4 DPNs as you (K4, YO) around. (25 sts) Row 4: (K5, YO) around. (30 sts) Row 5: (K6, YO) around. (35 sts) Row 6: K3, (YO, K7) 4 times, YO, K4. (40 sts) Row 7: K3, (YO, K8) 4 times, YO, K5. (45 sts) Row 8: K3, (YO, K9) 4 times, YO, K6. (50 sts) Row 9: Switch to size 7 DPNs as you K3, (YO, k10) 4 times, YO, K7. (55 sts) Row 10: K3, (YO, K11) 4 times, YO, K8. (60 sts)
Using size 3 needles and MC, CO 15 using the long-tail method. Distribute stitches over 3 needles (suggested distribution: 6 sts on the first needle, 3 on the second needle, 6 on the thirc needle). Join for working in the round. \*Note: for the CO sts below, use the knitting-on method. Row 1: Knit around. Row 2: (YO, K3, CO $\mathbf{1}^{*}$ 0 5 times. (25 sts) Row 3: Switch to size 4 DPNs as you (Sl 1, K3, Sl 1) 5 times. Row 4: (YO, K5, CO $\mathbf{1}^{*}$ ) 5 times. (35 sts) Row 5: (Sl 1, K5, Sl 1) 5 times. Row 6: (YO, K7, CO $\mathbf{1}^{*}$ ) 5 times. (45 sts) Row 7: (Sl 1, K7, Sl 1) 5 times. Row 8: (YO, K9, CO $\mathbf{1}^{*}$ ) 5 times. (55 sts) Row 9: Switch to size 7 DPNs as you (Sl 1, K9, Sl 1) 5 times. Row 10: (YO, K11, CO $\mathbf{1}^{*}$ ) 5 times. (65 sts)
Version 3:
Finishing for all versions:
Transfer stitches to prepared ring, moving stitches along the ring as necessary to facilitate transfer. After all stitches are on the ring, use scotch tape to close the ring into an unbroken circle. Distribute stitches as evenly as posible along the ring (note: you may find it helpful to mark on the ring where 12:00, 3:0o, 6:oo, and 9:00 would be if the ring was a clock, and distribute a fourth of the total number of stitches to each quarter of the circle). Use a needie to widen the yarn-overs by stretching them in a circular motion (this will make the design more defined). If you find that the ring tends to warp, cutting offa section of the ring and re-closing it may help alleviate the problem. Thread a length of CC embroidery floss several feet long (about 12-15' to leave fewer ends to weave in) onto a tapestry needle. Leaving a 6-inch tail, wrap the sections of the ring that are visible between the stitches (about 3-4 wraps between each pair of stitches). Optional: Use the cast-on tail to hang a decorative ornament in the center circle. Weave in all ends through the wraps on the back of the ring to hide and secure them, and trim the excess.
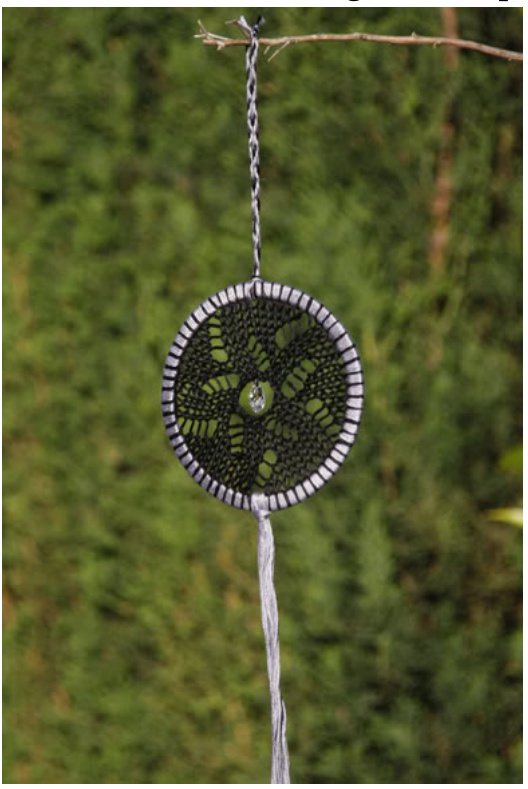
For fringe: Cut six 19-inch strands in desired color combination. Holding all the strands together, fold them in half. Insert a crochet hook from back to front between two stitches where you would like the bottom of the dreamcatcher to be. Hook the folds of the strands and pull them halfway through. Tuck the ends of the strands through the loop you have just made, and pulltight. Trim ends to desired length. For the hanging loop: Cut three 1o-inch strands, in desired color combination. Use these to make a standard braid. Fold in half and pull through (as for fringe) at a point at the top of the dreamcatcher. Tie the two ends together to form a closed loop.


