"beyond all towers strong and high, beyond all mountains steep, above all shadows rides the Sun and Stars forever dwell; I will not say the Day is done, nor bid the Stars farewell." \~Samwise the Brave, Return of the King
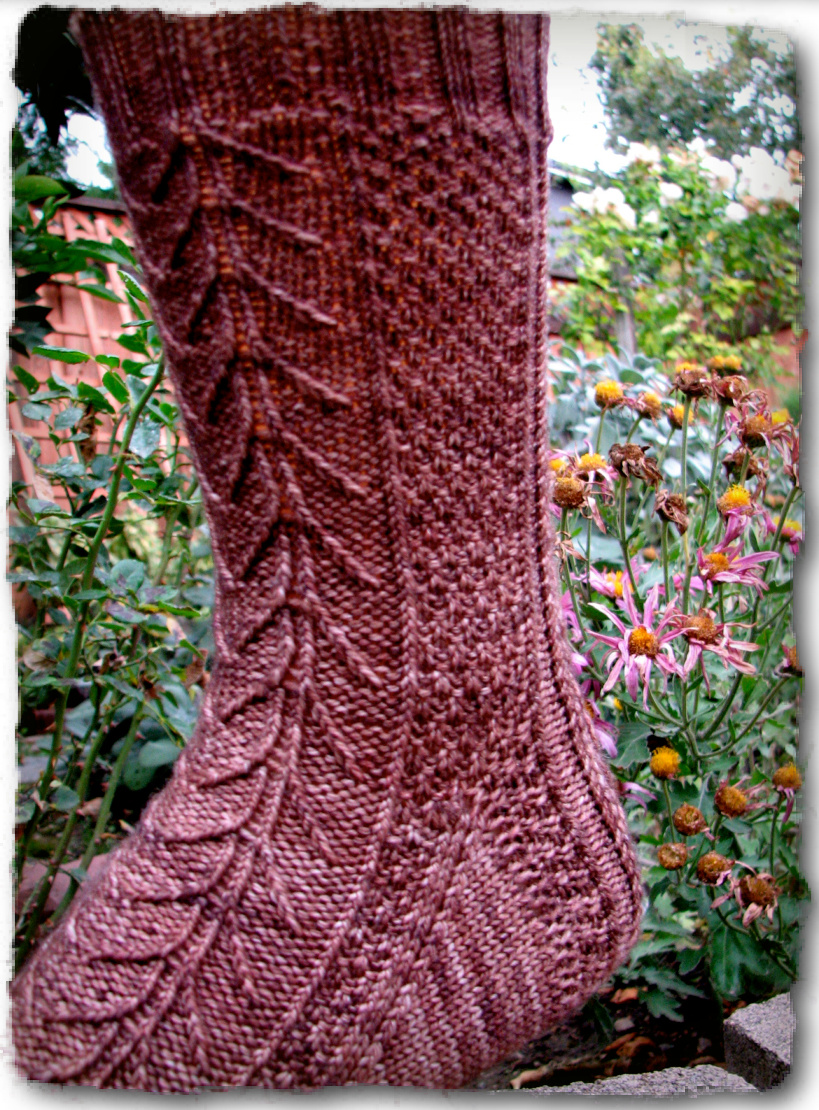
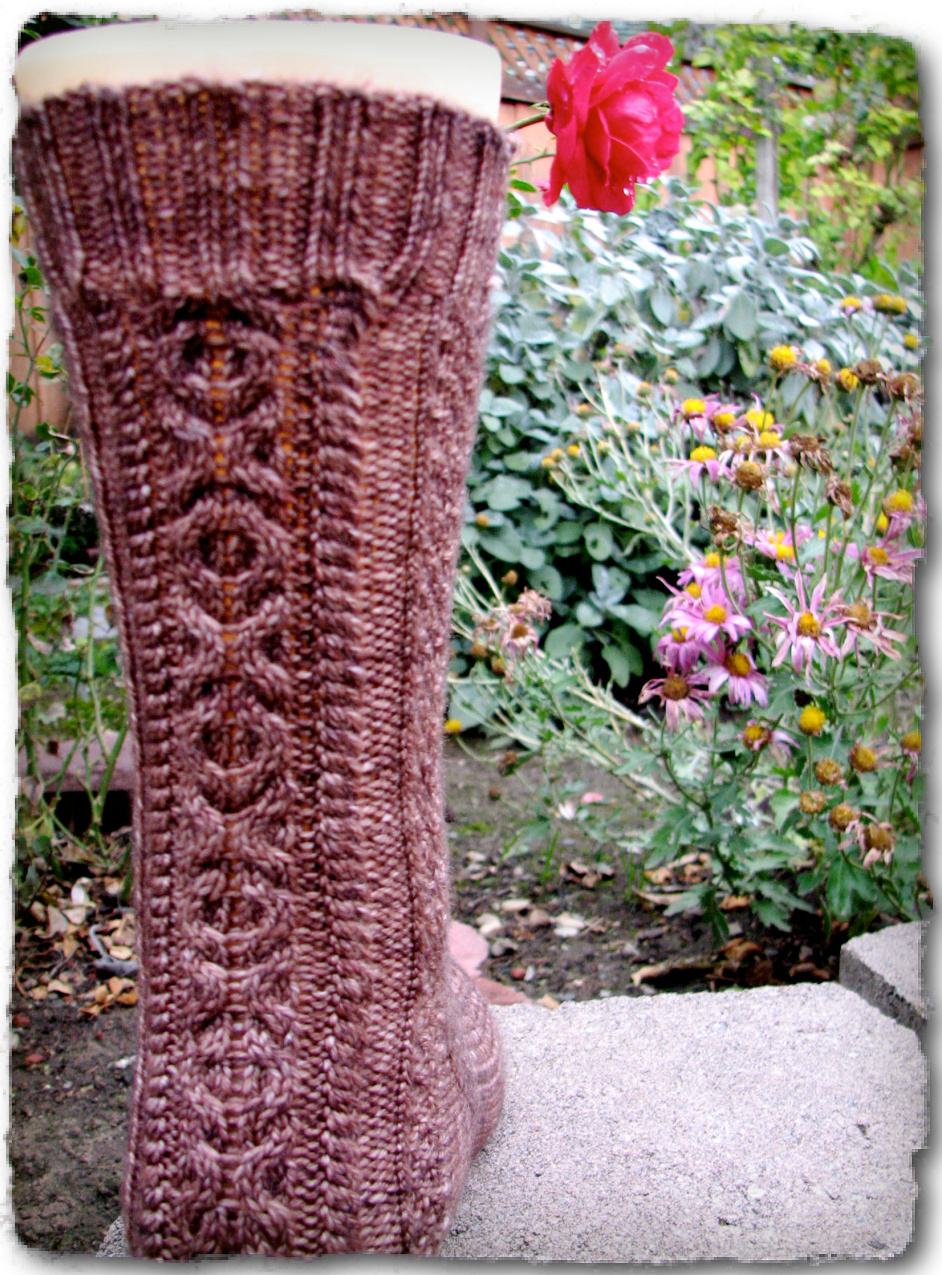
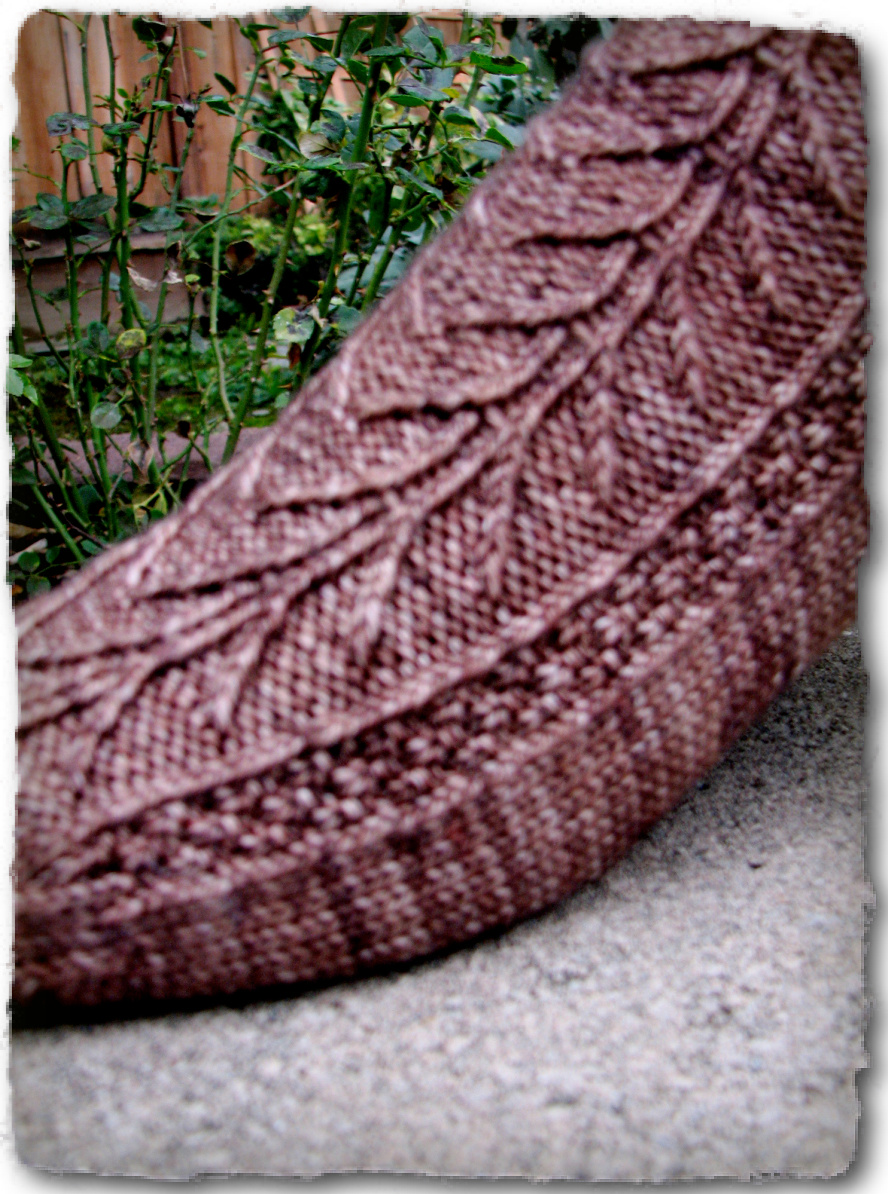
Samwise
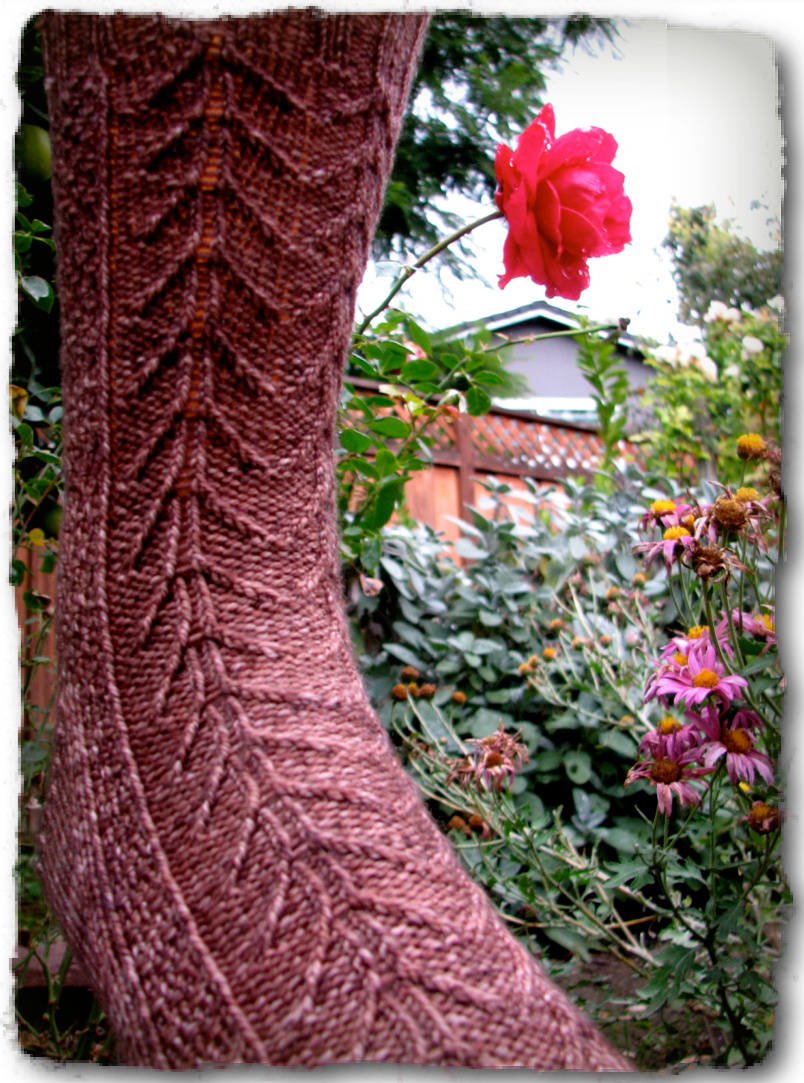
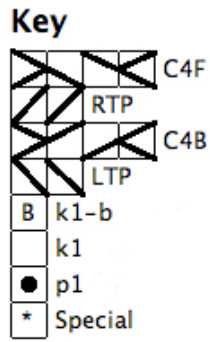
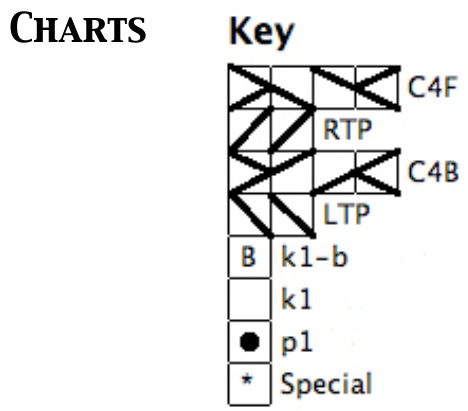
Quotes from the Lord of the Rings are taken from the 1987 Houghton Mifflin edition and remain the property of the Tolkien estate. SKILL LEVEL: Intermediate; includes basic top-down sock construction, extensive cables, and texture stitches. MATERIALS: 1 Set of US2 (2.75 mm) DPNs (or size necessary to achieve gauge), cable needle, measuring tape, and scissors. YARN: Approx. 400 yds of fngering weight. The socks pictured here use Anzula Squishy (8o% Superwash Merino, 10% Cashmere, 10% Nylon) 1 skein= 385 yds. Colorway: Coco GAUGE: 8 sts and 1l rows to 1 inch in stockinette stitch EASE: Slightly negative due to ribbing and texture SIZE: Small (Large) FINISHED MEASUREMENTS (All are adjustable by lengthening or shortening the calf, foot, or heel flap sections): \*CALF: 9(11) inches \*F00T: 7(9) inches \*GUSSET: 10 inches in circumference ABBREVIATIONS & STITCH DEFINITI0NS: K= knit P= purl K2tog= Knit 2 stitches together P2tog= Purl 2 stitches together SSK= Slip, slip, knit K-B= Knit one stitch through the back loop P-B= Purl one stitch through the back loop \* Special(right side)= Slip one stitch knitwise, return it to the lefthand needle, then knit it. \*Special(wrong side)= Slip one stitch knitwise, slip back to the lefthand needle, then purl it. RT= Right twist (or slip one stitch to a cable needle and hold to the back, knit the next stitch, then knit the cabled stitch) RTP= Right purled twist (or slip one stitch to a cable needle and hold to the back, knit the next stitch, then purl the cabled stitch) LTP= Left purled twist (or slip one stitch to a cable needle and hold to the front, purl the next stitch, then knit the cabled stitch) C4F= Slip the next two stitches onto a cable needle and hold to the front, knit the next two stitches, then knit the two cabled stitches C4B= Slip the next two stitches onto a cable needle and hold to the back, knit the next two stitches, then knit the two cabled stitches
CUFF
Cast on 64(72) stitches, divide them between three DPNs, and join for working in the round, being careful not to twist them. Work [K2, P2] ribbing for 1.5 inches.
CALF
Begin working with the charts, as indicated by size-- if it helps you, place markers to indicate the changes between charts. The charts are separated by a double moss stitch. SMALL: Round 1: [Kl, Pl] 2 times, Work first/next round of Front Chart once. [Kl, Pl] 4 times. Work first/next row of Back Chart once. [Kl, Pl] 2 times. Round 2: Repeat Round 1 one more time, using the next row in each of the charts. Round 3: [Pl, K1] 2 times, Work next round of Front Chart once. [Pl, Kl] 4 times. Work first/next row of Back Chart once. [Pl, Kl] 2 times. Round 4: Repeat Round 3 one more time, using the next row in each of the charts.
LARGE:
Round 1: [Kl, Pl] 3 times. Work first/next round of Front Chart once. [Kl, Pl] 6 times. Work frst/next row of Back Chart once. [Kl, Pl] 3 times. Round 2: Repeat Round 1 one more time, using the next row in each of the charts. Round 3: [Pl, Kl] 3 times. Work first/next round of Front Chart once. [Pl, Kl] 6 times. Work first/next row of Back Chart once. [Pl, Kl] 3 times. Round 4: Repeat Round 3 one more time, using the next row in each of the charts. Continue in this way, using the next row in each of the charts until the calf measures 7 (9) inches (or 2.5-3 inches shorter than desired length. End on an even numbered chart row. When the calf reaches the right length, write down which round of the Front Chart you have reached (you will continue from this point when working the top of the foot).
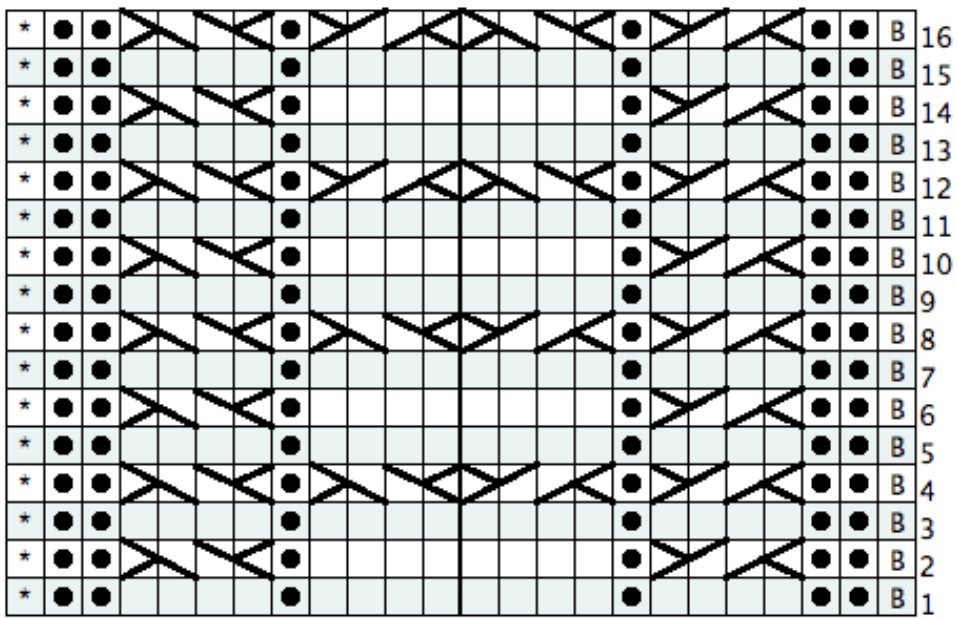
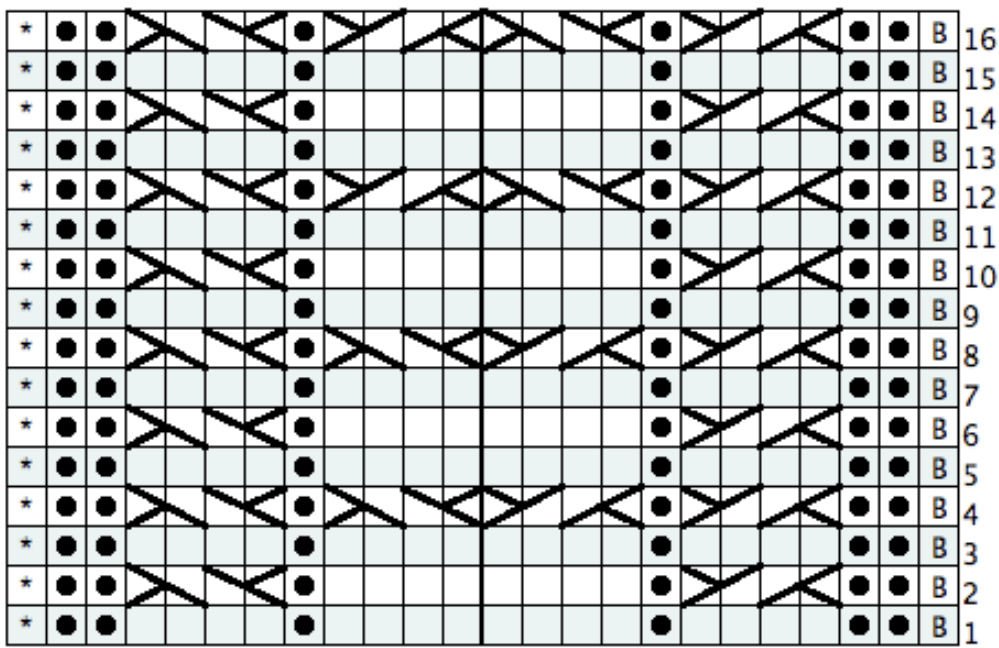
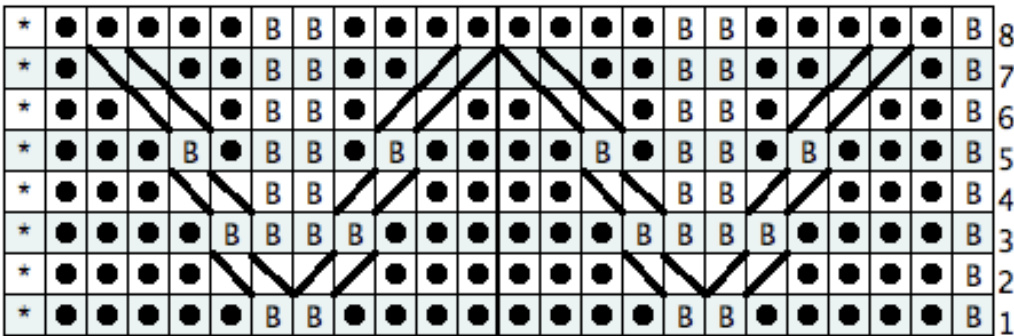
FRONT CHART
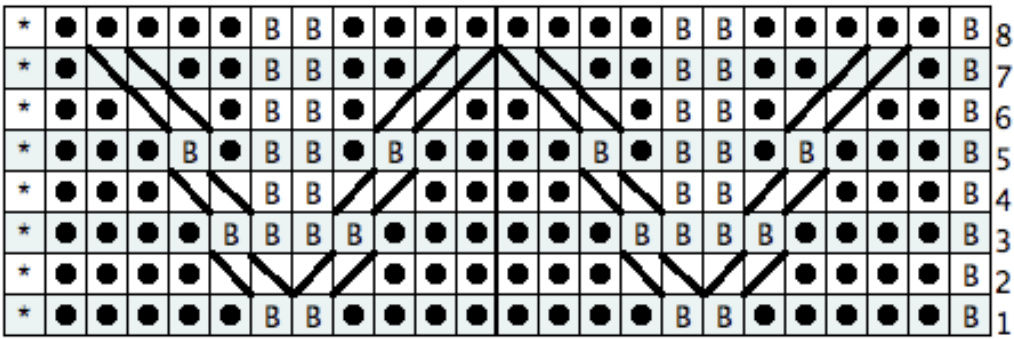
BACK CHART
HEEL FLAP
Divide stitches in half-- the heel flap will be worked over the 32(36) stitches on the back ofthe foot, the remaining 32(36) stitches will be held in reserve for the top of the foot. Turn work, so the wrong side is facing. Working back and forth in rows over 32(36) stitches, alternate the following two rows: Row 1 (wrong side): S1,Work the double moss stitch pattern as established for 3(5) stitches. Work the next row of the Back chart (remember to work back and forth as for flat knitting). Work the double moss stitch pattern as established till the end of the flap. Row 2 (right side): Sl, Work the double moss stitch pattern as establised for 3(5) stitches. Work the next row of the Back chart (remember to work back and forth as for flat knitting). Work the double moss stitch pattern as established till the end of the flap. Continue these two rows until the heel flap measures 2.5 inches (3 or 3.5 inches for a deeper, stretchier gusset). End after a Row 2 (ready to knit a wrong siderow)
HEEL TURN
The heel turn is worked using short rows and decreases the stitch count. Row 1: S1, P18(20), P2t0g, P1, turn work Row 2: S1, K7, SSK, K1, turn work Row 3: S1, P8, P2tog, P1, turn workRow 4: S1, K9, SSK, K1, turn work
Row 5: S1, P10, P2tog, P1, turn workRow 6: S1, Kll, SSK, Kl, turn work Row 7: S1, P12, P2t0g, P1, turn workRow 8: S1, K13, SSK, Kl, turn work Row 9: S1, P14, P2tog, P1, turn workRow 1O: Sl,K15, SSK, Kl, turn work Row 1l: S1, Pl6, P2tog, P1, turn work Row 12: S1, K17, SSK, K1 For LARGE SIZE ONLY: turn work Row 13: S1, P18, P2t0g, P1, turn workRow 14: S1, K19, SSK, K1 Total stitch count: Small-- 20, Large-- 22Note: Do not turn work after last row.
GUSSETS
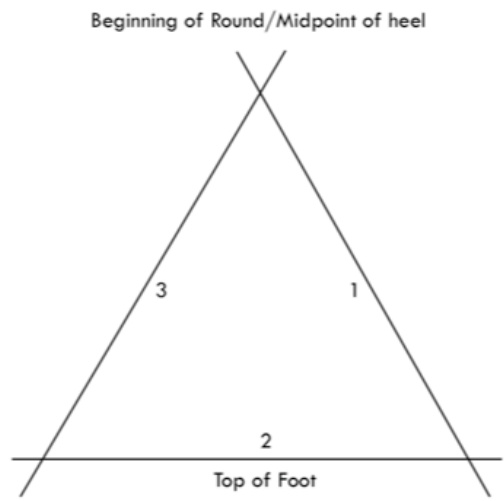
Set-up round: Pick up and knit one stitch in each slipped stitch along the side of the heel flap. For the top of the foot, and on needle 2, K-B, continue double moss stitch pattern over 3(5) stitches, work next row of Front Chart (which should be marked or written down from the calf section). Work the double moss stitch across 3(5) stitches, and finish with the \* Special stitch. On needle 3, pick up and knit one stitch in each slipped stitch along the other side of the heel flap and knit 1o(ll) stitches of the heel turn. NFW RFGTNNTNG OF THF: ROIIND Arrange the stitches as indicated by the diagram, the same number of stitches should be on needles 1 & 3, and all patterned stitches for the top of the foot should be on needle 2.
Gusset Round 1: On needle l, Knit to last 3 stitches, K2tog, K1. On needle 2, continue even in pattern as established (using next charted rounds). On needle 3, K1, SSK, knit to end. Gusset round 2: On needle 1, Knit all stitches. On needle 2, continue even in pattern as established (using next charted rounds). On needle 3, Knit all stitches. Repeat these two rounds until there are 64(72) stitches remaining.
FooT
The foot continues even in the established patterns: Foot round: On needle 1, Knit all stitches. On needle 2, continue even in pattern as established (using next charted rounds). On needle 3, Knit all stitches. Repeat the foot round until the foot measures 6(7) inches (or until the foot measures 2 inches fewer than total desired length of the foot).
ToE
This sock features a wedge toe, and 4 stitches will be decreased every other row. Toe Round 1: On needle 1, knit to the last 3 stitches, K2tog, K1. On needle 2, K1, SSK, knit to the last 3 stitches, K2tog, K1. On needle 3, K1, SSK, Knit to the end of the round. Toe Round 2: Knit all stitches.
FINISHING
When 20 stitches remain (both sizes), use needle 3 to knit the 5 stitches on needle 1. (l0 stitches each on needles 2 &e 3.) Use the Kitchener stitch to close up the toe. Weave in all the ends, and lightly block (if desired-- I never block socks, but to each her own). Don't you just love knitting?
Sam Photos & Pattern ? 2011 Claire Ellen Pattern intended for personal use only.
FRONT CHART
BACK CHART