FINISHED SIZE to fit Dot Pebble's Knitted Baby Doll YARN 50gm ball Aran (worsted) weight in MC actual meterage 94m/ 103yds Sbown in MC (main colour) - Rooster Almerino Aran in shade 305 Custard NEEDLES pair size 4%mm (US size 7) needles TENSION 21 stitches and 28 rows counted over a 10cm/ 4in square working stocking stitch in main colour and using size 4%mm (US size 7) needles NOTIONS length ribbon or tape for the ties at the back, stitch holder or spare needle for holding stitches that are not in use, press stud fastener, button. Special instructions and abbreviations can be found at tbe end of tbe patterns
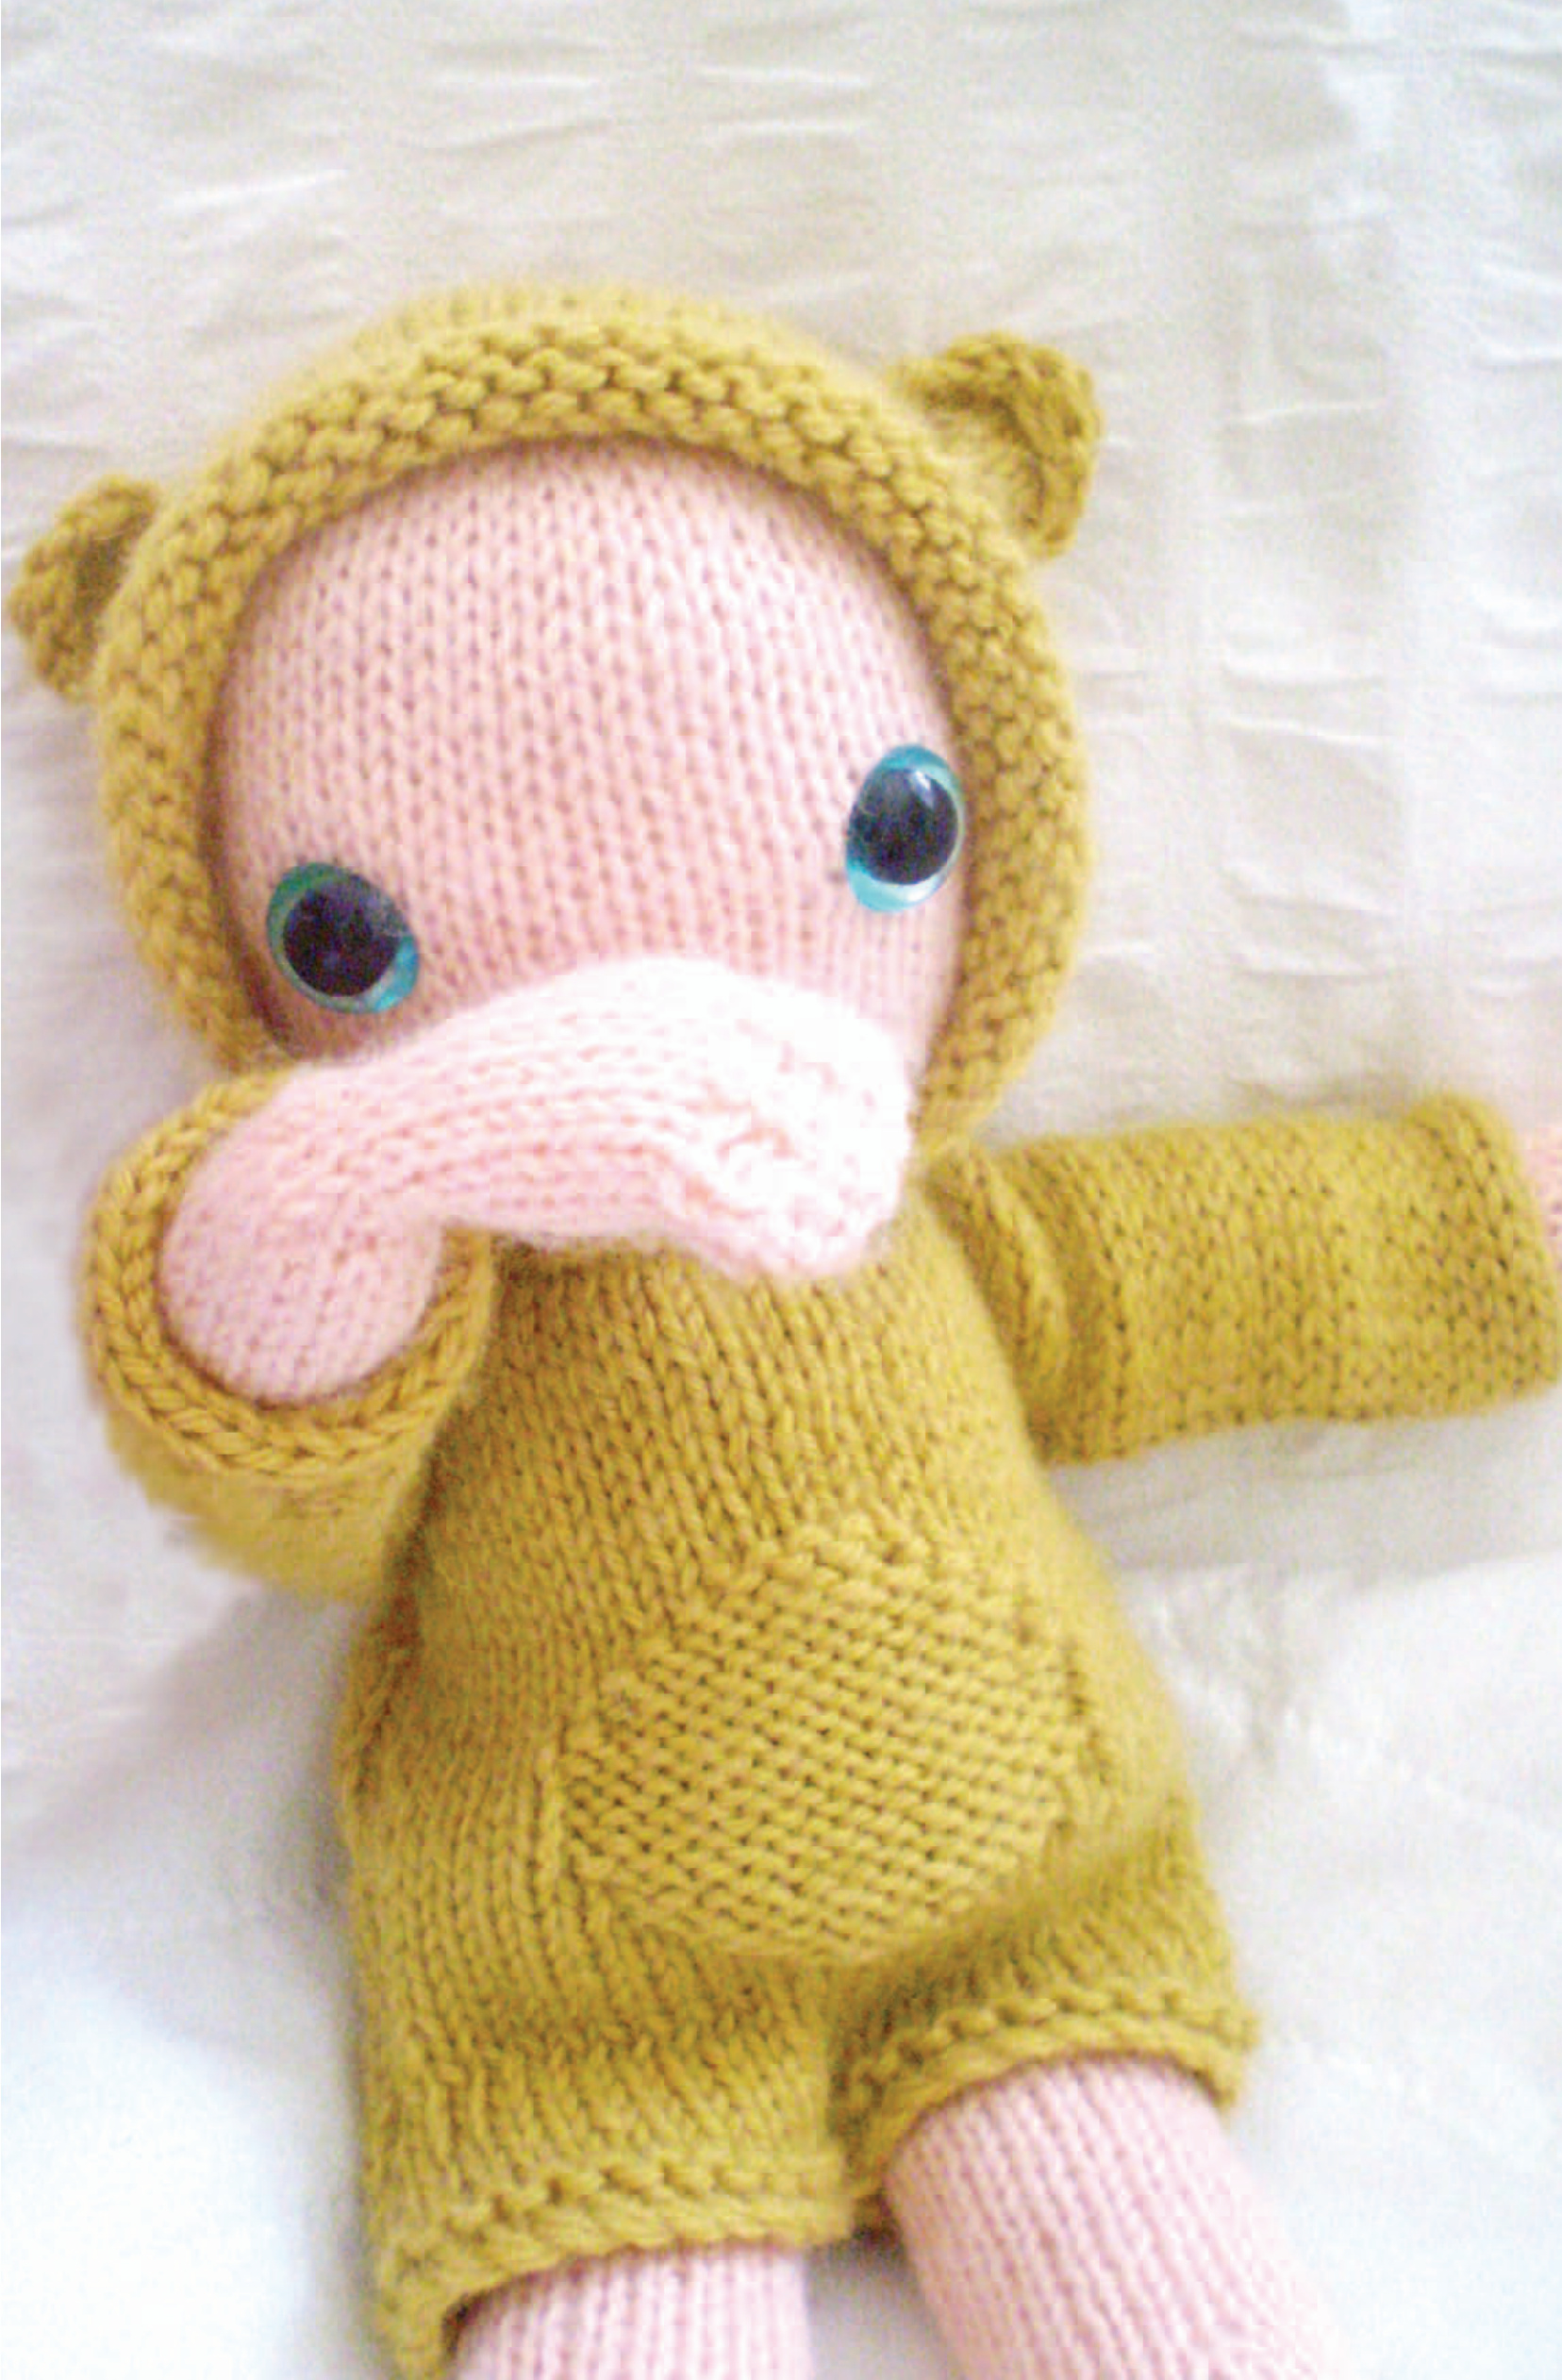
Baby Bear
Body front
Using 4%mm (US size 7) needles cast on 26 sts. Work 2 rows garter st, so ending with a WS row. Begin with a K row, work 10 rows st st.
Add pattern
Row 13 K11, p4, k11. Row 14 P10, k6, p10. Row 15 K9, p8, k9. Row 16 P8, k10, p8. Row 17 K8, p10, k8. Row 18 P7, k12, p7. Row 19 K7, p12, k7. Repeat last 2 rows once more. Row 22 P7, k12, p7. Row 23 K8, p10, k8. Knitted babies #FREEBEE pattern page 2 Row 24 P8, k10, p8. Row 25 K9, p8, k9. Row 26 P10, k6, p10. Row 27 K11, p4, k11. Work 3 rows st st.
Sleeves
Cast on 20 sts at beg of next 2 rows. 66sts Work 6 rows st st.
shape neck
Row 39 K27, bind off centre 12sts for Neck, k to end. 54sts Work on each set of sts in turn.
Right sleeve
Row 40 P27 to neck edge. Row 41 (dec) K2, k2tog tbl (through back loops), k to end of row (sleeve edge).26sts Work 3 rows st st.
Centre back opening
Row 45 (inc) Cast 0n 7 sts, k33 sts to end. Work 5 rows st st, so ending with a p row. Cut yarn, leave sts on a stitch holder or a spare needle.
Right sleeve
WS facing, rejoin yarn to 27 sts for Left Sleeve. P to sleeve edge. Row 41 (dec) K to last 4 sts, k2tog, k2 (neck edge). 26sts Work 2 rows st st.
Centre back opening
Row 44 (inc) Cast on 7 sts, p33 sts to end. Work 6 rows st st.
Join both halves
Row 51 (dec) K32 sts from Right Side, k32 sts from Left Side. 65stS
Knitted babies #FREEBEE pattern page 3 Work 5 rows st st, so ending with a p row. Bind off 20 sts at beg of next 2 rows. 26sts Work 28 rows st st. Work 2 rows garter st. Bind off. Mattress seam sides and underarm seams. Sew press stud fastening to the centre of the cast on/ bind of edges to create a closure at the legs. Sew ties at back of neck opening.
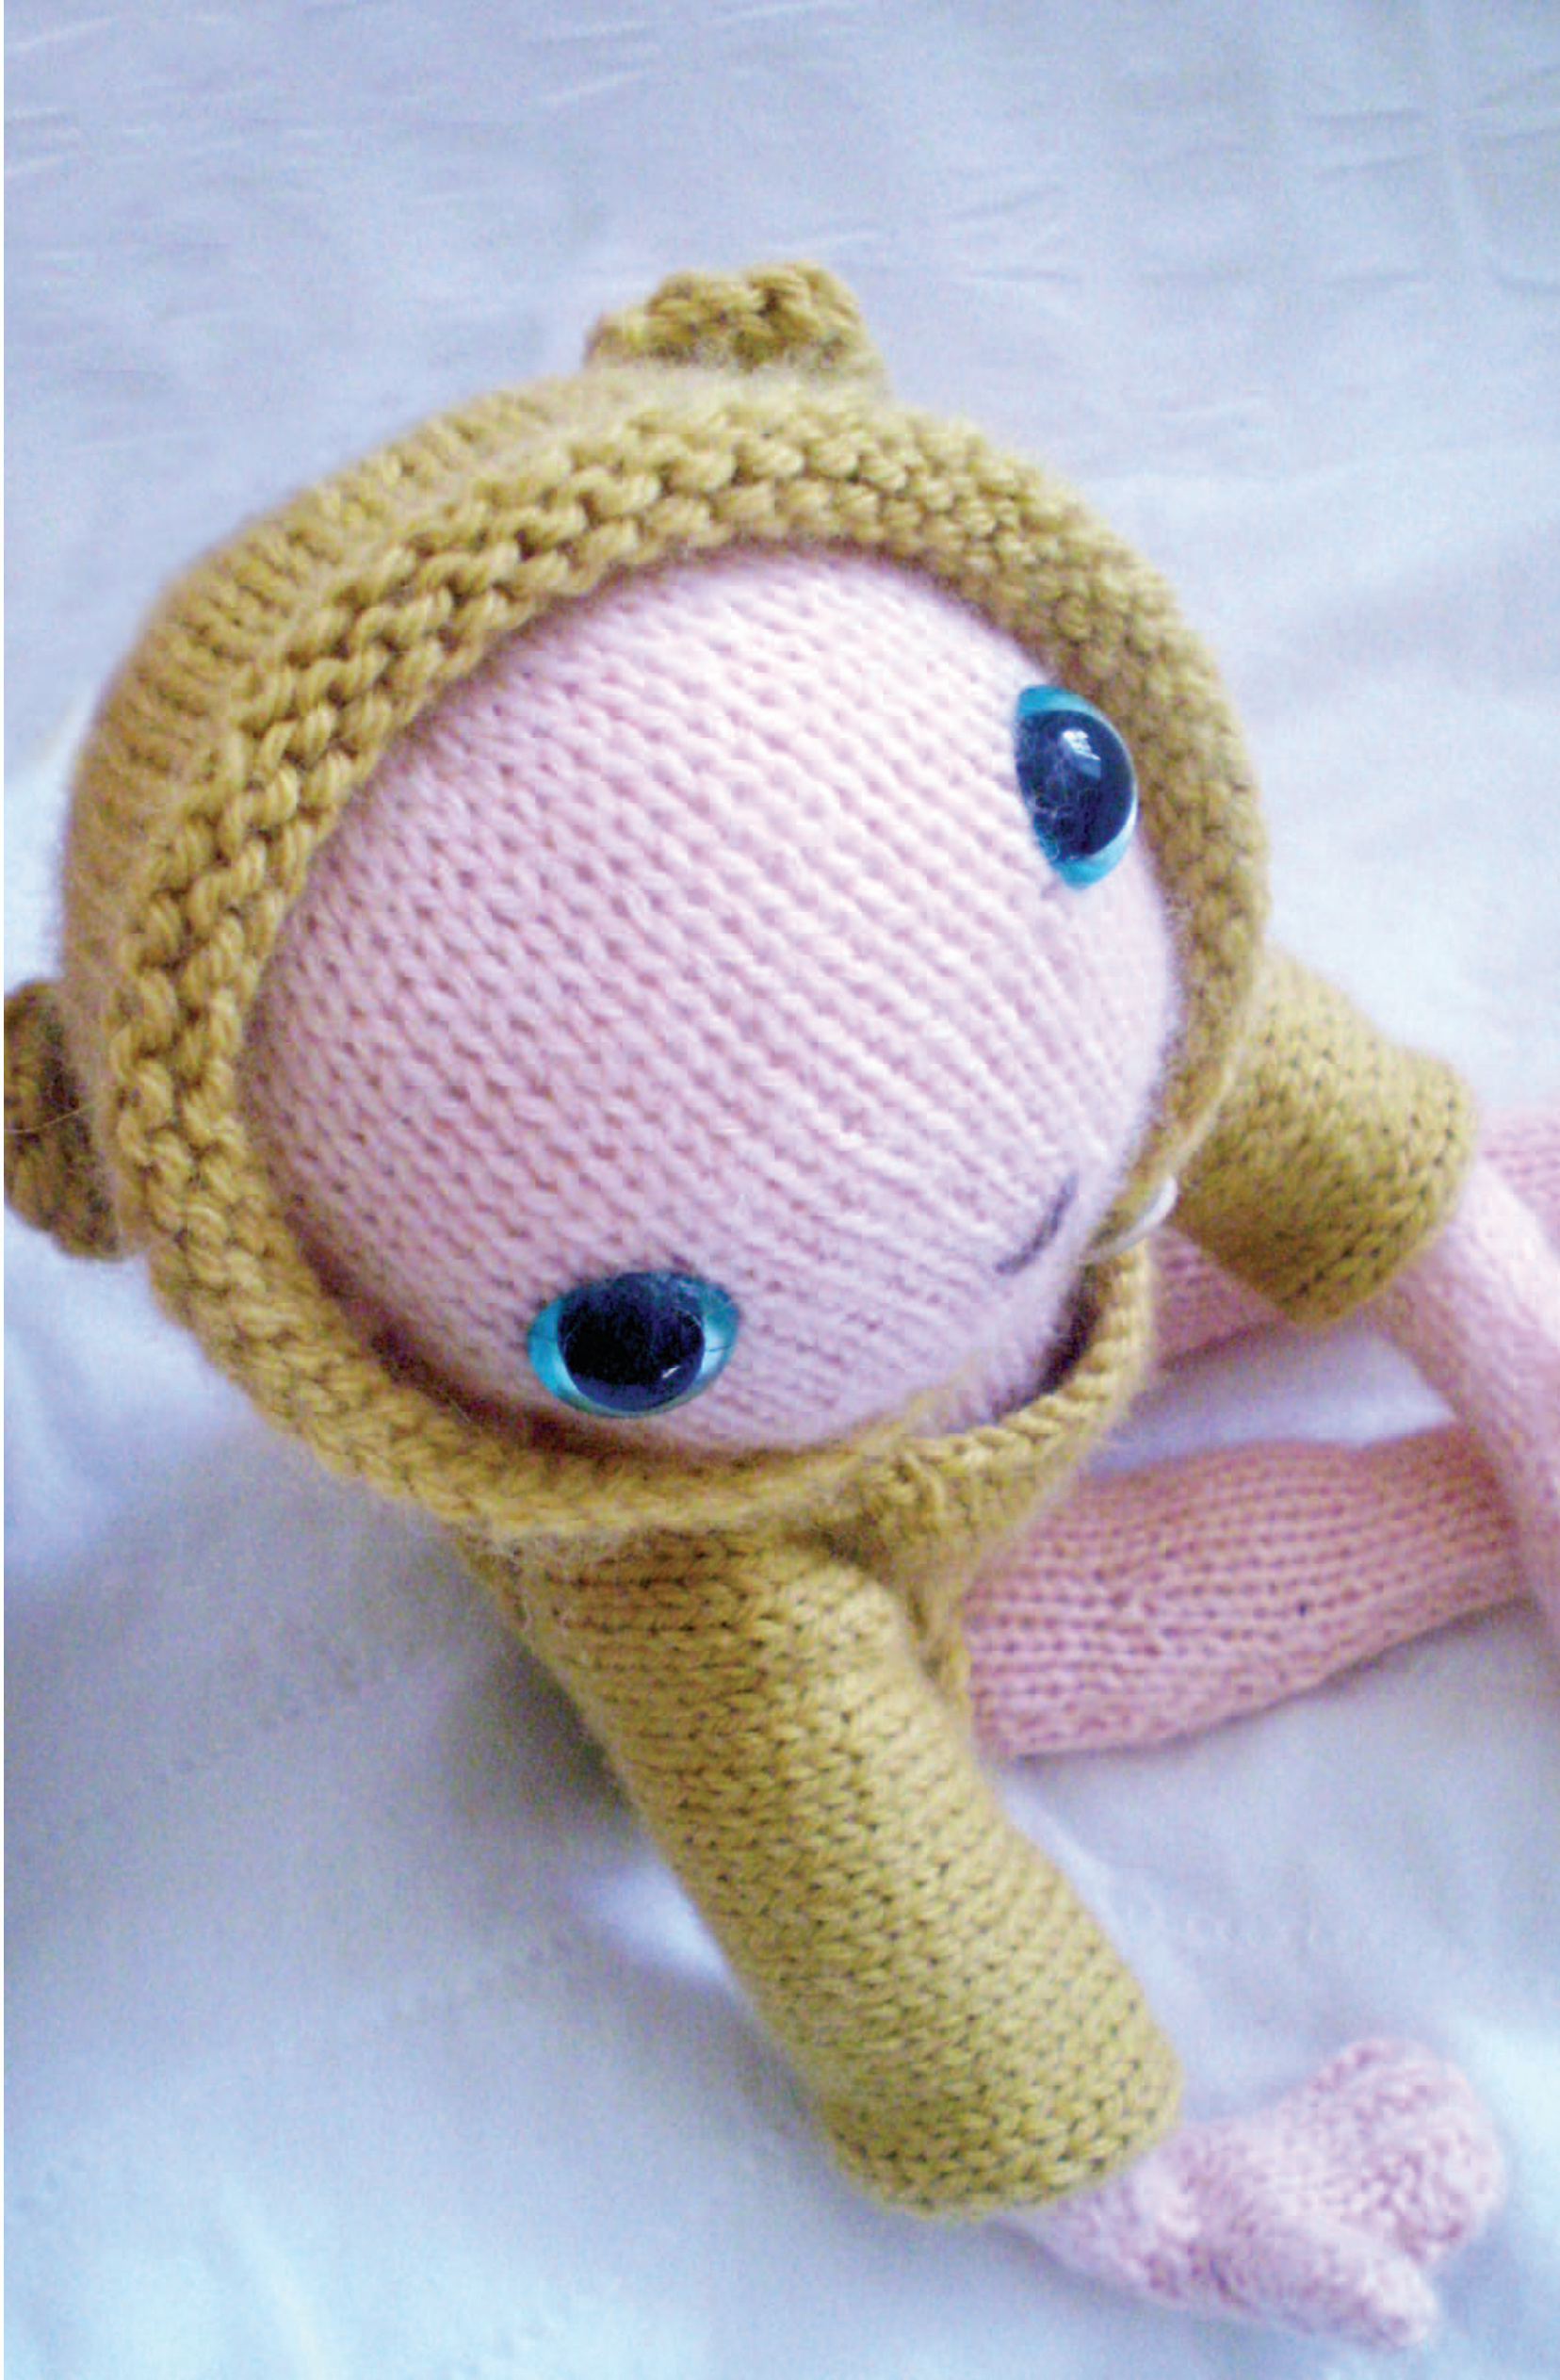
Bonnet
Using 4%mm (US size 7) needles cast on 52 sts, leaving a long tail end. Work 2 rows garter st, so ending with a WS row. Begin with a K row, work 13 rows st st. Row 16 P12, k1, p3, k1, p18, k1, p3, k1, p to end - to place markers for ear positions(\*).
Shape back
Row 17 (dec) K1, [k8, k2tog] 5 times, k1. 47sts Row 18 P. Row 19 (dec) K1, [k7, k2tog] 5 times, k1. 42sts Row 20 P. Row 21 (dec) K1, [k6, k2togl 5 times, k1. 37sts Row 22 P.
Divide back
Row 23 (dec) K1, [k5, k2togl twice, k3, turn.
Left back
Row 24 (dec) P2tog, p14. 15stsRow 25 (dec) K1, [k4, k2tog] twice, k2. 13sts Row 26 (dec) P2tog, p11. 12sts Knitted babies #FREEBEE pattern page 4 Row 27 (dec) K1, [k3, k2togl twice, k1. 10sts Bind off 10sts p-wise.
Right back
Row 23 (dec) RS facing, rejoin yarn to 19sts from Right back; k2, k2tog, [k5, k2tog] twice, k1. 16sts Row 24 (dec) P to last 2sts, p2tog. 15sts Row 25 (dec) K2t0g, [k4, k2tog] twice, k1. 12sts Row 26 (dec) P to last 2sts, p2tog. 11sts Row 27 (dec) K3, k2tog, k to end. 10sts Bind off 10sts p-wise. RS tog, join, working back st seam, the bind off edges. Turn out to RS. Join in mattress seam the rows ends at Back Divide.
Bear's ears make 2 alike
Using 4%mm (US size 7) needles cast on 8sts. Work 2 rows st st. Row 3 K6, w+t. Row 3 P4, w+t. Row 3 K3, w+t. Row 3 P2, w+t. Row 3 K1, w+t. Row 3 P4. Row 3 (dec) [Skpo] 4 times. 4sts Row 3 (dec) [P2tog] twice. 2sts
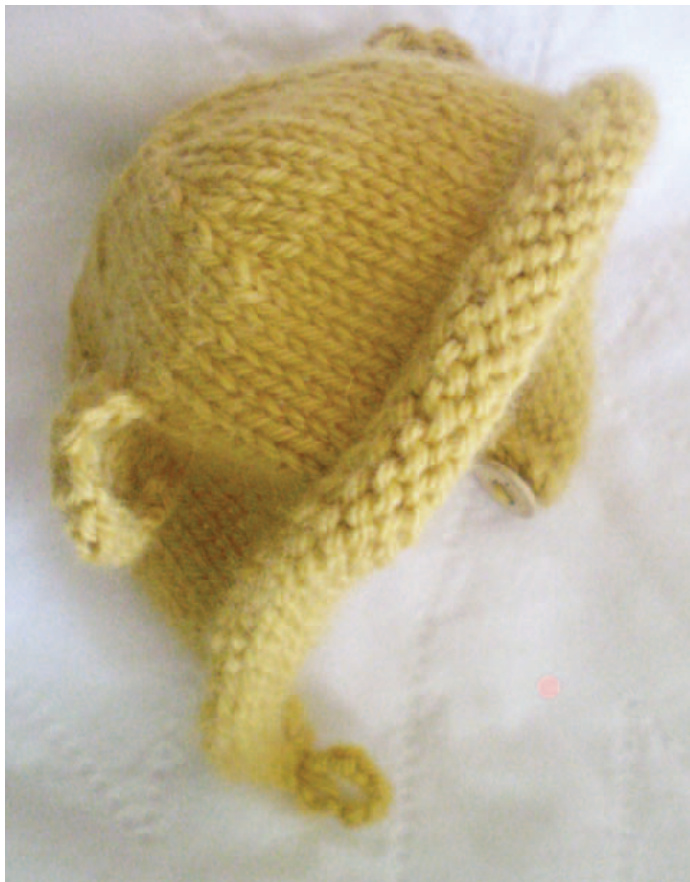
Cut yarn, thread end through rem 2sts, pull up tight and weave in end. Join ears with cast on ends to top of bonnet, curving ears between markers(\*). Make a loop from the tail end at cast on, work a buttonhole stitch Over this loop if wished. Sew a button to the other side at bonnet front.
Knitting etc. knowledge
abbreviations
cm centimetre/ s m1 make a stitch (see definitions) rh right hand cO cast on mc main colour rs right side cont continue mm millimetre skpo slip, knit, then pass slipped stitch dec decrease Ppurl over (see definitions) DKdouble knitpattpatternslslipft foot/ feet as in measurements pfkb purl into front, knit into back st/sts stitch/es gm gram/ mes pup&k pick up and knit tbl through back loop in inch/es (see definitions) WS wrong side inc increase re regarding w+t wrap and turn (see definitions) kknit/ knitting rep repeat yf Bring yarn to front of work kfb knit into front, then back rem remaining yo yarn over (see definitions)
definitions
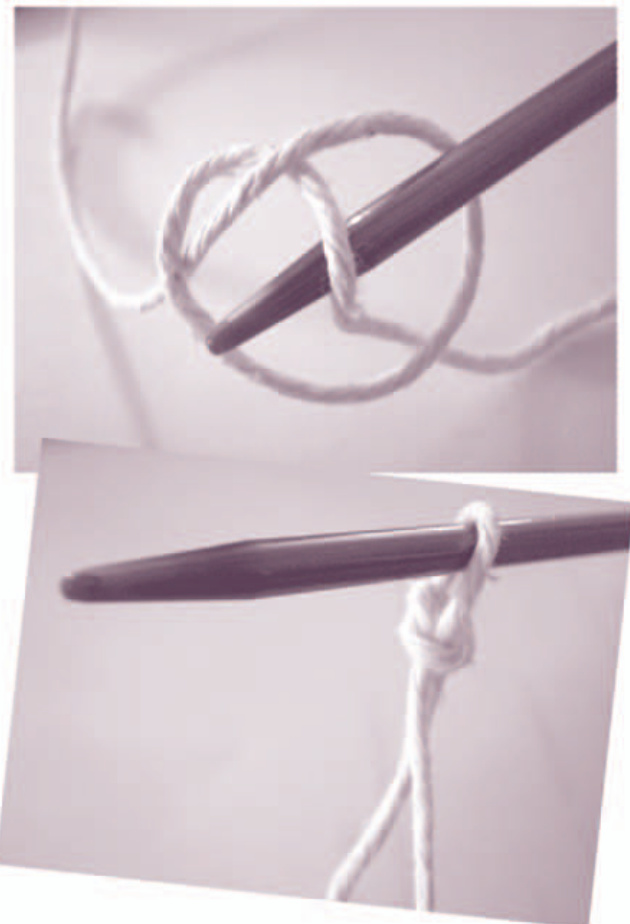
Tbe following definitions are brief explanations of tbe special tecbniques and some of tbe basic tecbniques tbat may bave been used within tbese patterns. Some definitions are explained witbin tbe patterns tbemselves, especially if tbey occur regularly and areuncommon,someareillustratedwbereitiseasiertoshowa diagram than it is to put into words. Plus for extra tuition, sometimes with step-by-step video footage, tbe Internet provides wonderfultutorials onall these and otber special orbasic tecbniques Slip knot this is generally how to begin knitting or crochet and usually becomes the first stitch; it is the beginning of the cast on method adopted for these patterns and it is also how to begin a crochet chain. To make a slip knot work the yarn, with your fingers, into a half knot but don't pull the knot closed - this will leave you with a loop. Slip the point of the knitting needle, or crochet hook for crochet projects, under the loop then pull the working yarn, this is attached to the yarn ball, gently until the knot lies, not too tightly, onto the needle or hook.
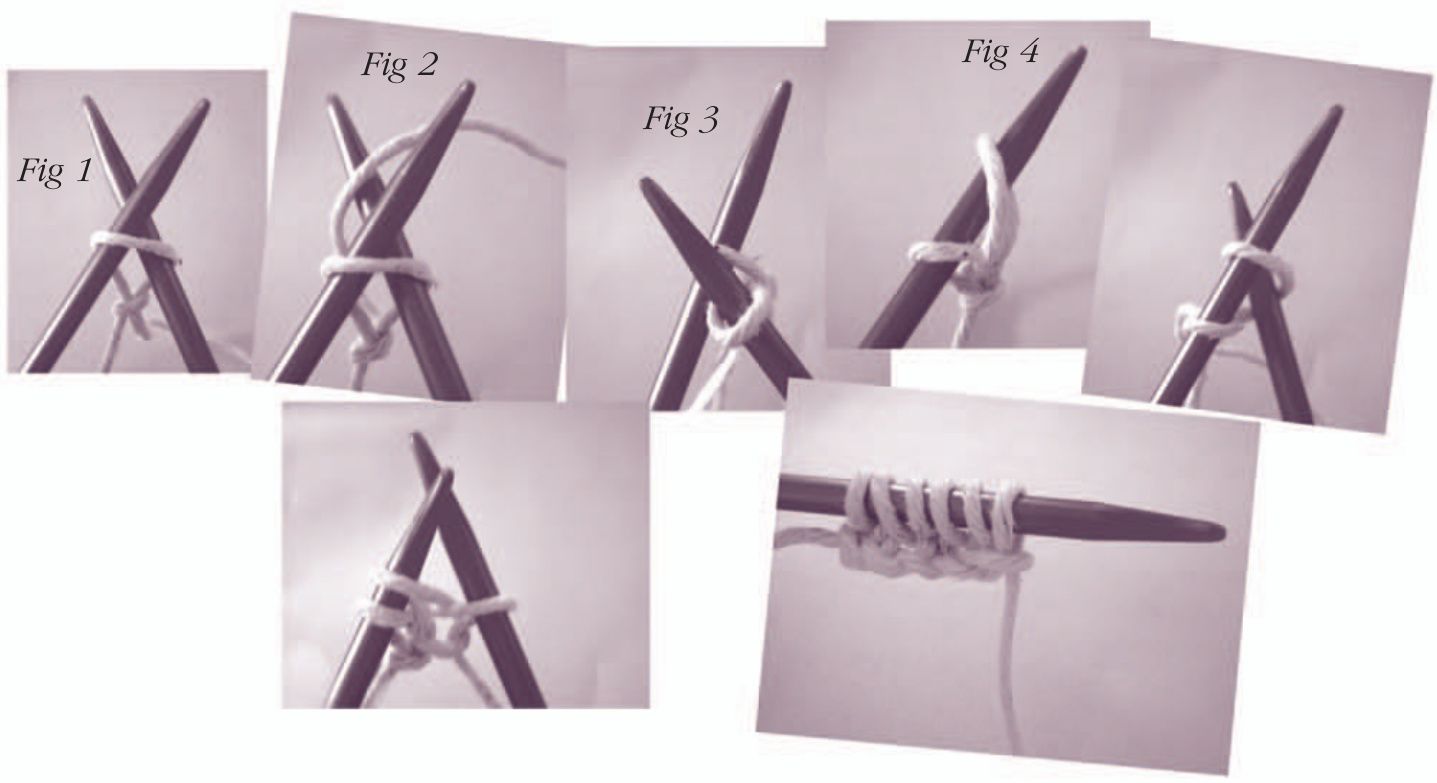
Cast on placing stitches on the needle to begin knitting. There are many ways to cast on although (unless stated otherwise within the pattern) the Knitting-on method is the type I have adopted throughout all of my patterns. Leaving about a 20cm/ 8in tail end, make a slip knot. Place the slip knot onto the tip of one of the needles, Fig 1 - the yarn from the ball(the working yarn) should be ready to work on the right of the knot. Begin adding stitches to the needle by taking the needle with the slip knot in your left hand. With the other needle in your right hand, \*push the tip of the right-hand needle into the slip knot loop (1st stitch) from the front to the back of the loop and under the left-hand needle. Now wrap the working yarn around the tip of the right-hand needle, over from front to back. Fig 2. Slide the tip of the right-hand needle down to catch this new loop of yarn. Fig 3. Lift the loop up and place it Onto the left-hand needle. Fig 4. Repeat from \* to \* until you have cast on the number of stitches needed.
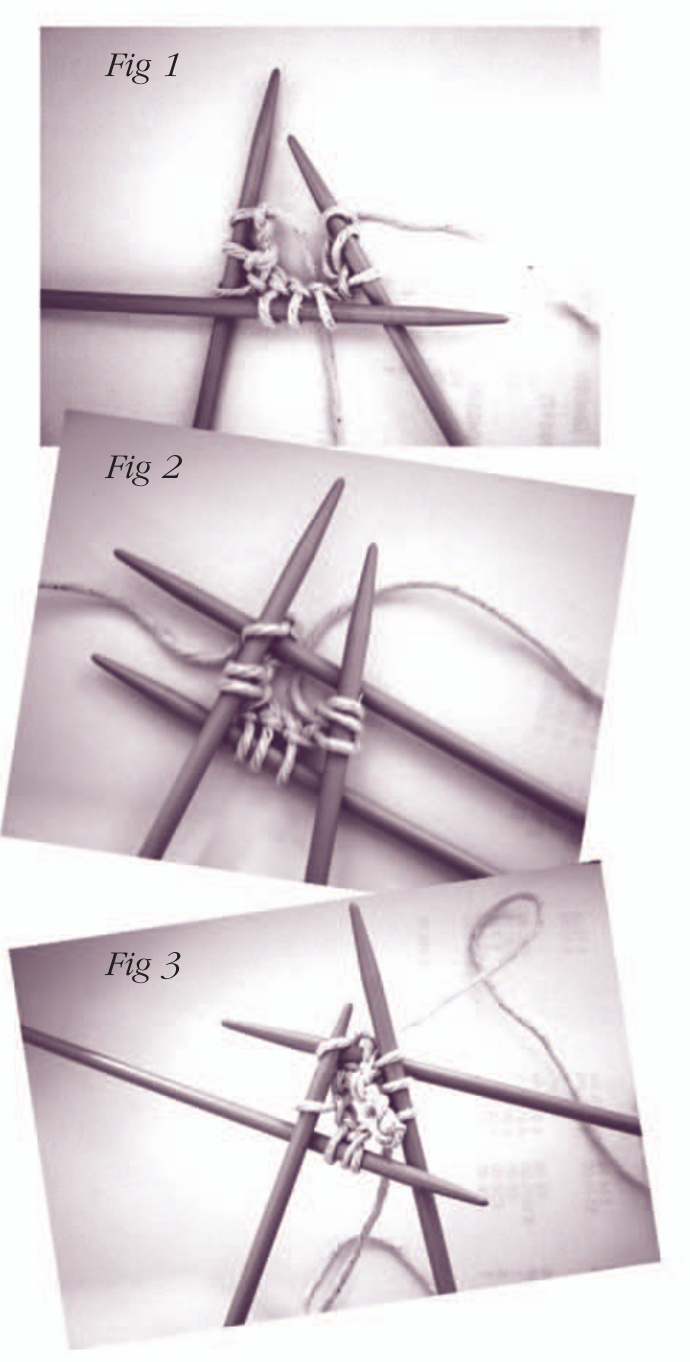
Backward loop cast on (bl) the only other alternative cast on method that is mentioned in any of my patterns and it is because it is the best cast-on method when adding stitches in the middle of a row, even though to work the next row over the new stitches can need a little patience! Basically you twist a loop of yarn around your forefinger then slip this new loop onto the right-hand needle to increase a stitch. Hold the working yarn in your left hand with the needle in your right. Extend your left forefinger parallel to the yarn, dip your finger under the yarn and towards you, you should have a single loop of yarn around your finger. Move the tip of the right-hand needle from the base of your finger so that the needle is through the loop on your finger. Remove your finger, tighten the loop on the needle. Brackets when you come across these brackets [] in a pattern enclosing an instruction/ number and followed by a number, work the instruction within the bracket the number of times stated. For example: [K5, k2 tog] 5 times means knit 5 sts then knit 2 stitches together - do these two instructions five times When you come across this bracket () in a pattern enclosing an instruction/ number it is there for your information only: an increase or decrease. Or (right arm) tells you where about you are within the pattern. Knit one of the two most basic stitches in knitting. There are other methods - this is the one I adopt: Hold the full needle (the needle with all the stitches on) in your left hand and the empty needle in you right. Insert the tip of the needle in your right hand into the first stitch from left to right, front to back. Wrap the working yarn around the back needle (right-hand needle) counter clockwise. Draw the loop through the stitch at the front of the work - this is the new stitch. Now slide the old stitch from the left needle. Purl the second of the two basic stitches. This is the reverse of a knitted' stitch and loops like a horizontal bar. To work a purl stitch, insert the needle from right to left in front of the work with the yarn at the front. Wrap the yarn around the right-hand needle in front of the work counter clockwise as you did for knit'. Draw the loop through the stitch, slide the old stitch off the needle. French knot working this embroidery stitch embellishes the knitting with texture and fine detail, a French knot is also usefu useful for creating the pupil and highlight for the doll's eye. Thread up a sewing needle with cotton thread or light-weight yarn. With the thread secured at the back of the work, bring the threaded needle through from the back of the work to the front where you want the knot to be. Wrap the yarn around the needle clockwise, three times. Holding the loops in a tight bundle with your thumb and forefinger, pull the needle through the coils by inserting the needle back into the fabric near the base of the knot, not in the same place. Secure the thread at the back of the work. i cord - an i cord, as the name suggests, is a cord or tube like a thick knitted string. Using 2 double pointed needles (dpns) cast on the number of stitches as directed within the pattern and knit across them. Then, instead of turning your knitting as you normally would, slide the stitches to the opposite end of the needle with the same side of the work still facing you. The working yarn will be at the wrong side of the work. Keeping the working yarn at the back, knit across the stitches. Slide the stitches to the opposite end of the needle again, with the working yarn at the back, knit across the stitches, drawing the knitting into a tube made of garter stitches. Pull the yarn quite tightly when knitting the first stitch. To reiterate - the working yarn is always on the wrong side of the cord, the right side of the wrong is always facing you. Kitchener stitch or grafting: to 'graft or sew together live' stitches held on double pointed needles (dpns) that are held parallel in your left hand. Thread up a yarn needle with the tail end, insert the threaded needle purl-wise into the first stitch on the double pointed needle (dpn) closest to you, pull the yarn through, leave the stitch on the needle. Insert the threaded needle into the first stitch on the back dpn, as if to knit, pull yarn through, leave that stitch on the dpn. \*Insert the threaded needle into the same front stitch, this time knit-wise, then slip that stitch off the dpn then bring threaded needle through the next front stitch as if to purl it - leave this stitch on the dpn. Pass the threaded needle through the same stitch on back dpn - this time purl-wise, slip that stitch off the dpn, then bring threaded needle through the next back stitch as if to knit it - leave this stitch on the needle\*\* Repeat from \* to \*\* until there is one stitch remaining. Fasten off the last remaining stitch. K2 tog knit 2 sts together. As knitting - insert the tip of the needle in your right hand, this time into the next two stitches on the left needle from left to right, front to back. Wrap the working yarn around the back needle (right-hand needle) counter clockwise. Draw the loop through both stitches at the front of the work - leaving one stitch remaining. Now slide this stitch from the left needle. One stitch decreased. Knitting in the round (rnd) is a process of working seamless knitting, that is not having to sew a seam to join front to back for example. It is working knitting around and around without having a beginning or an end - the start of the piece is however marked by a stitch marker of knotted loop of spare yarn. And it is worked, in the case of these patterns, with four double pointed needles (dpns). To join for working in the round' begin with two of the double pointed needles and cast on stitches in the normal way, then spread the stitches as evenly as numbers will allow dividing them over three of the needles. Fig 1 Arrange the stitches so that the loops are lined up on the top of each dpn, the working section/ cast on edge of the knitting lying beneath the needles and the working yarn to your right, ready to begin to knit - the three rows of cast on stitches are not to be twisted in a spiral around the needles as you link the last cast on stitch with the first cast on stitch by, using your forth needle, knitting into it. Fig 2 then Fig 3 Placing a marker before you knit the first stitch to link/ join the 'round’ determines the beginning of the round. Subsequent rounds are worked from the first stitch after the marker up to the last stitch before the marker. This marker you slip onto the right-hand needle before beginning another round. At the end of each rnd you should have the same number of stitches on each needle that you started with. With the first couple of rounds check to see that the stitches are not twisting/ spiralling around the needles, after that you can be reassured that this will not happen. Note: when you are working in the round you never see the wrong side of the fabric so to make stocking stitch, all rounds are worked all knit (no purling), garter stitch is one round knit, next round purl.
M1 an increase stitch, used primarily a within a row. Knit to where the increase is to occur, in a pattern this will read as k5, m1 - for example, so knit 5 sts, slip the right-hand needle front to back, under the horizontal bar that lies before the next stitch, slip left-hand needle through, from front to back, the picked up bar and allow the stitch to remain on the left-hand needle then, with the right-hand needle, knit into the back of the newly made loop to complete the new stitch. carry on knitting along the row or round unless otherwisestated. Mattress seam is the seam that gives you a non bulky join - perfect for small items like dolls' clothes. Always use a blunt ended, large eyed, yarn needle (so not to split the stitches) and matching yarn when sewing up your work. Lay the pieces to be sewn up side by side, matching row end stitches or cast on/ cast off stitches. ... Wben joining a vertical/ side seam - insert the threaded up yarn needle in between the first and second stitches on the lower edge of one of the pieces to be joined. With your needle, pick up the first horizontal bar, that look like a ladder rung, and pull the yarn through. Go to the other piece and pick up the adjacent ladder rung'/ horizontal bar. Continue picking up the horizontal bars along the edges of the two sides going back and forth from piece to piece, as the sides are joined. ...When sewing up borizontal/ cast on and or cast off edges - insert the threaded up yarn needle just inside the cast on or cast off edge of one of the pieces to be joined. With your needle, pick up the two strands that make the V shape of a knitted stitch - at the bottom of the V not the top, pull the yarn through. Go to the other piece and pick up the corresponding V stitch. Continue picking up the V shaped stitches along the edges of the two sides going back and forth from piece to piece. Pick up and knit (pup&k) When the need arises to join a finished row or cast on or cast off edges with new stitches, for example to create the gusset of a sock or edge of a shoe or neckline/ collar to an item of clothing, you work pick up and knit. With the right side of the work facing and one needle in the right hand, \*insert the needle tip through the knitted fabric to the back, at least two strands from the edge. Wrap counter clockwise, as if to knit, the working yarn around the needle and draw this loop through the fabric to the right side/ front of the work, leave this loop/ new stitch on the needle\*\* - one stitch picked up. Continue from \* to \*\* working along the finished edge picking up more stitches. The pattern will direct you how many stitches are to be ‘picked up'. P2 tog purl 2 sts together. As purling - insert the needle from right to left in front of the work this time into the next two stitches with the yarn at the front. Wrap the yarn around the right-hand needle in front of the work counter clockwise as you did for purl' Draw the loop through the two stitches, then slide the remaining stitch off the needle. One stitch decreased. Skpo slip stitch, knit a stitch then pass the slipped stitch over - a simple decrease sometimes used with K2 tog to give an even and balanced decrease at the ends or within a row. Simply work up to where the decrease is to be, for example: K5, skpo, k3 - knit 5 sts, slip the next stitch by inserting the right needle into the stitch as if to knit and moving it over to the right needle without winding the working yarn around it, knit the next stitch (a), then with the left needle, pick up the slipped stitch from the right needle and pass it Over the knitted stitch (a) and off the needle to lose' a stitch. One stitch decreased. Straight stitches are worked with a sewing or yarn needle. Simply take the threaded needle, secured on the wrong side, from the back to the front of the fabric, work even or random small or medium straight line stitches in the direction shown either from a template or referring to photographs. Yo yarn over - to work this simple increase - usually within a lace pattern - wind the yarn once over the needle from the back then Over, from right to left, the right-hand needle, knit the next stitch. W+t Wrap and turn. Bring yarn to front of work between needles, slip next st to right-hand needle, bring yarn around this st to back of work, slip st back to left-hand needle, turn work to begin working back in the other direction. Printer friendly versions. pages 14 - 17, follow: FINISHED SIZE to fit Dot Pebble's Knitted Baby Doll YARN 50gm ball Aran (worsted) weight in MC actual meterage 94m/ 103yds Shown in MC (main colour) - Rooster Almerino Aran in shade 305 Custard NEEDLES pair size 4%mm (US size 7) needles TENSION 21 stitches and 28 rows counted over a 10cm/ 4in square working stocking stitch in main colour and using size 4%mm (US size 7) needles NOTIONS length ribbon or tape for the ties at the back, stitch holder or spare needle for holding stitches that are not in use, press stud fastener, button. Special instructions and abbreviations can be found at tbe end of tbe patterns
Baby Bear
Body front
Using 4%mm (US size 7) needles cast on 26 sts. Work 2 rows garter st, so ending with a WS row. Begin with a K row, work 10 rows st st.
Add pattern
Row 13 K11, p4, k11. Row 14 P10, k6, p10. Row 15 K9, p8, k9. Row 16 P8, k10, p8. Row 17 K8, p10, k8. Row 18 P7, k12, p7. Row 19 K7, p12, k7. Repeat last 2 rows once more. Row 22 P7, k12, p7. Row 23 K8, p10, k8. Knitted babies #FREEBEE pattern page 2 Row 24 P8, k10, p8. Row 25 K9, p8, k9. Row 26 P10, k6, p10. Row 27 K11, p4, k11. Work 3 rows st st.
Sleeves
Cast on 20 sts at beg of next 2 rows. 66sts Work 6 rows st st.
shape neck
Row 39 K27, bind off centre 12sts for Neck, k to end. 54sts Work on each set of sts in turn.
Right sleeve
Row 40 P27 to neck edge. Row 41 (dec) K2, k2tog tbl (through back loops), k to end of row (sleeve edge).26sts Work 3 rows st st.
Centre back opening
Row 45 (inc) Cast 0n 7 sts, k33 sts to end. Work 5 rows st st, so ending with a p row. Cut yarn, leave sts on a stitch holder or a spare needle.
Right sleeve
WS facing, rejoin yarn to 27 sts for Left Sleeve. P to sleeve edge. Row 41 (dec) K to last 4 sts, k2tog, k2 (neck edge). 26sts Work 2 rows st st.
Centre back opening
Row 44 (inc) Cast 0n 7 sts, p33 sts to end. Work 6 rows st st.
Join both halves
Row 51 (dec) K32 sts from Right Side, k32 sts from Left Side. 65stS Knitted babies #FREEBEE pattern page 3 Work 5 rows st st, so ending with a p row. Bind off 20 sts at beg of next 2 rows. 26sts Work 28 rows st st. Work 2 rows garter st. Bind off. Mattress seam sides and underarm seams. Sew press stud fastening to the centre of the cast on/ bind of edges to create a closure at the legs. Sew ties at back of neck opening.
Bonnet
Using 4%mm (US size 7) needles cast on 52 sts, leaving a long tail end. Work 2 rows garter st, so ending with a WS row. Begin with a K row, work 13 rows st st. Row 16 P12, k1, p3, k1, p18, k1, p3, k1, p to end - to place markers for ear positions(\*).
Shape back
Row 17 (dec) K1, [k8, k2togl 5 times, k1. 47sts Row 18 P. Row 19 (dec) K1, [k7, k2tog] 5 times, k1. 42sts Row 20 P. Row 21 (dec) K1, [k6, k2togl 5 times, k1. 37sts Row 22 P.
Divide back
Row 23 (dec) K1, [k5, k2tog] twice, k3, turn.
Left back
Row 24 (dec) P2tog, p14. 15stsRow 25 (dec) K1, [k4, k2tog] twice, k2. 13sts Row 26 (dec) P2tog, p11. 12sts Knitted babies #FREEBEE pattern page 4 Row 27 (dec) K1, [k3, k2togl twice, k1. 10sts Bind off 10sts p-wise.
Right back
Row 23 (dec) RS facing, rejoin yarn to 19sts from Right back; k2, k2tog, [k5, k2tog] twice, k1. 16sts Row 24 (dec) P to last 2sts, p2tog. 15sts Row 25 (dec) K2tog, [k4, k2togl twice, k1. 12sts Row 26 (dec) P to last 2sts, p2tog. 11sts Row 27 (dec) K3, k2tog, k to end. 10sts Bind off 10sts p-wise. RS tog, join, working back st seam, the bind off edges. Turn out to RS. Join in mattress seam the rows ends at Back Divide.
Bear's ears make 2 alike
Using 4%mm (US size 7) needles cast on 8sts. Work 2 rows st st. Row 3 K6, w+t. Row 3 P4, w+t. Row 3 K3, w+t. Row 3 P2, w+t. Row 3 K1, w+t. Row 3 P4. Row 3 (dec) [Skpo] 4 times. 4sts Row 3 (dec) [P2togl twice. 2sts Cut yarn, thread end through rem 2sts, pull up tight and weave in end. Join ears with cast on ends to top of bonnet, curving ears between markers(\*). Make a loop from the tail end at cast on, work a buttonhole stitch over this loop if wished. Sew a button to the other side at bonnet front.


