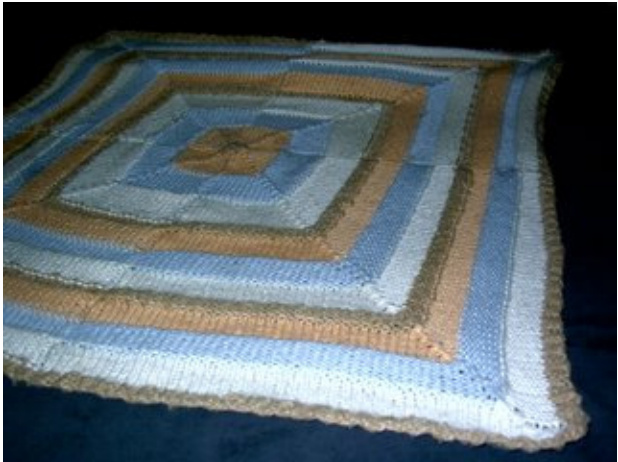
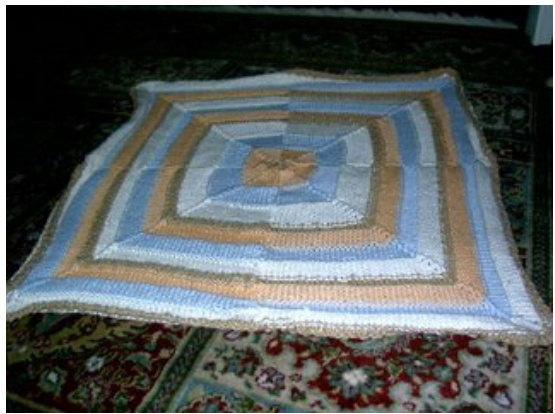
I've finished the first of my summer projects, the mitered baby blanket. I love the optical ilusion of the miters and ridges, it is the same front and back, and its easy to make! The whole thing is knitted in the round without any seams too! Mitered Baby Blanket Makes a 30"x30" square blanket Yarn: Worsted Weight, 4 Colors, 600 yards total I used: Blue Sky Cotton in Color 1: Nut (10oyds) , Color 2: Bone (200yds), Color 3: Sky (150 yds) , Color 4: Circus Peanut (150 yds) Needles: US 8, 36 inch circular, 24 inch circular, double points (Or size needed to obtain gauge) Gauge: 3.5 stitches per inch 8 Stitch Markers Note: The stitch markers will constantly be moved due to the shrinking nature of the blanket. Move Marker (MM): Slip stitch, remove marker, slip stitch back to left and place marker again (Marker moved 1 stitch to the right) SSKP (Left Slanted Double Decrease): Slip 2 stitches, Knit 1, Pass 2 Slipped stitches over. Cast on 400 stitches in Color 1, Placing a marker every 50 stitches. (see note below) Join, being VERY careful not to twist. (There are a lot of stitches so double check!) Markers 1,3,5 and 7 are your corners, they are where all the decreases will occur, these markers keep moving. Markers 2,4,6, and 8 are in the middle of the sides (Marker 8 ends the round) They are stationary and indicate where to switch from knit to purl.
Round 1:
K1P1 to 1 stitch before 1st marker, MM, SSKP K1P1 past next Marker (this is a side Marker) K1P1 to 1 stitch before 3rd Marker, MM, SSKP Continue to MM and SSKP at 5th and 7th Markers. Round 2: K1P1 around Round 3: Same as round 1 Round 4: K1P1 around Switch to Color 2, work 8 rounds as follows: Round 1,3,5,7: Knit to 1 stitch before 1st Marker, MM, SSKP, Knit to 2nd Marker, Purl to 3rd Marker, MM, SSKP, Purl to 4th Marker, Knit to 5th Marker, MM, SKP, Knit to 6th Marker, Purl to 7th Marker, MM SSKP, Knit to last Marker. Rounds 2,4,6,8: K to 2nd Marker, P to 4th Marker, K to 6th marker, P to 8th Marker. 8 Rounds of Color 2 completed. Switch to Color 3, Work 8 rounds as follows: (Knits and Purls are switched) Round 1,3,5,7: Purl to 1st Marker, MM, SSKP, Purl to 2nd Marker, Knit to 3rd Marker, MM, SSKP, Knit to 4th Marker, Purl to 5th Marker, MM, SSKP, Purl to 6th Marker, Knit to 7th Marker, MM SSKP, Purl to last Marker. Rounds 2,4,6,8: P to 2nd Marker, K to 4th Marker, P to 6th marker, K to 8th Marker. 8 Rounds of Color 3 completed. Switch to Color 4, work 8 rounds as for Color 2 Switch to Color 1 Work 4 rounds as for Color 3. 32 rows completed. Repeat the Color 2,3,4,1 pattern again. 60 rows Completed. Now is a good time to switch to the 24" Circular.
Continue in the same knit/purl patterns but do 12 rows each of colors 2, 3, and 4 switching to double points after color 3. Finish with rows of Color 1 until you have 16 stitches remaining. K2tog every stitch around. Cut your yarn leaving an long tail and use a yarn needle to thread it through the remaining stitches to finish. Sew in any ends and block! $\mathbf{1}/\mathbf{8}/\mathbf{o8}$ Note on Cast-on: This MAY make more sense with 404 stitches. Using 1 stitch in each corner as the 'turning' stitch. You would then place the markers alternating between 50 and 51 stitches. This will add 4 extra stitches every round as you go. Note of finish: The original pattern called for decreasing to 4 stitches, this makes a bit of a puckered point in the center. I have changed it to do a big decrease at the end instead. This should make a smoother center.


