FiBERSPACE
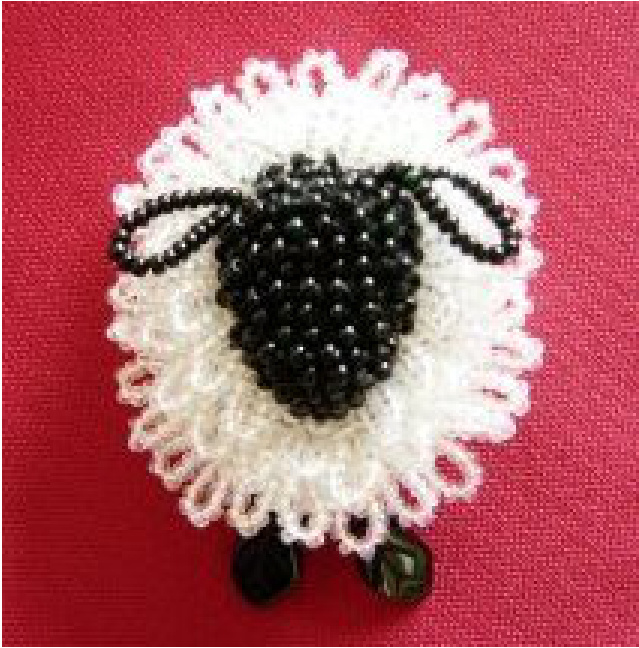
Sheep Pin P-24 A bead knitted sheep pin looks good on a lapel or even a felted hat! Easy to knit and assemble. Finished size: 1%" wide x 21%" tall
Materials
Size 8 DMC perle cotton, 1 ball white, approx 5ydsblack Size 11 seed beads in crystal AB, %2 strand black opaque US Size 0000, 1.25mm double pointed needles Black glass leaves or drops (side drilled) for legs Small amount of black fleece or yarn Small sewing needle for seams Beading needle, black bead string Oval bead screen pin finding (30 x 40mm) Gauge: 10 sts & 13 rows/1" in beaded knitting
Techniques
Transferring Seed Beads To Cotton For best results, place the hank of beads on a cookie sheet or something similar to catch “runaways". Carefully separate one end of one strand from the hank. Tie a knot around the last bead in the strand and remove the other end from the hank. This will keep the beads from slipping off the end. Unwind 3-4 yards of cotton and leave attached to ball. Tie (one tie only, do not knot) the unknotted end of the bead string to the cotton, about %2"-1" from the end. Gently slide the beads from the strand, over the tie and onto the cotton. Transfer short sections of beads and move them down the full length of the cotton. If a bead will not go over the tie, undo the tie and remove the bead. As the work progresses, continue to gently slide the beads down the length of the cotton. Beaded Knitting (Kslip, a.k.a., Slip/slide 1 bead, k1) - Insert the needle into the st to be knit, slide one bead up against needle and knit the st. This technique is used when knitting on the wrong side (WS) and results in bead placement on the right side (RS). inc - increase. Knit in the front and the back of the next st. skp - slip, knit, pass. Slip the next st as if to purl, knit the following st, pass the slipped st over the knit st. To skp with beads, slip the next st as if to purl, Kslip the following st and pass the slipped st over the knit st. w&t - wrap & turn. Slip the next st purlwise, bring the yarn forward and return slipped st back to left hand needle. Turnwork.
Exception: Do not slip the first st on rows beginning with inc or skp. 2) All RS rows are worked without beads, i.e., Slip 1, \*k\* across, unless otherwise noted. 3) All WS rows are worked with beads, i.e., Slip 1, \*Kslip\* across (in other words: slip 1 st, \*slide 1 bead, k1 st, rep \* across).
Head/Body
Transfer 212 strands of crystal seed beads to white cotton. Cast on 60 sts, leaving an 8" tail. Row 1: (RS) Knit across all stitches, do not slip the first st. Row 2: Slip 1, Kslip (i.e., slide 1 bead, knit 1 st) across. Row 3: Slip 1, skp, k to last 3 sts, skp, k1. (58 sts) Row 4: Slip 1, k1, \*Kslip 9 beads, k1, rep \* across. Row 5: Slip 1, k5, skp, k2, skp, k9, skp, k2, skp, k4, skp, k2, skp, k9, skp, k2, skp, k rem sts. (50 sts) Row 6: Skp, Kslip to last 2 sts, skp. (48 sts) Row 7: Slip 1, k3, skp, k2, skp, k7, \*skp, k2\*, rep \*\* twice, skp, k7, skp, k2, skp, k rem sts. (40 sts) Row 8: Repeat Row 4. Row 9: Skp, k1, skp, k3, skp, k4, skp, \*k3, skp, rep \* once, k4, skp, k3, skp, k1, skp. (31 sts) Row 10: Repeat Row 6. Row 11: Skp, k to last 2 sts, skp. (29 sts) Row 12: Repeat Row 4 to last st, k1. Bind off loosely as follows: skp, bind off until 16 sts rem, k the next 4 sts (5 sts rem on needle), continue bind off to end of row. Cut cotton leaving 10" tail and bring tail through last st.
Face/Ears
NOTE: Keep a close watch on the edge beads. They have a tendency to slip around to the WS. Make sure that the beads from the previous row(s) stay on the RS when beginning and ending rows. Transfer 1%2 strand of opaque black seed beads to black cotton. With WS facing, attach black cotton on WS next to the rem 5 sts. Row 1: Slip 1, \*Kslip\* across. Row 2: Slip 1, \*k\* across. Row 3: Repeat Row 1. Row 4: Inc, k to last st, inc. (7 sts) Row 5: (Ears) Slide 21 beads to edge of head, k into the back of the first st (one ear complete), Kslip 1 bead across to last st, slide 21 beads, k last st (second ear complete). Row 6: Slip 1, \*k1, inc, rep \* once, k2. (9 sts) Rows 7, 9, 11, 13, 15: Slip 1, \*Kslip\* across. Row 8: (short rows) Inc, k3, w&t, Kslip to end of row, turn, slip 1, k to last st, inc, turn, slip 1, Kslip 5 sts, w&t, k to end of row. (11 sts) Row 10: Slip 1, k4, inc, k to end of row. (12 sts) Row 12: Slip 1, k8, w&t, Kslip 6 sts, w&t, k to end of row. Row 14: Skp, k7, w&t, Kslip 6 sts, w&t, k to last st, skp. Row 16: Repeat Row 10. (11 sts) Row 17: Skp with bead (see Techniques), Kslip 6 sts, w&t, k4, w&t, Kslip to last 2 sts, skp with bead. (9 sts) Row 18: Slip 1, skp, k to last 3 sts, skp, k1. (7 sts) Rows 19, 21,23, 25: Slip 1, \*Kslip\* across. Row 20: Slip 1, k2, skp, k to end of row. (6 sts) Row 22: Slip 1, \*skp, rep \* once, k1. (4 sts) Row 24: \*Skp, rep \* once. (2 sts) Row 26: Skp. (1 st) Cut cotton leaving 10" tail and bring tail through last st.
Assembly
With small needle, sew lower edges of Head/Body section together. Do not trim tails. With black tail from Face/Ears section, sew face to cast off edge of head. Do not trim tails. Lightly fill face with black fleece or soft black yarn. Center piece on bead screen, curved side of screen (RS) facing. Use black tails to secure face to center of screen, sewing through screen and back out to the RS edges of face. Work around face edges until secure, tucking any tails from stuffing under face. Knot on WS side of screen. Use white tails to sew outside edge of Head/Body to edge of screen. Keep screen edge and cast on edge parallel. Work in any excess. Bring tails to WS of screen. Knot and trim. Determine location for feet. Using doubled strand of bead string and beading needle, sew through previous stitching for head on WS of screen. Knot securely. Bring needle to outside edge of screen. \*With beading needle, pick up 3 black seed beads, 1 leaf/drop, 3 black seed beads and attach to screen edge. Bring needle to WS of screen. Backstitch and knot securely\*. One foot completed. Stitch over to location of second foot and repeat \*\*. Work in tails. Insert completed piece into pin back, making sure that the top of the head is at the hinge end of the pin. With needle nose pliers, carefully bend prongs around edge of screen. Bend each prong slightly to position the screen correctly. Take care to work prongs between the edges of the head and the screen before making the final bend. Tighten prongs. Admire a job well done.
P-24
2007. FiberSpace. All rights reserved. Linda Taylor, Skip Taylor POBox765 Sterling CO 80751 www.fiberspacepatterns.com


