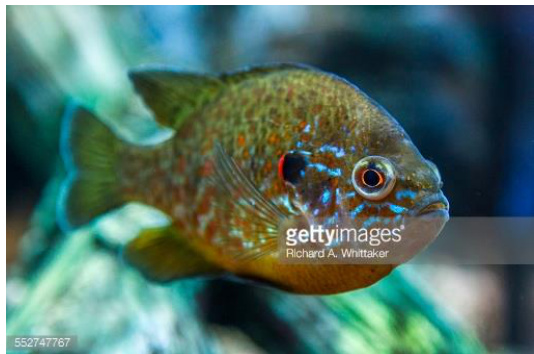
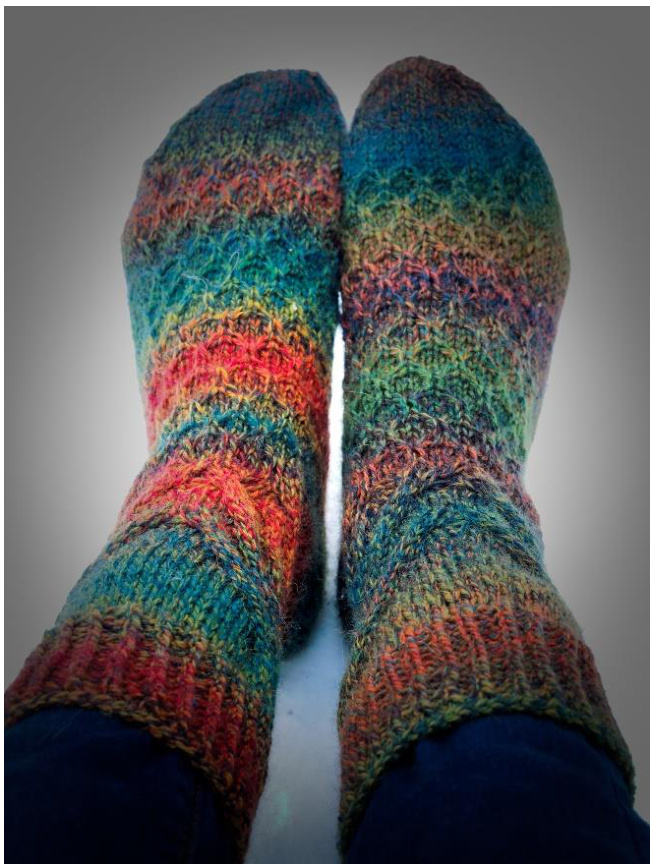
Sunfish
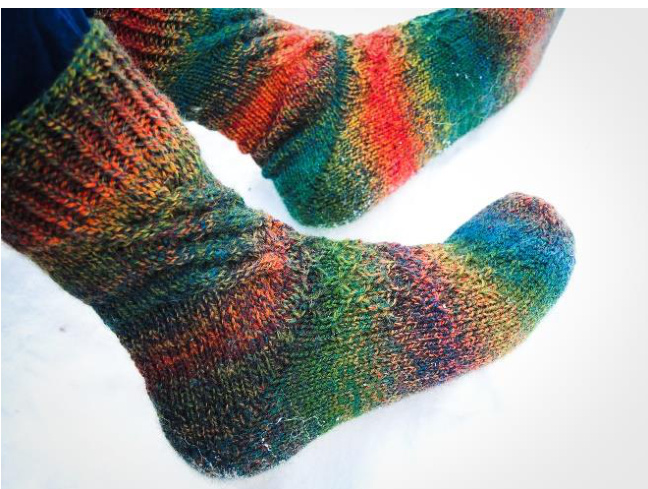
These socks were inspired by the beautiful freshwater common sunfish, also called “pumpkinseed" fish, commonly found throughout the Great Lakes area of the United States. Their cheery red, yellow, and green markings flash as they forage for snails and insect larvae along shallow lake edges.
Materials:
Approximately 80-100 grams of fingering weight yarn °2.25mm (US 1) needles 6 stitch markers o1 cable needle or locking stitch marker owaste yarn in another color and tapestry needle for lifelines (optional) ·Copy of “Fish Lips Kiss" heel pattern by Sox Therapist, available for download on ravelry, or heel construction of your choice Stitch abbreviation key: st: stitch \*\*: repeat pattern between asterisks k: knit p: purl mlr: make one right—using left needle, lift the bar between the previous and next stitch from the back and knit into the front of the stitch. mll: make one left—using the left needle, lift the bar between the previous and next stitch from the front and knit into the back of the stitch (ktbl). sl3wyif: slip 3 with yarn in front—move the yarn to the front of the work as if to purl. Slide 3 stitches from the left needle to the right without twisting the stitches (do not slip as if to knit, just slide the stitches from one needle to the other). This will form a “loose' strand across the front of the work. kluls: knit 1 under loose strands-knit 1 stitch by first sliding the right needle under the 2 strands created by the sl3wyif stitch in previous rows. Knit into the next stitch on the left needle, pulling the stitch back under the 2 loose strands, so that the strands are now pulled up and held in place by this stitch. (There are video tutorials online if this is confusing—see “mock honeycomb stitch"). C6B: cable 6 back—place 3 stitches on a cable needle or on a locking stitch marker and move to the back of the work. K3. Then knit the 3 stitches off of the cable needle/stitch marker. C6F: cable 6 front—-place 3 stitches on a cable needle or on a locking stitch marker and move to the back of the work. K3. Then knit the 3 stitches off of the cable needle/stitch marker. ktbl: knit through the back loop k2tog tbl: knit 2 together through the back loop p2tog: purl 2 stitches together ssk: slip slip knit—slip the first stitch to the right needle as if to knit, slip the second stitch to the right needle as if to knit, insert the left needle into the front of both stitches, and then knit the two slipped stitches together by pulling the yarn through the back with the right needle. These socks are knit toe-up and are not left or right foot specific, so you can easily knit two-at-a-time. Two sizes: Small (Medium) No gauge is given, I recommend increasing until you reach the size appropriate for your feet and the yarn you are using. More instructions for choosing a size are provided below in the pattern. Casting on: Cast on 16 sts using Judy's Magic cast on K1 round Toe: Place marker at the start of the round and after 28(32) sts; the first 28(32) sts will become the top of the foot and the last 28(32) will become the sole of the foot. \*k1, m1r, k to last stitch before marker, m1l, k1\* x2 -repeat 3 times, to a total of 32 stitches 1.k all stitches 2.k1, m1r, k to last stitch, m1l, k1 Repeat rows 1 and 2 until you have 56 (64) sts. Tip: Increase to 56 sts (small size) and then try the sock on over your toes. If the 56 sts fits across the tips of your toes, this should be the appropriate size for you. If the sock is not wide enough to reach across all 5 toes, increase to 64 sts. I like my socks to fit a but snug in the toes, so I only increase until the socks reach across the very tips of all 5 toes; if you do not like negative ease around your "toe knuckles", then continue to increase to 64 sts. Foot: k14(16), insert one stitch using backward loop increase method, k14(16) (Backward loop increase: holding the yarn between the thumb and forefinger of your left hand, twist your hand clockwise, forming a loop with the yarn, and place loop on right needle.) Stitch count will now be 29/28 (33/32) top/sole. Work fish scale pattern below on the top of the foot [first 29(33) sts] and stockinette stitch (k all sts) on the sole [last 28(32) sts]. 2.k1 \*sl3wyif, k1\* x 7(8) 3.k 4.k1 \*sl3wyif, k1\* x7(8) 5. k 6. k2 \*k1uls, k3\* x7(8), k2 7. k 8.k3 \*sl3wyif, k1\* x6(7), k2 9.k 10.k3 \*sl3 wyif, k1\* x6(7), k2 11.k 12.k4, \*k1uls, k3\* x6(7), k1 Tip: keep tension even on sole (stockinette sts) but knit a bit looser across the top, fish scale pattern. Because some rows have slipped stitches, the top may get shorter in length than the sole. A small amount of difference is expected (2.5 cm/1 inch), but the difference can be reduced by loosening your tension when knitting the odd rows across the top of the foot and keeping your tension even across the sole. Repeat rows 1-12 until foot reaches ankle hinge as indicated by FLK heel pattern (I started the heel when the sole sts reached just over the line, even though the instep sts had not quite reached the line yet). You may start the heel at any point in the scale pattern (anywhere between rows 1-12); you can finish the scale repeat you are on after completing the heel. Heel: For the small size only: before starting the heel, knit one sole stitch and place marker. Also add a marker before the last sole stitch on the other side of the sole side, s0 that you have 29/1/26/1 stitches separated by markers. Proceed to “Fish Lips Kiss Heel" instructions, knit heel. (Pattern By Sox Therapist, available on Ravelry—can follow the link from the pattern page). For the small size only: after knitting the FLK heel, remove the markers separating the single sole stitches omitted from the heel. You now should have 29/28 front/back sts again.
Leg:
Finish the scale repeat that you were working on before you started the heel before proceeding to the tail fin pattern below (for example, if you started the heel on a row 6 of the fish scale pattern, complete the fish scale pattern through row 12 before beginning the instructions below). For the medium size only: knit the following sequence before proceeding to Row 1 of the leg: \*k all odd rows (med1,3,5). med2. k5 \*sl3wyif, k1\* x6, k4 med4. k5 \*sl3wyif, k1\* x6, k4 med6. k6 \*k1uls, k3\* x6, k3 Here you are narrowing the fish body before starting the tail: Row1.k Row2.k5(7) \*sl3wyif, k1\* x5, k4(6) Row3.k Row4.k5(7) \*sl3wyif, k1\* x5, k4(6) Row5. k Row6. k6(8) \*k1uls, k3\* x5, k3(5) Row7. k Row8. k7(9), \*sl3wyif, k1\* x4, k6(8) ① Alexandria Wenninger, wee ewe knits, 2015 Row9. k Row10. k7(9), \*sl3wyif, k1\* x4, k6(8) Row11.k Row12. k8(9), \*k1uls, k3\* x4, k5(7) Row13. k Row14. k9(11), \*sl3wyif, k1\* x3, k8(9) Row15.k (Now you will begin the fish tail cables, continue knitting stockinette across the back of the leg.) (Tip: if you are adding lifelines so that you can remove your sock from the needles to try it on, do NOT add lifelines in any cable rows or in any rows just before a cable row. The lifeline will get twisted around in the cables and will become very tight, making your sock seem much tighter than it actually is. Add lifelines loosely in stockinette rows not preceeeding a cable row.) (lf your ankles/calves are wider than the widest part of your foot, you may need to add increase stitches to the socks. Add sts either after the markers on the back of the sock or in the center, back of the sock. Make sure your lifelines are not the cause of the tightness in the sock before adding sts.) Row16. k2(4), C6B, \*k1, sl3wyif\* x3, k1, C6F, k2(4) Row17. small: k. on back of the leg, k to last st before marker. proceed to directions for next row (med: k all sts) Row 18. (med:k1) C6B, k5, \*k1uls, k3\* x3, k2, C6F (k1) [For small size, you will need to use 1 sole stitch to complete C6F; just slide the marker to one st after the cable, so that you now have 31 sts across the top and 26 sts across the back of the leg.] Row19. k14(16) sts, k2tog, k15(17). k across back of the leg until 3(2) sts before marker. Place these 3(2) sts on cable needle as start of C6B. Slide marker indicating start of row to right needle. Stitch count is now 34/22 (34/30) front/back. Row20.FinishC6Bstarted atendoflastrow.C6B x2, C6Fx3. You will have to use 3(2) sts from the back of the leg to complete last C6F. Slide marker to after the last C6F when finished. K back stitches. Stitch count is now 36/20(36/28) front/back. (Tip: k stockinette rows with slightly less tension to give the cables some elasticity). Row21-22.k Row 23. k to 3 before end of round. Use these last 3 sts to start C6B, sliding the marker to before the first C6B. Row 24. C6B x3 (using 3 sts from last round), k6, C6Fx3 (using 3 sts from back of leg, moving marker to after last cable). k back sts. Stitch count is now 42/14(42/22) front/back. Row25-27: k Row28: k3, C6B x3, C6Fx3, k3, k to end Row 29-31.k Row 32: C6Bx3, k6, C6Fx3, k to end Row 33-35.k Row 36: k3, C6B x2, k12, C6Fx2, k3, kto end Row37-39.k Row 40. C6Bx2, k18, C6Fx2, k to end Row41-46. k Cuff:
Work 1x1 twisted rib for 15 rows (\*k1tbl, p1\*) for a very stretchy cuff. To make a tight cuff (if you have thin calves) in the first row of the rib reduce 4 sts: k2tog at start, p2tog at front center, k2 stitches before next marker together, and p2tog in back center. If you would like a looser cuff, try a 2x2 rib.
Bind off:
Bind off using a stretchy bind off. I bound off using ssk bindoff with a size 3 needle, but any stretchy bind off will work. (For ssk bind off: ssk first 2 sts. place st back on left needle. ssk. repeat until one st remains, cut yarn, and pull yarn through loop on last ssk, forming a knot.) Weave in ends (don't forget to weave in the cast on end now buried in the toe!).


