Christmas Tree Decorations By Erssie Major
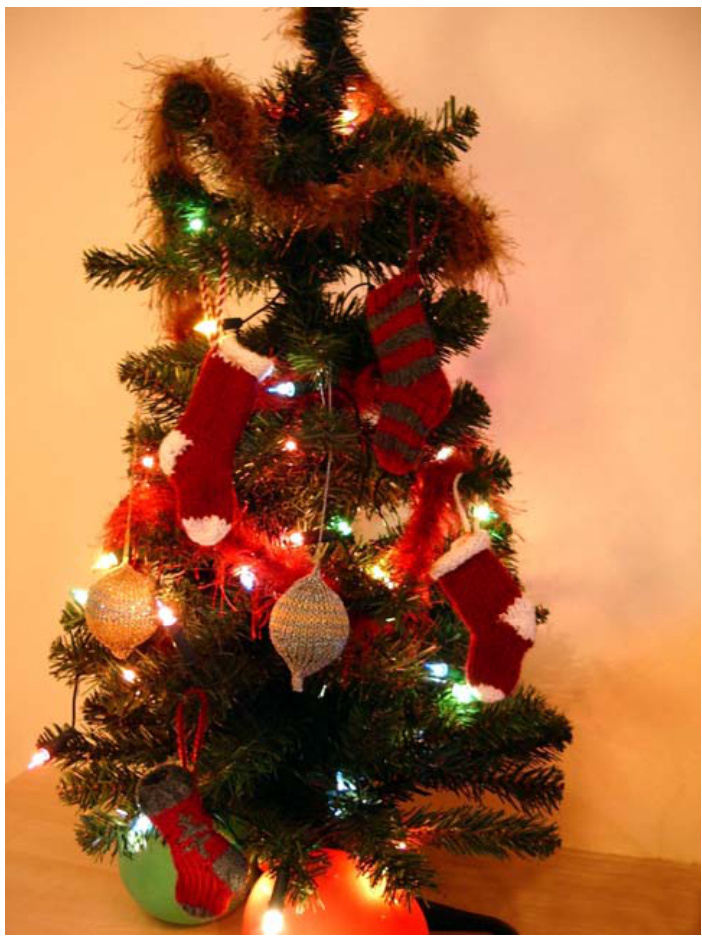
Includes: Gold and Silver Baubles Mini Stockings (3 different designs) Red and Gold Tinsel All of the decorations hanging on the tree can be knitted, even the tinsel which is knitted in a fun fur yarn. The mini stockings are knitted exactly like socks. The Gold and silver baubles are knitted in the round and mini balloons are inflated inside them to make a perfectly round shape, or they can be stuffed.
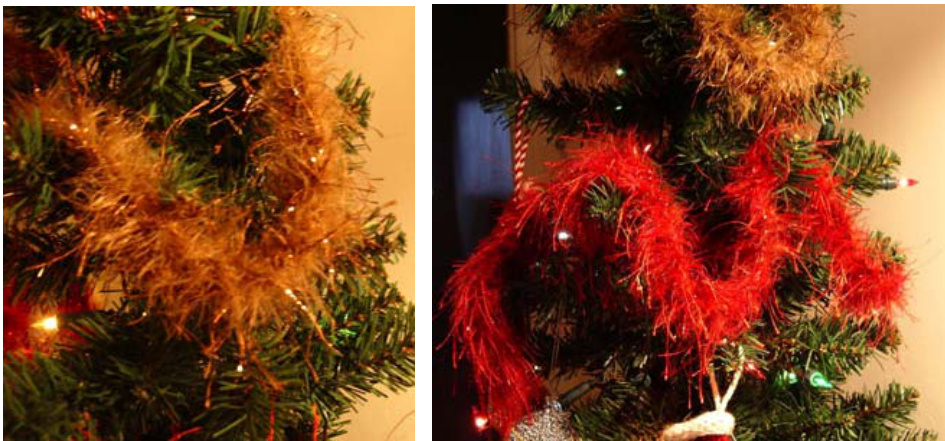
Red and Gold Tinsel
Size
One size. Approx 1.52m (5ft) in length
Materials
Wendy Chic $60\%$ Nylon, $30\%$ Polyester, $10\%$ Metallised Polyester/80m (87 yds) /25g 1 × 25g 254 Dali ( Gold) 1 x 25g 251 Raphael (Red) 1 pair 5mm straight needles (or half size bigger than suggested on ballband) Gauge Not necessary Abbreviations See end of pattern
Tinsel
Cast on 6 sts and K every row until you have a long skinny 'scarf' that can be wrapped around a tree (approximately 5 feet long).
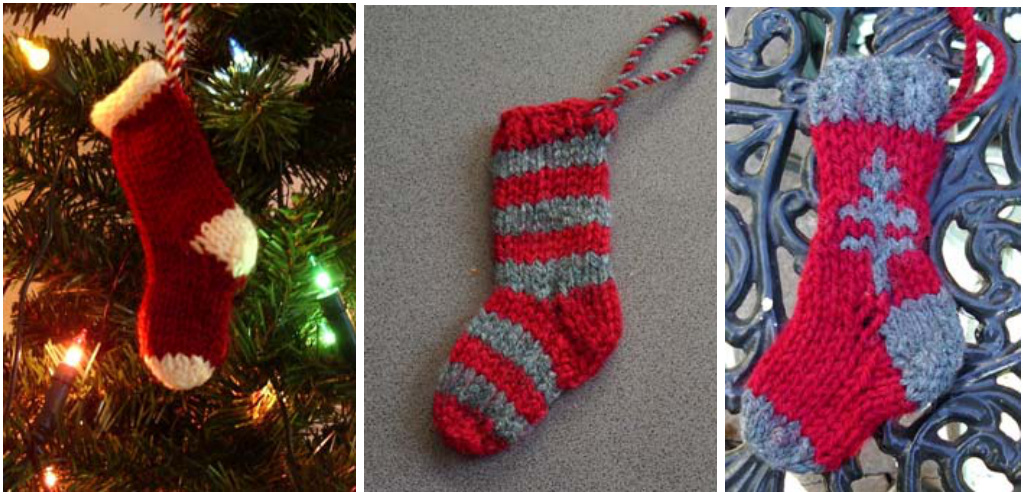
Christmas Mini Stockings
Size One size
Materials
Any Aran/worsted weight yarn Oddments of Red, Green, Cream A set (5) 3.5mm double pointed needles Gauge Not necessary Abbreviations See end of pattern
Red and Cream Santa Stocking
Using 3.5mm dpns and Cream Aran/Worsted yarn cast on 16 sts and divide between 3 dpns Knit 6 rnds Change to red and Kt 16 rnds Start heel flap as follows Turn and slip 8 sts purl wise onto one needle Join Cream and purl across these sts Row 1 Turn sl1 purl wise K7 Row 2 Turn sl1 purl wise P7 Repeat rows 1 and 2 once more (i.e. 5 rows in Cream for heel flap) Turn heel as follows K5 SSK turn P3 P2tog turn K3 SSK turn P3 P2tog turn (4sts left) Instep Slip first 2 sts on spare needle\* Cont in Red Next needle: K2 PU and K 4 sts from side of heel flap Next needle: K8 across stitches on 2 needles Next Needle: PU and K 4 sts side of Heel flap and K2 sts from spare needle\* You should now have: Needle $1=6\mathtt{s t s}$ (side of heel/bottom of sock) Needle $\scriptstyle2\;=\;8$ sts (top/front of sock) Needle $3=6$ sts (side of heel/bottom of sock)
Shape instep
Cont in RED K one rnd finish at end of needle 3 Next rnd: K3 K2tog K1, K8, K1 SSK K3 Next rnd: K2 K2tog K1, K8, K1 SSK K2 (16sts) Continue to K in rounds on these 16 sts until there are 10 rows from heel in Red
Shape Toe
Join Cream and K1 rnd Rearrange stitches if necessary so that you have: Needle 1 (bottom foot) 4 sts Needle 2 (top foot) 8 sts Needle 3 (bottom foot) 4 sts Next rnd: (cont in Cream) K1 K2tog K1, K1 SSK K2 K2tog K1, K1 SSK K1 Next rnd: K in Cream Next rnd: K2tog K1, K1 SSK K2tog K1 SSK (8 sts) K2 sts so that you have 4 sts at bottom with yarn tail and 4 sts top of foot. Cut yarn leaving a long tail. Thread on needle and gather stitches or for a neater toe and a traditional sock finish graft using Kitchener stitch (see end of pattern) Weave all yarns to inside of stocking.
Finishing
Make a twisted cord or cut a piece of yarn for hanging loop. Alternatively crochet a chain to use for a hanging loop. Attach hanging loop to top of sock and hang on tree.
Red and Green Striped Stocking
Using 3.5mm dpns and Red Aran/Worsted yarn cast on 16 stitches divide between 3 dpns Knit 4 rounds in K1 P1 rib. Join Green Aran/Worsted yarn and knit in striped pattern of 3 rnds Green then 3 rnds Red for 15 rnds ending after completing a green stripe
Heel Flap
Turn and slip 8 sts purl wise onto one needle Join Red and purl across these stitches. Row 1 Turn sl1 purl wise K7 Row 2 Turn sl1 purl wise P7 Repeat rows 1 and 2 once more (i.e. 5 rows total in Red for heel flap) Turn Heel K5 SSK turn P3 P2tog turn K3 SSK turn P3 P2tog turn (4sts left) Instep Slip first 2 sts on spare needle\* Next needle: K2 PU and K 4 sts from side of heel flap Next needle K8 across stitches on 2 needles Next Needle PU and K 4 sts side of Heel flap and K2 sts from spare needle\* You should now have: Needle $\mathsf{I}=\mathsf{\Omega}$ 6sts (bottom sock) Needle $z=8$ sts (top sock) Needle $3=6$ sts (bottom sock) Shape Instep Cont in Red, K 1 rnd finish at end of needle 3 Next round K3 K2tog K1, K8, K1 SSK K3 Join Green Next rnd: K2 K2tog K1, K8, K1 SSK K2 (16sts) Con to K in rounds of 3 rounds Green and 3 rounds Red striped pattern until there 4 stripes for top of foot have been completed ShapeToe Join Red and K 1 round Rearrange stitches if necessary so that you have Needle 1 (bottom foot) 4 sts Needle 2 (top foot) 8 sts Needle 3 (bottom foot) 4 sts Next rnd: Cont in Red K1 K2tog K1, K1 SSK K2 K2tog K1, K1 SSK K1 Next rnd: K in Red Next rnd: K2tog K1, K1 SSK K2tog K1 SSK (8 sts) K2 sts so that you have 4 sts at bottom with yarn tail and 4 sts top of foot. Cut yarn leaving a long tail. Thread on needle and gather stitches or for a neater toe and a traditional sock finish graft using Kitchener stitch (see end of pattern) Weave all yarns to inside of stocking. Make a hanging loop from twisted cord or yarn loop
Red and Green Stocking with Christmas Tree Motif
Using Green cast on 16 sts divide between 3 dpns K 4 rounds K1 P1 Rib Change to Red and K 2 rnds K 10 rounds from Christmas Tree Chart (at end of stockings pattern) K 4 rounds in Red Start heel flap as follows Turn and slip 8 sts purl wise onto one needle. Join green and puri across these stitches. Row 1 Turn sl1 purl wise K7 Row 2 Turn sl1 purl wise P7 Repeat rows 1 and 2 once more (i.e. 5 rows in green for heel flap) Turn heel as follows K5 SSK turn P3 P2tog turn K3 SSK turn P3 P2tog turn (4sts left)
Slip first 2 sts on spare needle\* Cont in Red
Next needle: K2 PU and K 4 sts from side of heel flap Next needle K8 across stitches on 2 needles Next Needle PU and K 4 sts side of Heel flap and K2 sts from spare needle\* You should now have: Needle $\mathsf{I}=\mathsf{\Omega}$ 6sts (side of heel/bottom of sock) Needle $\scriptstyle2\;=\;8$ sts (top/front of sock) Needle $3=6$ sts (side of heel/bottom of sock)
Shape Instep
Continuing in RED K one round finish at end of needle 3 Next rnd: K3 K2tog K1, K8, K1 SSK K3 Next rnd: K2 K2tog K1, K8, K1 SSK K2 (16sts) Continue to K in rounds on these 16 sts until there are 10 rows from heel in RED.
Shape Toe
Join green and knit one round Rearrange stitches if necessary so that you have Needle 1 (bottom of foot) 4 sts Needle 2 (top of foot) 8 sts Needle 3 (bottom of foot) 4 sts Next rnd: cont in Cream K1 K2tog K1, K1 SSK K2 K2tog K1, K1 SSK K1 Next rnd· K in Cream Next rnd: K2tog K1, K1 SSK K2tog K1 SSK (8 sts) K2 sts so that you have 4 sts at bottom with yarn tail and 4 sts top of foot. Cut yarn leaving a long tail. Thread on needle and gather stitches or for a neater toe and a traditional sock finish graft using Kitchener stitch (see end of pattern) Weave all yarns to inside of stocking. Make a hanging loop from twisted cord or yarn loop
Making up
If these stockings are purely for decoration you may wish to save time by threading yarn ends to wrong side of work but not weaving them in.
Hanging Loops
These can be as simple as a single thread of yarn in matching yarn or decorative metallic thread. They can also be made from a crocheted chain. Alternatively you can make a twisted cord as follows. Cut a length of yarn about 3 ft Tie ends of yarn together to make circle of yarn Loop yarn over door handle, chair post, or chair leg. Insert a pencil, pen or dpn into loop at opposite end Pull taught and twist yarn by spinning pencil/pen/dpn Keep twisting until yarn is so tight it is almost pulling back on itself Slide a finger half way along length of twisted yarn still keeping end taught Fold yarn twist in half and put loop/pencil/pen/dpn together with loop over door handle (post or leg). Let go of finger holding halfway mark and allow yarn to twist on itself.
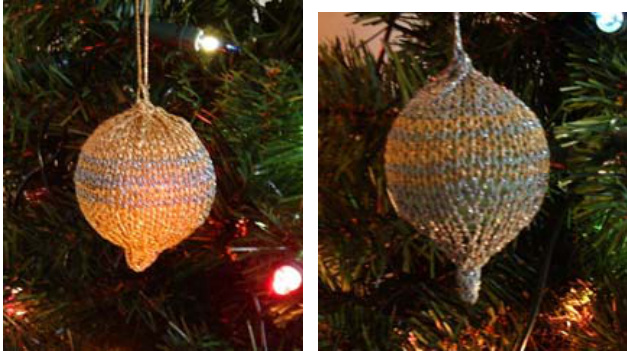
Gold and Silver Baubles
Size One size
Materials
Rowan Lurex Shimmer $80\%$ Viscose $120\%$ Polyester/95m (103yds)/25g $1\times25{\mathrm{g}}$ Silver (MC for Silver Bauble or CC for Gold Bauble) $1\times25{\mathrm{g}}$ Gold (MC for Gold Bauble or CC for Silver Bauble) 1 Set (5) 3mm double pointed needles Toy stuffing OR small ballons for inserting and inflating to sphere shape. Gauge Not necessary
Bauble
Using MC cast on 9 stitches and knit 2 rows Join into a round with 3 sts on each of 3 needles and knit one round. Next rnd: (Inc in $1^{\mathrm{st}}$ st K1 Inc in $3^{\mathsf{r d s t}}$ ) 3 times (15 sts) Next rnd: (K1, Inc in next st, K1, inc in next st, K1) 3 times (21 sts) K 3 rounds Next rnd: (K3 Inc in next st K4) 3 times (24 sts) K 1 round Next rnd: (K3 Inc in next st K3 Inc in next st) 3 times (30 sts) Next rnd: (K4 Inc in next st K4 Inc in next st) 3 times (36 sts) Divide these stitches between 4 needles K 1 round Next rnd: (K3 Inc in next st K 5) x 4 (40 sts) Knit striped bands as follows K 1 rnd CC, K 1 rnd MC, K 2 rnds CC, K1 round MC K1 rnd CC Continue in MC K 4 rounds Start decreasing as follows Before opening gets too small,stuff with toy stuffing as you knit If using a small balloon make sure balloon is inserted with the mouth opening peeking through the opening at this stage Next rnd: K3 K2tog around Next rnd: K2 K2tog around Next rnd: K2tog, around until 8sts remain. Cut yarn, thread through needle and pullstitches tight over stuffing/balloon. If using a balloon, inflate with air until bauble is round shaped. Leave small opening so you can re-inflate balloon if it goes flat. Make hanging loops, or use one strand of yarn to attach to tree
Kitchener stitch
Put half stitches on one dpn and other half of stitches on another dpn Hold stitches parallel to each other with needles side by side and WS together Thread yarn tail through a darning needle and pull needle through 1st stitch on needle at front purl wise and leave stitch on needle Now thread needle and yarn through $1^{\mathrm{st}}$ stitch on back needle knit wise and leave on needle Continue to graft as follows pulling yarn as you go to ensure even stitches \*Front needle knit wise pull stitch off Front needle purl wise leave st on Back needle purl wise pull st off Back needle knit wise leave st on Repeat from \* until all sts off needles and you will have a neatly grafted toe.
Christmas Tree Chart
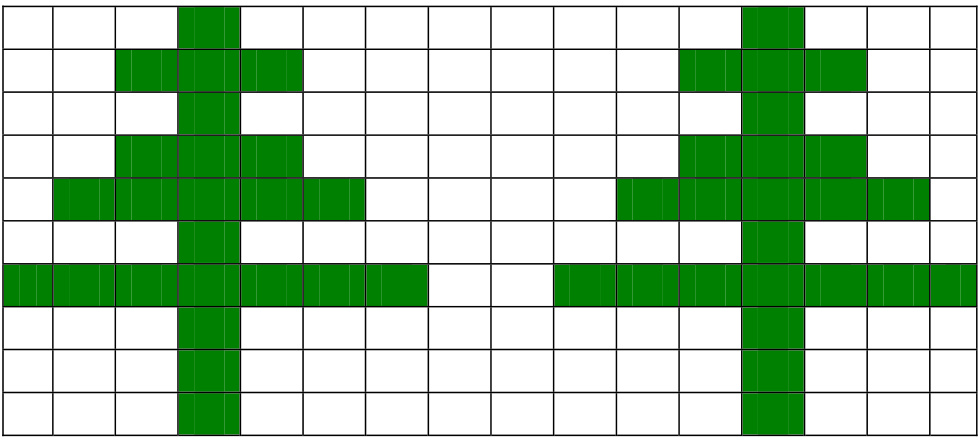
Start from top of chart
K in rnds each $\mathsf{r o w=1}$ rnd stocking stitch Follow chart every row from right to left Knit all the green tree squares in Green Knit the blank background squares in Red E.g. Round 1 would be K3 Red, K1 Green, K8 Red, K1 Green, K3 Red. Round 2 would be K2 Red, K3 Green, K6 Red, K1 Green, K2 Red.
Abbreviations
K - Knit, P - Purl, St - stitch, PU - pick up, K2tog - Knit 2 together P2tog - Purl two together, Dpn - double-pointed needle SSK- Slip (Knit wise) Slip (Knit wise) and Knit together by inserting tip of left needle through and knitting off needle. MC - main colour, CC - contrast colour, WS - Wrong side
Erssie Major has enjoyed knitting and crochet since she was 4yrs old and she loves to write knitting and crochet patterns for on line magazines, print magazines and books. Her blog Skeinspotting: A World of Erssie Knits on her website http://www.erssieknits.com documents her knitting adventures as well as kniting patterns, book and yarn reviews, links to other free patterns and craft community websites and the Erssie Knits gallery. Erssie has a long term chronicillness with disabilities and as such is committed to the idea of knitting as therapy. You can contact her via her email address; erssiemajor@yahoo.co.uk.
US\$3 or GBPE1.50


