Tea for JoJo
A neat small tea cosy for a neat small teapot. Ideal for solitary afternoon tea, when one wishes to be alone with one's tea and one's knitting!
Materials:
For the outer body and inner lining: 2 colours of DK yarn, less than 50m of each. In the example, blue Rooster Almerino DK yarn was used for the lining - I like a dark colour for this as the lining is the most likely to get tea stains. And an undyed Merino Wool blend DK was used for the outer body. For the flowers and leaves: Oddments of fingering weight yarn (in the example, oddments of Renaissance Dyeing Troubadour was used, meaning the tones of the flowers all go together beautifully, but pick whatever colours take your fancy!)
Needles and Notions:
4.50mm (US size 7) needles: either DPNs, 2 x short circulars or 1 long circular 3.50mm (US size E) crochet hook for flowers 3.25mm (US size 3) needles (any you like) for leaves. Tapestry needle Pins
Abbreviations:
| K | - Knit | Kfb | - Knit through the front and back of the same stitch (to increase by one) |
| P | - Purl | YO | -Yarn over |
| K2tog St | -knit 2 stitchestogether - stitch | SSK | - Slip one st, slip another st, knit the 2 together |
| ** | - Repeat instructions between the * for the entireroworround | ||
| S1 | - slip 1 stitch | Ch | - Chain (crochet st) |
| PSSO | - pass slipped stitch over | Tr | - Treble stitch (UK crochet term) |
Pattern:
Lining:
This will be knit from the top down in the round, switching to knitting flat for the side rib sections. With 4.5mm needles and the darker coloured wool, cast on 8 stitches, divide evenly over needles, and join in the round, being careful not to twist the stitches. Round 1 (and each odd number round): Knit Round 2: Kfb into each stitch (16 stitches) Round 4: \*K1,Kfb\* Round 6: \*K2, Kfb\* Round 8: \*K3, Kfb\* Continue in pattern until you have 56 stitches (or have a circle of the same diameter as the top of the teapot you are trying to fit). Divide the stitches into half for knitting flat, and keep one half on a spare needle or lifeline as you knit the other half: Use K1 P1 rib (i.e. \*K1, P1\* for every row) for 3 inches, or the height of your teapot. Cast off in rib pattern, or whichever method you like to produce a stretchy edge. Repeat for the second side of the lining. Alternatively, once you have knit to the base of the spout/handle on the first side of the lining do not cast off, and then switch to the second side, and knit until the two sides match. Then join the two sides and continue to knit in K1 P1 rib in rounds until the desired length (this saves sewing the bottoms of the two sides together underneath the spout and handle).
Body:
This is knit from the base up, beginning in the round, dividing and knitting flat, then joining in the round again. With 4.5mm needles and the lighter coloured wool, cast on 60 stitches. Join to work in the round, being careful not to twist the stitches. Work 6 rounds of K2 P2 ribbing. Work one round of plain knitting (K every st) Divide for working flat. Using stocking st (K one row, P one row) for 2 and 12 inches, or the top of the body of the teapot (not to the top of the lid). Repeat for the second side. Join to work in the round again, and knit 4 rounds plain. Decrease rows: Round 1: \*K8, K2tog\* Round 2 (and every even round): Knit Round 3: \*K7, K2tog\* Round 5 \*K6, K2tog\* Continue in this manner until 6 stitches remain. Use the 6 stitches, and knit an I-cord for 3 inches. Cast off and sew in ends. Knot the I-cord.
Flowers:
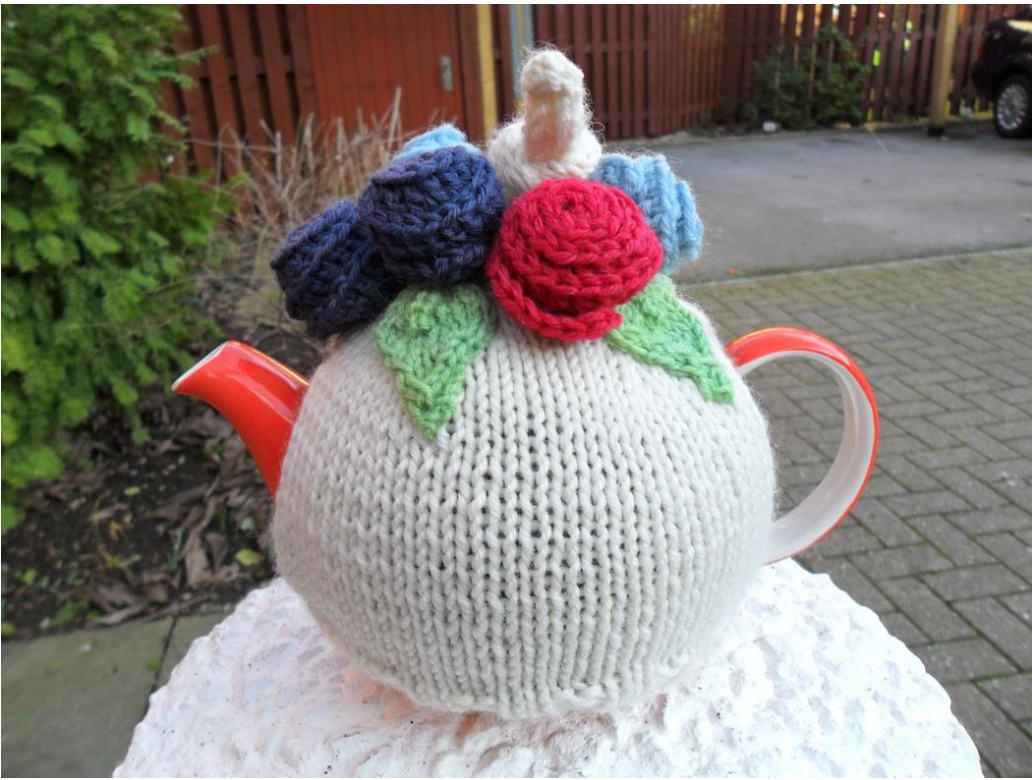
Using the crochet hook and your chosen yarn: Chain53 Row 1: tr into the third chain from hook, tr into every chain. Row 2: Ch3, turn work, \*tr into first st, 2tr into next st\* Fasten off, leaving a 6 inch tail. With the fastened off tail in the centre, roll into a flower shape and using the tapestry needle fix in place. Thread the needle with the fastened off 6 inch tail, and send it down through the centre of the flower to pull in the roll, creating a dip in the flower. Repeat for as many flowers as you need.
Leaves:
With 3.25mm needles and green wool, cast on 5 stitches. Row 1: K2, YO, K1, YO, K2 Row 2 (and every even row): Purl Row 3: K3, YO, K1, YO, K3 Row 5: K4, YO, K1, YO, K4 Row 7: K1, SSK, K5, K2tog, K1 Row 9: K1, SSK, K3, K2tog, K1 Row 11: K1, SSK, K1, K2tog, K1 Row 13: K1, S1, K2tog, PSSO, K1 Row 15: S1, K2tog, PSSO, K1 Cut yarn and pass through last st. Repeat for desired number of leaves.
Finishing:
Sew the two sides of the liner together, leaving enough room for the handle and the spout. Place the liner inside the body of the teapot. Sew the liner to the body round the openings for the handle and spout (I didn't sew the bottoms of the two together, as they will be more stretchy and accommodating for your pot). Pin the flowers and leaves over the teapot before you begin sewing them on, so you can decide the most pleasing arrangement. Once happy, sew the leaves on first, and then the flowers. Put the kettle on and enjoy a very pretty pot of tea! This pattern has been written for personal use, please do not reproduce the pattern or items made from the pattern for commercial use without the express permission of the author.


