Introduction
In the Colorworks by Debi Ravelry group, we have enjoyed monthly knit-alongs (KALs) for three-and-a-half years. We have formed a friendly, fiber-loving community, and we have become friends. It is my pleasure to design patterns for the KALs, and it is my joy to see what the participants do with my designs. As always, they are free to add their own personality to the projects, and they always blow me away with their creativity. As a group, we have knitted the InfiniTAM, InfiniCOWL, InfiniCHRISTMAS, and InfiniCATS patterns. And now, we have worked the ScrapSTASHtic InfiniTUNIC pattern. To be honest, this design didn't originate as an InfiniPATTERN. Rather, I designed it as a way to use up all the left-over fingering-weight yarns we have accumulated over the years. But the knitters in the group had so many great ideas and requests, the design possibilities just kept growing. And I started to include them. The ideas kept flowing, adding to what seemed to be an endless list. Finally, ilenek1p2 (on Ravely) suggested the name of the design, and it was an "of course!" moment. Another InfiniPATTERN! Thank you, llene! The ScrapSTASHtic InfiniTUNIC can be made with any yarn, be it scraps, discontinued colorways, stash, or even brand new yarn. (We won't telll) Use any needle size and most any pattern stitch. To my mind, the greatest draw is that your tunic can be made virtually any size. If you want, you can even make a dress. You can embellish as you wish, make a cardigan with a zipper, add pockets or a hood. This pattern is infinitely versatile. It is particularly great is you don't like to throw away leftovers and want a practical and beautiful use for them. It's the best of all worlds! As always, thank you to my up-beat, happy knitting pals in the CBD group. You keep me inspired. Enjoy the pattern, and enjoy the pictures of some of the participants' projects. Enjoy, the ScrapSTASHtic InfiniTUNiC! -Deborah
Table of Contents
Introduction 1 Table of Contents 2 Abbreviations 3 Participants' Project Pics 4 ScrapSTASHtic InfiniTUNIC Pattern 7 Size 8 Materials 8 Style Choices 9 Instructions: Neck shaping 10 Instructions: Bottom Shaping 12 Instructions: Sleeves 14 Instructions: Lacing and Finishing 15
Abbreviations
BO -bind off cO - cast on Dec - decrease Inc - increase K - knit KTBL - Knit through the back loop K2Tog - knit two stitches together P-purl St(s) - stitch(es)
Participants’ Project Pics
Cpainter used some new yarns she had in stash for a color-coordinated, matchinf stripes tunic.
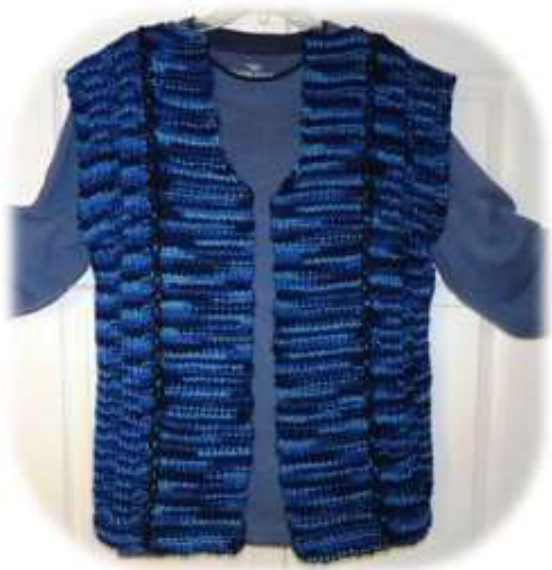
ajsgramma used a heavy-weight yarn and, Rather than a tunic, she knitted a vest.
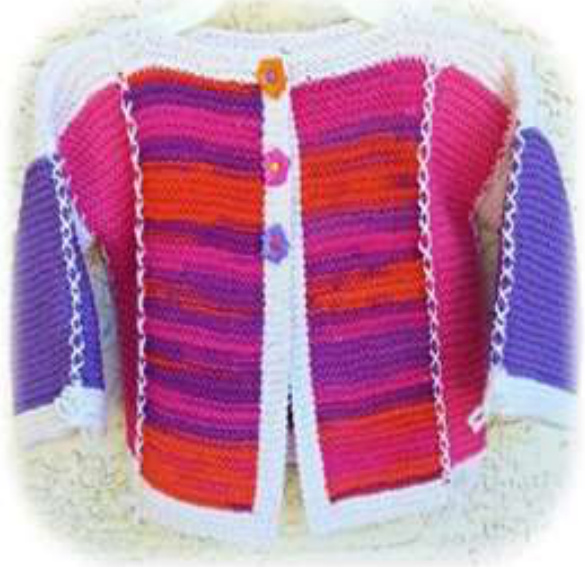
zokrmom made a baby cardigan, and she laced the panels,ending with adorable littlebows.
CaBia knitted a tunic for herlittle one.Sheknit her center panels in a V, alternating garter and stockinette sts.
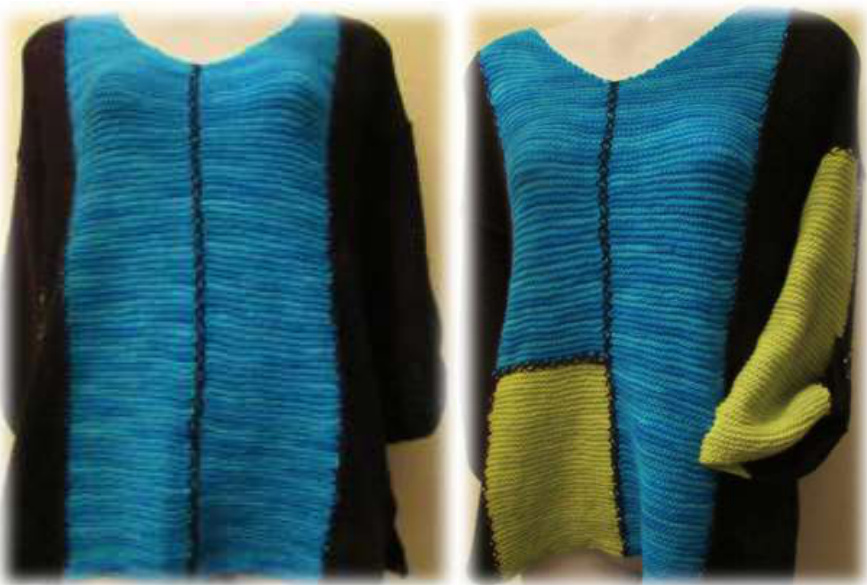
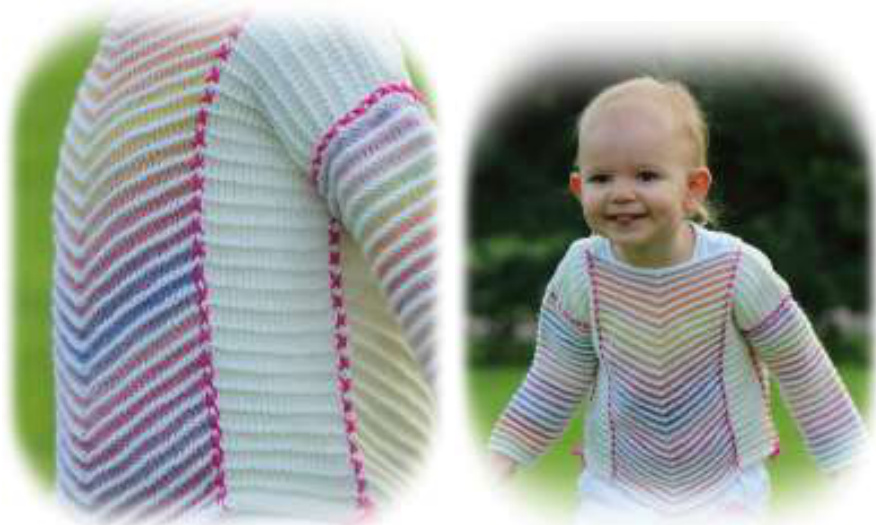
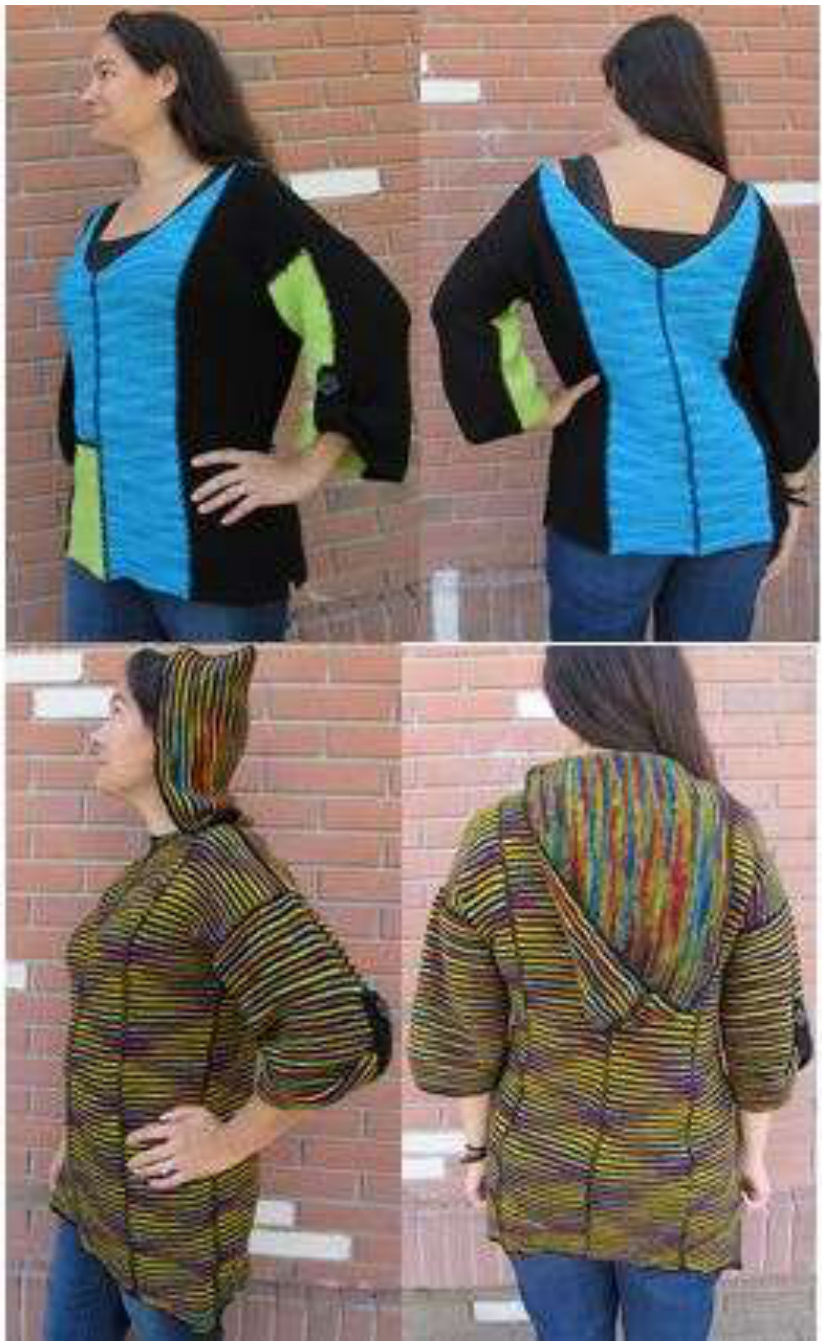
Deborah Tomasello didn't have enough blue, so in the mood of the ScrapSTASHtic Tunic design, she went strash diving and found a lovelySpringtime green.
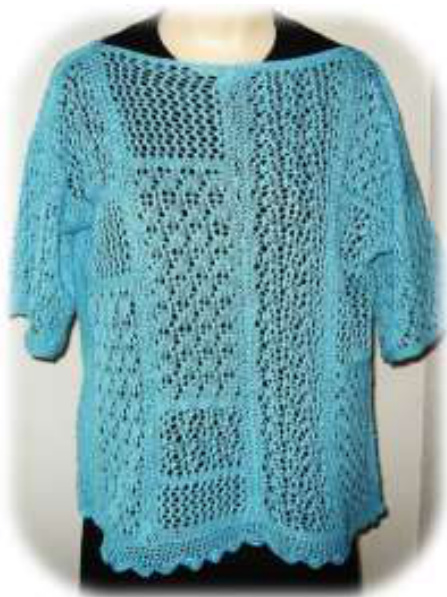
maybaby24 lives in Florida, s0 she wanted something lighter. She knitted panels comprising different lace sts.
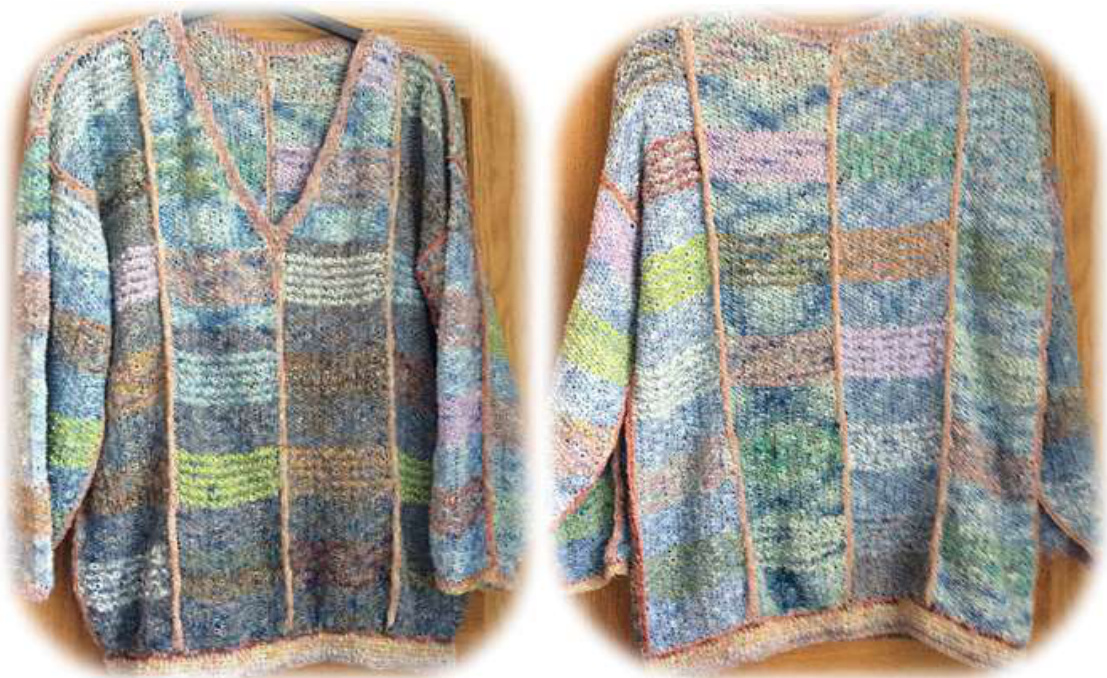
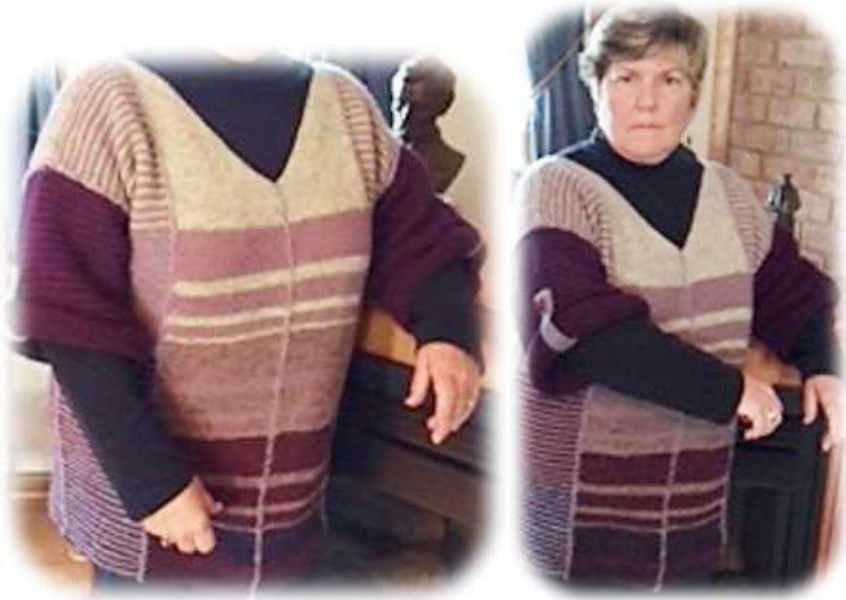
Ramsey3 worked a V-neck for the front of her tunic and a straight neckline for the back. She added a border on thebottom to finsh.
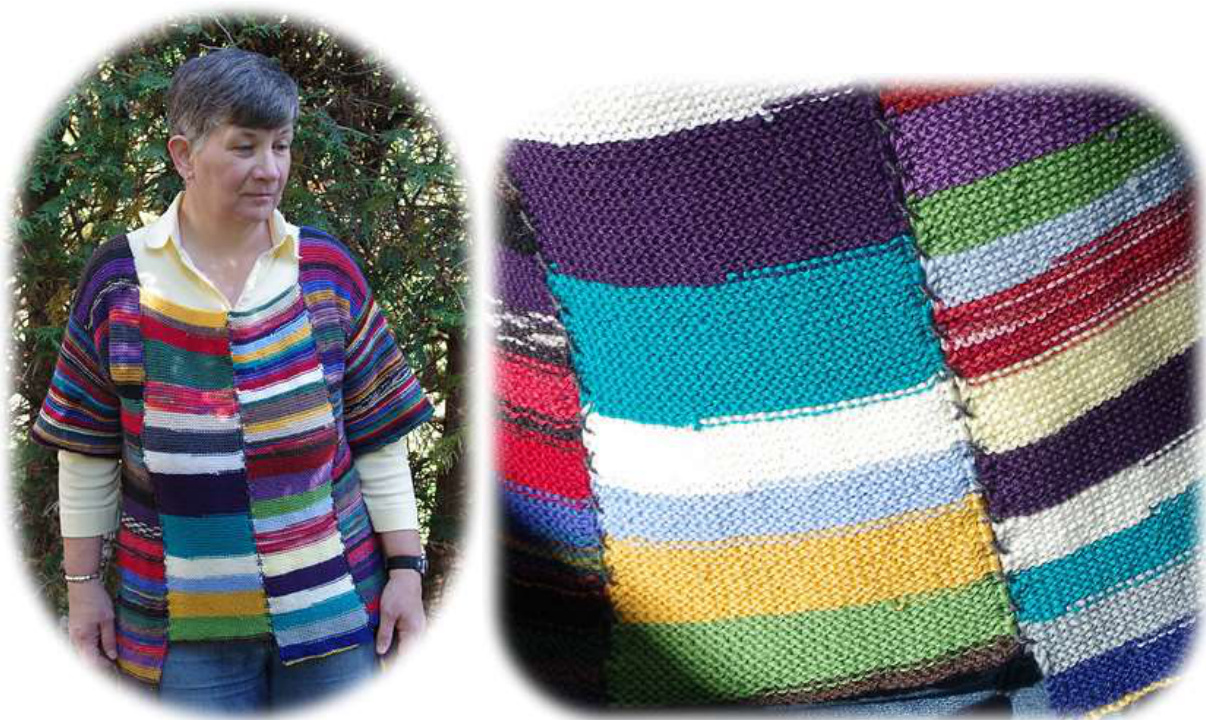
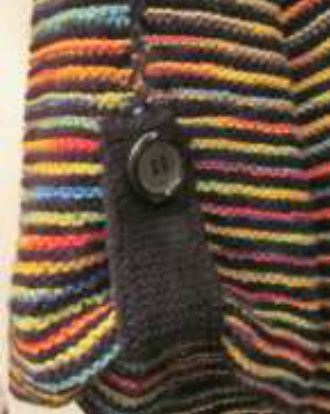
Cozyknitsca captured the true spirit of the srapstashtic tunic design. She knitter her entire project from scraps that she wound into balls. When lacing, she spaced her "x"'s. Notice the panels end in differing lengths, adding charming interest to her tunic.
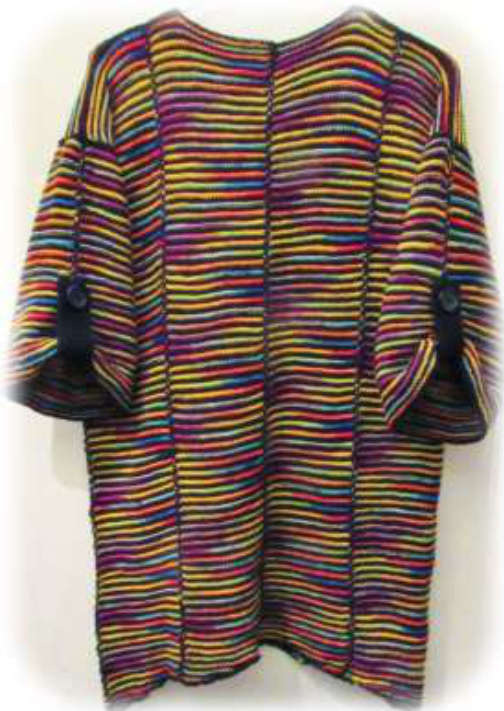
Deborah Tomasello knitted this tunic from stash. She knitted a boat neck and a rounded bottom. This project features a hood, too. (See pattern cover photo.)
ScrapSTASHtic InfiniTUNIC
Deborah Tomasello
There are so many great things about this pattern: First, you can save your scraps, or use your scraps as you get them. You can knit panels as scraps become available...so you don't have to make the tunic all at once. Originally, I designed this pattern to use up left-over yarns, but you can use any yarn you have in stash---even new skeins (or you can buy all new yarn---we won't tell). You can make the tunic virtually any size, with any yarn and with any needle size. You can even make narrow, long panels to make a little-girl's dress. I have included instructions for a hood option, as well. The ScarapsTASHtic InfiniTUNIC offers a limitless range of possibilities for size and shape. Throw color options into the mix, and the possibilities are INFINITE!
Here's the formula:
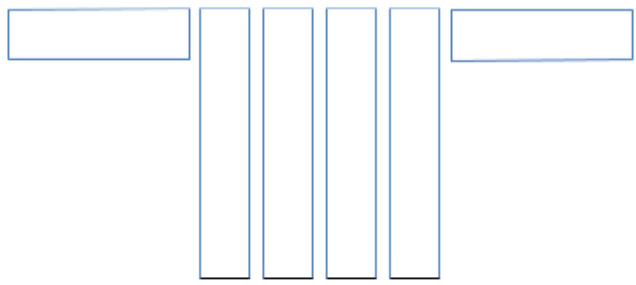
Take total number of circumference inches and divide by 8. Take that result and multiply by the number of sts you get to the inch. This total will be the number of sts for the width of each panel. Example: 40 inch circumference divided by 8 gives you 5 inches (per panel). If you knit 5 sts to the inch, you multiply 5x5 and get 25 sts per panel. Remember to measure widest point and allow some ease; you don't want this tunic to fit too snugly. Below are a few sizing possibilities, but you can choose to make this pattern any size you desire. XS 34"-36" circumference 8 panels of 4.25-4.5 inches per panel S 38" circumference 8 panels of 4.75 inches per panel M 40"-42" circumference 8 panels of 5-5.25 inches per panel L 44"-46" circumference 8 panels of 5.5-6 inches per panel XL 48" circumference 8 panels of 6 inches per panel XXL 52" circumference 8 panels of 6.5 inches per panel XXXL 56" circumference 8 panels of 7 inches per panel Materials: #2, #3, or #4 needle if using fingering-weight wool. Larger needle if using a heavier yarn. Approx. 1800-2400 yds any Knit-Picks fingering-weight wool, but this will vary greatly, depending on the length and size tunic you want. The cover tunics used Knit Picks Stroll Tonal Sock: Blue Yonder and Springtime and Stroll Sock Yarn: Black. The other cover tunic used Stroll Sock: Black striped with Stroll Hand Painted: Cartoon (Cartoon is now discontinued. Spectrum or any other Knit Picks fingering sock yarn will work as well). Twotapestryneedles Two 1-inch sew-through (buttons that are not shank buttons) buttons Gauge: Your gauge will be determined by you and will depend on your knitting style, your needle size, and the weight of your wool. Choose needle size and swatch to determine gauge. (If you want a denser fabric, use a smaller needle, such as a #2 or #3. For a drapier fabric that flows, use a larger needle.) NOTE: Garter stitch works best for this project. Stockinette should be avoided, as each panel must lie perfectly flat before blocking. Some have chosen to do lace or mitered squares. As long as each panel lies flat--no curling edges, you can do what you'd like, stitch-wise. NOTE: To avoid weaving in an endless number of yarn ends, I suggest using the magic knot to attach yarn pieces as you go. If you are doing a real scrapstashtic tunic, just knit your yarn scraps and attach as needed using the magic knot, illustrated here: https://www.youtube.com/watch?v=Aj_-V5xVPcs Choose the Style you want: Which neck and bottom style do you want for the front and for the back? Below are examples, but you can mix them any way you want; not every possibility is shown. For example, you might choose a boat neck and a rounded bottom, which is a combo of style 1 and 5. And you might want something different for the back. For a slimming look, knit the inner panels a bright, solid color, and the outer panels and sleeves black. Or you can alternate panels colors for lengthening stripes. This tunic is designed to use up all those sock-yarn leftovers, but you can use new yarn, solid colors, gradients, self-striping..The choices are all yours! If you are choosing the same style for your front and back, knit 2 of each panel shape. Work center two panels for the front, according to the shape you've chosen—as well as the center two panels for back--first. After the 4 center panels are complete, you will knit 4 of your side panels, which will each have a straight top and straight or shaped bottom. EZ-Pz. If you choose style 1, and you want the back a couple inches longer than the front, knit the 4 back panels a few inches longer than the 4 front panels. When joining the panels, you can leave a side opening between front and back. Width: If, after knitting the two center panels, you see your finished tunic might be too big or too small, no problem! You can adjust by decreasing or increasing the two outside panels. But be sure you remember that the front and back panels should match, width-wise. Length: The tunic length is up to you, too. You might want the back a couple inches longer than the front, leaving small vents on each side-seam. If you are shaping the bottom, the shaping begins on the center panels and these will determine your overall length.
Style 1: boat neck, straight bottom Style 2: boat neck, V bottom
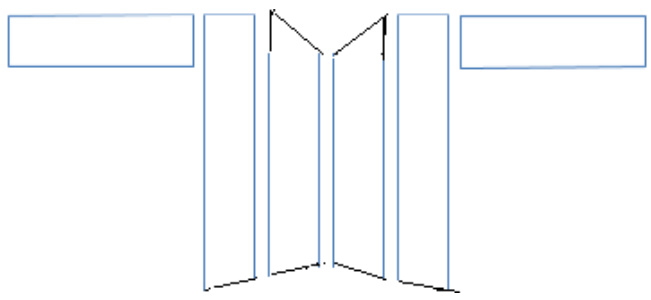
Style 3: square neck, V bottom
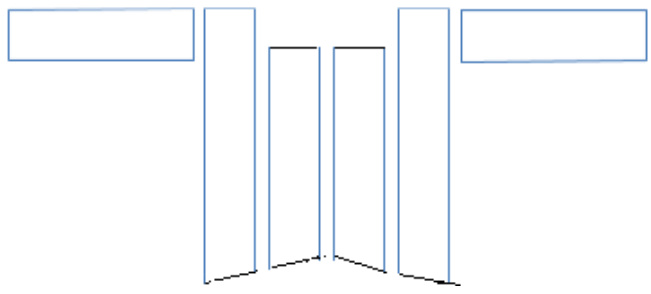
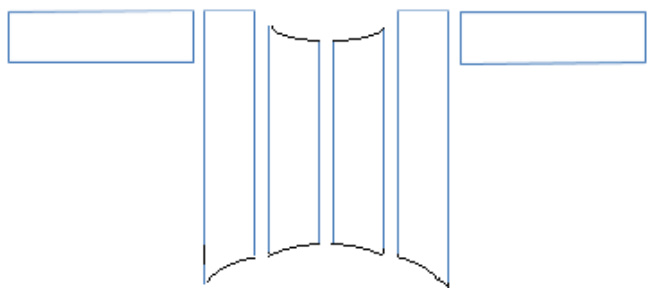
Style 4: V neck, V bottom Style 5: scoop neck, round bottom
Always slip, purl-wise the first stitch of each row. Instructions: Once you know how many sts to CO, You are ready to start your center panels. IMPORTANT: To avoid an overly tight CO, or one with those awful loops, k the first st, then KTBL next st, and alternate this way across the first row only. Slip, purl-wise, the first stitch of each row.
NECK SHAPING INSTRUCTIONS
Styles 1 and 2 Boat neck: No neck shaping required. Simply knit the entire width of your determined panel size to the desired length. Style 3 Square neck: EZ-PZ...Simply knit your 4 center panels (2 front and 2 back, if you want the square neck in the back as well) as wide as you determined, but make them 4-5 inches shorter than the 4 outside panels. IMPORTANT: When increasing on the V- neck, take care to keep all edge sts (on the increase side) very loose. Style 4 V-neck: V-neck shaping takes place on the center panels only. If you are using solid colors for your panels, or if you are changing yarns such that there is no obvious right or wrong sides to each panel, knit all 4 center panels the same (That is if you want a V neckline in both the front and the back. If you want the V in the front only, make only 2 panels.) They will be able to be turned to create the desired shape. But, if you have an obvious right and wrong side to your panels, knit the centers as follows: First two panels as follows: Keep last sts on increase edge VERY LOOSE 1. CO 2 sts. Knit 2 sts. Turn. 2. K1, inc 1 (knit thru back loop of st just knit—"KTBL"). (3 sts)Turn. 3. Knit across. Turn. 4. Knit to last st, K1, ktbl.(4 sts) 5. Knit across. Turn. 6. Repeat last 2 rows until you have your determined st count for your panel. (If your panel st count exceeds 42 sts, you will want to begin using a shallow V for the remainder of your sts. See instructions for a shallow V under the center panel instructions for a V bottom.) If you have no obvious right or wrong side to your work, knit all 4 center panels as above. However, if you have a right and wrong side, knit two as above, and two more as follows: 1. CO 2 sts. Knit 2 sts. Turn. 2. K1, inc 1 (knit thru back loop of st just knit—"KTBL"). (3 sts)Turn. 3. Knit across. Turn. 4. K1, ktbl. Knit across. (4 sts) Turn. 5. Knit across. Turn. 6. Repeat last 2 rows until you have your determined st count for your panel. (If your panel st count exceeds 42 sts, you will want to begin using a shallow V for the remainder of your sts. Simply increase on the increase edge EVERY ROw for a shallow V.) IMPORTANT: When increasing on the scoop neck, take care to keep all edge sts (on the increase side) very loose. Style 5: Scoop neck: Scoop neck shaping takes place on the center panels only. If you are using solid colors for your panels, or if you are changing yarns such that there is no obvious right or wrong sides to each panel, knit all 4 center panels the same. They will be able to be turned to create the desired shape. But, if you have an obvious right and wrong side to your panels, knit the centers as follows: First two panels as follows: Keep last sts on increase edge VERY LOOSE. 1. CO 3 sts. Knit rows of these 3 sts for approx. 3 inches. Turn. 2. K1, inc 1 (knit thru back loop of st just knit-"KTBL"), k1. Turn. 3. Knit across. Turn. 4. (K1, ktbl) twice. Knit across. Turn. Knit 6 rounds. 6. Repeat last 2 rows until you have 11 sts. THEN, 7.(K1, ktbl) three times, Knit across. Turn. This round only - The first two stitches on each needle will be: k1 k2tog - making 12 stitches total this round. 9. Repeat last two rows until you have 20 sts. THEN, 10.(K1, ktbl) four times, Knit across. Turn. 11. Knit across. Turn. Repeat until you have the number of sts your panel requires. Neck shaping is complete, and now you can knit your panel straight. If you have no obvious right or wrong side to your work, knit all 4 center panels as above. However, if you have a right and wrong side, knit two as above, and two more as follows: Second two center panels if you have a right and wrong side: Keep last sts on increase edge VERY LoOsE. 1. CO 3 sts. Knit rows of these 3 sts for approx. 3 inches. Turn. 2. K1, inc 1 (knit thru back loop of st just knit-"KTBL"), k1. Turn. 3. Knit across. Turn. 4. Knit across to last 2 sts. (K1, ktbl) twice. (Keep increase edge sts very loose!) Turn. 5. Knit across. Turn. 6. Repeat last 2 rows until you have 11 sts. THEN, 7. Knit across to last 3 sts. (K1, ktbl) three times, Turn. 8. Knit across. Turn. 9. Repeat last two rows until you have 20 sts. THEN, 10. Knit across to last 4 sts. (K1, ktbl) four times, Turn. 11. Knit across. Turn. Repeat until you have the number of sts your panel requires. Neck shaping is complete, and now you can knit your panel straight.
BOTTOMSHAPINGINSTRUCTIONS
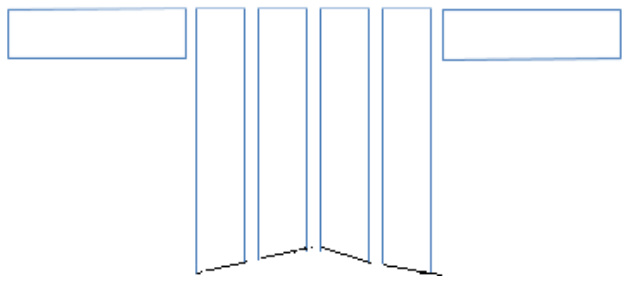
If you are shaping the bottom of your tunic, you will want to start the shaping 3"-5" shy of your desired overall length. Style 1: Straight bottom: No bottom shaping required. Simply knit the entire width of your determined panel size to the desired length. Styles 2, 3, and 4: V-bottom: V-bottom shaping takes place across all four panels in the front, and all 4 panels in the back. The angle of the V changes, however. If you are using solid colors for your panels, or if you are changing yarns such that there is no obvious right or wrong sides to each panel, knit all 4 center panels the same. They will be able to be turned to create the desired shape. But, if you have an obvious right and wrong side to your panels, knit 2 of the front center and 2 of the back center panels as follows:
Shallow V:
Begin to shape your edging 5-8 inches shy of your overall desired tunic length. 1. K2tog. Knit across. Turn. 2. Knit across to last 2 sts. k2tog. Turn. Repeat these two rows until you have depleted all your sts. If you have an obvious right and wrong side to your panels, knit 2 of the front center and 2 of the back center panels as instructed above. Remembering that you want to mirror the shape knitted above, start shaping at the same point in your panel. Knit the remaining 2 front center and 2 back center panels as follows: 1. Knit across. K2tog.Turn. 2. K2tog. Knit across. Turn. Repeat these two rows until you have depleted all your sts. V-bottom shaping uses all 8 tunic panels. Now that you have all the center shaping done for the bottom. You change the angle of the V for the 4 outside panels. Your decrease creates a steep V. If you are using solid colors for your panels, or if you are changing yarns such that there is no obvious right or wrong sides to each panel, knit all 4 outer panels the same. They will be able to be turned to create the desired shape. But, if you have an obvious right and wrong side to your panels, knit 2 of the front outer and 2 of the back outer panels as follows:
Steep V:
Begin to shape your outer panel V bottoms at the lowest point of the center panels, so that once they are connected, the V shape will simply continue across panels. See diagram for the V-shaped bottoms. 1. K2tog. Knit across. Turn. row for a steep V. Repeat these two rows until you have depleted all your st If you have an obvious right and wrong side to your panels, knit 2 of the front outer and 2 of the back outer panels as instructed above. Remembering that you want to mirror the shape knitted above, start shaping at the same point in your panel. Knit the remaining 2 front outer and 2 back outer panels as follows: 1. Knit across. K2tog. Turn. 2. Knit across. Turn. Repeat these two rows until you have depleted all your sts. Style 5: Round bottom, front and back: If you are using solid colors for your panels, or if you are changing yarns such that there is no obvious right or wrong side to each panel, knit center 4 panels the same. They will be able to be turned to create the desired shape. But,if you have an obvious right and wrong side to your panels, knit the centers as follows: Two center panels as follows: Once you have knitted center panel to the desired length before shaping, 1. Knit one row. Turn. 2. BO 12 sts. Knit across. Turn. 3. Knit across to last 2 sts, k1tog. Turn 4. BO 3 sts. Knit across. Turn. 5. Knit across to last 2 sts, k2tog. Turn. 6. BO 3.sts. Knit across. Turn. Repeat last 2 rows until you have depleted all sts. Two remaining center panels as follows: Once you have completed the center panel to match the length of the first two before shaping, 1. Knit one row. Turn. 2. Remembering that you want to mirror the shaping of the first panels, you want to knit across the same number of stitches you knit after B0 12 in step 2 of the first panel. So, if you B0 12, and then knitted 20 across to the end, You now start with knitting those 20 (or as many you have) and then BO 12. Turn. Detach Yarn. 3. Reattach yarn , BO 3 sts. Knit across. Turn. 4. Knit across to last 2 sts, k2tog. Turn. 5. BO 3.sts. Knit across. Turn. 6. Knit across to last 2 sts. k2tog. Turn. Repeat last 2 rows until you have depleted all sts.
Outside panels as follows:
Only begin decreasing the outer side panels once you have knitted to the length of the longest point of the center panel next to it. If you are using solid colors for your panels, or if you are changing yarns such that there is no obvious right or wrong sides to each panel, knit all 4 outer panels the same. They will be able to be turned to create the desired shape. But, if you have an obvious right and wrong side to your panels, knit 2 of the front outer and 2 of the back outer panels as follows:
2 outside panels as follows:
1. Slip first st, as usual. BO 1 st. Knit across. Turn. 2. Knit to the last 2 sts. K2tog. Turn. 3. BO 3 sts. Knit across. Turn. 4. Knit to the last 2 sts. K2tog. Turn. 5. Repeat 3. 6. Repeat 4. 7. Repeat 3. 8. Repeat 4. 9. BO 2 sts. Knit across. Turn. 10. Knit to the last 2 sts. K2tog. Turn. Repeat 9. and 10. 3 more times. 17. BO 1 sts. Knit across. Turn. 18. Knit to the last 2 sts. K2tog. Turn. Repeat last two rows until sts are depleted. 2 remaining outside panels as follows: Again, if you are using solid colors for your panels, or if you are changing yarns such that there is no obvious right or wrong sides to each panel, knit all 4 outer panels the same. They will be able to be turned to create the desired shape. But, if you have an obvious right and wrong side to your panels, knit 2 of the front outer and 2 of the back outer panels as instructed above and knit the remaining 2 outer panels as follows: 1. Knit across to the last st. BO last st. Detach yarn. Turn. 2. Reattach yarn , BO 3 sts. Knit across. Turn. 3. Knit to the last 2 sts. K2tog. Turn. 4. BO 3 sts. Knit across. Turn.. 5. Repeat 3. 6. Repeat 4. 7. Repeat 3. 8. Repeat 4. 9. Repeat 4. 10. BO 2 sts. Knit across. Turn. 11. Knit to the last 2 sts. K2tog. Turn. Repeat 10. and 11. 3 more times. 18. BO 1 sts. Knit across. Turn. 19. Knit to the last 2 sts. K2tog. Turn. Repeat last two rows until sts are depleted. Weave in all ends and block panels before seaming to the desired, uniform, width and length. \*Each panel, including sleeve and hood panels, should be washed and blocked before joining together. SLEEVEs: Knit two panels (each sleeve is one panel) roughly 3 times the width of your tunic panels, or as big as you want your sleeves. Do not make them snug. Knit them so that, once blocked, they will hit about 2-3 inches below your elbow.BO evenly. TABS: Knit two strips, about an inch to an inch and a half wide and 8 inches long. Use a smaller needle, if desired. I used a #2 needle for the tabs.) HOoD: If you would like to add a hood, knit the back neckline straight across. Knit a rectangle 4 times the width of one of your tunic panels and knit it so that it is 16-18 inches long (after blocking). Block first, and then attach the CO edge of the rectangle, using the lace-up method, to the neck of the tunic, center back to center back. The seam joining the hood to the neck will extend beyond the shoulder seams to include the front neck portion of the tunic on each side. This will make for a deeper, more “useable" hood. Then, fold the BO edge at the top in half, and lace the two halves of the BO edge together. Copyright ? 2015 by Deborah Tomasello All rights reserved. This pattern or any portion thereof may not be reproduced or used in any manner whatsoever without the express written permission of the publisher. WARNING: Giving or accepting a free copy of this pattern, without permission of the designer, is stealing.
LACING: (https://www.youtube.com/watch?v=ryP25AbrB90)
Use a flat surface such as an ironing board or tabletop to lace seams. Cut a length of yarn a few inches longer than four times the length of your seam. Thread each end through a needle (two needles). Pull one end through the top edge st of one center panel, and pull the other needles through the top edge stitch on the other center panel, front to back. Check lengths, and make sure yarn is situated with half on each side and the center of the length in the middle, between the two panels. Now, cross your yarns in the back and bring the opposing needle back up through where the initial needle went down. Place one needle, still threaded, off to one side, and begin lacing with the other needle in a slanted motion, making a st every 4 rows. (The front will be slanted, but the back of the st will run straight across per video tutorial.) Do this, in the same direction all the way to the bottom of your panel. Make sure the sts are even and snug without puckering your fabric. Now, go back up to the top of your panel again, and, using the other needle and remaining half of seam yarn, cross your "x"s by slanting your sts in the opposite direction from the first half. See video. When you reach the bottom end of the seam, tie ends to be woven in later. erfi Stickbeskrivning tabs on sleeves, one end on the back side about 3 inches up from the bottom edge of the sleeve and the other sleeve. Attach tabs by sewing short end edges to sleeve. Place button on the top of the tab on the front side,
Crochet edge on bottom, if desired. POCKET: If you desire a pocket or two, simply knit a square the width of your panel. Block it. Then position it where you'd like it to be on your tunic and attach it on the bottom and sides, using the lace-up method. Leave the top edge unattached for the pocket opening.


