As an undergrad at the University of Michigan, I went to a concert at Hill Auditorium. I don't remember what band was playing, but one moment from that evening is with me still. Searching for my balcony seat, I glanced down at the stage, with its robin-egg blue ceiling and coppery organ pipes gleaming. A memory from a decade earlier flooded my mind, of the day my dad graduated with his PhD, and my mom and I watched from the balcony as he walked across the very go may same stage below me. Until the concert at Hill, that graduation memory was a mere fragment, with no mooring to a familiar place, no attachment to daily life, but from that day forward, I held the memory close. In college, I was studying biology, and planning my own path to a PhD. Life being what it is, fifteen years rushed by - work, marriage, kids - before I found my way to grad school, working in a lab right across the street from Hill. Each April, I watched from the lab window as the new PhDs streamed out of Hill, their colorful hoods shimmering in the sun like butterfly wings. I remembered my dad's big day and prayed that I'd make it through to mine. It was a tough path, hard in ways I could never have imagined at eight or eighteen, but that memory helped me keep going. When I finally took the walk across that stage at Hill, the sweetest part was knowing that my husband and children, and my dad, were all up in the balcony, making memories. uitl althperights, pri This pattern is for everyone who struggles to reach their goals I wish Date at Am Arbu, fichim you the joy of hard-earned success, shared with people you love.
The Mee Timp Branuation Sork
a knitting pattern for a mee felted sork and matching hat designed and mritten bp Mleg Bakemell im rerognition of the exrellent knitters of the Wee Tinp Sotk Club Requiring tmenty pards AlC, Knitirks Nalette in blark and fine pards CC1, Aluenth Touth Ale in hlark and one pard CC2, Tosh Sork in hright goln; Worked using a set of four G& si3e 3 Mouble ointed Aeedles at a Bauge of six stitches and nine roms per inch in stockinette using fAlC; And benefitting greatlp from the assistanre of one stitch marker. Mated at lpmouth, AHlichigan, this Spring tmo thousand and tmelne.

Begin pattern
Using CC1, cast on 18 and join for knitting in the round without twisting. Round 1: Continuing with CC1, p all sts. Rounds 2-4: Using MC, k all sts. Note: Do not break CC, just carry it along on the inside of the work. Round 5: Switch to CC1. K all sts. Round 6: P all sts. Rounds 7-11: Repeat rounds 2-6 one more time. Break CC1 after round 11. Rounds 12-14: Using MC, k all sts.
Jeel Jflap and Turn
Arrange sts so that the next 9 sts are on one needle (Needle 1), and the remaining 9 sts are on another needle (Needle 2). Heel flap will be worked back and forth in rows on the 9 sts on Needle 1. Row 1: S1 1, k8. Row 2: S1 1, p8. Rows 3-11: Repeats rows 1-2, ending with a knit row. Row 12: Sl 1, p4, p2tog, p1, tw. Row 13: Sl 1, k2, ssk, k1, tw. Row 14: Sl 1, p3, p2tog. (You should be at the end of the row.) Row 15: Sl 1, k3, ssk. (You should be at the end of the row. 5 sts remain on Needle 1.)
Busset
Continuing with Needle 1, pick up and knit 6 sts along the edge of the heel flap. Knit the 9 sts on needle 2. With another needle (Needle 3), pick up and knit 6 sts along the other edge of the heel flap, and knit 2 sts from Needle 1. You are at the center of the sole, and the new beginning of the round. 26 sts total, arranged 9/9/8 on Needles 1/2/3. Round 1: K to last 3 sts on Needle 1, k2tog, k1, k 9 sts on Needle 2, k1, ssk, k to end of Needle 3. (24 sts remain after Round 1) Rounds 2-4: Repeat round 1 three more times. (18 sts remain after round 4) Round 5: K2, k2tog, k2, ssk, k3, k2tog, k2, ssk, k1. (14 sts remain, arranged 4/7/3 on Needles 1/2/3) Rounds 6-10: K all sts. Round 11: K1, k2tog, k2, ssk, k1, k2tog, k2, ssk. (10 sts remain, arranged 3/5/2 on Needles 1/2/3) Round 12: K2tog, k2, skpo, k2, ssk. Note: The final ssk requires using one st fromNeedle1.
finishing
Knit the last st from Needle 1 onto Needle 3. You should now have 3 sts on Needle 2 and 3 sts on Needle 2. Graft these together. Weave in ends.
at
Using MC, cast on 3. Row 1 (RS): Kfb, PM, kfb, k1. (5 sts) Row 2 and all even rows (WS): K all sts. Note: I find it helpful to put a marker of some kind on the wrong side, like a reclosable stitch marker or a safety pin or a little piece of contrasting yarn, so I can easily see which rows are the “just knit" rows. Even though the rows are short, odds are one of my kids has asked me a question or I had to let the dog out or the phone rang or...well, you get the picture, so I've already forgotten what I just did before I get to the next row, and especially with black yarn it's harder for me to seethoselittleKFBs. Row 3: K to 1 st before marker, kfb, sm, kfb, k to end. Rows 4-17: Repeat rows 2-3 seven more times. (21 sts after Row 17) Bind off all sts. You should have a mitered square approximately 2’”’ across. Note the diagonal line running across the square. Pick up 7 sts just to the side of the diagonal on one dpn, centered within the diagonal. This is fairly easy to do if you look for the raised “purl bumps” along the diagonal - you can pretty much slide your needle right under them. Pick up 7 sts on another needle on the other side of the diagonal. Now you have 7 sts on each of two needles and both needles are parallel to the diagonal line of increases on your square. Divide the sts on one of the needles between 2 needles, s0 you have 7/4/3 sts on Needles 1/2/3. Begin knitting in the round with MC. Round 1: K all sts. Round 2: (Kfb, k4, kfb, k1) twice. (18 sts) Rounds 3-5: K all sts. Rounds 6-7: (K1, p1) around. Bind off all sts. Weave in ends.
Jfelting
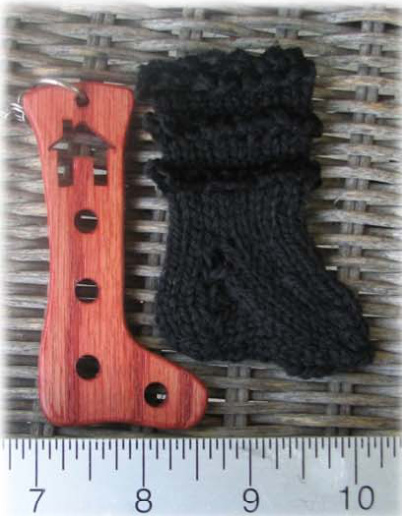
Throw the hat and the sock in the washer with a load of laundry, using a hot wash temperature and a cold rinse. The black yarn may lose a bit of dye, so don't put them in with your snowy whites. For me, one normal wash brought the sock down to the right size for the blocker - it loses about 30% if its size. Your results may vary - you can try checking half way through the wash if you have a top loader, or setting it for a short wash if you have a front loader. Run it through again if need be to get it down to the right size for the blocker.
Blocking
Put the sock on the blocker and smooth out any wrinkled introduced in the washer. To block the hat, pin it top side down on a foam blocking board, a corkboard or even a taut pillow or mattress, squaring up the shape and flattening the top. Let it dry. Cut a small hole in the top center of the hat - you can slip one blade of a sharp pair of scissors into the cap portion of the hat and out through the top, creating a hole just large enough to slip the chain of the blocker through so you can pull the hat down on the top of the blocker. When the wool is well felted, there is no concern about unraveling when you cut a hole.
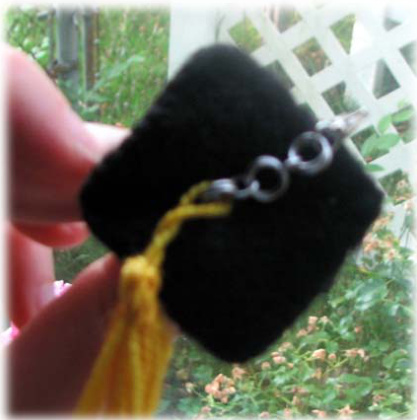
Tassel
Thread one end of the CC2 yarn on a tapestry needle. Leaing a tail of about 10", wrap the CC2 yarn ten times around two fingers held together. Break CC2. Slip the loops off your fingers and pinch them so they stay aligned and in place. About 14 from the end the loops, wrap the tail yarn tightly around the loops about 6-8 times. Bring the needle through the wrapped section from bottom to top (the needle is traveling parallel to the finger loops, and through the middle of the tight wraps. Pull tight and bring it through the tight wraps bottom to top once more. To create a hanging loop at the top of the tassel, bring the tail yarn back down through the tight wraps from the top, leaving a 3%4" loop at the top. Bring the needle through the tight wraps from top to bottom once more, tightly to secure the loop. You can run the needle back and forth through the wrap portion a couple more times to secure the tail if need be. Finally, cut open the loops at the bottom of the tassel and trim the ends to make them even. Attach the tassel to the hat by simply slipping it over the chain, or if preferred, stitch the hanging loop to the top center of the hat using MC yarn.


