ASSETS OF EVO
By Marnie MacLean
INTRODUCTION
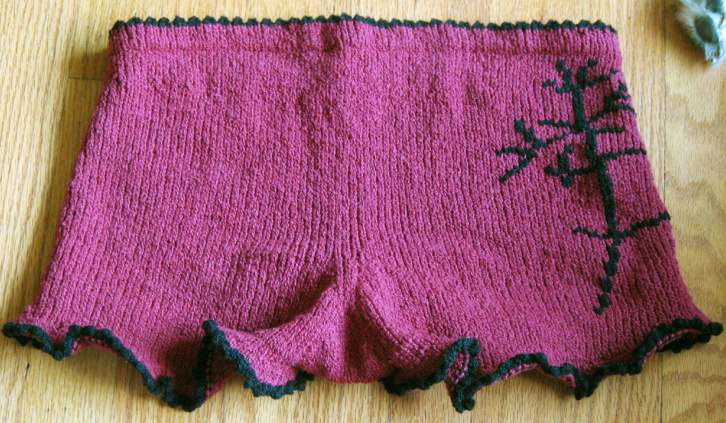
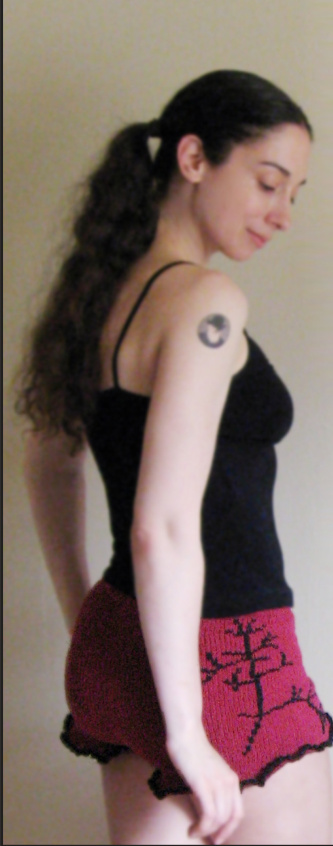
Get your Intelligent Behind into a cute little pair of boy shorts and express your love for rationality, reason, and the man with the plan, Charles Darwin. These shorts are knit top-down and in the round, so there's almost no finishing. If you want to skip the duplicate stitch motif, you can have these quick little knits on your tuckus in no time at all. Assets of Evo are worked in a super stretchy yarn called Esprit, made of cotton and elastic. Knit with a bit of negative ease, with the yarn held loosely, these shorts hug the body. Refer to the chart below to find the best fit for your hip measurements. Throughout the pattern, you'll fnd notes on customizing the ft. But don't forget, modifications may require extra yarn, so plan accordingly.
SIZES
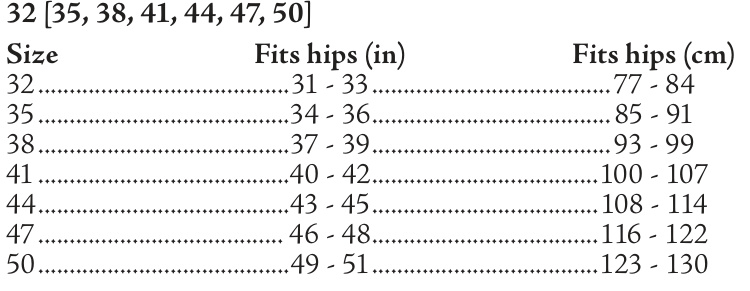
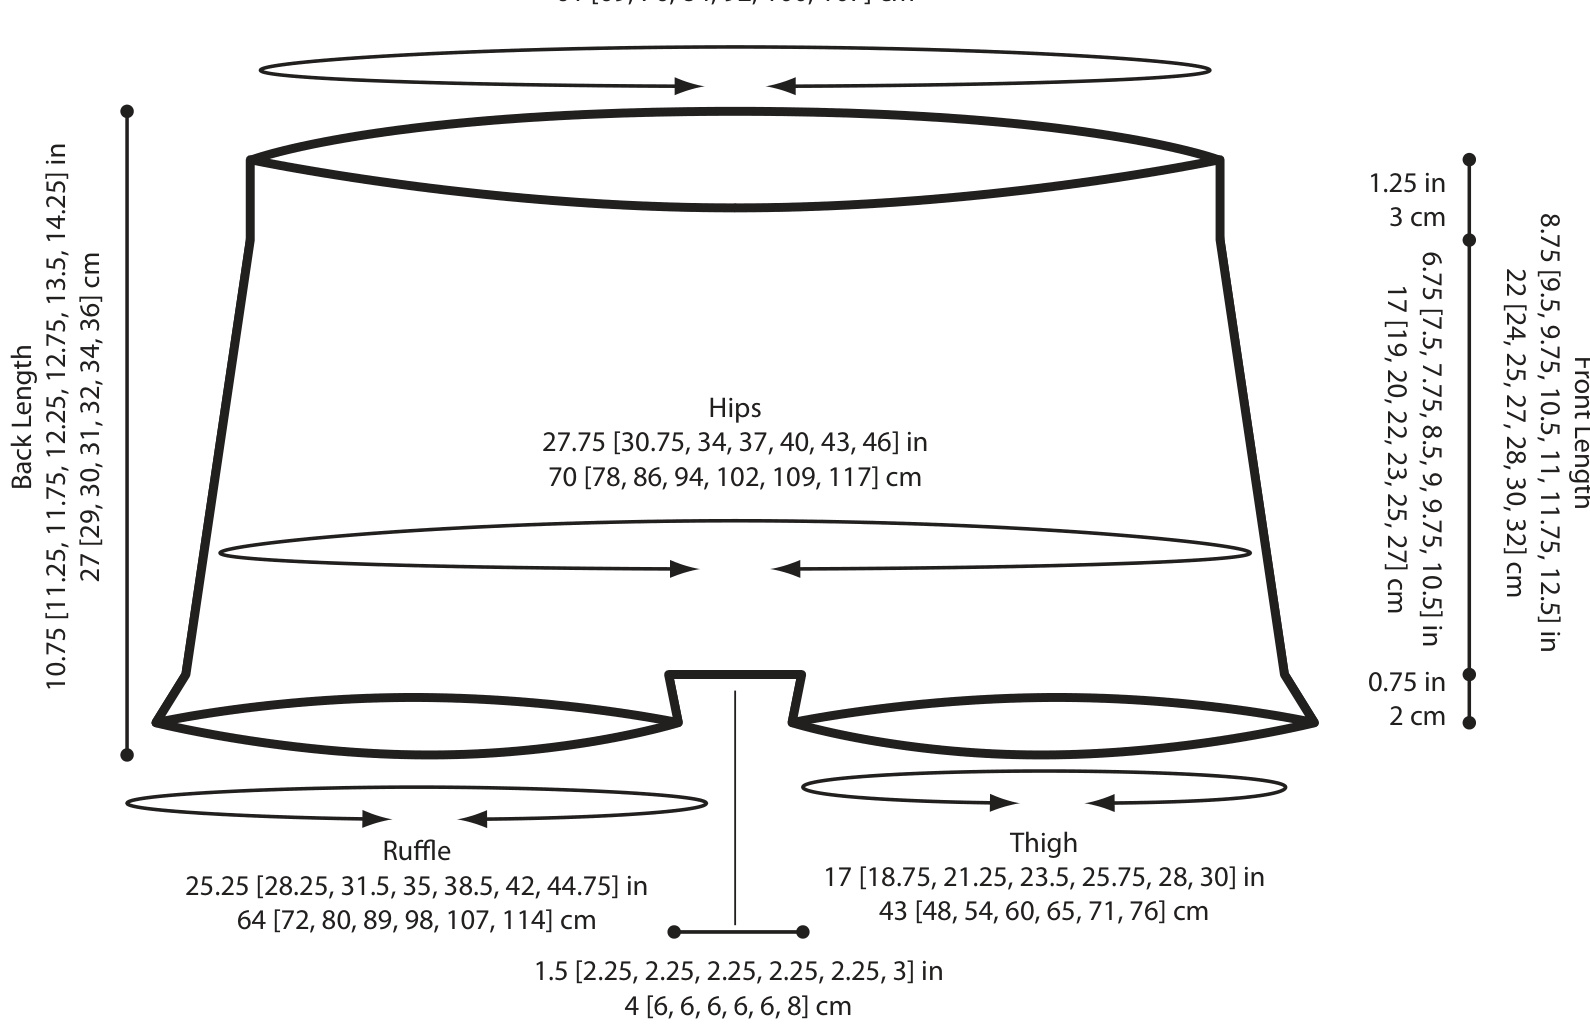
This garment is worked with negative ease (approximately 3-5/813cm.) Please use this chart, not the schematic, (on next page,) to determine which size will ft you best. Schematic lists finished garment measurements only.
SUPPLILES
+ 2 [3, 3, 3, 4, 4, 5] balls of Elann Esprit $(98.3\%$ Cotton/ $1.7\%$ Elastic $-\,91\mathrm{{m}/100}$ yds per $50\mathrm{g}$ ball) in Main Color, “"Wine" 3794 + 1 ball of Elann Esprit $(98.\bar{3}\%$ Cotton/ $1.7\%$ Elastic - 91m/100 yds per $50\mathrm{g}$ ball) in Contrasting Color, “Deep Black" “8990" Note: Yardage is dependant on tension. As the package states, the ball asalmstoubletadagewhenstrechedfyounwtht you knit very loosely, you should plan to purchase an extra skein. + US #5/3.75mm\* circular needle. Length should be at least a few in/cm shorter than your waist circumference. ·U $\mathrm{S}\,\#5/3.75\mathrm{mm}^{*}$ circular needles in $16^{\circ}/40c\mathrm{m}$ length for legs + Spare circular needle - it should be a smaller size than the one that gives you gauge + Tapestry needle + .125"/3mm Ribbon or $0.5^{\prime\prime}/1c\mathrm{m}$ elastic for waistband + Stitch markers + Waste yarn to hold stitches \* Or size to obtain gauge
GAUGE
+ 21 sts x 39 rows $=$ 4"/10cm in STst
ARBREVIATIONS
+ MC: Main color. + CC: Contrasting color. + St(s): Stitch(es). + K: Knit. + STst: Stockinette stitch. + P: Purl. + Sl: Slip + YO: Yarn over. + SSK: Slip slip knit. + K2tog: Knit two together. + co: Cast on. + LIR: Lifted increase right —- Lift the stitch below the next stitch to be worked. Knit that lifted stitch then the stitch itself. + L1L: Lifted increase left —- Lift the stitch below the last stitch worked on the right hand needle. Knit the lifted stitch then proceed to the next live stitch. + Kfb: Knit into front and back of stitch. + Bo: Bind off. + Pm: Place marker. + SM: Slip marker. + W&t: Wrap and turn —- Slip next stitch, bring yarn forward (knit row) or back (purl row), slip stitch back to left needle. Bring yarn back (knit row) or forward (purl row), turn work and work back in the other direction.
PATTERN NOTES
Notes andftting ti willappear tbroughout the pattern,fomat ted like this. Pattern begins at the waistband, which is worked with a provisional cast-on so that it can be closed without any seaming. Short rows are placed below the waistband in the back to add length to ensure good coverage. You may work more or fewer short rows to suit your shape. From there, the garment is worked in the round, increasing at the down the middle and then the increases split to form a gusset that will eventually be seamed with either grafting or a three-needle bind-off. A few more short rows are added to the back to lengthen the garment and the crotch further. Finally, the legs are worked individually in the round, and completed with a short rufle and contrasting picot bind-off. IMPORTANT: Do not hold the yarn too tightlyor you'll negate ll the built in elasticity.Its fine to ave a litte tension on the yarn,but be sure you aren't knitting so that the yarn is completely taut. When you complete your swatch and get gauge, your fabric should still have plenty of stretch.If it doesnt, try relaxing a little or don't wrap te yarn so tightly around your finger for tension.
PATTERN
WAISTBAND
Entire garment is worked in STst, unless otherwise stated. Using a provisional co, co 126 [142, 158, 174, 190,206, 222] sts in MC. Place a stitch marker 58 [66, 74, 82, 90, 98, 106] sts in from the first st to separate the back from the front. Place a second st marker to indicate end of round.
The front is 10 sts (about 2"/5cm) narrower than the back. Ifyou change gaue or change teumberof stithes ou o,easeadst the placement of your st markeraccordingly. Round 1: Switch to CC and begin working in the round, being careful not to twist the co edge.
Rounds 2-6: K
Round 7: K27 [31, 35, 39, 43,47, 51] sts, yo, ssk, k2tog, yo, knit to end of round. These eyelets willbe used for a drawstring ribbon and should be located in the center front of garment. If you prefer to have an enclosed elastic instead, you can just k the whole round. Eyeletswileon theinsidefthgarment,allwingyou totu t ends of your ribbon out of sight. If you fee this will be uncomfort able, you can work the eyelets on round 12 instead.
Rounds 8-9: K
Round 10: \*Yo, p2tog\* around. This is your turning round.
Round 11: K
Cut CC yarn and join MC yarn.
Rounds 12-19: K
Weave in all ends. Pullout provisional co and place stitches on spare needlIf you lan toadd an elastic into th caing get your elasti and measure it out so that it is snug but not too tight, about $2^{\circ}/5\mathrm{{cm}}$ below your natural waist. Sew the elastic ends together and position in place. Align the first st of the co with the frst st of the live round; knit those two stitches together as a single stitch. Repeat this all the way around the waistband. When you are done, you should still have 126 [142, 158, 174, 190, 206, 222] sts, and your casing will be closed and folded along the purled picot edge. The purl picot round is now considered the frst round of the garment. This means your garment currently has 1l rounds total.
SHORT ROWS
Unless otherwise stated, round counts, throughout pattern, do not include short rows. K to the frst stitch marker to complete the front section. You will now work 10 rows, back and forth, using short rows to lengthen the back of the garment. Rows 1 & 2: Work to one st before stitch marker, w&t. Rows 3-10: Work to 4 [4, 5, 5, 6, 6, 7] sts before last w&t, w&t. You willbe working another inch of short rows at the bottom of the garment, but ifyoufeelyou need more length inback, you can continue to work short rows at this point. Try on the garment by placing the live stitches on waste yarn, and ensure that the bottom edge ofthe garment is level when worn. You should nowbe on the right side. Knit to end of round, picking up all wraps along the way. On next round, pick up and work all remaining wraps.
INCREASE TO HIPS
Increase rows are worked as follows: $^{\ast}\mathrm{K}$ to one st before next side marker, LIR, k1, sm, k1, IL.\* Repeat at next SM, noting that the second increase will overlap with the start of the next round. Increase 5 times over the next 48 [48, 48, 50, 51, 54, 55] rounds as follows: Increase on the NEXT round and then every: Then every: 12 [12, 12, 13, 13, 14, 14] rounds 3 [3,3, 1, 2, 1, 2] times Counting the 11rounds of the waistband, your garment willhave 59 [59, 59, 61, 62, 65, 66] rounds in front 69 [69, 69, 71, 72, 75, 76] rounds in back 146 [162, 178, 194, 210, 226, 242] sts at end of this section To lengthen garment, add rounds to this section between increass. You may also adjust the number ofincs toft your personal body shape.Eachinc round willadd .75/2cmif worked to gauge. Refer to the schematic and your own measurements to decide what will work best for you.
(ROTH SHAPING
Place a st marker on either side of the two center sts in the front and back sections. A total of 4 stitch markers added. These will be called center markers. Crotch shaping is worked in two parts. First,the increases will happen right at the center point of each front and back section. Then, the crotch will be widened to form a gusset. On next round (round 60 [60,60, 62,63, 66, 67]) inc every other round for a total of20 [26, 30, 34, 38, 42, 48] rounds, as indicated below. For the frst 12 [14, 18, 22, 26, 30, 32] rounds, inc rounds are worked as follows: \*Work to ne st before center marker, L, SM, k,SM, LL\* Reat one more time. Note that you maintainjust 2 sts between the center markers for this section. For the remaining 8 [12, 12, 12, 12, 12, 16] rounds, work inc rounds as follows: \*Work toext entr mak , , worktone st bfe nx center marker, LIR, SM.\* Repeat one more time. Note that you are now increasing sts between the center markers. This is your crotch gusset. 79 [85, 89, 95, 100, 107, 114] rounds in front 89 [95, 99, 105, 110, 117, 124] rounds in back 186[214, 238,262,286, 310, 338] total sts 88 [102, 114,126, 138,150, 164] sts in front section 98 [112, 124, 136, 148, 160, 174] sts in back section On last round, stop one st shy of end of round, w&t
SHORT ROWS
You should have just completed an increase round. At this point,to extend the crotch a little further and add a bit more length to the back, we will work some additional short rows. Crotch increases will continue on either side of the gusset on right side rows. Work as many short rows as you need to achieve a good ft. It is recommended that you periodically move yourlive sts to waste yarn and try the garment on. The front crotch gusset willgo between your legs infront and meet with the back crotch gusset. Fit should be snug but comfortable when you complete this section. Incs are worked on right side rows as follows: \*Work to center marker, LIL, SM, work to next marker, SM, LIR\* Work remainder of row as indicated. You arenolonger adding sts to the gusset. The back gusset needs to remain the same width as the front gusst. Inceases are now bappening outside the gusset. Row 1: Work to one st before side marker, w&t. Rows 2-7: Work to 5 sts before last w&t, remebering to work inc on even rows, w&t. You should now be ready to begin a right side row. Knit to end of round, working incs as above and picking up all wraps along the way.
LEGS
Each leg is made up of half the front and half the back, minus the gusset. Legs are each worked identically. Gusset is 8 [12, 12, 12, 12, 12, 16] sts wide. The two outermost sts in each gusset section will be worked as part of the legs. Place each set of8 [12, 12, 12,12, 12, 16] gusset sts on waste yan. This will separate the leg sts naturally for you. Remove the center markers. 8 [12, 12, 12, 12, 12, 16] sts in each crotch gusset section Place one leg on your $16^{\circ}/40c\mathrm{m}$ long circular needle. Place the other leg's sts on waste yarn or st holder, keeping the marker in place to indicate the side seam. Join to work in the round. You should already have a marker in place to mark the end of round. If you have not cut your yarn, your round starts at the outside edge of the leg. You should start your second leg at this point too. Round 1: K to inside of leg, PM between two halves of leg where the gusset was before. Pick up and knit all wraps as you get to them. To avoid a gapwhere you closeup theleg, crossthest before and after the st marker before placing the marker. Continue knitting to end of round. Round 2: K Add length to legs here. You may want to inc or dec to fit your personal shape. Additional length will require additional yarn. Round 3: $^{\ast}\mathrm{K}1$ kfb\* kl around lg. 133 [148, 166, 184, 202, 220, 235] sts For a more dramatic rufe, inc in every st instead of every other. For a more subtle rufle, in lessoften. If you don't wish to add any rufle at all, do not increase at all in this round.
Rounds 4-6: K.
Cut yarn. Slip your sts, without working them, until you reach the other st marker, which is at the inside ofthe leg. Join your CC yarn. Starting your contrasting color round at the inside of the leg will prevent ajog in the stripes and will make the picot Bo look cleaner.
Round 1: K.
Round $2\colon^{*}\mathrm{co}\;1_{.}$ BO $3^{*}$ repeat around to form a picot BO. You may use a knitted on or cable cofor this Bo. Cut yarn and pullend through last st.
FINISHING
Either graft or use a 3-needle Bo to join the front and back of crotch together. If you pick up one extra st on each side ofthe gusset, you can avoid any gaps or boles that would later need to be band-sewn closed. It is also recommended that you graft your stitches very looselyto start with,and adjust the tension after.This yarn is hard tograft evenly and if pulled tootightly, is very bard to loosen up.
Weave in all ends.
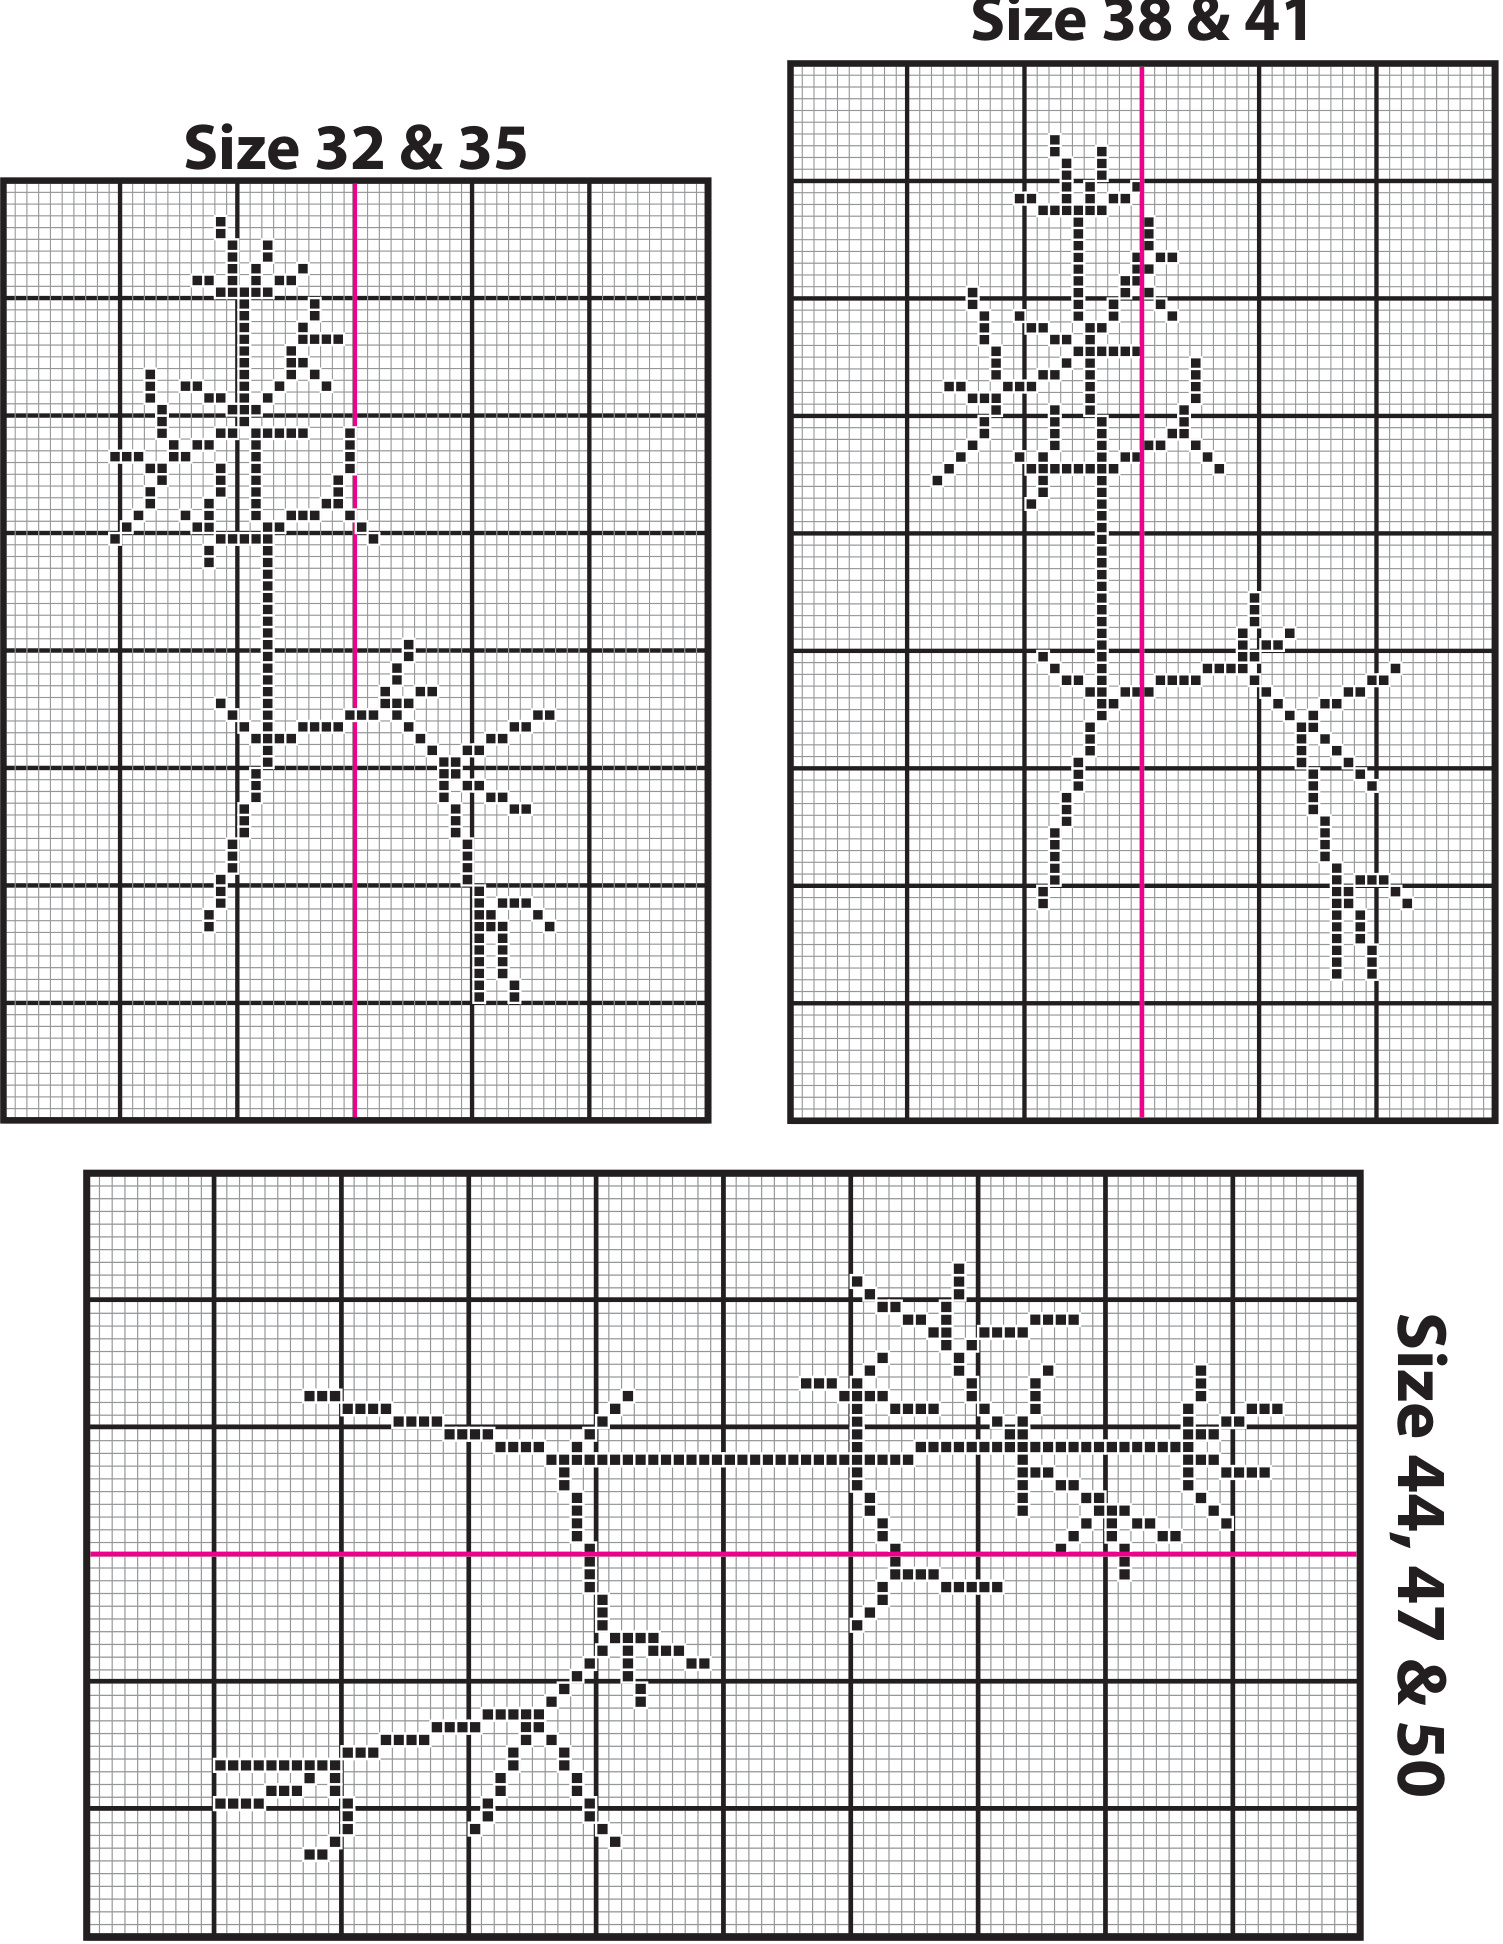
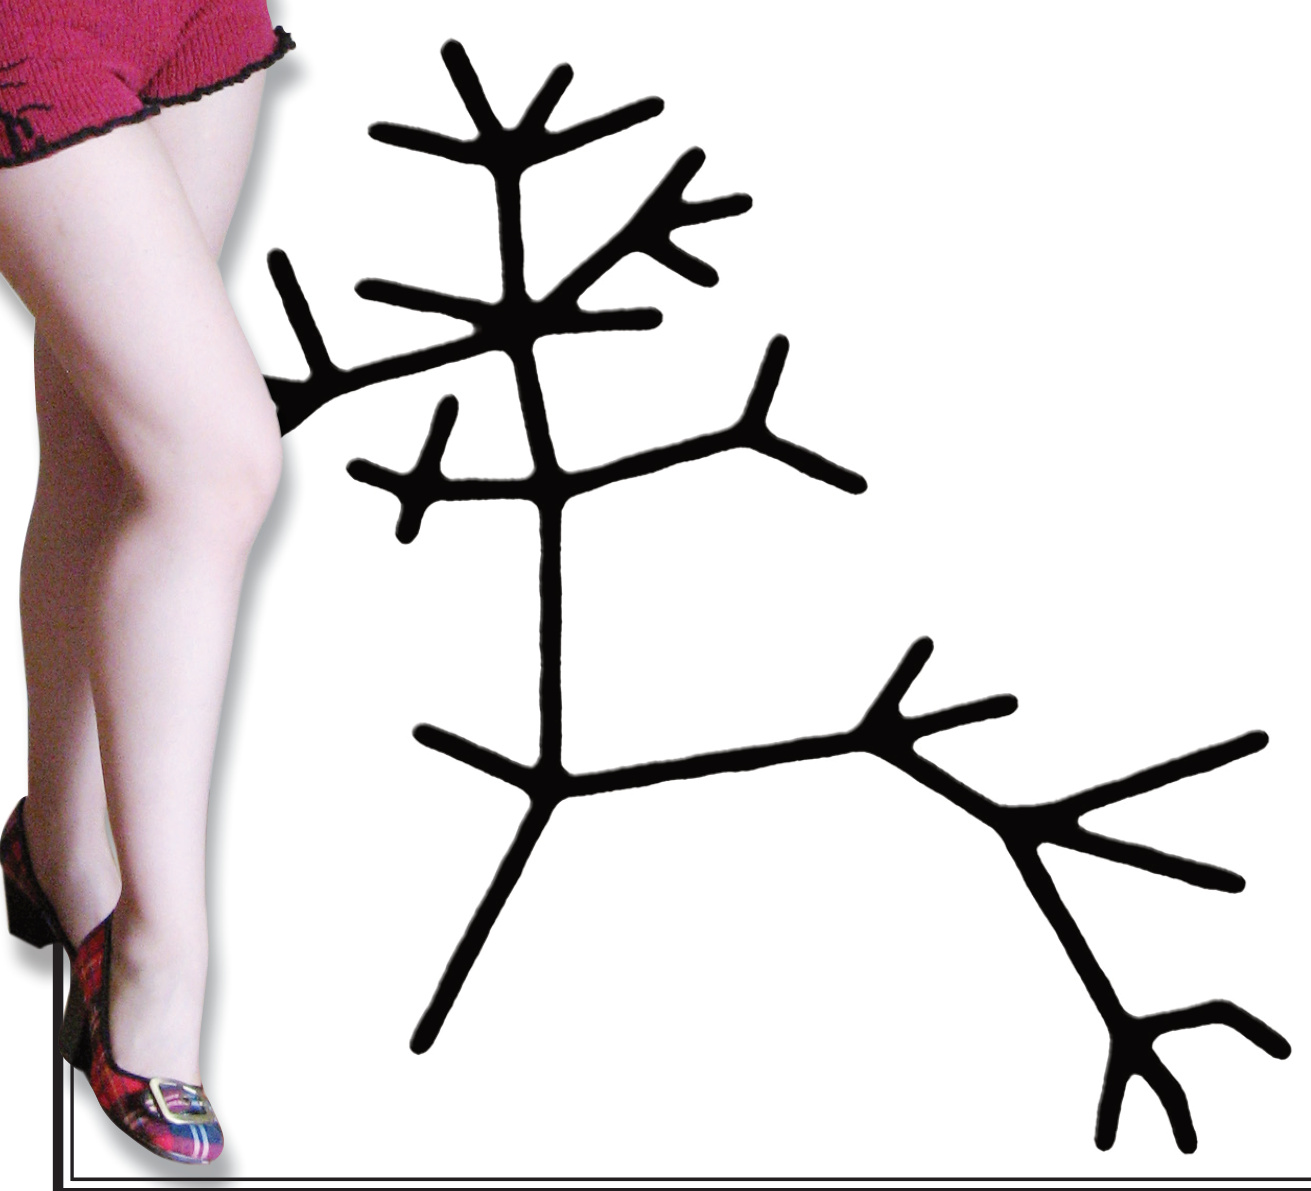
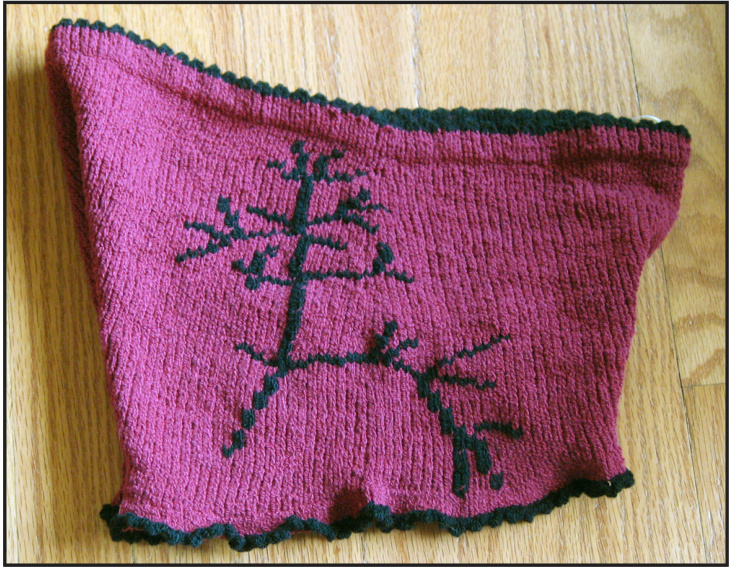
Using CC yarn and referring to the chart for your size on the follow ing Pages, use duplicate stitch to embroider the tree of life pattern. Keep a light tension when working duplicate st. The charts show the tre of life worked over the right side of the gar. ment.The pink line indicates the side “seam." Duplicate sts near the side seam may overlap an increase.If an area falls near an increase, you may need to add an extra duplicatest to fllin the gap. Thisis totally fine. The integrity of the design will not be compromised.
RESOURCES
Original tree oflife drawing createdbyCharles Darwin 1837 Simplifed tree oflife drawing created by Colin Purrington http:/ www.fickr.com/photos/cpurrin1/ Boy short idea inspired by Thuy http:/chmeebot.com Information and tutorial for duplicate stitch: http://knitting.about.com/od/knittingskills/ss/duplicat_stitch. html Technical Editing by Elizabeth Sullivan elizabeth@sweetpaprikadesigns.com
SUPPORT
This pattern is offred free for your personal use, however, if you enjoy the pattern and would like to make a donation to help cover the cost of supplies, time, and technical editing, you can make donation, of any amount, by clicking here.
COPURIGIT
$\copyright$ Copyright 2008, Marnie MacLean. All rights reserved. This pattern is offered for free for personal non-commercial use only. This pattern, and the text and photos contained within, may not be copied or reproduced for any purpose other than personal use. This pattern may be found at http://MarnieMacLean.com For questions regarding legal use of this pattern, please contact the author at marnie@marniemaclean.com.
ABOUT THE DESIGNER
Marnie MacLean has been designing knitwear since 2003,but has been knitting and crocheting for more than 25 years. She is currently living in Oregon, with her long-time boyfriend and two ridiculously fantastic dogs. Marnie has appeared on five episodes of Knitty Gritty and has patterns in several books and magazines. She maintains a large collection of free and for sale patterns, as well as a blog and website at http://MarnieMacLean. com
Weave in ends from duplicate s
Ifusing a ribbon drawstring, run it through the waistband casing.