MY LITTLE ANGEL
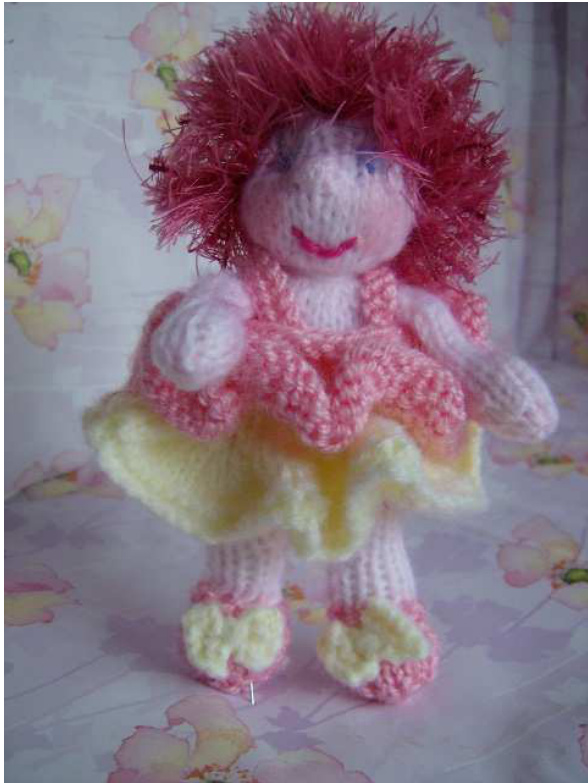
MATERIALS : 2.75 needles 2.5 mm needles (you will need 3) Tapestry Needle for sewing up Sharp scissors Each doll takes approx 15 gms of 4 ply yarn The dolls hair takes 8 gms of eyelash yarn Dress : less than 10gms These quantities will vary slightly according to the yarn you choose. Polyester fibrefill (approx 5 gms) per doll Abbreviations: CO - Cast on K - Knit P - Pearl Kfb - knit into front & back of next stitch Pfb - pearl into front & back of next stitch K2tg. Knit two stitches together to make 1 P2tg. Pearl two stitches together to make 1 St or sts - stitch or stitches St-st - stocking stitch (1 row K, 1 row p) Garter stitch - every row knit \*.\*\* repeat stitches/rows between asterisks Yo - make a stitch by bringing yarn around right needle from back to front. BO - Bind off/cast off Sl - slip 1 stitch Psso - pass slip stitch over Garter - every row knit Skpo - slip 1, knit 1, pass slip stitch over S2kpo - slip 2 sts, knit 1, pass slipped stitches over SPPO - Slip 1, purls 1, pass slip st over B & T - break yarn, thread thru stitches and draw up tightly Inc 1 - inc by knitting into front and back of stitch. M1 - make 1 by picking up and knitting the horizontal yarn between the stitch you just knitted and the next stitch. K2tgtbl - Knit 2 together through back of loops. To make an I-cord: You need double pointed needles (no ‘knob' on the end) Knit the first row, don't turn needles, instead slide the sts to the other end of the needle and with the same side facing you, knit the next row. Continue in this way knitting with right side facing you, sliding the sts along on every row. Bring your yarn firmly across the back of the work. This way you will produce a sort of tube. As you work give a little tug on your work to keep a good smooth shape. Make your cord as long as you want it for your design and then B & T. To make a twisted Cord : Cut a length of yarn twice as long as desired finished length, fold in half. Holding the cut ends together, insert your finger into the loop end and keep twisting until your yarn is very tightly twisted. Bring the two ends together and let them selftwist into a cord. Secure by tying the end. Alternatively, cut a length of yarn twice as long as desired finished length, make a slip knot in one end and slide onto a door handle, hold the other end of the length and twist around clockwise until it is very tightly twisted and then bring this end up to the door handle end and allow the cord to self twist. It may help if, as it self twists, you run your thumb and forefinger down the twisting length to smooth it out and see if you have achieved an adequate twist. When you attach your twisted cords and are happy with the length you can knot the ends again and cut to right length. TINY 4" DOLL : This little angel doll can have a hanging thread attached to the top of her head to hang on/over the cot or on the Christmas tree. If you would rather use DK wool, you could do that and she will come up a little bigger. I have used 4ply mine and she comes up at 4" tall. That is a lovely size to hang on the cot or pushchair and for tiny fingers to grasp. DOLL BODY : Starts at feet and ends at top of head. With 4 ply and 2.5 mm needles (using shoe colour) cast on 9 sts leaving a tail of about 6" Pearl a row \*K1, Inc 1\* to last st, K1 (13) st-st 5 rows K1, (K2tg) x 5, K2 (8) Knit 1 row for shoe edge Change to leg colour yarn St-st 6 rows K1, Inc 1, K4, Inc 1, K1 (10) St-st 3 rows Leave on a spare needle and make second leg alike. With right sides facing, work across the sts of both pieces : K9, skpo, K to last st, Inc 1 (20 sts) P1, Inc 1, P5, Inc 1, P4, Inc 1, P5, Inc 1, P1(24) Buttocks : K1, Inc in next 3, K16, Inc in next 3, K1 St-st 5 rows Knit 1, K2tg x 3, K16, K2tg x 3, K1 (buttocks finished) St-st 9 rows Neck : K1, \*K2tg, K1, rpt from \* to last 2, K2 (17) Pearl a row \*K3, M1\* rpt to last 2 sts, K2 (22) Pearl a row Cheeks : K6, Inc in nxt 3, K4, Inc in next 3, K6 St-st 3 rows Nose : K6, (K2tg) x 3, K1, (Kfb) in next 2 sts, turn, P4, turn K4tg, K1, (K2tg) x 3, K6 (cheeks & nose finished) St-st 3 rows \*K1, K2tg\* to end Pearl \*K1, K2tg\* to last 2 sts, K2 Pearl B/T Use your 6" cast on tails to gather and draw tight the cast on edge of each shoe, join seams. If you will want to hang your dolly, insert a hanging thread and tie tightly on the inside before seaming the head. You will find it easier if you stuff the buttocks with little balls of stuffing rolled around in your hands. Use the blunt end of a tapestry needle to poke and wiggle your stuffing into the buttocks and the cheeks to give definition. After stuffing, Wrap a doubled yarn so tightly round the neck that it ‘disappears' tie and bury ends inside the body. Thread a piece of yarn on a tapestry needle and sew into the top of the buttock cleft out to the belly and back. When you tighten this yarn it will define both the belly-button indentation and the buttock cleft. Fasten tightly and bury ends inside the body. I embroidered the eyes with 2 wrap french knots. Use a soft rose pastel pencil to brush across the cheeks to blush. You may find it helpful to roughen the lead with your thumbnail before applying. If you are intending this little doll to be played with by a little person, don't just loop the eyelash thru a crochet hook but tie each piece tightly to prevent little fingers from pulling it out. ARMS : Make 2 alike Still using 4 ply and 2.5 mm needles Cast on 7 sts in ‘hand' colour Pearl a row K1, Inc 1, to last st, K1 (10) St-st 3 rows Change to cuff colour yarn: K2, (K2tg) x 3, K2 (8) Garter 3 rows Change to sleeve colour : st-st 8 rows Skpo, K6, K2tg B& T. If you are making your doll as an ornament then use the crochet hook method to attach the hair. i.e. cut a length of yarn, double it over and hold the loop end. Pass a crochet hook under a stitch at the hairline , draw the loop thru, pass the two cut ends thru the loop and tighten. Continue all round the hairline and over head. If it is going to be in the hands of a small person then you will need to tie each strand in a knot to withstand handling and play.
TINY DOLL FRILL DRESS :
Starts with Top Frill (Ilf making in 2 colours Colour 1 will be your top frill, Colour 2 will be bottom frill, top edge and straps). If making the two coloured dress as illustrated in pink and white, I made the top frill in DK wool which gives a crisper frill. I used Sirdar snuggly 4 ply for the bottom frill which has a softer curl. TOP FRILL : Using 2.75mm needles and 4 ply. Cast on 100 stitches St-st 8 rows (6 rows for DK) \*K2tg\* to end \*P2tg\* to end st-st 4 rows(2 rows for DK) Leave these stitches on a spare needle for later and start bottom frill. BOTTOM FRILL : Using Colour 2, cast on 100 sts Garter 3 rows Pearl a row St-st 4 rows \*K2tg\* to end \*P2tg\* to end (2 for DK) st-st 8 rows (6 for DK) With Right Sides of both pieces facing you, place the needle holding the shorter (top) frill on top of the needle holding the longer (bottom) frill, using colour 2, with a 3rd needle do a 3- needle cast off ( i.e. \*knit the first stitch on each needle together as if one stitch, repeat a 2"d time and cast off as usual. Rpt from\* until all are cast off and grafted together. Knit one row Cast off. Dress straps (crossed at back) Make 2 alike. Cast on 20 sts, cast off all. Stitch straps to dress. Shoe Bow decoration : Cast on 5 sts, knit 6 rows, cast off leaving a tail for sewing on. Thread the end yarn into a tapestry needle sew it down to the middle, wrap around the middle of the bow 4 or 5 times until you have a good bow definition and sew to each shoe. Since tension is not really important you can vary your wools and your needle size to give an individual look. These take such small amounts of wool that you can really have fun looking thru your stash and using what you have. If you have wool left over from making little clothes for small people it is a lovely idea to dress the dolls in colours/patterns to match. What I really like about these dolls is that not only are they absolutely safe and washable but they don't need to be stored away for another 12 months, they can be given to the children as presents (rewards?) for undressing the tree after 12tn night. I really hope you have had fun working your way thru this pattern and that you are happy with your results. However diligently I proof-read, some typos and omissions sometimes creep in (which mortify me!) If this is the case, I apologise and hope you will let me know. If you get stuck at all or if there is any way I could have made it easier or clearer for you please let me know : Abigail at : 4organicsolutions@sky.com I will usually get back to you within 24 hrs. I have 6 other patterns for hanging Christmas tree angels with wings to purchase in my Ravelry Store : Abigail Orlando's Ravelry Downloads.


