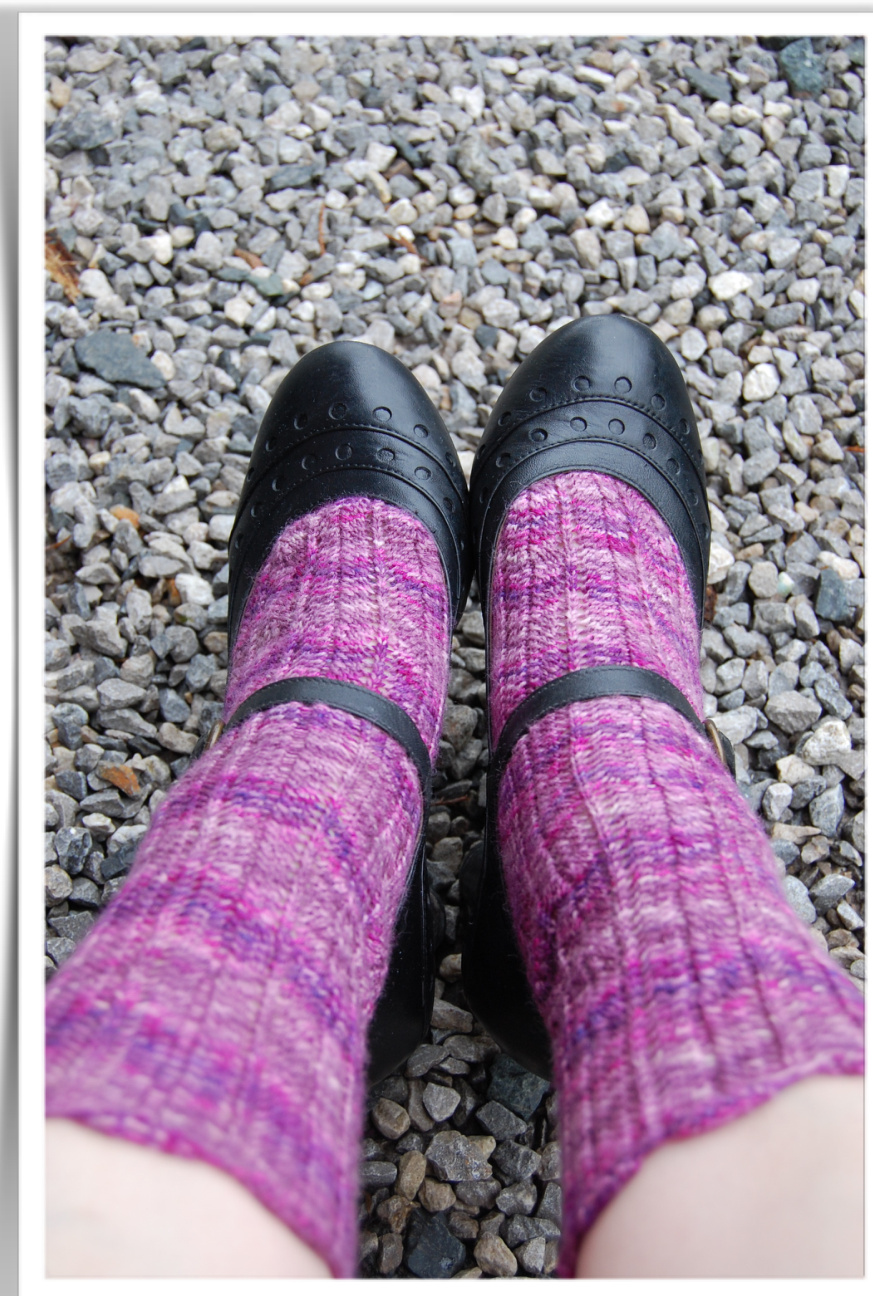
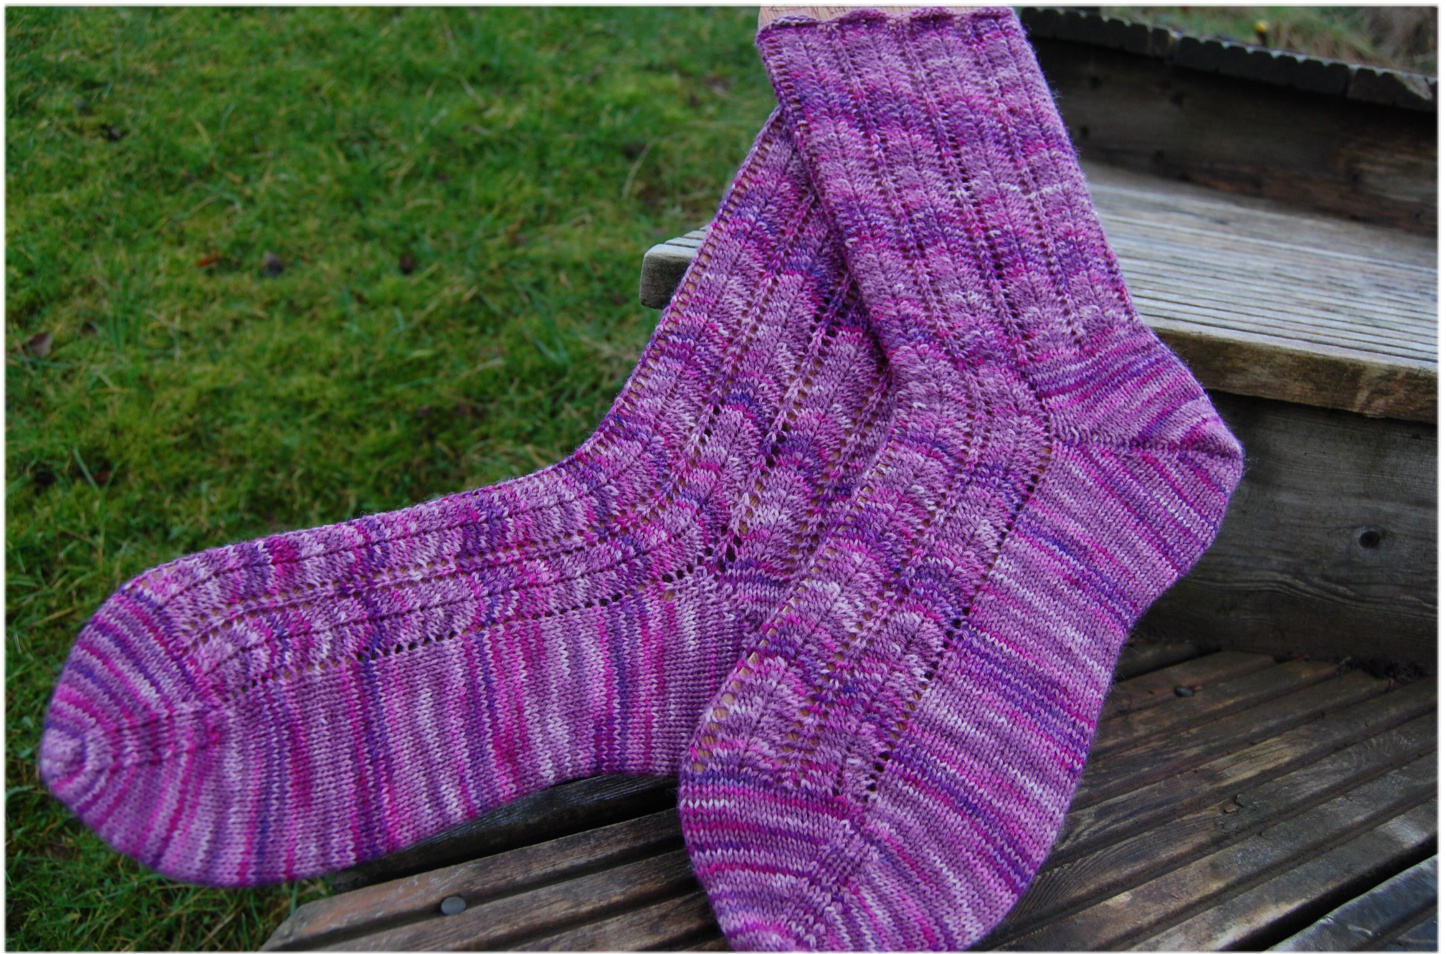
Scalloped Tulip Socks
Once upon a time I wanted a pair of socks. I wanted them to be a bit fancy. I looked around in my books and nothing grabbed me. So the Scalloped Tulip Socks were born. Ilike them because there's no ribbing. Ribbing saps my happiness! Here, the simple lace repeat gives a beautiful scalloped edge. These socks offer a gentle introduction to lace knitting. A short pattern repeat and only two rows to remember means they're a good project to take anywhere.
My favourite heel to use is the 'Fish Lips Kiss Heel' by Sox Therapist. I can not recommend this heel enough. The pattern is available for the princely sum of \$1 on Ravelry. It's not just a heel, it's a foolproof recipe for making your socks fit EVERY time. If you don't want to use the Fish Lips Kiss Heel, then I've written a basic short row heel in the pattern for you to use, feel free to substitute it for your favourite heel. Let'sbegin.
Ingredients
2.25mm sock needles - feel free to use any type of needle you like. DPN's, 2 circulars or magic loop will all work as well 400 yards of a light weight sock yarn. I used a yarn local to me from Jan and Cecelia at the Woolclip in Caldbeck in Cumbria. It's a great hand dyed yarn gently variegated which pools in a lovely spiral as you knit. If you like, youll need a stitch marker to mark the beginning of the round. I just note where the tail is from my cast on. A darning needle to Kitchener your toes
Method
Using a stretchy cast on and your preferred needles, cast on 72 stitches. If you're using DPN's, cast on 18 stitches onto each of 4 needles (2 pattern repeats per needle). If you're using 2 circulars or magic loop cast on 36 stitches per needle (4 pattern repeats eachside) in the round placing a stitch marker to mark the start of the round if you like Start the pattern has follows: Round 1- (YO, K2, Sl1, K1, PSSO, K2tog, K2, YO, K1) 8 times. Round 2- knit all stitches NB- at the beginning of each pattern repeat you start with a yarn over. Take care to keep your tension on this yarn over especially when it's at the beginning of a needle. Too slack and youll get ladders and too tight and you'll lose the hole created by the yarn over. Find your Goldilocks spot of tension. Continue with these two rows until the leg of your sock is an inch shorter than you'd like in the finished article. I like my socks to be about 8" long so I knit until mine measures 7" from the cast on edge. At this point you're going to start knitting the heel portion of your stitches in plain stockinette. I like this because I feel that the patterning may increase wear on the heel. Feel free to omit this next bit and continue in pattern for another inch if you like. Round 1- Pattern across the first 36 stitches which are now your top foot stitches Next knit across the next 36 stitches which are your sole stitches. Round 2- knit across all stitches. Continue working in this manner for another inch.
Turn your heel
I work the fish lips kiss heel here, again I can't recommend it enough. It's the best \$1 I've spent in a long while. If you don't want to use this heel here is a good short row heel you can substitute. Pattern across the stitches on the top of the foot. You will now start to work back and forth over the sole stitches only: Knit 35 stitches. Move your yarn forward as if to purl, slip the last stitch from the left to the right hand needle. Turn your work Slip the first stitch onto the right needle and purl across to the last stitch (you can see you have wrapped the first stitch) Move your yarn to the back of the work as if to knit. Slip the last stitch onto the right needle and turn thework Slip the first stitch onto the right needle and knit across to the stitch before the last wrapped stitch. Wrap and turn as before Slip the first stitch and purl across to the stitch before the last wrapped stitch. Wrap and turn. Continue in this manner until you have 12 wrapped stitches on the left, 12 live stitches in the middle and 12 wrapped stitches on the right. If you have a narrow heel, you can continue to wrap and turn to make a narrower heel. If you have a wide heel do fewer wraps and turns leaving more live stitches in the middle of your row Knit across the live stitches to the first wrapped stitch. To work this stitch you need to pick up the wrap and knit it together with the original stitch. Wrap the next stitch as you have done previously. This stitch now has 2 wraps. Turn. Slip this double wrapped stitch and purl across to the first wrapped stitch. Pick up the wrap and purl it with the original stitch. Wrap the next stitch and turn. Continue to work in this manner until you have worked all double wrapped stitches and all your 36 stitches are now purled - your heel is turned. Continue to work in the round, patterning the foot stitches and working the sole stitches in plain stockinette. You may find you need to pick up a stitch or two on the first round where the heel meets the foot stitches to close up any small holes. Decrease these extra stitches on the next couple of rounds
Foot
Continue to work the foot stitches in pattern and the sole stitches in stockinette until your sock reaches the joint of your little toe. If you've invested in the Fish Lips Kiss Heel pattern you'll have a handy cardboard foot to measure this. If you haven't you can gingerly try on your work or guesstimate!
Toe
We will now work continuously in stockinette. Round 1- K1, SSK, K to the last 3 foot stitches,K2tog, K2, SSK, knit to the last 3 sole stitches, K2tog,K1 Round 2 - knit all stitches Repeat these 2 rounds until you have 16 stitches left Kitchener your toe shut
Ta da!
Wear with pride! Copyright Ellen Penney 2014


