FIBERSPACE Fanciful Felted Fish P-8
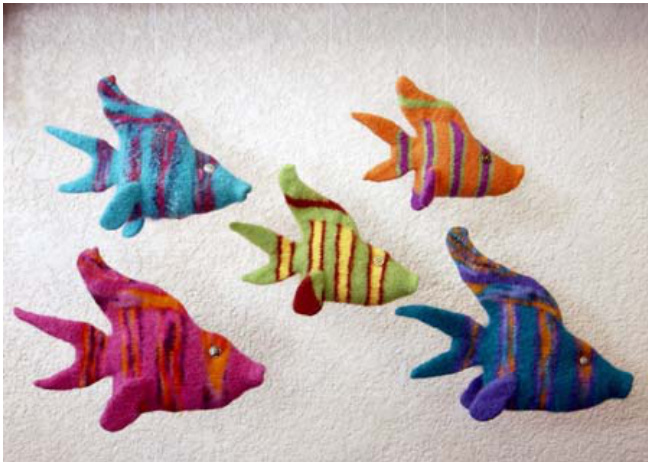
Sleek and colorful, the Fanciful Felted Fish makes an interesting addition to any collection of felted sea life. Variegated yarns make interesting stripes and can be substituted for Colors A & B. Yarns pictured: solid colors - Brown Sheep NatureSpun Sport & Worsted in Spring Green, Orange You Glad, Impasse Yellow, Alpine Violet, Deep Sea, Turquoise Wonder, Cherry Delight, Burnt Sienna; variegated - Interlacements Cheyenne & Oregon Worsted in The Berries, Summer Fruit, Southwest. Finished size - sport weight: 10%2" x 8", worsted weight: 14"x 11".
Materials
100% wool, worsted: 150 yds MC, 50 yds each ColorA&B 100% wool, sport: 70 yds MC, 30 yds each Color A&B Worsted: US Size 1012 double pointed needles & 24" circular, Sport: US Size 8 dpns & 16" circular Ring marker, stitch marker 2 beads, buttons, or "google eyes" for eyes Tapestry needle Stuffing Gauge: approx 3 sts/in worsted, 4 sts/in sport
Techniques
inc - increase. Knit in the front and the back of the next stitch. m1 - make one. Pick up loop lying between st just worked and next st, k into the back of it. w&t - wrap and turn. On right side (RS) - bring yarn forward, slip next st as if to p, take yarn to back of work, slip slipped st back onto left needle, turn work and begin to p. On wrong side (ws) - take yarn to back of work, slip next st as if to p, bring yarn forward, slip slipped st back onto left needle, turn work and begin to k. W&T can produce small holes at the turn. Avoid this problem by picking up the wraps, and working them along with the corresponding stitch when they are encountered. 3 Needle Bind Off - Holding two needles parallel, \*k2tog (one st from front needle, one st from back needle)\*. Repeat \*\* once. Bind first st off over second st. Continue to k2tog, one front st and one back st, while binding off. ssk - slip, slip, knit. Slip the next two sts knitwise, one at a time. Insert the left needle from left to right through the slipped sts and knit.
Mouth & Head
With MC and dpn, CO 18 sts loosely. Divide evenly on 3 needles and join in round being careful not to twist sts. Rnd 1: K3, m1, (k2, m1) twice, k4, m1, (k2, m1) twice, k3. Rnds 2, 3, 5, 6, 7 & 9: K around. Rnd 4: K4, m1, (k2, m1) twice, k 8, m1, (k2, m1) twice, k4. (30 sts) Rnd 8: K5, m1, (k2, m1) twice, k 12, m1, (k2, m1) twice: k5. (36 sts)
Body
Rnd 1: Attach Color A and k16, (m1, k1) twice, (k1, m1) twice, k to end of rnd. (40 sts) Rnd 2: K around. Rnd 3: Attach Color B and k around. Rnd 4: K1, m1,k18, m1, k2, m1, k18, m1, k1. (44 sts) Rnd 5: K around. Rnd 6: K32, w&t, p20, w&t, k to end of rnd. Rnd 7: With A, k around. Rnd 8: K21, m1, k2, m1, k to end of rnd. (46 sts) Rnds 9-11: With MC, k around. Rnd 12: K22, m1, k2, m1, k to end of rnd. (48 sts) Rnds 13-15: K around. Rnd 16: With A, k around. Rnd 17: K23, m1, k2, m1, k to end of rnd. (50 sts) Rnd 18: With B, k around. Rnd 19: K24, m1, k2, m1, k to end of rnd. (52 sts) Rnd 20: K36, w&t, p20, w&t, k to end of rnd. Rnd 21: K around. Rnds 22-23: With A, k around. Work next section as follows: With MC, k 6 rnds. With A, k 2 rnds. With B, k 4 rnds. With A, k 2 rnds. Break A & B, secure tails. With MC, k 2 rnds. Next rnd: K1, k2tog, k to 3 sts from end of rnd, ssk, k1. Next rnd: K. (50 sts) Set-up for tail section: Place split ring marker at beginning of rnd. With dpn, k1, k2tog, k22. With a seconc dpn, k to last 3 sts, ssk, k1. (48 sts) Holding the two dpns parallel, work 3 Needle Bind-Off over first 7 sts, k rem 16 sts on front dpn only. Turn work. With second dpn work 3 Needle Bind-Off over first 6 sts, k rem 9 sts on front dpn only. 20 sts remain, 10 sts on each of the two dpns. Divide these sts on 4 dpns. Move split ring marker to beg of rnd.
Tail
Rnd 1: K around. Rnd 2: (Inc, k8, inc) twice. (24 sts) Rnds 3-4: With A, k around. Rnd 5: With B, (inc, k10, inc) twice. (28 sts) Rnds 6-7: K around, moving marker up 5 rnds. Rnd 8: (Inc, k12, inc) twice. Break B. (32 sts) Rnds 9-10:With A,k around.Break A. Rnd 11: With MC, k around. Rnd 12: K4, m1, (K8, m1) three times, K4. (36 sts) Set-up for tail ends: with dpn, k7, with second dpn, BO 4 and k13, with third dpn, BO 4 sts, K rem 6 sts and first 7 sts worked. There are now 2 dpns on either side of tail fin with 14 sts each. Working yarn marks the edge of lower fin and is the starting point. The following sections areworked flat.
Lower Tail Fin
Rows 1, 3, 5, 7: P. Rows 2, 4, 6, 8: K1, k2tog, k to last 3 sts, ssk, k1. Row 9: P1, (p 2tog) twice, p1. (4 sts) Row 10: K1, k2tog, k1. Row 11: P3tog. Break yarn leaving 12-14" tail, bring through last st.
Upper Tail Fin
With WS of fin facing, attach MC. Rows 1, 3, 5, 7: P. Rows 2, 6: K. Row 4: K1, k2tog, k to last 3 sts, ssk, k1. (12 sts) Row 8: K1, k2tog, k to last 3 sts, ssk, k1. Row 9: P. Repeat Rows 8 & 9 three times. Next row: K2tog, ssk. Next row: P2tog. Break yarn leaving 12-14" tail, and bring through last st. Use tails to sew fins together. Use excess yarn from tails toclose small holes at base of tail where sts were bound off.
Dorsal Fin
Worked along top edge. Sts are picked up on two dpns that sit parallel to one another. The fin is worked in the round on the two needles and the first few rounds can be awkward. Any gaps in the knitting will disappear in the felting process. With right side facing and dpn, pick up 32 sts along top edge beginning at back. Repeat for left side, picking up 32 sts parallel to right side dpn. Attach MC at back end of fin. (64 sts) Rnd 1: K15, k2tog, k13, (k2tog) twice, k13, k2tog, k to end. Rnd 2: K26, (k2tog) four times, k to end. (56 sts) Rnd 3: K14, k2tog, k8, (k2 tog) four times, k8, k2tog, k to end. Rnd 4: Inc, (k10, k2tog) twice, (k2tog, k10) twice, inc. Rnd 5: K20, (k2tog) four times, k to end. Rnd 6: Inc, k6, (k2tog), k11, (k2tog) twice, k11, k2tog, k6, inc. Rnd 7: Attach A or B, K10, k2tog, k5, (k2tog) four times, k5, k2tog, k to end. (36 sts) Rnd 8: K14, (k2tog) four times, k to end. (32 sts) Rnd 9: K12, (k2tog) four times, k to end. (28 sts) Rnd 10: Inc, k9, (k2tog) four times, k to last st inc. Break A. Rnd 11: With MC, inc, k10, (k2tog) twice, k to last st, inc. Rnd 12: Inc, (k4, k2tog) twice, (k2tog, k4) twice, inc. Rnd 13: K8, (k2tog) four times, k8. (20 sts) Rnd 14: Inc, k5, (k2tog) four times, k5, inc. Rnd 15: K7, (k2tog) twice, k to end. (16 sts) Rnd 16: K4, (k2tog) four times, k4. Rnd 17: K2, (k2tog) four times, k2. Work 3 Needle Bind Off over rem 8 sts. Weave in tail
Side Fin/Left
Fins are placed 5 sts from bottom edge, parallel to last striped section. With dpn, pick up 6 sts. With second dpn, pick up 6 sts just behind and parallel to first dpn. (12 sts) Attach MC at dorsal fin end of second (back) needle. Rnds 1, 3: K around. Rnd 2: (Inc, k4, inc) twice. (16 sts) Rnds 4, 5, & 6: K to last st on first dpn, inc in last st, inc in first st on second dpn, k to end. Rnd 7: Attach A or B if desired, k around. (22 sts) Rnd 8: K2tog, k to last 2 sts, k2tog. Rnd 9: K14, w&t, p8, w&t, k to end. Rnd 10: K2tog, k to last 2 sts, k2tog. (18 sts) Rnd 11: K2tog, k12, w&t, p10, w&t, k12, k2tog. Rnd 12: K6, (k2tog) twice, k6. (14 sts) Rnd 13: Work 3 Needle Bind Off over first 3 sts, on individual needles, k2tog, k to end. (6 sts) Work 3 Needle Bind Off over rem sts.
Side Fin/Right
Set up dps as for left side. Attach MC at dorsal fin end of first (front) needle. Work as for left side fin above.
Felting
Set washer for heavy-duty cycle, low water level and hot water. Add about one tablespoon of liquid laundry soap to the water. Place fish in a zippered bag and drop into the washer. Agitate. Check progress after 10 minutes, then, every 3-5 minutes until fish is felted as desired. Reset the cycle, if necessary. Since size and fit are not a consideration, you can let the fish swim through the entire cycle. There is a chance that a crease can develop from too much spinning. Stop the spin cycle and position fish flat against the tub to avoid this problem. Shape fish and let dry. Stuff lightly. Mouth is extra long to allow for different shapes. With matching yarn, baste around edge of mouth. Do not cut yarn. Draw basting up tightly and push basted edge back into mouth section. Form mouth to desired shape; funnel, overbite, round, etc. Stitch into the felt through the mouth opening to secure mouth shape into place. Sew on buttons, beads or “google eyes". Eyes can also be embroidered or needle felted directly on the head. Hang with monofilament line.
P-8
2005. FiberSpace. All rights reserved. Linda Taylor P O Box765,Sterling CO 80751 www.fiberspacepatterns.com09/07


