Dooley
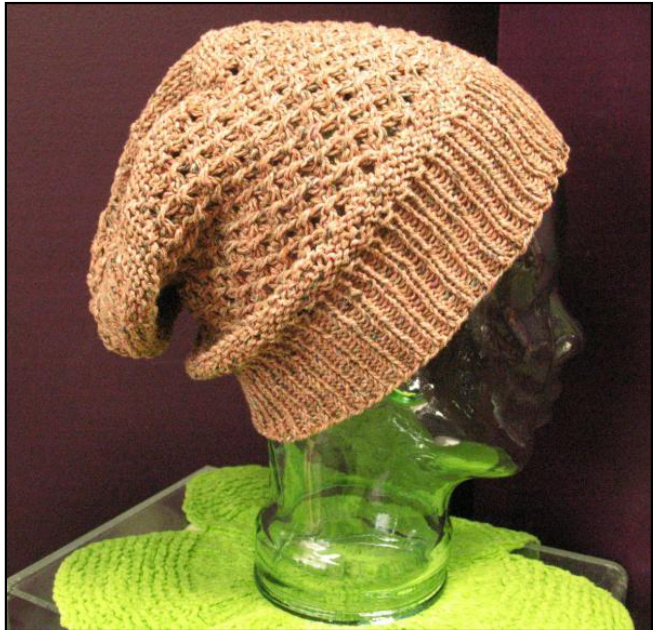
Not too tight, not too scratchy, not too fancy, not too frilly—just right for fall and bad hair days. Dress it up with ribbons or keep it elegantly rustic. The recycled yarn has the feel and look of raw silk and the tweedy colors add to the inviting texture. The clustered star stitch looks complex, but is simple enough to make this a portable project which is sure to attract compliments. Knit one for all the special people in your life. Materials: Revive, a Rowan Purelife recycle yarn, $(50\;\mathfrak{g}.=137$ yds; $36\%$ recycled silk, $36\%$ recycled cotton, $28\%$ recycled viscose) --- 2 skeins (See Section V: Ribbing for option.) Needles: US size 6 and 5; you will need dpns or a $32^{\circ}$ circular to knit the beginning sections; you may choose to use a $16^{\mathfrak{"}}$ once the circumference is large enough. 8 markers. Gauge: 5 sts to the inch. Because you are working from the top down, the gauge is less critical because you can slide your work onto the needle cable and try it on as you progress. Adjust size in groups of four stitches.
Section I: The Base Circle—Cast on 4 sts.
1. Join by knitting in the front and back of each st. (8 sts 2. Repeat row 1. (16 sts) 3. Knit all. 4. \*Kf&b, K1; repeat from \*. (24 sts) 5. Knit all. 6. \*Kf&b, K2; repeat from \*. (32 sts) 7. Knit all. 8. \*Kf&b, K3; repeat from \*. (40 sts) 9. \*Yo, K2tog; repeat from \*. 10. \*Kf&b, K4; repeat from \*. (48 sts) 11. Purl all. 12. Kf&b, K5; repeat rom \* (56 sts) 14. \*Kf&b. K6; repea from \* (64 sts)
Section Il: The Pinwheel
1. \*K4, yo, K4; repeat from \*. (72 sts) 2. \*K5, K2tog, yo, K2: repeat from \*. 3. \*K4, yo, K5; repeat from \*. (80 sts) 4. \*K5, K2tog, yo, K3: repeat from \*. 5. \*K4, yo, K6; repeat from \*. (88 sts) 6. \*K5, K2tog, yo, K4: repeat from \*. 7. \*K4, yo, K7; repeat from \*. (96 sts) 8. \*K5, K2tog, yo, K5; repeat from \*. 9. \*K4, yo, K8; repeat from \*. (104 sts) 10. \*K5, K2tog, yo, K6: repeat from \*. 11. \*K4, yo, K9; repeat from \* (112 sts) 12. \*K5, K2tog, yo, K7: repeat from \*. 13. \*K4, yo, K10; repeat from \*. (120 sts) 14. Purl all. 15. Purl all. 16. Purl all. 17. Purl all. 18. Purl all. 19. Knit all Copyright ,2010 Jane Prater; Http:/jpknits.com
Techniques used
$\mathsf{K f}\&\mathsf{b}=\mathsf{A n}$ increase; knit normally, but do not remove st from left needle; insert right needle straight into the back of the same st and knit a second st. Then remove the old stitch from the left needle.
Cluster $\pmb{2}=\pmb{\Omega}$ wrapping technique
1. bring the working yard between the points to the front, 2. slip next two sts purlwise to the right needle, 3. take working yarn to the back, 4. replace the slipped sts on the left needle, 5. bring yarn to the front again, 6. slip the two sts again, 7. place working yarn where needed and continue.
$\mathbf{\forall0=}$ yarnover
K2tog $=$ knit two stitches together as one K1tbl $=$ knit through the back loop of the stitch or yarnover 1.\*K2tog, yo twice, K2tog tbl; rep from \*. Note: You may substitute an ssk or a sl1, k1, psso for the K2tog tbl if you wish. 2. K1, \*(K1, K1tbi) in the yarn over from the previous row, Cluster 2; rep from \*, end (K1, K1tbl in yo) K1. 3. K2, \*K2tog, yo twice, K2tog tbl; rep from \*, end K2. 4. K1, \*Cluster 2, (K1, K1tbl in yo); rep from \*, end Cluster 2, K1. Repeat rows 35 - 38 five more times or until that section measures 4 inches. Section IV: Decreasing to fit head measurement. Note: If you increased or decreased the number of sts for sizing, evenly distribute those sts when decreasing. 1. Purl all placing a marker after every $15^{\mathrm{th}}$ st. You should have eight sections of 15. (120 sts) 2. \*Purl 13, P2tog; rep from \*. (112 sts) 3.Purl all. 4. \*Purl 12, P2tog; rep from \*. (104 sts)
Section V: Ribbing.
Note: This yarn does not have memory as wool does, so your ribbing needs to be tight enough when stretched to hold the hat comfortably. Change to your size 5 needle (or smaller) to work this section. After working two inches of ribbing, secure your stitches and try on the hat. Change to a smaller needle again if you feel it is necessary. You should use the last of your first skein of yarn shortly into this section. Therefore this is a good place to exercise the option of changing yarns for the ribbing to add another block of color if you wish. $^{\star}\mathsf{K}\mathsf{1}$ , P1; rep from \*. Work this 1 X 1 ribbing until this section is 3 inches long.
Bind off loosely.
I recommend using a needle two sizes larger for the bind off row.
Weave in ends.
Embellishments to consider: 1.Weave $1/4$ inch ribbon through some of the eyelet sections. 2. Knit an extra 1.5 inches of stockinette stitch before binding off to create a rolled band. Test Knitted by Deborah Carlson and Donna Richardson. Many thanks.


