Fancy Gauntlets
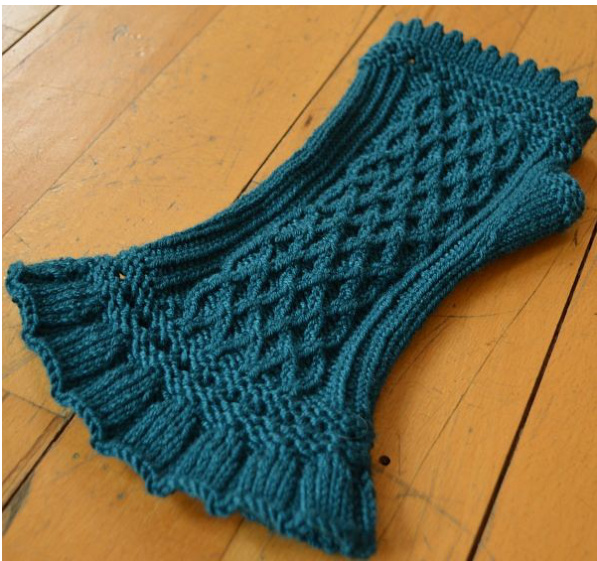
I love fingerless mittens, also called gauntlets, also called wristlets. They give me warmth through incredibly long oratorio concerts in incredibly cold churches, feel great and embellish my hands. These little things don't need too much yarn and knit up fast, so you will be able to use special yarn and try crazy patterns. Usually my wristlets are in stockinette with pretty ribbing, a bit fancy stuff and I call it done. This time I made a bit of an effort. I wanted them a bit longer and with cables, so I knitted them cuff down in order to keep control of the yarn Usage. The pattern on the back of the hand is a traditional travelling stitches pattern from the alps, called "burning love" ("Brennende Liab"). I didn't knit it as given, since this would require the stitches to travel in each row. This seemed too exhausting for me. The upper cuff is a picot seam with a bit lace fiddle-faddle for the transition. It is knitted in one, so there is no extra thumb, just a gussed and a small cuff (saves darning time, I'm lazy). I found a beautiful yarn for this, Schulana Bella-Fine, a merino-silk-cashmere-blend. You will have to be a bit attentive with the travelling stitches, since the yarn tends to split, but the pattern and the yarn are worth paying attention, 1 think. I needed 40 grams for each gauntlet, because the ruffle uses up quite a lot. My gauntlets are knitted on circular needles with magic loop, since the pattern would have otherwise been a bit difficult to knit. It should work with four DPNs. Then there were two needles for the front of the hand and a third needle holding all of the stitches for theback of the hand. Gauge: 24 stitches and 36 rows for 4"
Material:
100 Gramm Schulana Bella-Fine (120 yards/50 grams) Needle size 3mm, US 2.5 (I wanted them dense) Skill level: well, if I say intermediate, it seems difficult. Its fiddly and unfamiliar, but not really difficult. The description seems much more complicated than the actual knitting is.
Pattern:
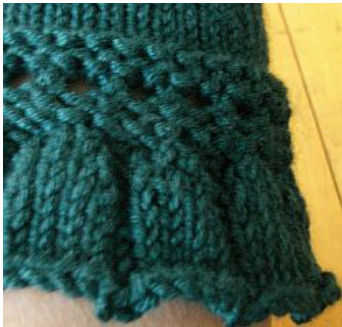
1. Picot edging:
Cast on 48 stitches (2x24 stitches, i.e. Cast on 24 stitches, make loop, cast on aonther 24 stitches). My proisional cast on is the one, where you wrap the working yarn around a waste yarn. This video shows, what I'm talking about: http: / /www.youtube.com/watch?v=UYvQzBpReH4&feature=fvst
Tipp:
I'm using a trick for this: Instead of waste yarn I use another circular needle with very small needle size. This works out, we will use it soon. So you can't knot the two yarns together in the beginning. My solution is to make a slip knot on the auxiliary circular needle and get rid of it as soon as we need the lower stitches. Then I wrap the 24 stitches, make a loop and wrap the next 24 stitches.
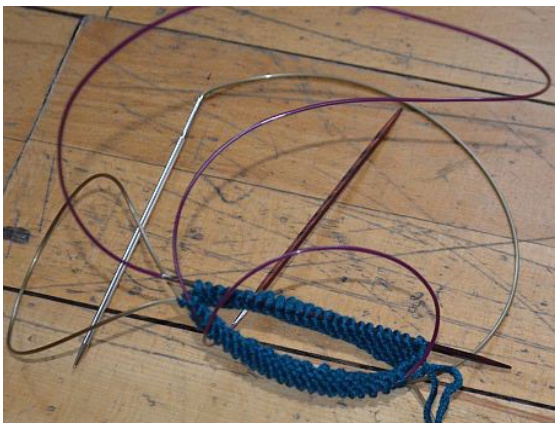
Warning: With this technique the first round feels like a punishment of the godess of knitting and good behaviour for all our misconducts (no swatch, secretly buying the yarn my dear knitting fried desperately wanted, no proper darning in of ends, you get the drift). The picture gives an impression of this challenge. This helped to me: 1. I take two different looking circulars, so at least I know which of the loops is in my way. 2. When I have wrapped the first 24 stitches, I make a loop in both circulars, that makes the beginning easier. Now comes the grand entrance of the second circular: fold the picot in half, get the auxiliar needle parallel to the working needle, drop the slipknot from the beginning. Then knit one stitch from working and auxiliary needle together. Using the second circular saves you from picking up the stitches from the waste yarn. It is a bit fiddly to get the auxiliary needle through the small tube, so you will be able to use it. But it is not half as bad as the cast on round, big promise! There are two advantages to this kind of making the seam: 1. No sowing of seams. 2. The seam is as elastic as the rest of the knitting, neither thighter nor more loose. If you used waste yarn for the cast-on, get rid of this, pick up the stitches on a needle (not important, which one, can be circular or dpn, it should just be smaller than the working needle, this makes it easier to pick up stitches) and go on as described.
2. Intermediate pattern:
p one round k one round poneround k one round Next round: k2tog, yo around k one round poneround k one round p one round
3a. Left mitten

Start knitting the next round (we'll call that Round O, since it is the preparation row for the burning love pattern) by k2tog, ssk, then knit the stitches on the needle. (22 stitches). Start "burning love" pattern on the second needle like this: p1, k1b, p1, k1b, p3, (k1b, m1, p2) four times, (you have four pairs of k2b), p1, k1b, p1,k1b, p1 (28 stitches) On this needle (back of the hand needle) follow the chart or written instructions of the burning love pattern (see page 6) At the same time you knit the thumb gusset on the other needle: Second round after the intermediate pattern (Round 1 of the burning love pattern) k1, cast on 15 stitches (l used the knitted cast on, you can just as well make backward loop), k21 (37 stitches) Next round: k1, p15, k21 Next round: k all on this needle Next round: k1, p15, k21 Next round: k all on this needle Next round: k1, p15, k21 Next round: k all on this needle (these correspond with rounds 2-7 of the burning love pattern on the back of hand needle) Gusset decrease (all on this needle, the other still follows the burning love pattern): ssk, k13, k2tog, k20 (35 stitches) k 2 rounds ssk, k11, k2tog, k20 (33 stitches) k 2 rounds ssk, k9, k2tog, k20 (31 stitches) k 2 rounds ssk, k7, k2tog, k20 (29 stitches) k 2 rounds ssk, k5, k2tog, k20 (27 stitches) k 2 rounds ssk, k3, k2tog, k20 (25 stitches) k 2 rounds k14, k2tog (24 stitches)
3b. Right mitten
Start knitting the next round by k20, k2tog, ssk (22 stitches) On the back of hand needle knit Round O for the burning love pattern as described at the left mitten, then follow written instructions or Chart on page 6. The right thumb gusset is knitted as follows: Second round after the intermediate pattern (Round 1 of the burning love pattern) k21, cast on 15 stitches, k1 (37 stitches) Next round: k21, p15, k1 Next round: k all on this needle Next round: k21, p15, k1 Next round: k all on this needle Next round: k21, p15, k1 Next round: k all on this needle (these are Rounds 2-7 of the burning love pattern on the back of hand needle) Gusset decrease: k20, ssk, k13, k2tog (35 stitches) Knit two rounds k20, ssk, k11, k2tog (33 stitches) Knit two rounds k20, ssk, k9, k2tog (31 stitches) Knit two rounds k20, ssk, k7, k2tog (29 stitches) Knit two rounds k20, ssk, k5, k2tog (27 stitches) Knit two rounds k20, ssk, k3, k2tog (25 stitches) Knit two rounds k23, k2tog (24 stitches) 4. Arm: Go on with the pattern on the back, stockinette stitch on the inside of the arm. Follow this until the mitten is long enough (l like them quite long, therefore I did seven pattern repeats, but that's your choice) ng enough, end with the first round of the chart (four pairs of k1b have just been cable Next round: k all stitches on the inside needle, on the back of the arm k2tog each the just cabled four pairs of k1b (24 stitches
5. Intermediate pattern Il:
follow Intermediate pattern I If you don't want a ruffle, you can call it done here. Cast off the stitches in the last purl round very, very loosely. I would suggest to make a yo before every third stitch and cast it of together with the following stitch. This makes it very stretchy. 6. Ruffle: Imade some kind of ruffle, because I wanted those mittens to really look fancy. This is the easiest way possible:
round 1: p2, k1 all around round 2: \*p2, m1 (here I used the make a stitch by knitting into the back of the stitch of the round below), k1, m1 (this time I again used the stitch underneath the knit stitch), repeat from \* (40 stitches per needle) rounds 3+4:p2,k3 round 5: \*p2, m1, k3, m1, repeat from \* (56 stitches on each needle) Knit five rounds in pattern (p2, k5) then cast off not too loosely so the ruffle will be nice and straight. Darn in the ends and wear them with pride.
Variations:
Usually I would never do a swatch for these small things. For this I would recommend to do one after all. The beginning is so exhausting, it will pay off.
Variations in stitch gauge:
If your gauge doesn't fit and you need more or less stitches, always take an even number. These additional stitches are calculated to the stockinette part of the mitten, but distributed evenly between back and front of the mitten. This changes the thumb as follows:
a. more stitches:
If you need for instance four more stitches, you get 26 stitches on each needle (30 onthe back of the hand during the burning-love-pattern). So you will have to add those two stitches to the knit stitches during the instructions of the thumb gusset (22 instead of 20). Also the pattern on the back of the hand begins and ends with an additional knit stitch. If you just need two additional stitches, I would suggest those to the back of the hand, so you can use the pattern for the thumb gusset. If you need six additional stitches, put two on the inside (26 before picking up the thumb stitches) and four on the back of the hand (28 stitches at the beginning, 32 stitches during cable pattern) Attention: If you need six more stitches for the mittens, the 15 stitches for the thumb gusset will also be too little. So cast on 17 instead of 15 stitches and go on as described, but with three more rounds for an additionaldecrease b. less stitches: If you need just two less stitches, subtract them from the inside needle. So there are just 22 stitches). If you have to have four less stitches, do as described and additionally leave out one of the purl stitches of the burning-love pattern. It then goes like this: Inside 22 stitches stockinette stich (of course with the necessary cast on and decrease of the gusset), back of hand: p1, k1b, p1, k1b, p2, k2b, p2, k2b, p2, k2b, p2, k2b, p2, k1b, p1, k1b, p1 Maybe it is then advisable to just cast on 13 stitches for the thumb. This will reduce the decrease section by three rounds.
Variations on row gauge:
If your row gauge differs a lot, this has the most important effect in to parts: the part above the thumb and the thumb gusset. Everything else is basically up to you anyway.
a. Less rows needed:
1. Beginning: You could knit 4 rounds instead of 5 rounds. This means: Cast on, k4 rounds, 1 round of picots, k4 rounds, follow the pattern. Also Hier kann man beispielsweise am Anfang statt funf Reihen rechts nur vier Reihen rechts stricken. Also you could just knit several rounds of garter stitch instead of the 9 rounds intermediatepattern. 2. Thumb gusset: I alway knitted two plain rounds between the decreases. You could reduce those to one round.
b. More rows needed:
1. Beginning: : Here you could either knit one or two more rounds for the picot seam or make additional two rounds in garter stitch at the beginning and end of the Intermediate pattern. 2. Thumb gusset: The round number of this varies anyway with more or less stitches to be decreased. If this is not enough, decrease every fourth round instead of every third round.
Chart for Burning Love
| B | B | BB | BE | B | BB | BB | B | B | ||||||||||
| B | B | B | B | |||||||||||||||
| B | B B | B B | BB | BB MN | BB | B | B | B | ||||||||||
| B B | B | B | BB | BB | MN | B | B | B | ||||||||||
| B | B | BB | B | B | B | |||||||||||||
| B | B | BB | B | B | B | B | ||||||||||||
| B | B | BB | BB | B | B | |||||||||||||
| B | B | BB | BB | BB | YA BB | B B | B B |
Explanation:
| Empty h | P |
| k1b Right twist of two k1b: First stitch on cable needle and hold in back, k1b, k1b from cable needle | |
| Left twist of two k1b: First stich on cable needle and hold in front, k1b,k1b from cable needle | |
| Right twist of k1b and p: First stitch on cable needle and hold in back, k1b, p from cable needle | |
| Left twist of k1b and p: First stich on cable needle and hold in front, p, k1b from cable needle |
Written Instructions of Burning Love pattern:
Explanation: RTK2: Right twist of two k1b: First stitch on cable needle and hold in back, k1b, k1b from cable needle LTK2: Left twist of two k1b: First stich on cable needle and hold in front, k1b, k1b from cable needle RTKP: Right twist of k1b and p: First stitch on cable needle and hold in back, k1b, p from cable needle LTKP: Left twist of k1b and p: First stich on cable needle and hold in front, p, k1b from cable needle round 1: p1, k1b, p1, k1b, p3, k2b, p2, k2b, p2, k2b, p2, k2b, p3, k1b, p1, k1b, p1 round 2: p1, k1b, p1, k1b, p3, RTK2, p2, RTK2, p2, RTK2, p2, RTK2, p3, k1b, p1, k1b, p1 round 3: p1, k1b, p1, k1b, p3, k2b, p2, k2b, p2, k2b, p2, k2b, p3, k1b, p1, k1b, p1 round 4: p1, k1b, p1, k1b, p2, RTKP, LTKP, RTKP, LTKP, RTKP, LTKP, RTKP, LTKP, p2, k1b, P1, k1b, p1 round 5: p1, k1b, p1, k1b, p2, k1b, p2, k2b, p2, k2b, p2, k2b, p2, k1b, p2, k1b, p1, k1b, p1 round 6: p1, k1b, p1, k1b, p2, k1b, p2, LTK2, p2, LTK2, p2, LTK2, p2, k1b, p2, k1b, p2, k1b, p1 round 7: p1, k1b, p1, k1b, p2, k1b, p2,k2b, p2, k2b, p2, k2b, p2, k1b, p2, k1b, p1, k1b, p1 round 8: p1, k1b, p1, k1b, p2, LTKP, RTKP, LTKP, RTKP, LTKP, RTKP, LTKP, RTKP, p2, k1b, P1, k1b, p1 Repeat those 8 rounds until mitten is long enough Note: This pattern may be used to everything of your heart's content. I just ask to respect that it is my pattern. You can freely share it, however I explicitly forbid the pattern to be sold. Any questions or mistakes in the pattern? Feel free to contact me: nanika.bayliss@gmail.com


