STUFFY OWL
KNITTING PATTERNS BY AMANDA BERRY fluffandfuzz@googlemail.com www.fluffandfuzz.weebly.com
YARN + NOTIONS
Needles:
A pair of 4.5mm straight knitting needles (US 7)
Notions:
· 2 x 6mm toy safety eyes (or you can use buttons or beads) Toy filling (less than 100g) · A darning or tapestry needle to sew the knitted pieces together
Yarn:
All Aran weight yarns, and less than 20g in each colour: Grey Drops Nepal "Grey" 0501 White Drops Nepal "White" 1101 Yellow Drops Nepal "Goldenrod" 2923 The yarn brand used was sold in skeins weighing 50g; one skein in each colour will be more than sufficient to knit your stuffy owl.
NOTES
Finished size: The owl is approximately 10cm tall and 9cm wide. Work flat: The owl is knitted flat (back and forth) on a pair of straight knitting needles. Tension: The tension is approximately 17 sts x 22 rows per 10cm square in stockinette on straight 4.5mm needles. Don't worry too much about tension, as the knitted pieces will stretch a bit when the toy is stuffed. Casting on: Use the long tail cast on for the owl. Sewing seams: Use mattress stitch to sew the seams.
| ABBREVIATIONS | ||||
| Aran Worsted weight | sew through the remaining sts | two slipped stitches on the | ||
| yarn | on the knitting needle. Pull the sts off the knitting needle | right needle | ||
| k Knit | on to the yarn, gather | st(s) | Stitch(es) | |
| k2tog Decrease: knit two | together tightly and secure | WS | Wrong side | |
| stitches together. | the yarn. | [...] | Repeat the | |
| kfb Increase: knit into | rep | Repeat | sequence between the | |
| the front and back of the next | RS | Right side | square brackets by the | |
| stitch. | ||||
| ssk | Decrease: slip the | number indicated. | ||
| p Purl | ||||
| next stitch on the left needle | (.. sts) | The number in | ||
| Pull through to cast off | knit-wise, then slip the next | round brackets at the end of | ||
| stitch on the left needle purl- | the instruction indicates the | |||
| Cut the yarn leaving at least a | wise. Take the left needle and | number of stitches after | ||
| 30cm tail. Thread the tail | onto a darning needle and | knit through the front of the | working the row. | |
All patterns designed by Amanda Berry are protected by international copyright laws. Any unauthorised copying will constitute an infringement of copyright. All rights reserved.
KNITTING PATTERNS
Stuffy Owl
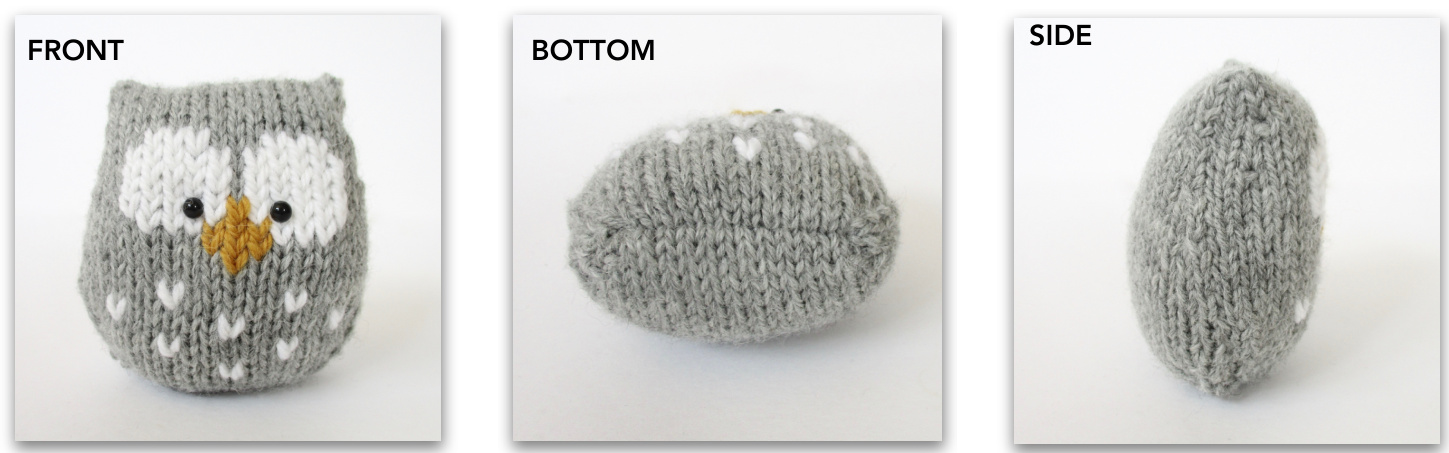
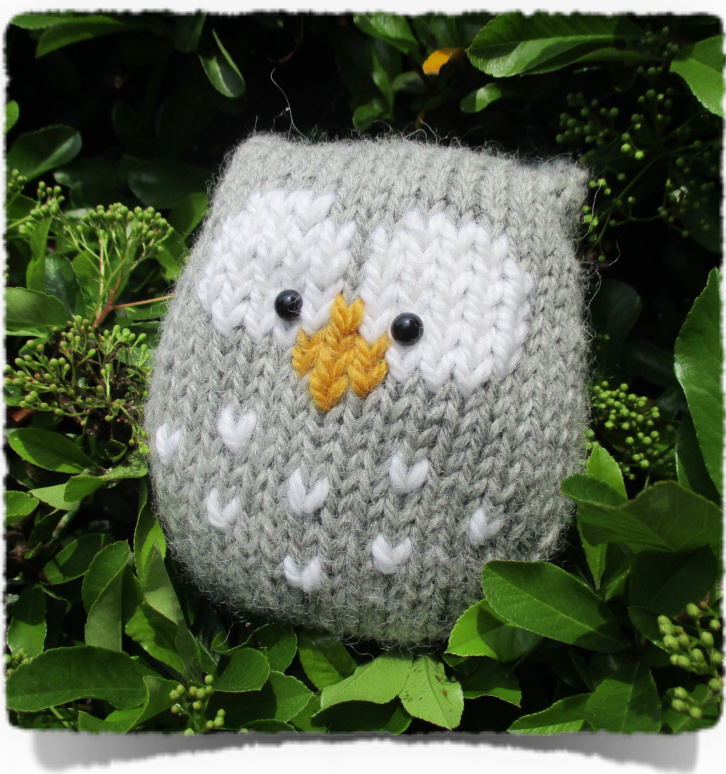
Make 1. Cast on 15 sts in grey on straight 4.5mm needles. Row 1: p (15 sts, WS) Row 2: k1, kfb, k to the last 2 sts, kfb, k1 (17 sts, RS) Rows 3 to 8: rep rows 1 and 2 three times (23 sts) Row 9: p (23 sts) Row 10: k (23 sts) Row 11: p (23 sts) Rows 12 to 19: rep rows 10 and 11 four times (23 sts) Row 20: k1, ssk, k to the last 3 sts, k2tog, k1 (21 sts) Row 21: p (21 sts) Row 22:k (21 sts) Row 23: p (21 sts) Rows 24 to 27: rep rows 20 to 23 (19 sts) Row 28: k1, ssk, k to the last 3 sts, k2tog, k1 (17 sts) Row 29: p (17 sts) Row 30: k1, kfb, k to the last 2 sts, kfb, k1 (19 sts) Row 31: p (19 sts) Row 32: k1, ssk, k to the last 3 sts, k2tog, k1 (17 sts) Row 33: p (17 sts) Row 34: k1, kfb, k to the last 2 sts, kfb, k1 (19 sts) Row 35: p (19 sts) Row 36: k (19 sts) Row 37: p (19 sts) Rows 38 to 45: rep rows 34 to 37 twice (23 sts) Row 46: k (23 sts) Row 47: p (23 sts) Rows 48 to 53: rep rows 46 and 47 three times (23 sts) Row 54: k1, ssk, k to the last 3 sts, k2tog, k1 (21 sts) Row 55: p (21 sts) Rows 56 to 61: rep rows 54 and 55 three times (15 sts) Cast off all sts.
MAKInG UP
Sew sides together: Fold the piece in half so that the cast on and cast off edges meet. Sew the side edges together leaving the bottom edge (cast on/off edges) open.
| 1234567891011121314151617181920212223 | |||||||||||||||||||||||
| 31 | |||||||||||||||||||||||
| 30 | |||||||||||||||||||||||
| 29 | |||||||||||||||||||||||
| 28 | |||||||||||||||||||||||
| 27 | |||||||||||||||||||||||
| 26 | |||||||||||||||||||||||
| 25 | |||||||||||||||||||||||
| 24 | |||||||||||||||||||||||
| 23 | |||||||||||||||||||||||
| 22 | |||||||||||||||||||||||
| 21 | X | ||||||||||||||||||||||
| 20 | |||||||||||||||||||||||
| 19 | |||||||||||||||||||||||
| 18 | |||||||||||||||||||||||
| 27 | |||||||||||||||||||||||
| 16 | |||||||||||||||||||||||
| 15 | |||||||||||||||||||||||
| 14 | |||||||||||||||||||||||
| 13 12 11 10 6 8 7 6 5 4 3 2 1 |
Add features: Use Swiss darning (duplicate stitch) to add the features following the chart opposite. To start, on the front of the owl the top of the eyes are on row 25, so count down 6 rows from the top edge. Then find the central point on that row (the 10th stitch on row 25) and work the embroidery on either side of the centre stitch. Use white yarn for the eyes and flecks on the tummy, and yellow yarn for the beak. (In the chart the yellow beak stitches are marked "Y" so they can be seen clearly if you are printing this page in black and white.) Add toy safety eyes: Insert the toy safety eyes (the position is shown by the "X" in the chart). You can use buttons or beads instead if you prefer. Stuff and finish: Add toy filling inside the owl, and then sew the cast on and cast off edges together at the bottom of the body.