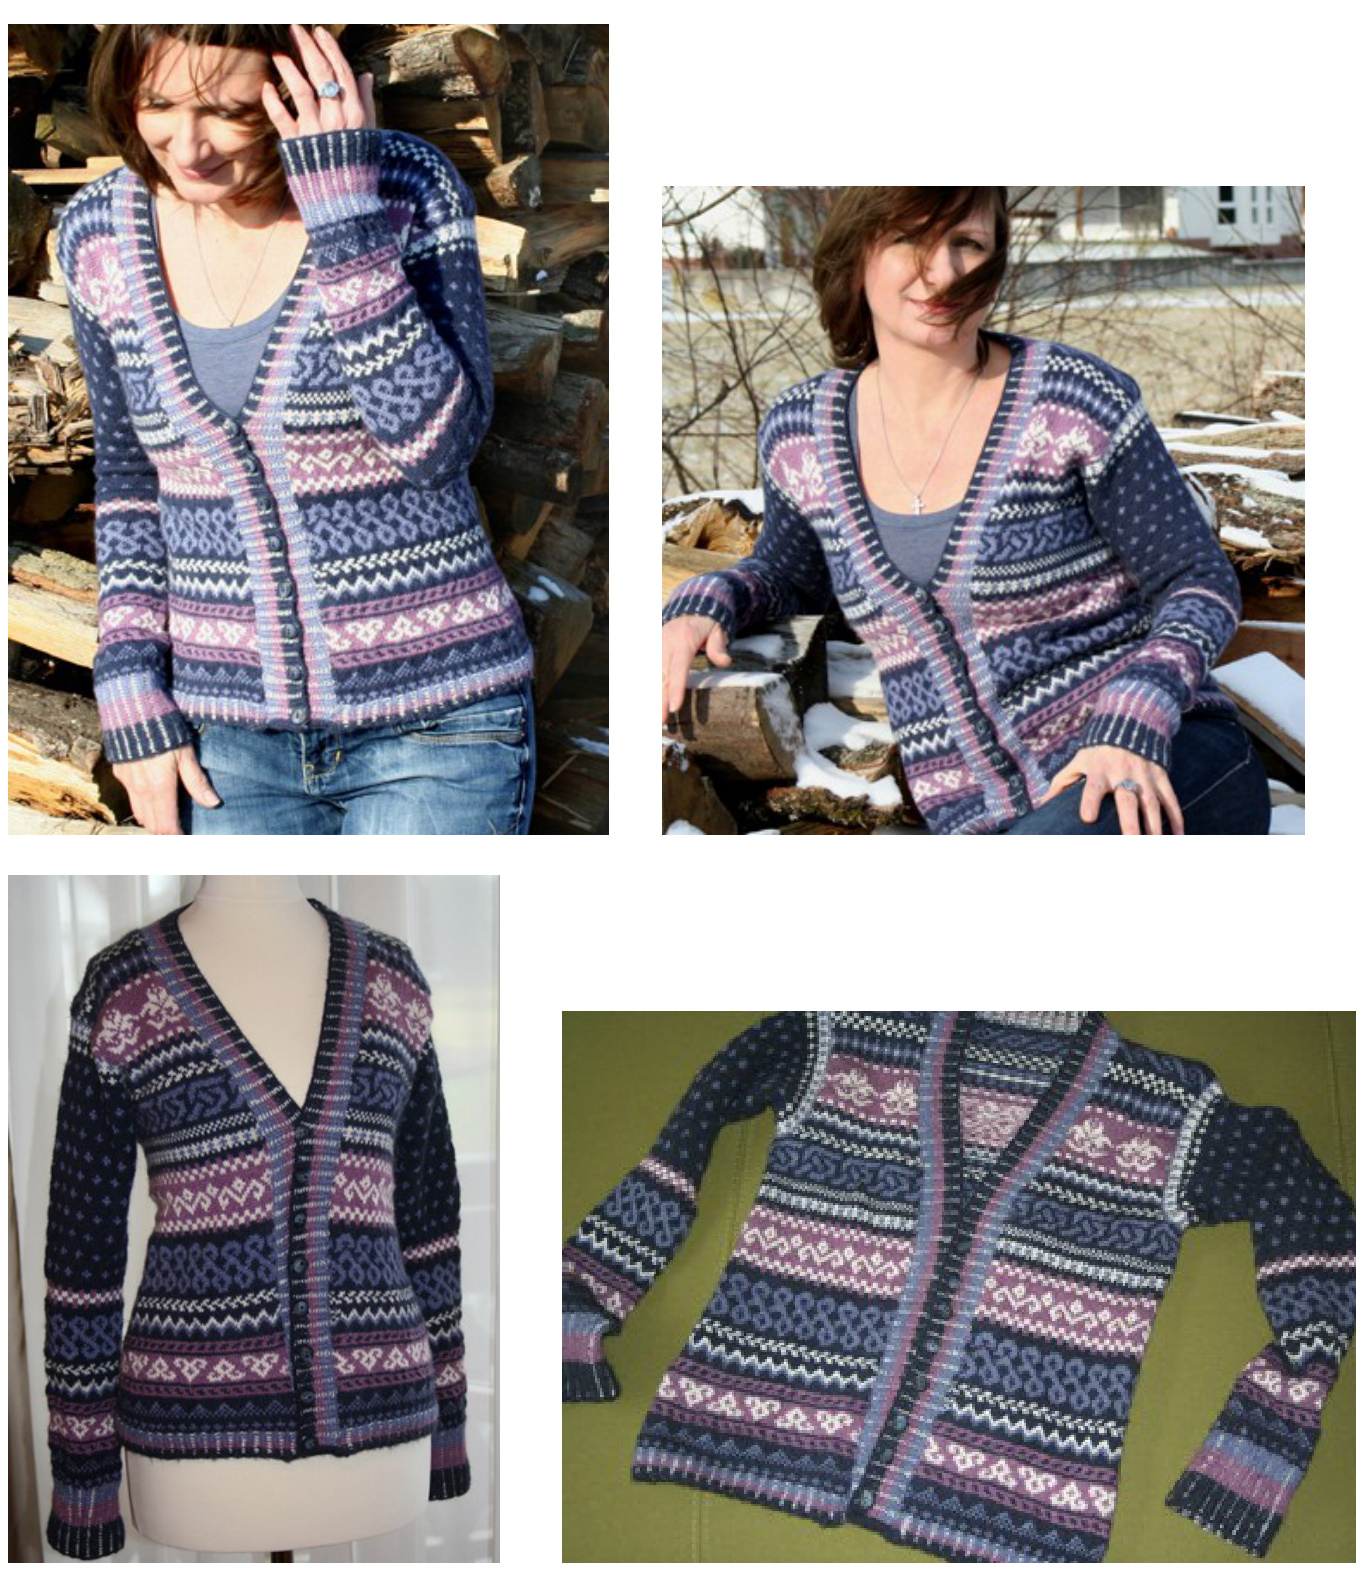
Arctic Winter Sky/ fair-isle cardigan by Juliane Hasa
Please note: I recommend to read the entire directions before you start. I've taken great care not to miss anything and had lots of fun creating this cardigan, I hope you'll enjoy it. Happy knitting! The Celtic pattern which was used here is from Paige Waffle and to be found on Ravelry: http://www.ravelry.com/patterns/library/fair-isle-headband-3 Thank you for the free Ravelry download! Size: S - this one is a rather tight fit, please refer to measurements before you start. Note about the yardage: If you intend to work a slightly bigger size than indicated here, you'll need more yarn of both the dark blue and the off-white yarn. There was no leftover of these twocolors.
Recommended Needles:
US # 3- 3.25 mm circular needles, 32- and 47 -inch length 1 set US # 3- 3.25 mm double point needles Yarn: Garnstudio Drops Alpaca: (50 gr.= 200yards) 4 skeins (800 yards)-color dark blue (color way 4305) Garnstudio Drops Baby Alpaca Silk: (50 gr.= 183 yards) 4 skeins (732 yards) off white (color way 0100) 2 skeins (366 yards)color light blue (color way 6347) 2 skeins (366 yards) color rose (color way 4088). - 8 blue buttons. Gauge: 35 sts. + 36 rows = approx 10x10cm
Decrease is done as follows:
Before the marked stitch: Knit 2 together. After the marked stitch: skp (slip 1, knit 1, psso)
Directions/ Body:
Using the shorter one of the circular needles cast on 300 sts. (this includes 10 sts. for the steek) in dark blue (color way 4305) Place marker and join to begin working in the round, being careful not to twist. Work the corrugated rib starting with the main color dark blue:
| 1 | D | □ | Color 1= off white | ||
| 2 | □ | □ | Color 2= dark blue | ||
| 1 | □ | □ | Color 3= light blue | ||
| 2 | □ | □ | Color 4= rose |
■ knit 1 purl1 - slip stitch as if to purl, yarn back. After working the rib in the desired width start chart no.1 using dark blue. The change of color is indicated in the chart. Place stitch markers as follows: 5 sts first half of front steek/ 50 sts right hand front of the body/ 12 sts for steek of right armhole / 130 sts for the back/ 12 sts for steek of left armhole / 50 sts left hand front of the body/ 5sts second half of front steek.
Shape waist:
Starting to decrease when work measures 10 cm placing the decreases on the sides of the sweater. Decrease 18 x 2 sts to get to the total number of 264 stitches. The waist shaping ends when work measures 21 cm.
Decreases for front slope and arm hole shaping:
ote: Read ahead! Neckline shaping is worked at the same time as armhole shaping Work straight until the work measures 37 cm and up to the marked stitch for the armhole. Let 12 sts rest on a piece of yarn and cast on 12 new sts in the next round (cut up sts) Start to decrease for the armhole shaping. Knit 2 together in every second round before and after the steek for the sleeve. Repeat 5 times. When work measures 39 cm start to decrease for the neckline. Knit 2 together in every second round before and after the front steek. Repeat 9 times = 226 sts. Number of stitches at the back of neckline = 56 sts. Put these ones as well as the stitches of the shoulder seams on a holder. (Number of stitches at shoulder seam= 34 sts/each) Bind-off steek stitches.
Assembly
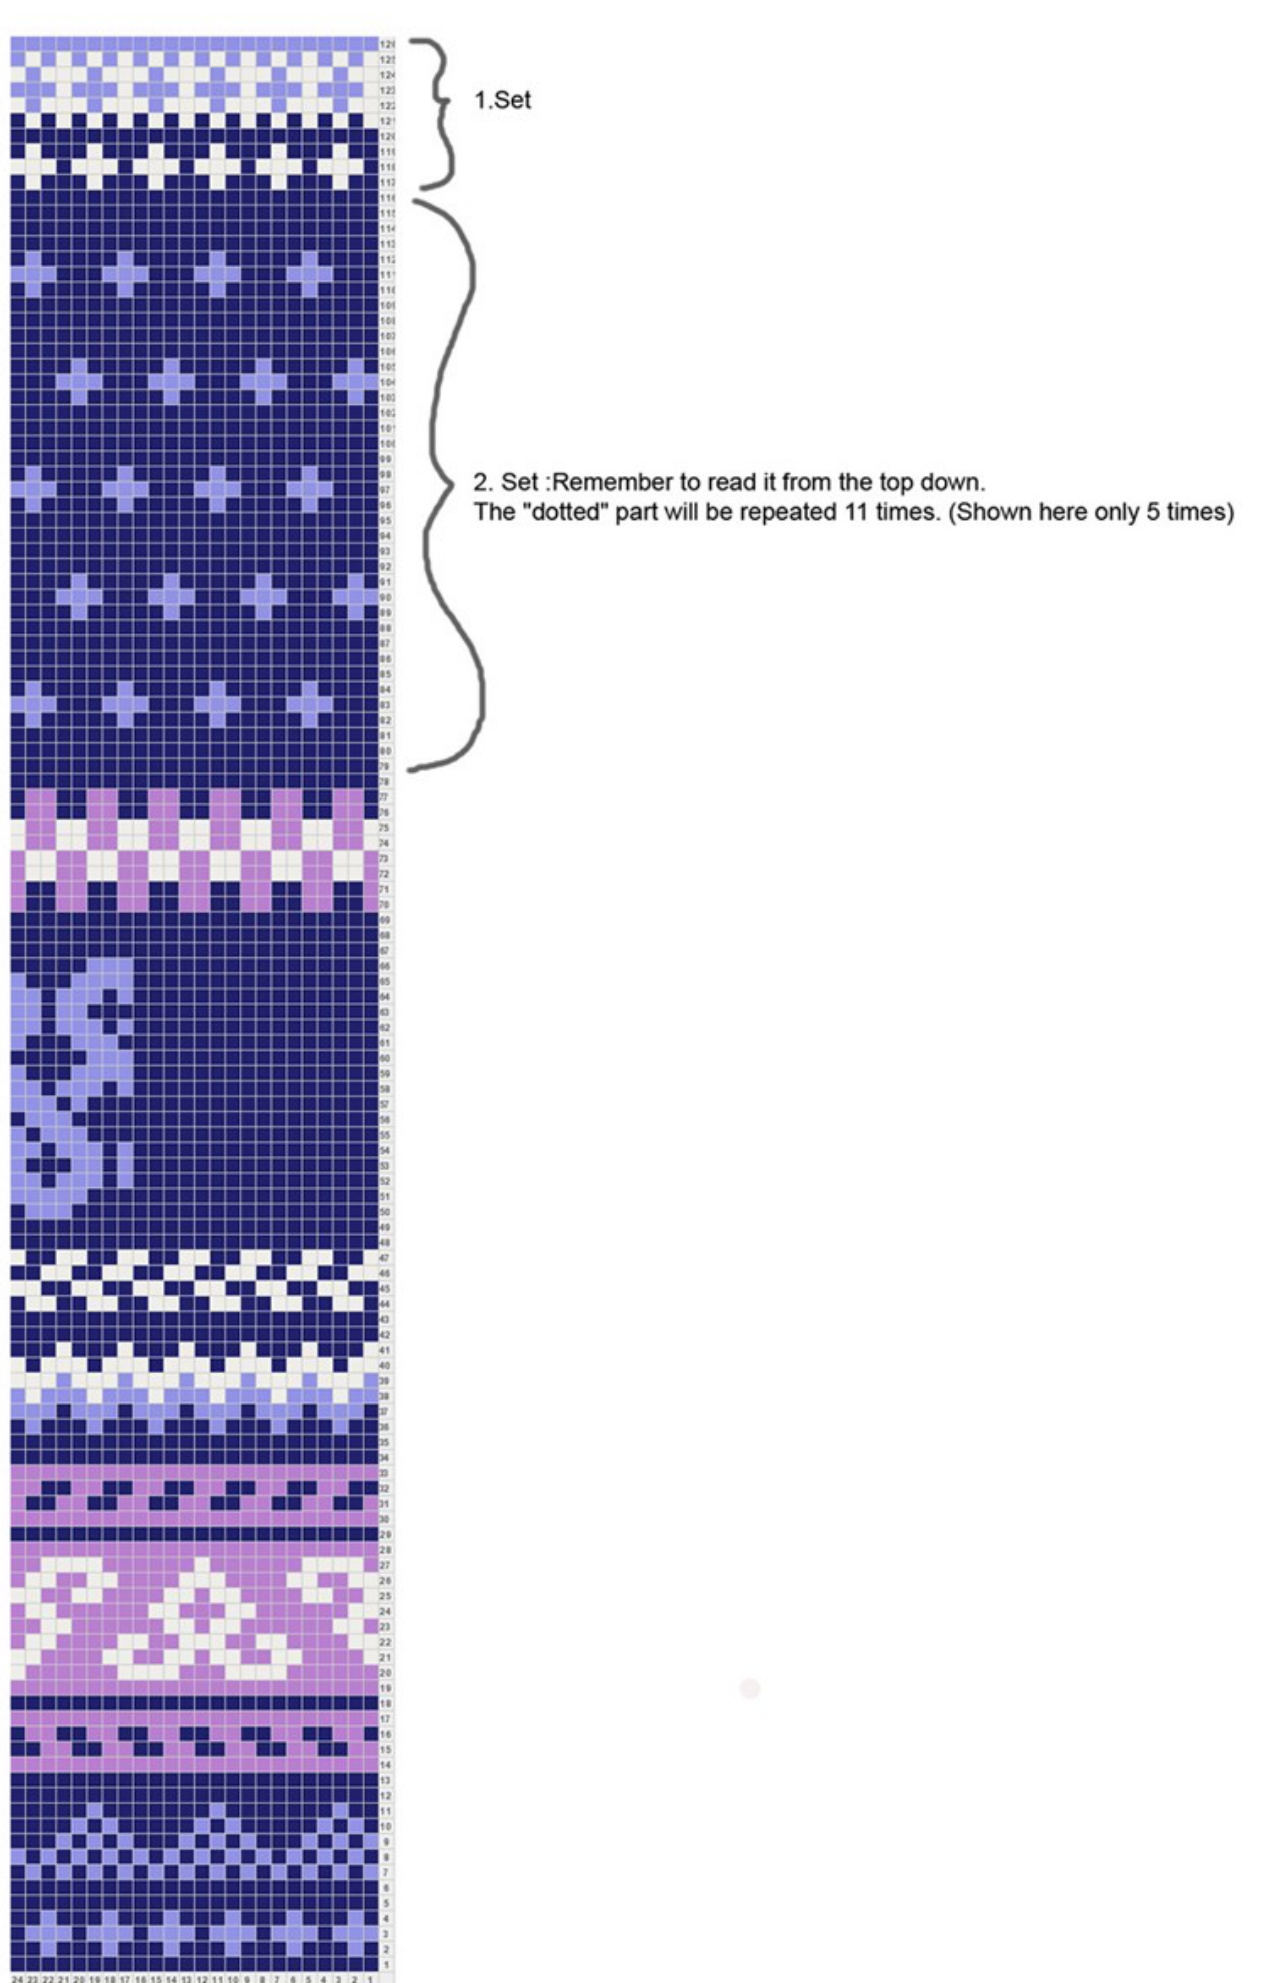
Reinforce sleeve and body steeks using a sewing machine. Cut all steeks. Join shoulder seams using kitchener stitch. (34 sts for each shoulder seam.) Fold the armhole edges over against the wrong side and sew. Sleeves: Start with the second chart- fair-isle chart no. 2: Read it from the top down. The sleeves are knitted upside down. Using the 3.25 mm double point needles knit up 134 sts round the armhole (color light blue). This includes the 12 sts which were rested on a piece of yarn. Start your rounds under the arm placing a stitch marker. The decrease starts immediately and is placed within the first set of the pattern (see chart). Reduce the number of sts by 30, decreasing evenly within the next couple of rounds. By the end of the first set of pattern (where the white yarn ends), you'll have 104 stitches/round. Continue to decrease by knitting two together before and after the marked stitch every 4th round. Repeat 14 times (= 76 sts). The last round before starting the cuff reduce the number of stitches by another 4 sts. (= 72 sts). Knit cuff in desired width working the corrugated rib as before. Bind off all stitches. Knit second sleeve.
Buttonband:
Fold both parts of the front steek over against the wrong side and sew. The button band is worked in rounds including a steek. With right side facing, using the 3.25mm/ 47 inch circular needle knit up 414 sts in light blue. Join to begin working in the round. This number of sts includes 12 sts for the steek as well as the 56 sts from the back neckline which were put on a holder. Work the corrugated rib as before. When button band measures 3 cm mark desired locations for 8 buttons along right front edge. Place first buttonhole close to lower edge, and last buttonhole just below beginning of neckline shaping. Work buttonholes at markers as follows: \*work to 1 stitch from marker, bind-off 2 sts\*, repeat between \*\* 7 more times and work to end. On next round, cast-on 2 stitches above each set of bound-off stitches. When button band measures 5 cm bind-off all stitches loosely, a little tighter around the neckline. Secure and cut steek, folding the corners over against the wrong side and sew.
Finishing:
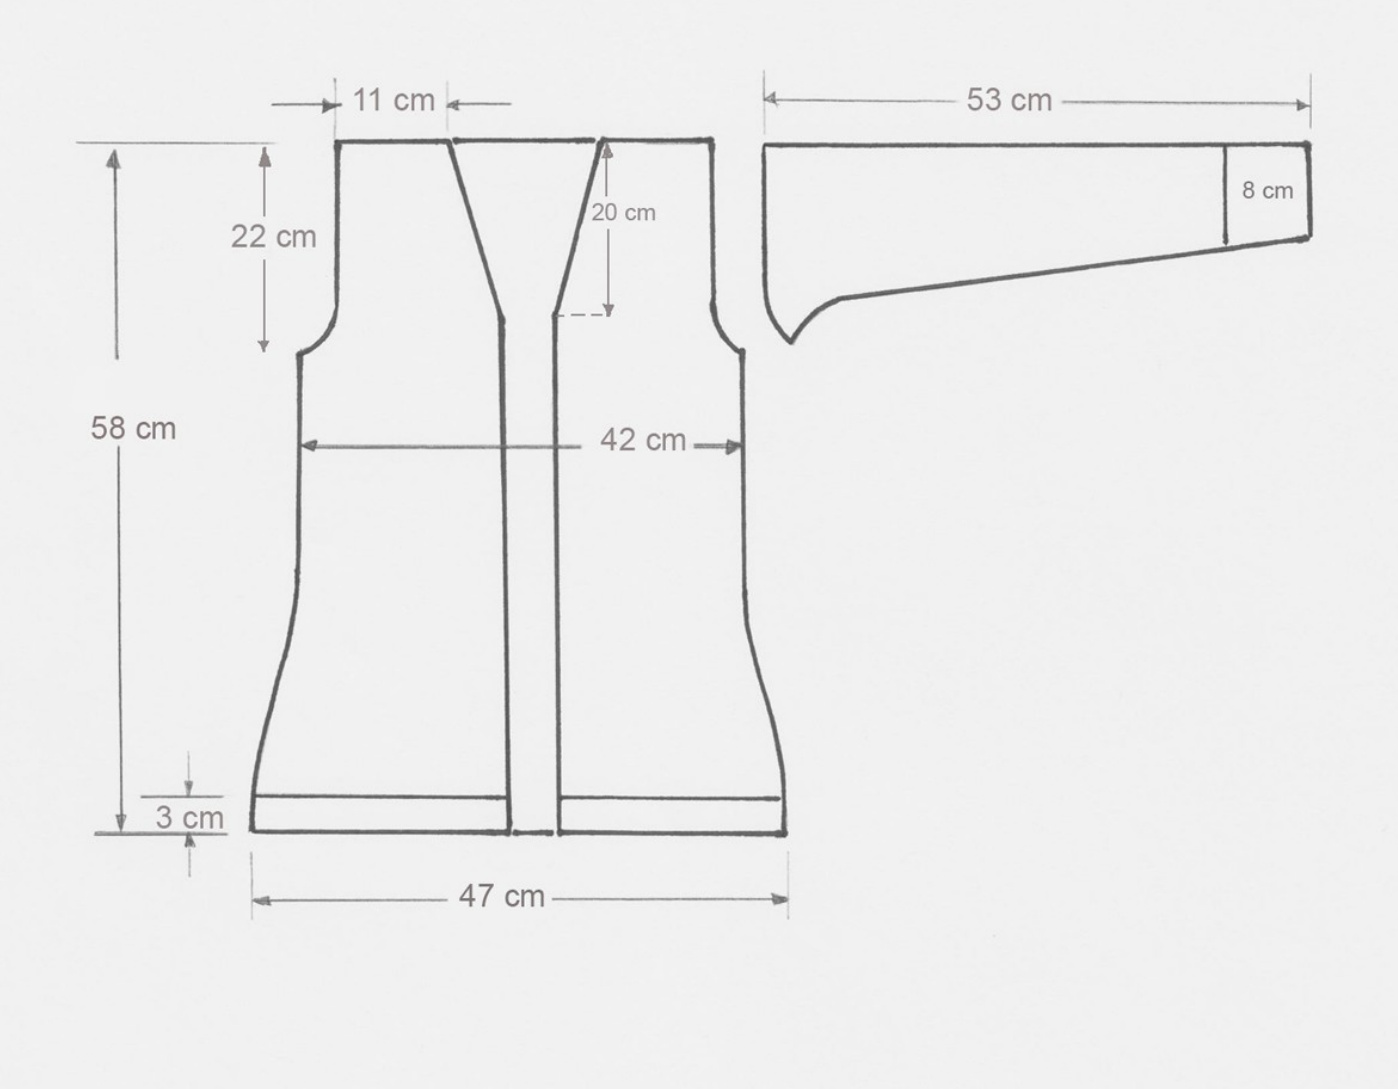
Weave in ends and block sweater to measurements shown in schematic. Sew buttons to left front band, opposite buttonholes.
Fair-isle chart no. 1: Read it bottom up.

Fair-isle chart no. 2- sleeves: Read from the top down.
① 2012 Juliane Hasa. This pattern is for personal and none profit use only. It may not be reproduced for sale or distribution without permission. You may not sell a garment made from this pattern. By downloading this pattern, you agree to these terms. For questions or errata, please send an email to julianehasa@yahoo.de


