Arctic Blast Mitts by Star Athena
Size Women's Medium Wrist circumference: 6.5 inches (16.5 cm) unstretched. Will stretch to fit 10 inches (25.5 cm).
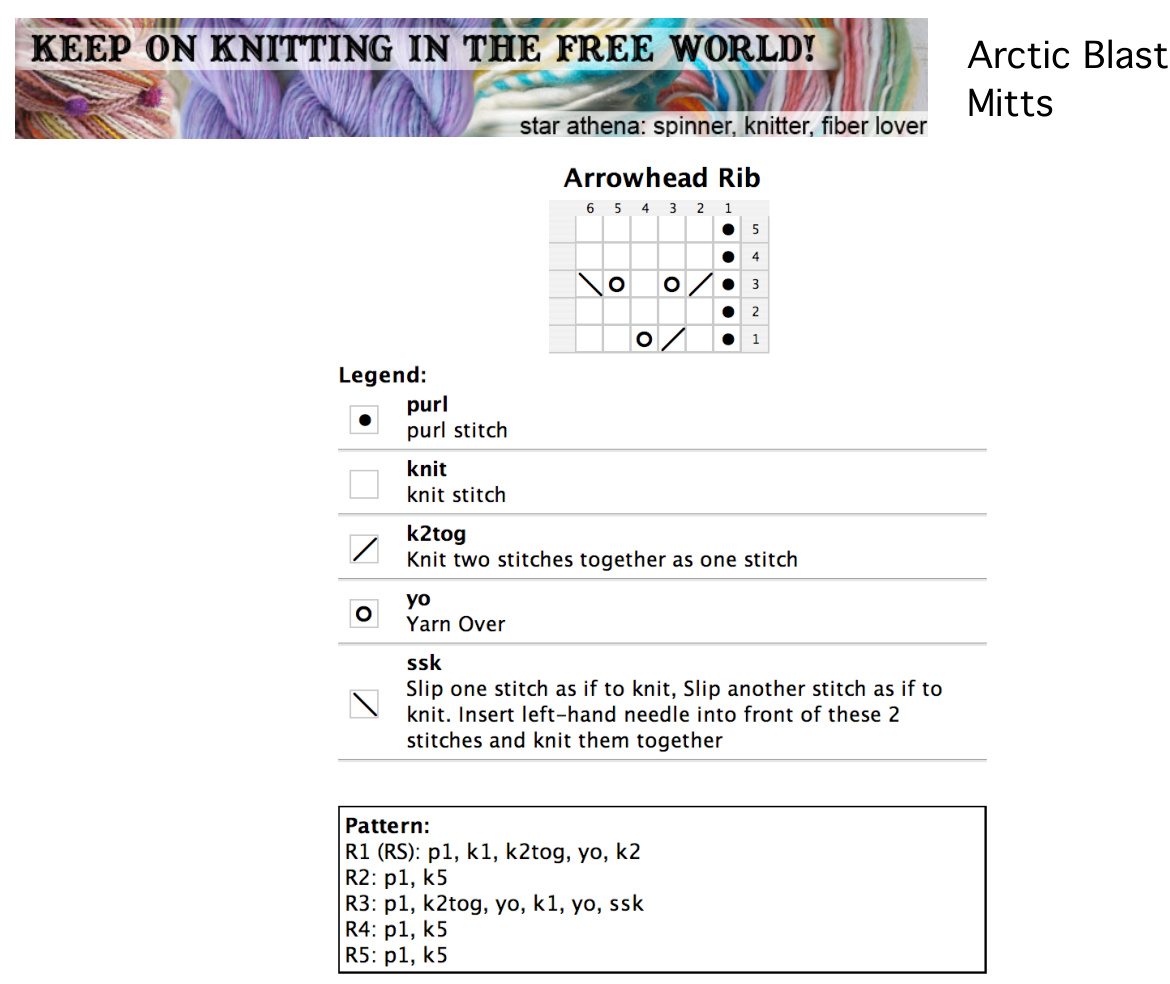
Gauge: 26 sts/36 rows = 4' in st st Needles: 1 set US #3 /3.25mm $32^{\mathfrak{s}\mathfrak{g}}$ circular needles (magic loop), 2 sets of 24" circulars, or double pointed needles, or size to get gauge. Yarn: Malabrigo Silky Merino [ $50\%$ Merino, $50\%$ Silk; 150yd/137m per 50g skein]; color: Natural; 1 skein. (Or any DK weight yarn that gives you proper gauge) Notions: Darning needle, stitch holder, and stitch markers. Some people live in towns that expect two feet of snow. These towns have snow plows and salt and intrepid spirits that function despite the challenges. I live in a town that panicked. We had some plowing of the major streets, with sand instead of salt. But if you didn't have chains, you weren't driving anywhere. I did what I had to do... I stayed at home with some hot tea, bad movies, and knit some armwarmers. And now I get to brag that I officially survived the Arctic Blast of Ought Eight. NOTES: This intermediate level pattern includes instructions to make a pair of lacy wrist warmers. You'll need to know how to read a pattern, cast on, knit, purl, YO, k2tog, ssk, ktbl, k2tog tbl, and work in the round. The lace pattern is charted as well as written; take your pick. This pattern is written using the magic loop or 2-circular method, where half the stitches are on N1, and the other half are on N2. You can easily divide these stitches again for double pointed needles. ABBREVIATIONS: CQ: Cast on K: Knit Kltbl: Knit one st through the back loop. K2tog: Knit two stitches together as one stitch M: Marker. M1L: Make one, left leaning. Bring the tip of the left-hand needle under the strand between stitches, from front to back. Knit through the back of the loop. M1R: Make one, right leaning: Bring the tip of the left-hand needle under the strand between stitches, from back to front. Knit this loop. One stitch increased LN: Left needle P: Purl PM: Place marker RN: Right needle Rnd: Round. RS: Right (or public) side of work Sl: Slip. As in, slip the next stitch from left to right purl-wise. Sl m: Slip marker. SSK: Slip one stitch as if to knit, slip the next stitch as if to knit, insert left needle into front of these two stitches and knit them together. St: stitch WS: Wrong (or non-public) side of work YQ: Yarn over
Start Mitts:
Cuff:
CO 42 sts. Divide evenly between needles and join to begin working in the round, being careful not to twist sts when joining. If needed, place marker to indicate the beginning of the round. Rnds 1-5: (P1, k2) across Rnd 6: (P1, k2, p1, yo, k2tog) across Rnds 7-8: (P1, k2) across
Start Lace:
Work rnds 1-5 of Arrowhead Rib chart 9 times.
Start Thumb Gusset Shaping:
You will continue to work the Arrowhead Rib pattern while making increases for your thumb. The thumb stitches will be worked in stockinette stitch. Rnd 1: Work next row of Arrowhead Rib pattern for 18 sts, pm, M1R, YO, pm, work in Arrowhead Rib until the end of the round. Rnd 2: Work next row of Arrowhead Rib chart until first marker, sl m, k to next marker, sl m, continue Arrowhead Rib chart until the end of the round. Rnd 3: Work next row of Arrowhead Rib chart until first marker, sl m, M1R, k to next marker, M1L, sl m, continue Arrowhead Rib pattern until the end of the rnd. Rnd 4: Work next row of Arrowhead Rib chart until first marker, sl m, k to next marker, sl m, continue Arrowhead Rib chart until the end of the round. Rep Rnds 3-4 until there are 14 thumb sts in between markers. Next rnd: Work next row of Arrowhead Rib chart until just before first marker. M1L, sl m, k to next marker, sl m, continue Arrowhead Rib chart until the end of the round. Next rnd: Work next row of Arrowhead Rib chart until 1 st before first marker, k1, remove marker, sl 1 st from LN to RN, place 12 sts onto stitch holder, return slipped st back from RN to LN, k2tog tbl, remove marker, continue Arrowhead Rib chart until the end of the round. Next rnd: Work next row of Arrowhead Rib chart until you hit the 2 extra sts above the thumb gusset, k those 2 sts, continue Arrowhead Rib chart until the end of the round. Next rnd: Work next row of Arrowhead Rib chart until you hit the 2 extra sts above the thumb gusset, k2tog, continue Arrowhead Rib chart until the end of the round. Next rnd: Work next row of Arrowhead Rib chart until you hit the 1 extra st above the thumb gusset, k1, continue Arrowhead Rib chart until the end of the round. Next rnd: Work next row of Arrowhead Rib chart until 1 st before you hit the 1 extra st above the thumb gusset, k2tog, continue Arrowhead Rib chart until the end of the round.
Start Hand:
Work rnds 1-5 of Arrowhead Rib chart 2 times. Rnds 11-15: (P1, k2) across
Bind off:
BO using an elastic, stretchy bind off method of your choice. I prefer Elizabeth Zimmermann's sewn bind off as follows: Break yarn, leaving a tail that is five times longer than your bind off edge. Thread yarn tail onto a tapestry needle. \*Sew needle through the first two sts on knitting needle purl-wise, then sew through the first st on knitting needle knitwise. Drop the first st off the knitting needle. Repeat from \* until all sts are bound off.
Ihumb:
The thumb is slightly less stretchy than the Arrowhead Rib pattern. You will need to try on the wrist warmer and find the number of sts comfortable to you. Work asfollows: Slide the sts on hold to working needles and divide to work in the round. Attach yarn (leaving a long tail to sew up holes later) and knit across the 12 sts. Pick up and knit 2-5 sts along the hand side of the mitt. (The number depends on the size of your thumb - try it on and see what is comfortable. You may need only 2 extra sts, you may need 5, or something in between.) Rnds 1-5: Knit around all sts. Rnds 6-8: (K1, p1) across Bind off using the sewn bind off described above.
Finishing:
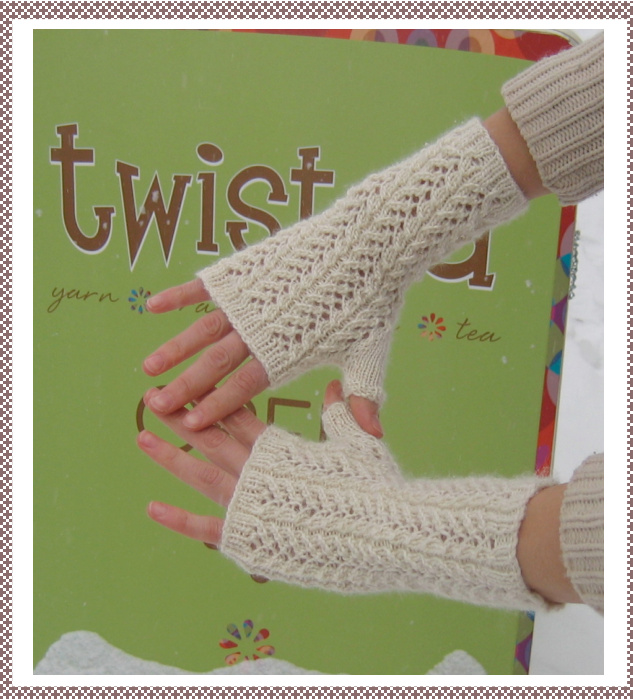
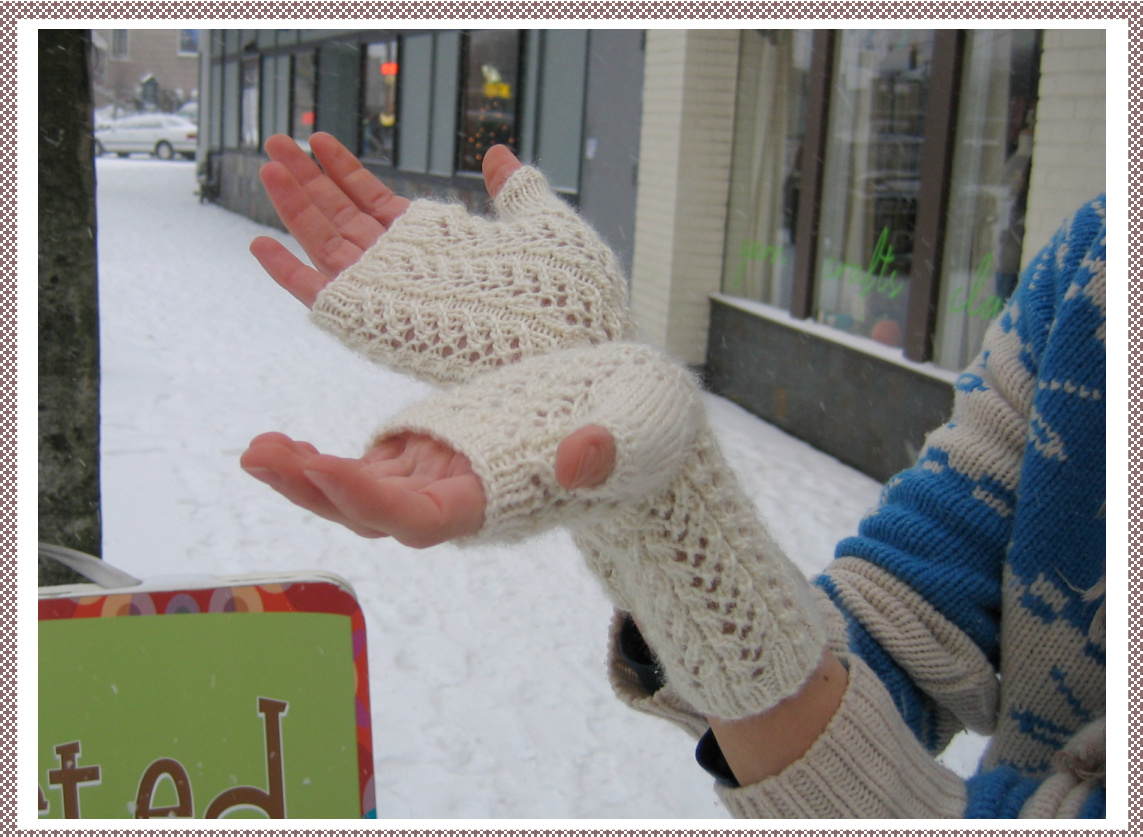
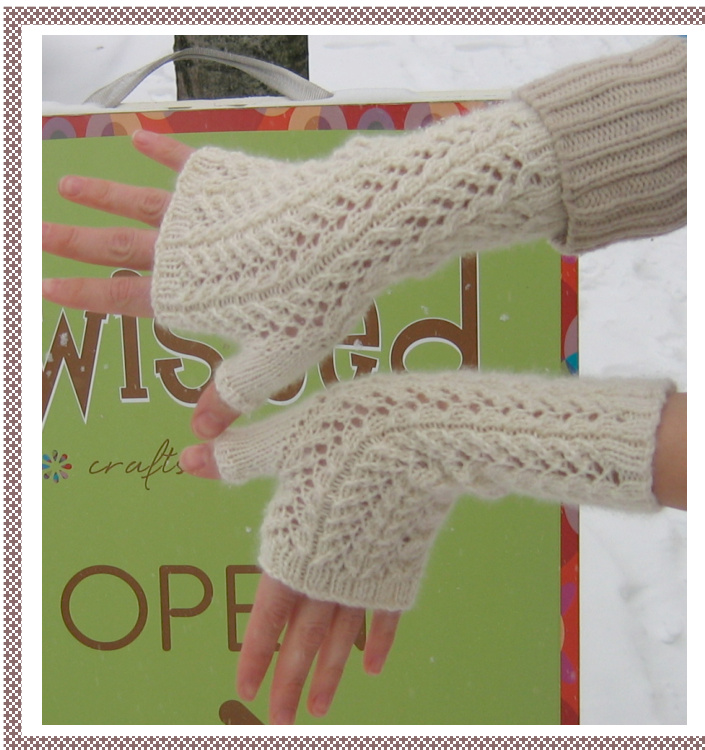
Weave in ends. Use long tail at thumb to sew up any holes. Block as desired. Blocking is important! This pattern was originally part of the 2009 Single Skein Club at Twisted in Portland. Thanks to Vivian for modeling! This design is for personal, non-commercial use only. lf you wish to share the pattern please don't distribute, instead, direct people to my site, or to Ravelry, so they can acquire their own copy. Thank you! Email: starina@hotmail.com