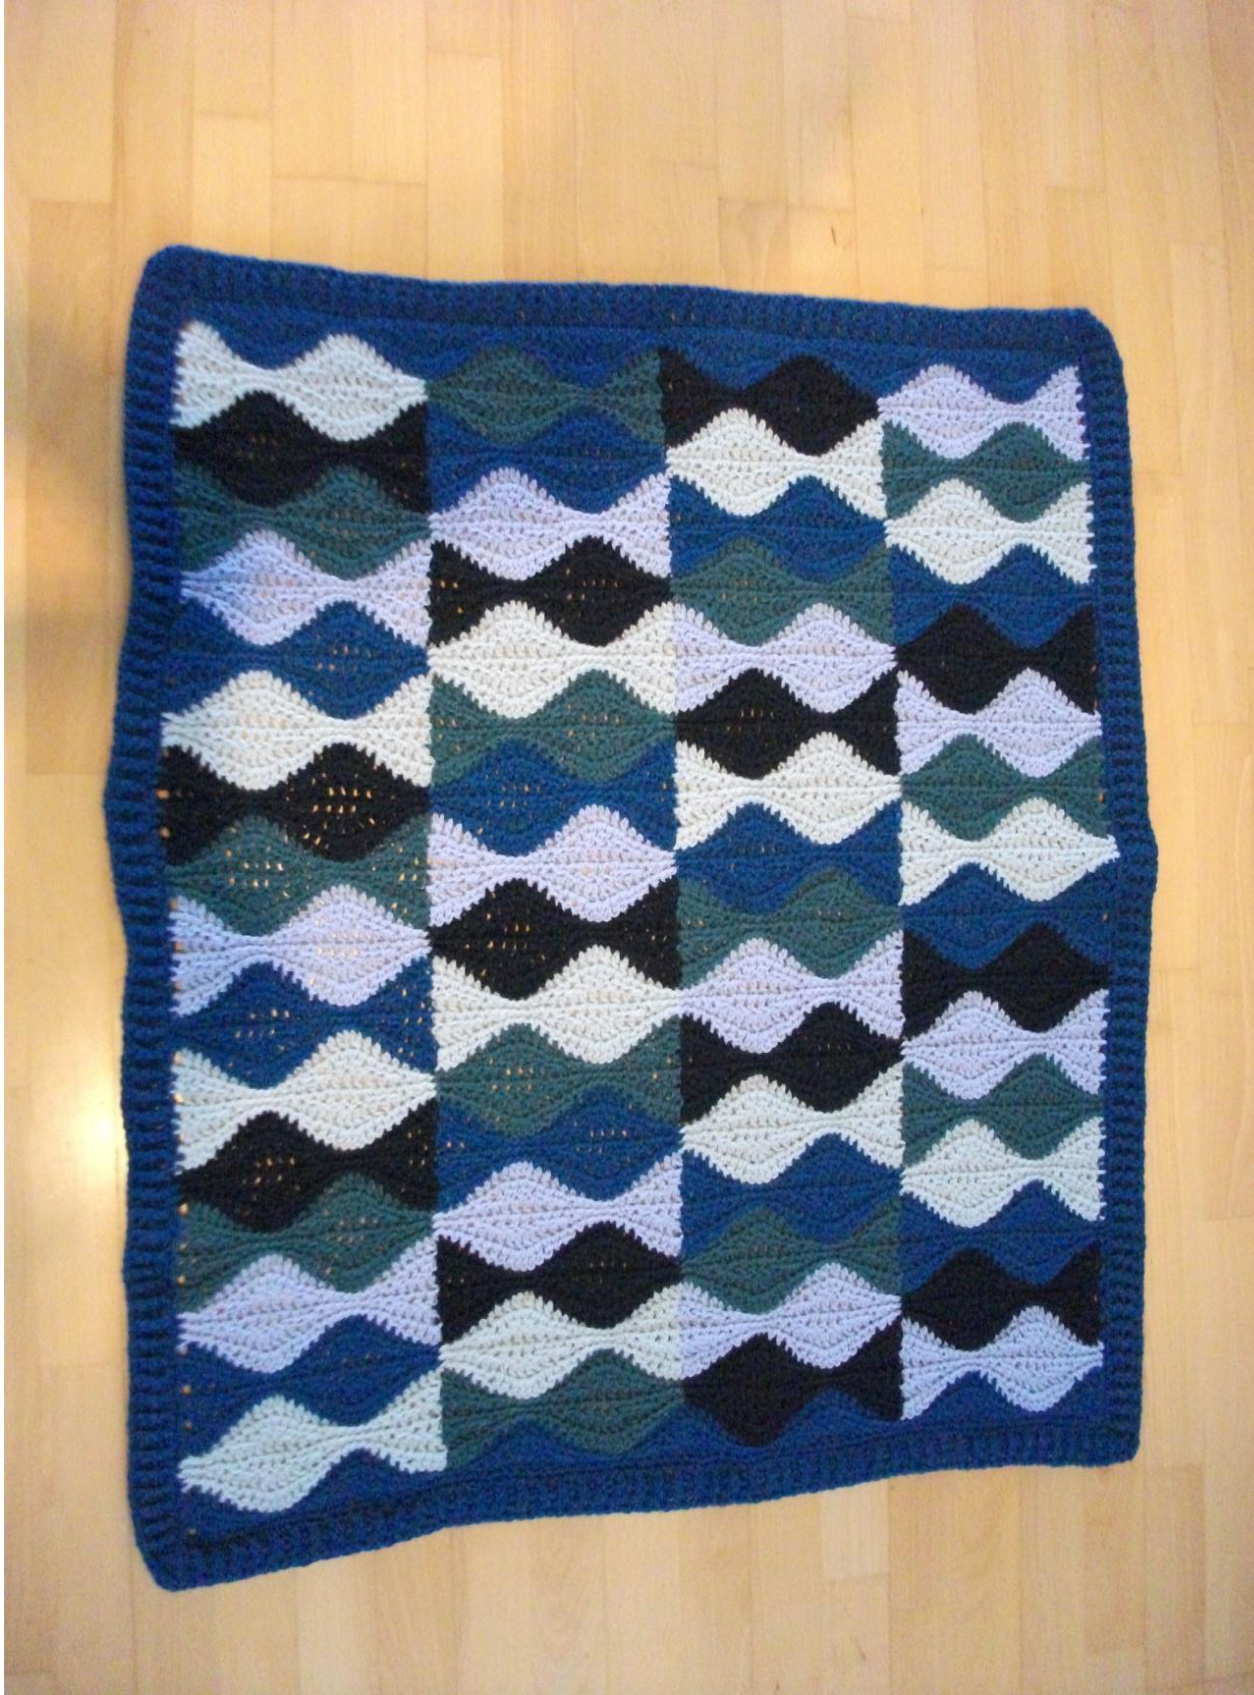
Fish Blanket

This pattern was inspired by Paula Levy's Festive Fish, but firstly I wanted to crochet and secondly I didn't want to have to sew together lots of individual fish. So I designed this pattern where the fish are shaped using different height stitches and a few decreases and increases. You are working in whole rows across and there is no sewing at the end - just lots of ends to weave in!
Abbreviations
ch = chain slst = slip stitch sc = single crochet hdc = half double crochet dc = double crochet dc2tog = joining two double crochet into one (decrease): yarn over, insert hook in stitch, yarn over and pull up a loop (3 loops on hook), yarn over and draw through 2 loops (2 loops on hook), yarn over, insert hook in next stitch, yarn over and pull up a loop (4 loops on hook), yarn over and draw through 2 loops (3 loops on hook), yarn over and draw through all 3 loops on hook FPdc = front post double crochet: yarn over, insert hook from front to back around post of dc in the row beneath, yarn over and pull up a loop (3 loops on hook), (yarn over and draw through 2 loops on hook) twice. BPdc = back post double crochet: yarn over, insert hook from back to front around post of dc in the row beneath, yarn over and pull up a loop (3 loops on hook), (yarn over and draw through 2 loops on hook) twice. MC = main color CC = contrast color Note: This pattern uses US crochet terms.
Material
250 g (appr. 550 yards or 500 meters) of Aran yarn (main color used for fish and edging) 100 g (appr. 220 yards or 200 meters) of Aran yarn each in 4 complementary or contrasting colors e.g. Wendy Mode Aran in 213 Sapphire Blue (main color) and 221 Arctic Ice (CC1), 214 Navy (CC2), 212 Teal Green (CC3), 206 Stirling Blue (CC4) H/5mm hook Tension/Gauge: 1 Fish motif is 20.5 cm or 8" wide and 10 cm or 4" high at the highest point. If you work to this gauge, your finished blanket will be about 90 cm x 110 cm or 35" x 43". Gauge is not crucial, you'll just end up with a bigger or smaller blanket. However, if your fish motif is much bigger, 100 g per CC might not be sufficient. I actually used 90 g Wendy Mode Aran per CC, so there is a bit of leeway, but not much!
Fish motifs are worked over 24-30 stitches and 6 rows
Fish motif R (looking right):
Row 1: 2 slst, 2 sc, 2 hdc, 2 dc, 2 dc2tog, 2 dc, 2 hdc, 2 sc, 4 slst,2 sc, 2 hdc, 2 dc, dc2tog Row 2: dc2tog, 1 dc, 2 hdc, 2 sc, 4 slst, 2 sc, 2 hdc, 1 dc, 2 dc2tog, 1 dc, 2 hdc, 2 sc, 2 slst Row 3: 2 slst, 2 sc, 2 hdc, 4 dc, 2 hdc, 2 sc, 4 slst, 2 sc, 2 hdc, 2 dc Row 4: 2 dc, 2 hdc, 2 sc, 4 slst, 2 sc, 2 hdc, 4 dc, 2 hdc, 2 sc, 2 slst Row 5: 2 slst, 2 sc, 2 hdc, 1 dc, (2 dc in the next stitch) twice, 1 dc, 2 hdc, 2 sc, 4 slst, 2 sc, 2 hdc, 1 dc, 2 dc in the next stitch Row 6: 2 dc in the next stitch, 2 dc, 2 hdc, 2 sc, 4 slst, 2 sc, 2 hdc, 2 dc, (2 dc in the next stitch) twice, 2 dc, 2 hdc, 2 sc, 2 slst
Fish motif L (looking left):
Row 1: dc2tog, 2 dc,2 hdc, 2 sc, 4 slst, 2 sc, 2 hdc, 2 dc, 2 dc2tog, 2 dc, 2 hdc, 2 sc, 2 slst Row 2: 2 slst, 2 sc, 2 hdc, 1 dc, 2 dc2tog, 1 dc, 2 hdc, 2 sc, 4 slst,2 sc, 2 hdc, 1 dc, dc2tog Row 3: 2 dc, 2 hdc, 2 sc, 4 slst, 2 sc, 2 hdc, 4 dc, 2 hdc, 2 sc, 2 slst Row 4: 2 slst, 2 sc, 2 hdc, 4 dc, 2 hdc, 2 sc, 4 slst, 2 sc, 2 hdc, 2 dc Row 5: 2 dc in the next stitch, 1 dc, 2 hdc, 2 sc, 4 slst, 2 sc, 2 hdc, 1 dc, (2 dc in the next stitch) twice, 1 dc, 2 hdc, 2 sc, 2 slst Row 6: 2 slst, 2 sc, 2 hdc, 2 dc, (2 dc in the next stitch) twice, 2 dc, 2 hdc, 2 sc, 4 slst, 2 sc, 2 hdc, 2 dc, 2 dc in the next stitch These are the basic fish motifs which make up the blanket. You alternate between left-looking fish and rightlooking fish. On color changes, it is important to change color on the last element of the previous stitch: On dcs this means that you change color the last time that you draw the yarn through two loops on the hook; on slst it means that you actually work the whole last slst in the new color. t cut the yarn on every color change; only cut it after row 6 when the whole fish is finishe
Blanket
Ch 99 in MC (4 x 24 for 4 columns of fish plus 2 edge stitches plus 1 ch to turn). Tip: I always miscount when I do long chains. So I deliberately work a chain about 3 ch longer, crochet the first row, and then carefully unpick the extra bit of the chain, of course making sure that the last loop is securely holding its stitch. If you want to do that, do not pull your starting slip knot tight or it will be hard to Unpick.
Bottom Edge:
Keeping the first 3 rows in MC only: Row 1: 3 slst, \*2 sc, 2 hdc, 4 dc, 2 hdc, 2 sc, 4 slst \*, repeat between \*\*for another 4 times, 2 sc, 2 hdc, 4 dc, 2 hdc, 2 sc, 3 slst, ch 1, turn. Row 2: 3 slst, \*2 sc, 2 hdc, 1 dc, (2 dc in next stitch) twice, 1 dc, 2 hdc, 2 sc, 4 slst \*, repeat between \*\* for another 4 times, 2 sc, 2 hdc, 1 dc, (2 dc in next stitch) twice, 1 dc, 2 hdc, 2 sc, 3 slst, ch 1, turn. Row 3: 3 slst, \*2 sc, 2 hdc, 2 dc, (2 dc in next stitch) twice, 2 dc, 2 hdc, 2 sc, 4 slst \*, repeat between \*\*for another 4 times, 2 sc, 2 hdc, 2 dc, (2 dc in next stitch) twice, 2 dc, 2 hdc, 2 sc, 3 slst, change to CC1, ch 2, turn.
Begin fish motifs:
Work row 1 of Fish L in CC1, row 1 of Fish R in CC2, row 1 of Fish L in CC3, row 1 of Fish R in CC4, ending with an extra dc in Cc4 for the edge. Ch 2, turn. Remember to change colors on the last element of the previous stitch. Keep the loose ends to the back of the blanket - row 1 of the fish motifs is always a right side row. Continue working row 2-6 of the fish motifs in the established colors, with an extra dc, ch 2, turn at the end of each row. End row 6 with an extra dc, change to CC3, ch 1, turn. Cut all other yarns. 2nd strip of fish motifs: Work row 1 of Fish R in CC3, row 1 of Fish L in MC, row 1 of Fish R in CC1, row 1 of Fish L in CC2, ending with an extra slst in CC2 for the edge. Ch 1, turn. The slip stitches of the new colour have a tendency to curl around to the front of the fabric. On the next row, just follow the stitches in the new colour and it should be clear where your stitches need to be worked. The fabric will straighten itself out as right-side and wrong-side rows areworked. Continue working row 2-6 of the fish motifs in the established colors, with an extra slst, ch 1, turn at the end of each row. End row 6 with an extra slst, change to CC2, ch 2, turn. Cut all other yarns. 3rd strip of fish motifs: Work row 1 of Fish L in CC2 row 1 of Fish R in CC4, row 1 of Fish L in MC, row 1 of Fish R in CC1, ending with an extra dc in CC1 for the edge. Ch 2, turn. Continue working row 2-6 of the fish motifs in the established colors, with an extra dc, ch 2, turn at the end of each row. End row 6 with an extra dc, change to CC4, ch 1, turn. Cut all other yarns. 4th strip of fish motifs: Work row 1 of Fish R in CC4, row 1 of Fish L in CC3, row 1 of Fish R in CC2, row 1 of Fish L in MC, ending with an extra slst in MC for the edge. Ch 1, turn. Continue working row 2-6 of the fish motifs in the established colors, with an extra slst, ch 1, turn at the end of each row. End row 6 with an extra slst, change to MC, ch 2, turn. Cut all other yarns. 5th strip of fish motifs: Work row 1 of Fish L in MC, row 1 of Fish R in CC1, row 1 of Fish L in CC4, row 1 of Fish R in CC3, ending with an extra dc in CC3 for the edge. Ch 2, turn. Continue working row 2-6 of the fish motifs in the established colors, with an extra dc, ch 2, turn at the end of each row. End row 6 with an extra dc, change to CC1, ch 1, turn. Cut all other yarns. Repeat this set of 5 fish motif strips twice more. On the first repeat set, all the fish need to be mirrored (Fish L is now Fish R, and Fish R is now Fish L), the 2nd repeat set is exactly the same as the original set. Then repeat the 1st strip of fish motifs once more, mirrored.
Top Edge:
You have switched to MC at the end of the last fish, chained 2 and turned. Row 1: dc2tog, \* 2 dc, 2 hdc, 2 sc, 4 slst, 2 sc, 2 hdc, 2 dc, dc2tog twice \*, repeat \*\* 4 more times, 2 dc, 2 hdc, 2 sc, 4 slst, 2 sc, 2 hdc, 2 dc, dc2tog, 1 dc, ch 2, turn. Row 2: dc2tog, \* 1 dc, 2 hdc, 2 sc, 4 slst, 2 sc, 2 hdc, 1 dc, dc2tog twice \*, repeat \*\* 4 more times, 1 dc, 2 hdc, 2 sc, 4 slst, 2 sc, 2 hdc, 1 dc, dc2tog, 1 dc, ch 2, turn. Row 3: Row 2: 2 dc, \* 2 hdc, 2 sc, 4 slst, 2 sc, 2 hdc, 4 dc \*, repeat \*\* 4 more times, 2 hdc, 2 sc, 4 slst, 2 sc, 2 hdc, 3 dc, ch 1, do not turn.
Edging:
3 edging is crocheted in rounds with the right side of the blanket facing, without turning. Round 1: Work sc all around the blanket: On the vertical sides work 2 sc in any dc of the fish tails, and 3 sc in total into each fish mouth (every second row). Work 3 sc into each corner. On the horizontal sides simply work 1 sc per stitch. End with slst into first sc. Round 2: Ch 2, dc into same stitch, dc all around the blanket, working 3dc into each corner. End with dc into bottom of ch 2, slst into top of chain. Round 3: Ch 2, dc into same stitch, \* FPdc around next dc, BPdc around next dc \*, repeat all the way around, working 3 normal dc in each corner. End with dc into bottom of ch 2, slst into the ch 2. If you have worked an even number of stitches in round 1 this works out; if you had an uneven number you need to either skip a stitch or work an extra one e.g. into the bottom of the turning chain. This will be hardly visible, this is why 1 don't bother counting the stitches in round 1. Round 4: Ch 2, dc into same stitch, BPdc around next dc, \*FPdc around FPdc of the previous round, BPdc around BPdc of the previous round \*, repeat all the way around. At the corners, work FPdc or BPdc into the first dc of corner group according to established pattern, work 3 dc into 2nd dc of corner group, work FPdc or BPdc (same as before the 3 corner dc that you just crocheted) and continue with the established pattern. You can stop here or repeat round 4 until the edging is as wide as you want (or until you run out of yarn).
Finishing off:
Weave in all ends securely. ) Jill Kapushinski for testing this pattern (and getting me to write it down in the first plac. Copyright @Meike Beumers 2010. For personal use only. Revision 1.1 (March 2011)


