Happymaking Designs by Jacqui Harding
Spring star hat

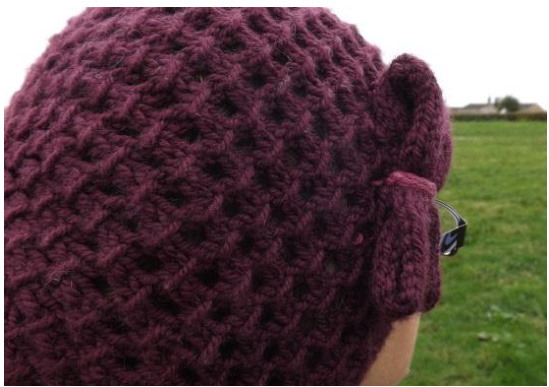
Springtime in the UK is the perfect season for a light lacy hat that looks pretty, and will keep your head warm and your hair under control in a sudden icy arctic wind! This easy to wear hat with its cute picot brim will look great on most people, and the soft springy cashmere blend yarn feels light and luxurious. There is a lot of flexibility built into the pattern to allow for your personal hat preference, whether beanie, beret or teen slouch - this can be knit to suit you perfectly. Add a bow if you want to up the cute factor, or leave it off if you like things simple. I'm making a different coloured bow and a crochet flower that I can pin on to change the look whenever I want!
Materials:
Lion Brand Superwash Merino Cashmere; 2 x 40g balls in Wine (Aran weight; 80m per 40g; 72% superwash Merino wool, 15% nylon, 13% cashmere) 4.5 needles - 40 or 60cm circular 6.5mm needles, circular or dpns NOTE - a sharp point on the 6.5mm needles makes working the star stitch easier stitch markers scrap yarn or dental floss for lifeline (optional) small amount of contrast colour yarn for bow (optional) Tension: 18st & 24 rows to 4" in stocking stitch on 4.5mm needles. Sizes Women's S/M (L/XL). Shown in larger size.
Springstar Hat
To fit: 51-56cm (56-61cm) 20-22"(22-24") This is easy to resize - you need an even number of stitches for the picot brim, and a multiple of 3 for the pattern. Each picot point adds approx 1.25cm to the brim - and it's very stretchy. Ideally cast on a multiple of 6 sts, otherwise once you have done the brim, add 1 or 2 stitches to make the total number up to a multiple of 3.
Instructions
Open star stitch:
Rnd 1: \*YO, sl1, k2, psso; rep from \* to end of rnd. Rnd 2: K to last stitch, sl1, rm, sl last stitch back onto LH needle, PM for new beg of rnd. Rnd 3: \*Sl1, k2, psso, yo; rep from \* to end of rnd. Rnd 4: K to marker, rm, k1, PM for new beg of rnd.
Brim
Cast on 78 (84) sts using long tail cast on method. Join to work in the rnd, being careful not to twist. PM to mark beg of rnd. Rnds 1-3: Knit. Rnd 4: \*K2tog, yo; rep from \* to end of rnd. Rnds 5-9: Knit. Switch to larger needles. Rnd 10: Knit.
Body
Begin working in open star stitch pattern until the work measures approx 16 cm from the brim (unstretched) for a beanie-style hat, 18-19 cm for moderate slouch and 20cm+ for veryslouchy. If you are unsure about the degree of slouch you want, run a lifeline through your work before starting decreases so that you can rip back to that point if the hat is too fitted. To insert a lifeline, thread scrap yarn through all the stitches on your needles and secure loosely. Dental floss also works very well for this. If you use interchangeable needles with a hole through the connector for tightening, you can thread dental floss through the hole to run a lifeline as you knit. If you need to rip back to this point, the lifeline will hold your stitches, so you can put your needles back in along the lifeline. End after Rnd 4 of open star stitch pattern.
Crown shaping
Begin working crown decreases, switching to dpns when necessary. Next Rnd (Dec Rnd): \*Sl1, k2, psso; rep from \* until end of rnd. 52 (56) sts Next Rnd: Knit. Next Rnd: \*Sl1, k2, psso; rep from \* to last 1 (2) st(s), k0(1). This is new beg of rnd. 35 (38)sts Next Rnd: Knit. Next Rnd: \*Sl1, k2, pss0; rep from \* to last 2 sts. 24 (26) sts Next Rnd: Knit. Next Rnd: \*Sl1, k2, pss0; rep from \* to last 0 (2) sts, k0 (2). 16 (18) sts Next Rnd: \*K2og; rep from \* to end of rnd. 8 (9) sts Cut yarn, leaving a tail, sew through the remaining stitches, pull tight and secure. Sew up the brim: Fold the brim along the eyelet row to form picot edge. With the hat inside out, whipstitch the cast on edge to the stocking stitch brim, checking that the points stay aligned.
Springstar Hat
Finishing: Block lightly over a balloon to open up the fabric, which will make it more drapey and slouchy. Alternately, block over a dinner plate to give more of a beret shape.
Optional bow
With larger needles, cast on 10 sts. Work in St st until work measures around 20cm. Cast off. Sew cast on/off edges together to form tube. With a small amount of contrast colour and smaller needles, make 3 st i-cord around 4 cm long, leaving a long tail at either end. Tie i-cord around the centre of the tube to make a bow, and attach to hat using i-cord tails.
Jacqui x I hope you enjoy making and wearing your Springstar hat.
Schematic:

50 (55)cm around
Glossary
PM place stitch marker St stitch Kknit RLI knit into the stitch below the next on the needle LLI with left hand needle, pick up the side loop of the stitch below the one just worked M1 Make 1 stitch using a backwards loop dpn double pointed needles i-cord Knitted tube made on dpns. Cast on 3 st, k 1 row. \*slide sts to other side of dpn, k3; rpt from \* until cord is required length. Cast off.


