Pissenlits
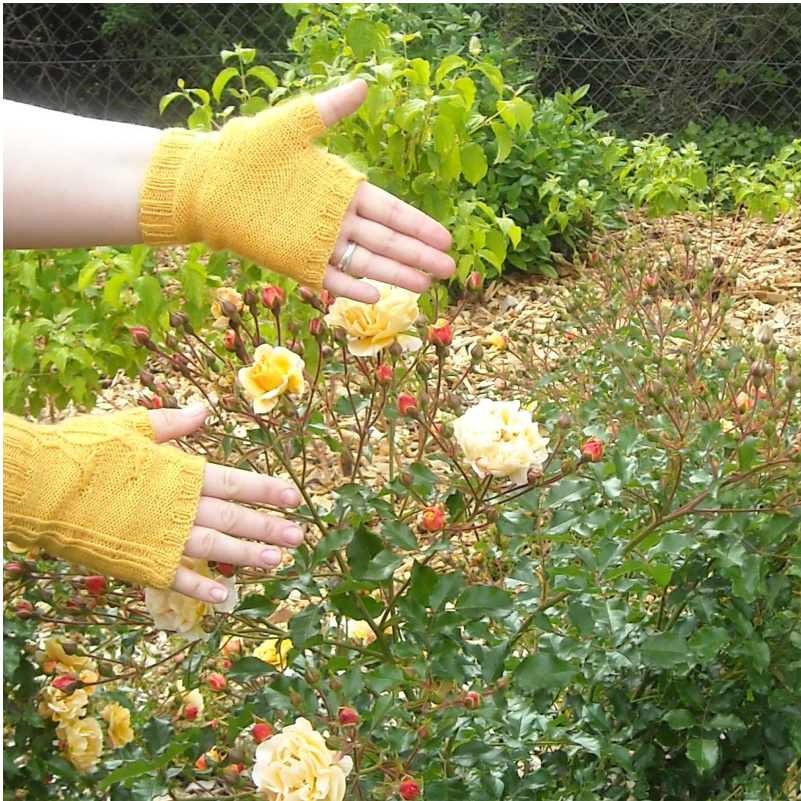
Mittens Pissenlits.are alsoprettylittle mittens with some embossed flowers, little sisters of my socks pattern, Pissenlits. If you do not know yet, there is a rule really important in the knitting world : your feet and your hands, you will match. When the Pissenlit's knit-test was running,some of my testerswanted me toput the same littleflowers onour hands. So, here they are, those lovely and romantic mittens, with the same springlike spirit. They are knit in the round, one piece. There is no sewing. We begin with the wrist, making the thumb at the same time. Then, the stitches of the thumb are put on stand byandwefinishthebodyofthehand. Theembossedflowersareobtainedwithstitchesknitted throughbackloop crossedbetweenthem.The corolla are builtwithahook,samesizeofyourneedles. This pattern has negative ease.It means everything is calculated so that the mittenfits closely the hand without pressingit. Even ifyou are not quite familiar with the techniques used in’this pattern, have no worry !They are fully described instep-by-stepvideo tutorials (links are given in the pattern).Please,be aware that the videos are in French.But I think using the visual support is enough to understand. Still you may fin other videos in your own languageonthenet.
Material :
Thread : Fingering 4ply - 80 to 120 meters. My version, size 4, I used Sockli, from Woll Butt,_(75% virgin wool - 25% polyamide, 50 gram = 210 m), 26 gram in total (around 108m). Circular needles 2.5 mm Hook 2.5mm Cable needle 2.5mm 2 marker to mark beginning of the row if necessary. Gauge : 30s x 42 R = 10 cm (stockinette in round). You have to respect this gauge if you want to obtain indicated final size.
Abbreviations :
RS : right side -ws:wrong side st : stitch(es) -r:row N1/2 :Needle 1/2 (top/bottom of the foot). CN : cable needle. Mc/cc: main color / contrasting color. M1 : Make one. K1BL : Knit one stitch through back loop. You have to knit or purl in the front loop, then the back loop, this way you obtain an increase. SSK : Slip, Slip, Knit. P2tog : Purl two stitches together. S1 : Slip 1 stitch without knitting. C2L: Cross_2 to the left. Slip 1 stitch on the CN, on the front, K1BL, KBL the CN. C2R : Cross 2 to the right. Slip 1 stitch on the CN, on the back, K1BL, KBL the CN. C2LP1 : Cross 2 to the left, P1. Slip 1 stitch on the CN, on the front, P1, KBL the CN. C2RP1 : Cross 2 to the right. Slip 1 stitch on the CN, on the back, K1BL, P the CN. This pattern is my intellectual property. It's for PERSONAL USE ONLY. It means you cannot sell or distribute this pattern on commercial or non commercial purpose, fully or partially, or any object basedonit. me if you need any information or help : support@inapanda:
Advice and information :
You will find links in this pattern. These are several step-by-steps to show you how to do M1, shadows wraps, elastic CO and BO. I advise you to see them, even if you already know those techniques, they might have variations. Sizes available in cm : 17, 18, 19, 20, 21. Choose according to you hand's measure, at the larger spot. If your wrist is smaller (more than 2 cm), choose the cast on for thin wrists. I highly recommend you to read the whole pattern before beginning, at least once, to avoid any kind of surprise. Moreover, always read entirely each paragraph before continuing. If you want to save paper and ink, print only p. 2, and the charts you need ;).
PATTERN:
1 - The wrist
Each size is indicated in this order : 17 [18, 19,20,21]. Let's be serious. Now that the size is chosen, we have to cast on. The further indications are given after cutting off 10%, so, you do not have to calculate anything. Wide wrist: cast on 44 [48, 50, 54, 56] stitches with an elastic method. Thin wrist : cast on 36 [40, 42, 46, 48] stitches. d, as follows : 3 to 5 cm (as you like) of ribs 2/2 : \*K2, P2\*. This is y Be careful, sizes 3 and 4, the stitches number (cast on AND bind off) is not multiple of 4. If you want something nice, I advise you to knit ribs 1/1 : \*K1, P1\*. Be careful, if you made a thin wrist cast on, increase 8 stitches, anywhere on the row, 4 on each needle, distributed wisely. Make them with a "make on" between 2 purled stitches.
2-The body of the mitten
As a reminder, needle 1 hold front of the hand's stitches, needle 2 back of the hand's stitches. Begin the motif, only on N1. Refer to charts(at the end of the pattern). Each color corresponds to a size (17, 18, 19, 20, 21). RIGHT HAND LEFT HAND Place a marker after the 20th [22nd, 23rd, 25th, 26th] stitch. Place a marker after the 24th [26th' 27th' 29th,' 30th] stitch. While knitting the motif, on row 3, M1R after the first markerI While knitting_the motif, on row 3, M1L before the first markand M1L before the second marker. er and M1R after the second marker. Repeat 5 [6, 6, 7, 7] times these increases in total, every two rows. It means, 2 increases rows 3, 5, 7, 9, 11, 13 (except size 1) and i5 (except sizes 1 to 3). When you finished increases, continue in round with the motif until you reach the junction of the thumb. Then, put the stitches on the thumb (between markers) on stand-by, that is to say 14 [16, 16, 18, 18] stitches. Cast on 2 stitches to replacethem. Finish the 44 rows of motif. Be careful, if you have divided your work after row 33 (motif) and that you have 《 long hands >》, add some purled stockinette rows before continuing (3 to 6 rows should be enough). Then, Knit 6 rows of ribs 2/2 : \*K2, P2\* (or ribs1/1 if you begin the mitten like this) and bind off with an elastic method.
3 -The thumb
Take back the stitches on stand-by on your needles. Pick up two stitches at the level of the junctions. You have now 16 [18, 18, 20, 20] stitches. Purl 2 rows, in the round, then make 6 rows of ribs (2/2 or 1/1, check your size). Be careful, sizes 2 and 3, stitches number is not multiple of 4, you will miss 2 purled stitches. You can pick up 4 stitches instead of 2, previously ; or leave it this way. Bind off with an elastic method. Weave in ends, wet-block and that's all ;)

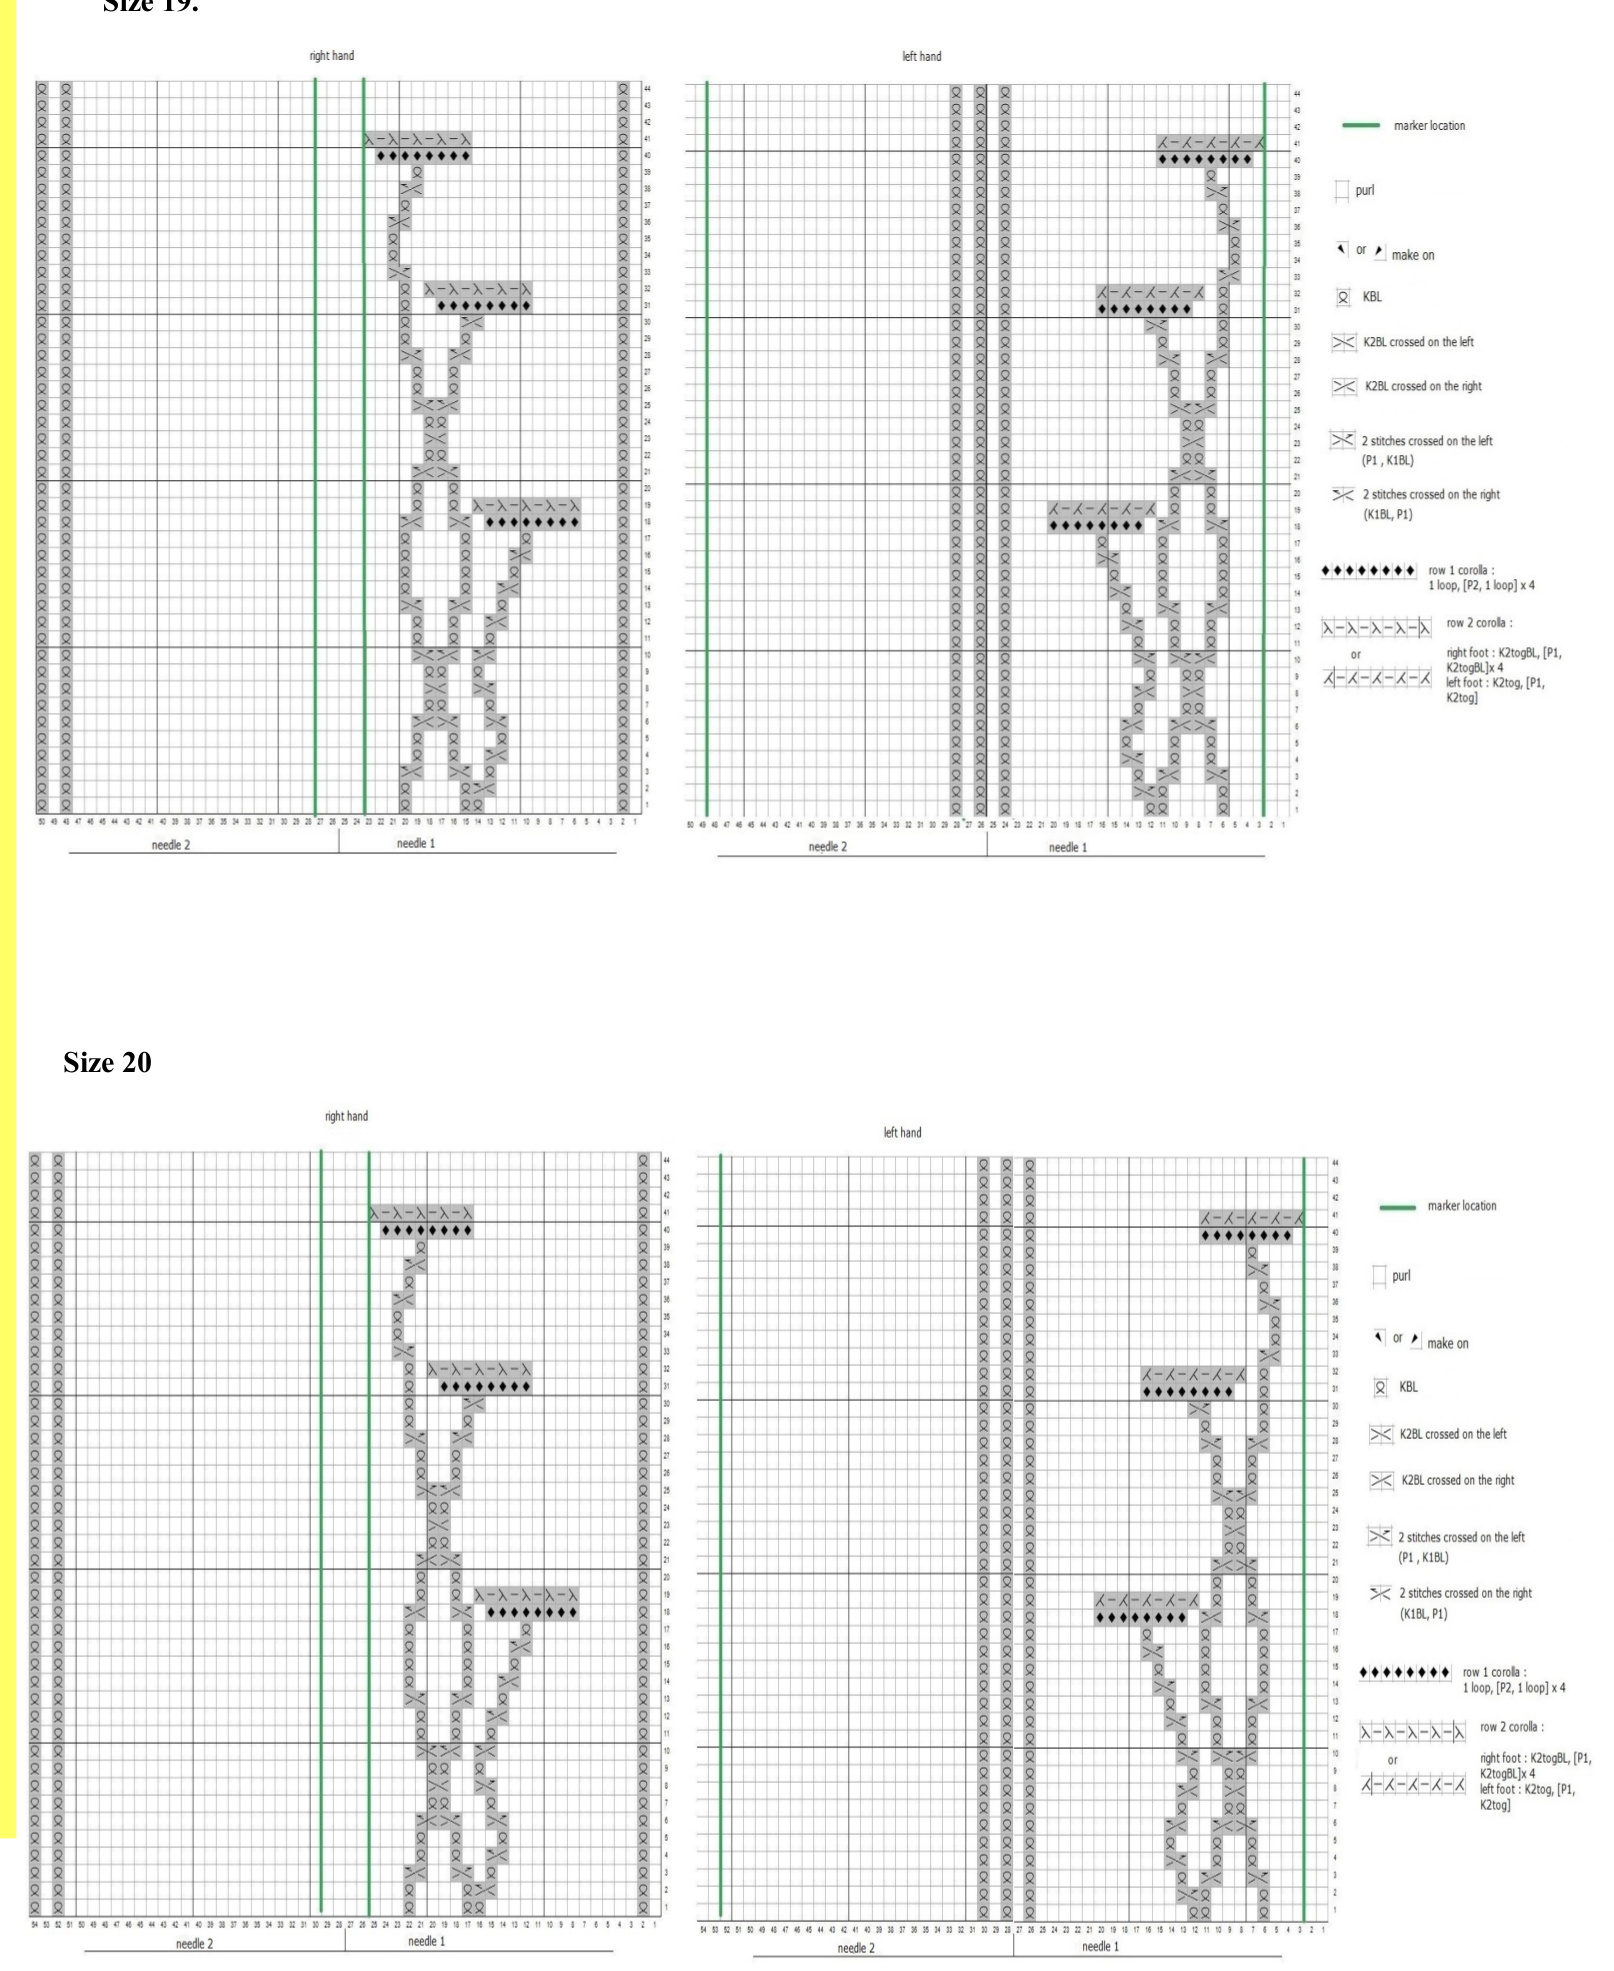
Size 19.
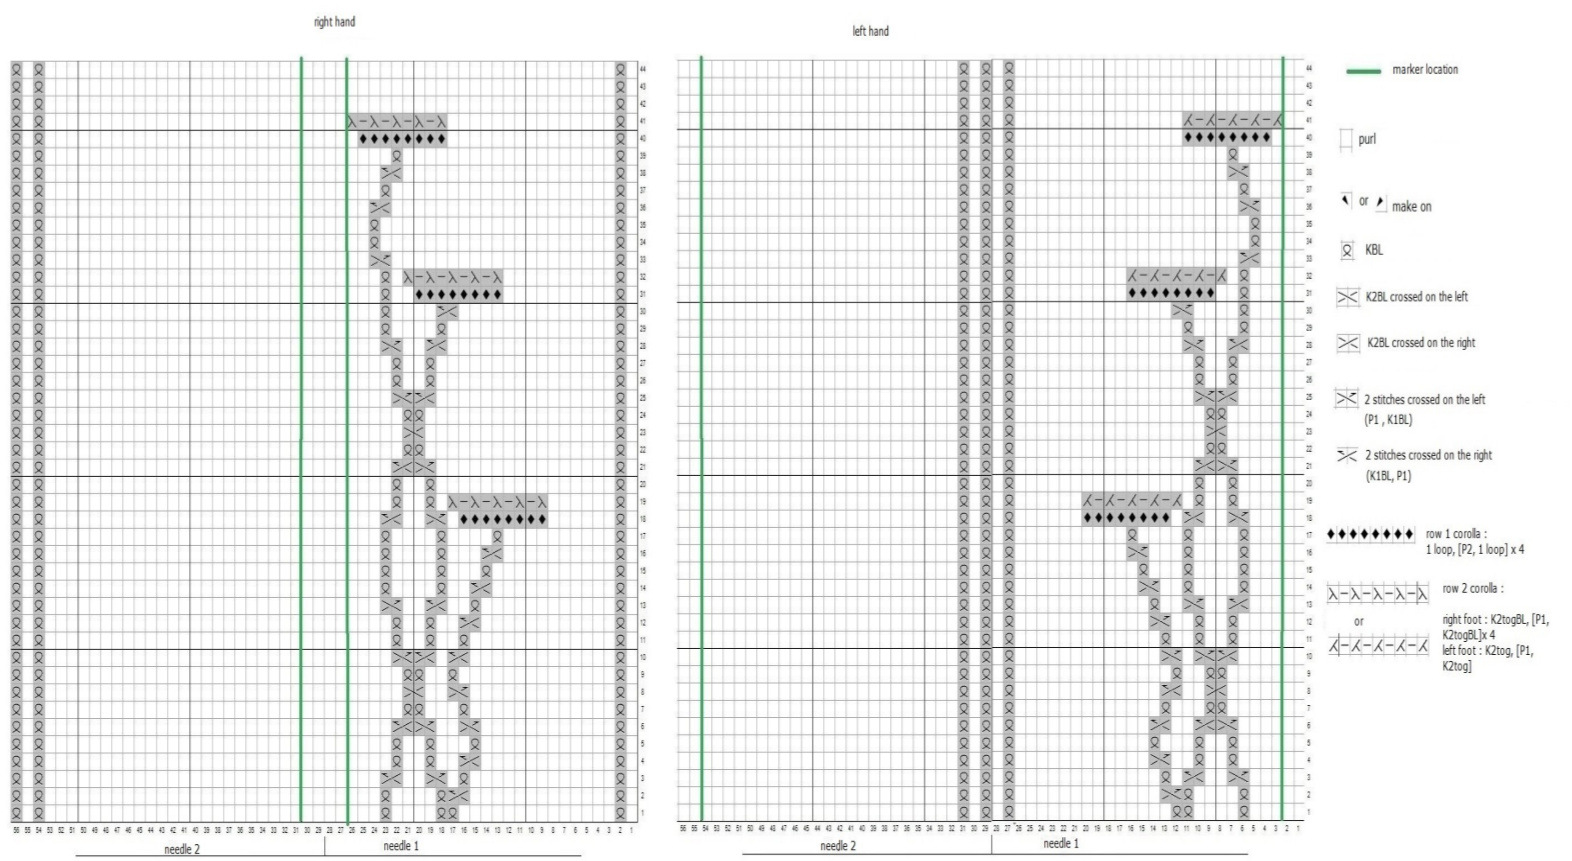
Size 21.
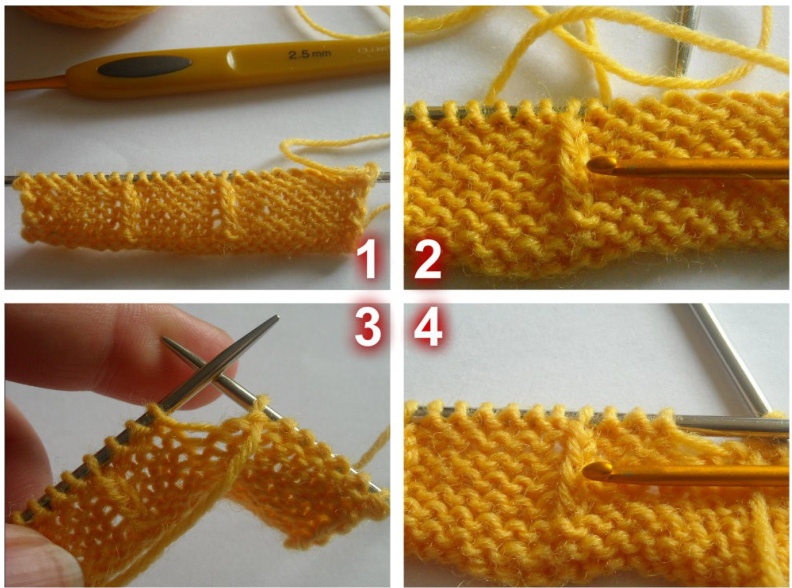
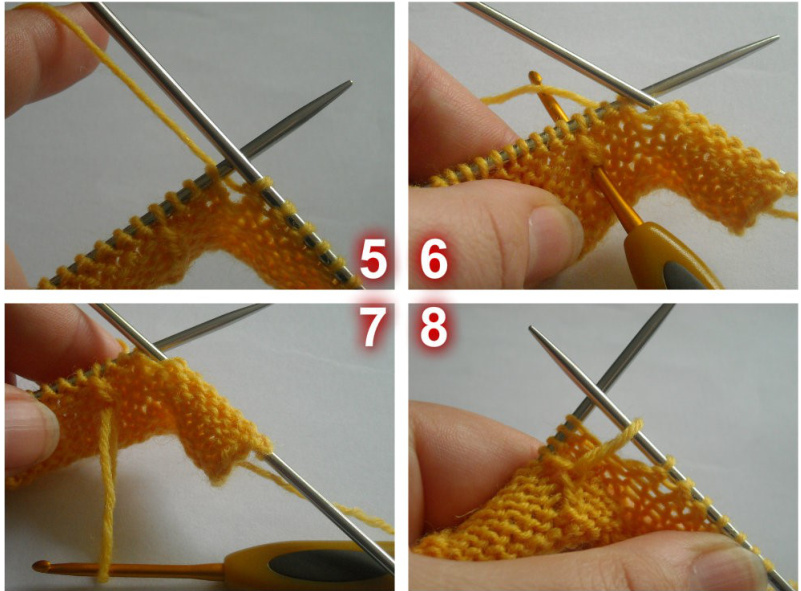
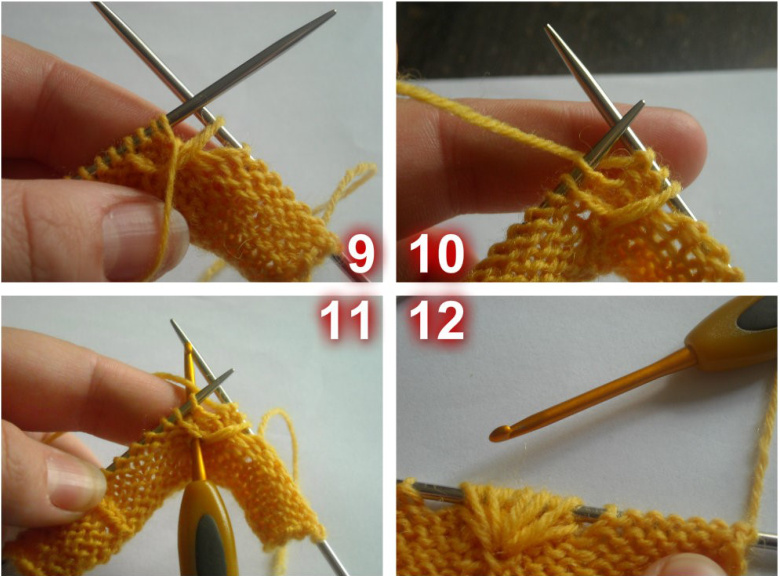
Corolla :
It's a two rows time. The first row with 8 stitches + 5 loops, the second row with 9 stitches. Here, a how-to : Let's imagine that picture 1 represents stitches knitted through back loop of your sock. To knit a corolla, you need a hook, same size of your needles. Picture 2 indicates you which stitch you have to go through with your hook to make loops of the dandelion. In other words, the third stitches below the needle. Purl until you reach 3 stitches (or 4, check charts) before the KBL stitch (picture 3) and let's pick on that stitch (picture 4). Before picking on the stitch, put the thread behind ‘the work (picture 5)."Put the hook through the stitch (picture 6) and pull a loop (picture 7). Put the loop on the right needle (picture 8). Be careful not to tighten too much theloop. Put the thread back at the front of the work (picture 9). Purl two stitches and put the thread behind the work again (picture 10). Pick again your hook on_the stitch and pull' a new loop (picture 11). Continue until you have : 1 loop, [P2, 1 loop] x 4 ( a total of 8 purled stitches + 5 loops) (picture 12). Second row : Right foot_: purl until you reach the first loop. Knit together through back loop the first loop with the following purled stitch . Be careful not to cross 《 legs 》 of the loop on the process. Purl one. Do it again for each loop. Left foot : purl until you reach one purled stitch before the first loop. Knit together through front loop the loop with preceding purled stitch.Be careful not‘to cross 《 legs 》 of the loop on the process. Purl one. Do it again for each loop. I insist on the fact that you must not cross the legs of the loops to have a pretty dandelion. So, when you pull the loop through the stitch with your hook, be careful that legs are not crossed. And, at the same time, be careful that the loop is on the 《 good > side to knit.