Hippy Ripply Retro Socks
My e-mail address: hcdarmara@roadrunner.com My URL: www.warmwarmwarm.com
Hippy Ripply Retro Socks
by Helen Darmara Difficulty: Advanced beginner This pattern was designed to break up the stripey effect of self patterning yarn. As I knit it, I realized it reminded me of the colors of the 5os and the 7os! I had a flower power bedspread and as a child, a striped tee shirt in just these colors. The pattern is very stretchy, so it fits many foot widths without adjustment in the number of stitches. It uses the Japanese short row method I found on nonaknits' blog (http:/nonaknits.typepad.com/nonaknits/2005/04/japanese_short_.html) and is knit toe up. I also like to close up the possible hole at the heel corners by increasing and decreasing, so I included instructions for that as well.
SIZE
Woman's large. Length of foot: 1o inches from heel to toe, length of leg: $_{7\,1/2}$ inches from top of heel. Easily adjusted for length. I had plenty of leftover yarn.
FINISHED MEASUREMENTS
Foot Circumference: 7 inches (unstretched) Fits woman's size large when worn. Foot Length (to beginning of heel shaping): 8 inches Leg Length (from top of heel shaping): $_{7\,1/2}$ inches
MATERIALS
Knit Picks Felici $[75\%$ Superwash Merino Wool, $25\%$ Nylon; 218 yds per 50g ball]; color: Clay; 2 skeins for a pair of adult socks 1 set (5 needles) US $\mathbf{1}/\mathbf{2.25mm}$ double-point needles (if you like, you may use two circulars or one long circular) Or size to achieve gauge notions required stitch markers 20 or so small safety pins. You can use regular pins or coilless ones. needle if using sewn bindoff
GAUGE
8 sts/12 rows $=$ 1" in stockinette stitch
PATTERN NOTES
Instep pattern: (over 33 stitches)
Rnd 1: p1, k2tog, ${\bf\nabla\ast}{\bf k}{\bf1}$ yo, k1, yo, k1, slip 1, k2tog, psso\* repeat to last 4 sts before marker, k1, slip 1 as if to purl, k1, psso, p1, knit to end of round. Rnd 2: p, k31, p (pul the purls on either side of instep, knit allother stitches). Repeat these two rounds for instep.
Leg pattern: (over 64 stitches)
Rnd 1: \*yo, k1, yo, k1, slip 1, k2tog, psso, $\mathbf{k1^{*}}$ repeat. Rnd 2: knit Repeat these two rounds for leg. Left lifted increase: Insert right needle from front to back into right leg of stitch in row below the first stitch on left needle. Knit a stitch into this lifted leg. Knit into stitch on left needle as usual. Right lifted increase: Insert needle from front to back into left leg of stitch two rows below last stitch on right needle. Knit a stitch into this lifted leg. Note: There are many descriptions for these lifted increases. If the instructions seem confusing, there is a video on YouTube.com that demonstrates them. I found them by searching for “Lifted Knit Increase." Rib: k1, p1 Picot bindoff: With cable cast on, $^{*}\mathbf{co}~2$ sts, bo 4 sts\* repeat.
PATTERN
Sock Toe Beginning at toe, cast on 16 sts. I used Judy Becker's Magic Cast on for Toe up Socks (http://knitty.com/issuespringo6/FEATmagiccaston.html), but you may use any other toe cast on you prefer (figure 8, provisional, etc.) Inc round: At beginning of first needle, k1, m1, knit to last st of second needle, m1, k1, at beginning of third needle, k1, m1, knit to last st of fourth needle. Knit even round: knit ll stitches Repeat increase round three times, then alternate knit even round with increase round until there are 16 stitches on each of 4 needles (64 sts total).
Sock Instep
Rearrange stitches so that there are 32 stitches on the instep needle (needle 1) and 16 sts on each of the next two needles. You can go back to using 4 needles after the heel shaping, but I find the pattern easier to knit with all the instep stitches on one needle. Place marker for beginning of round (I place the marker just before the last stitch of the round, but you can also mark the first stitch.) Begin Instep pattern. Kin front and back of last stitch to increase 1 stitch. (65 stitches, 33 on instep needle) When foot measures 8 inches from tip of toe (or desired length to hee), begin heel shaping. End with a plain row.
Heel Shaping
Rearrange stitches again, so that the first 17 stitches are on the first needle and the next 16 stitches are on the second needle. Put all the other stitches on a single needle for the heel shaping. Yarn should be between last stitch of bottom of foot and first stitch of instep). If it isn't, knit another partial round to place it correctly. Turn work so wrong side is facing you. Purl Row: Purl to last stitch (31 sts), turn, slip the next stitch purlwise. Place a pin over the working yarn. Do not put the pin through the yarn. Ignore the pin(s), they will just hang down inside your knitting.) Knit Row: Knit to last stitch (30 sts),turn, slip the next stitch purlwise. Place a pin over the working yarn. Do not put the pin through the yarn. Repeat these two rows, knitting or purling one fewer stitch each row until 8 stitches remain. Now, begin the other half of the shaping. You should have a lot of pins (22, 11 on each side) hanging on the inside of your heel. Purl Row: Slip the first stitch. Purl across the center stitches to the first gap. Slip the next stitch as if to purl. The pin should be hanging under the right needle. Pull on the pin, lift the loop it's attached to up onto the left needle, return the last stitch from the right needle to the left needle and purl the two stitches together. Turn. Remove the pin. Knit Row: Slip the first stitch. Knit across the center stitches to the first gap. The pin should be hanging under the right needle (on the wrong side). Pull on the pin, lift the loop it's attached to up onto the left needle and knit it together with the next stitch. Remove the pin. Repeat these two stitches until all the gaps are closed and there are no pins left. These instructions are illustrated on nonaknits' blog (http:// nonaknits.typepad.com/nonaknits/2005/04/japanese_short_.html)
Sock Leg
Check the arrangement of stitches on your needles. The first stitch of the round should be the purl at the edge of the instep. If not, rearrange stitches. (You have 65 sts, but need to have only 64 for leg pattern. Decrease one at the corner of the heel.) I find I can avoid any potential gap at the corner where heel and instep connect by doing a lifted increase before the first stitch of needles one and three and after the last stitch of needles two and four. (If you're using circulars, the increases are on either side of the instep.) I decrease these stitches in the next round. If you do not want to fuss with this, you may ignore the increase instructions and simply knit the first leg round in pattern as established. To avoid gaps, knit these two rounds. First round: Needle one and two: Right lifted increase, ${\bf\nabla}^{*}{\bf s l\nabla1}$ ,k2 tog,psso, k1, yo, k1, yo, k1 \* repeat between \* four times end. End needle one with the k1 between two yo's. Left lifted increase. Begin needle three: Right lifted increase, yo, k1, \*sl1, k2 tog, psso, k1, yo, k1, yo, k1 \* repeat between \* four times. At end of needle four, lef lifted increase. · Second round: You will decrease the four extra stitches in this round as you encounter them. K 2 tog. Knit to two stitches before end of instep (needle two) . When you reach the last two stitches of the instep (end of second needle) SSK. Begin needle three with K 2 tog, end needle four with SSK. You should now have 64 stitches, arranged so that each needle begins with a yo and ends with yo, k1 on the pattern rows. Otherwise, skip these two rounds and just begin instep pattern. (64 sts) Continue in pattern as established until leg is 7 inches long or desired length to ribbing.
Sock Ribbing
Purl the first stitch of the round, then continue in p1, k1, ribbing for 1to 2 inches as desired.
Bind off
Because the leg is very stretchy, the bind off needs to be equally stretchy. The regular cast off is not stretchy enough. Use any of the following bind offs, depending on the effect you want. I used the Picot edge bind off because I wanted the frilly look. Bind off alternatives: Picot edge bind off Sewn bind off Increase bind off Suspended bind off
FINISHING
Block. Sew in ends. CHARTS I believe all patterns should be displayed as charts, so here goes. I used Knit Visualizer, available at Knitfoundry.com, to make the chart.
Legend:
No Stitch
Placeholder - No stitch made. knit knit stitch
make one right
[MR] Place a firm backward loop over the right needle, so that the yarn end goes towards the back make one left [M Place a firm backward loop over the right needle, so that the yarn end goes towards the front purl purl stitch k2tog Knit two stitches together as one stitch yo Yarn Over $\uplambda$ sl1 k2tog psso slip 1, k2tog, pass slip stitch over k2tog Slip one stitch as if to knit, Slip another stitch as if to knit. Insert left-hand needle into front of these 2 stitches and knit them together $\boxdot$ Turn, place pin Knit to end, turn and place pin $\boxed{>}$ ik Lifted Increase Right lifted increase: Insert needle from front to back into left leg of [M this lifted leg. Left lifted increase: Insert right needle from front to back into right leg of stitch in row below the first stitch on left needle. Knit a stitch into this lifted leg. Knit into stitch on left needle as us ual. $\uplambda$ sl1 k3tog psso Slip 1 stitch, k3tog, pass slipped stitch over k3tog k3tog Knit three stitches together as one Picot bind off With cable cast on,\*co 2 sts, bo 4 sts\* repeat
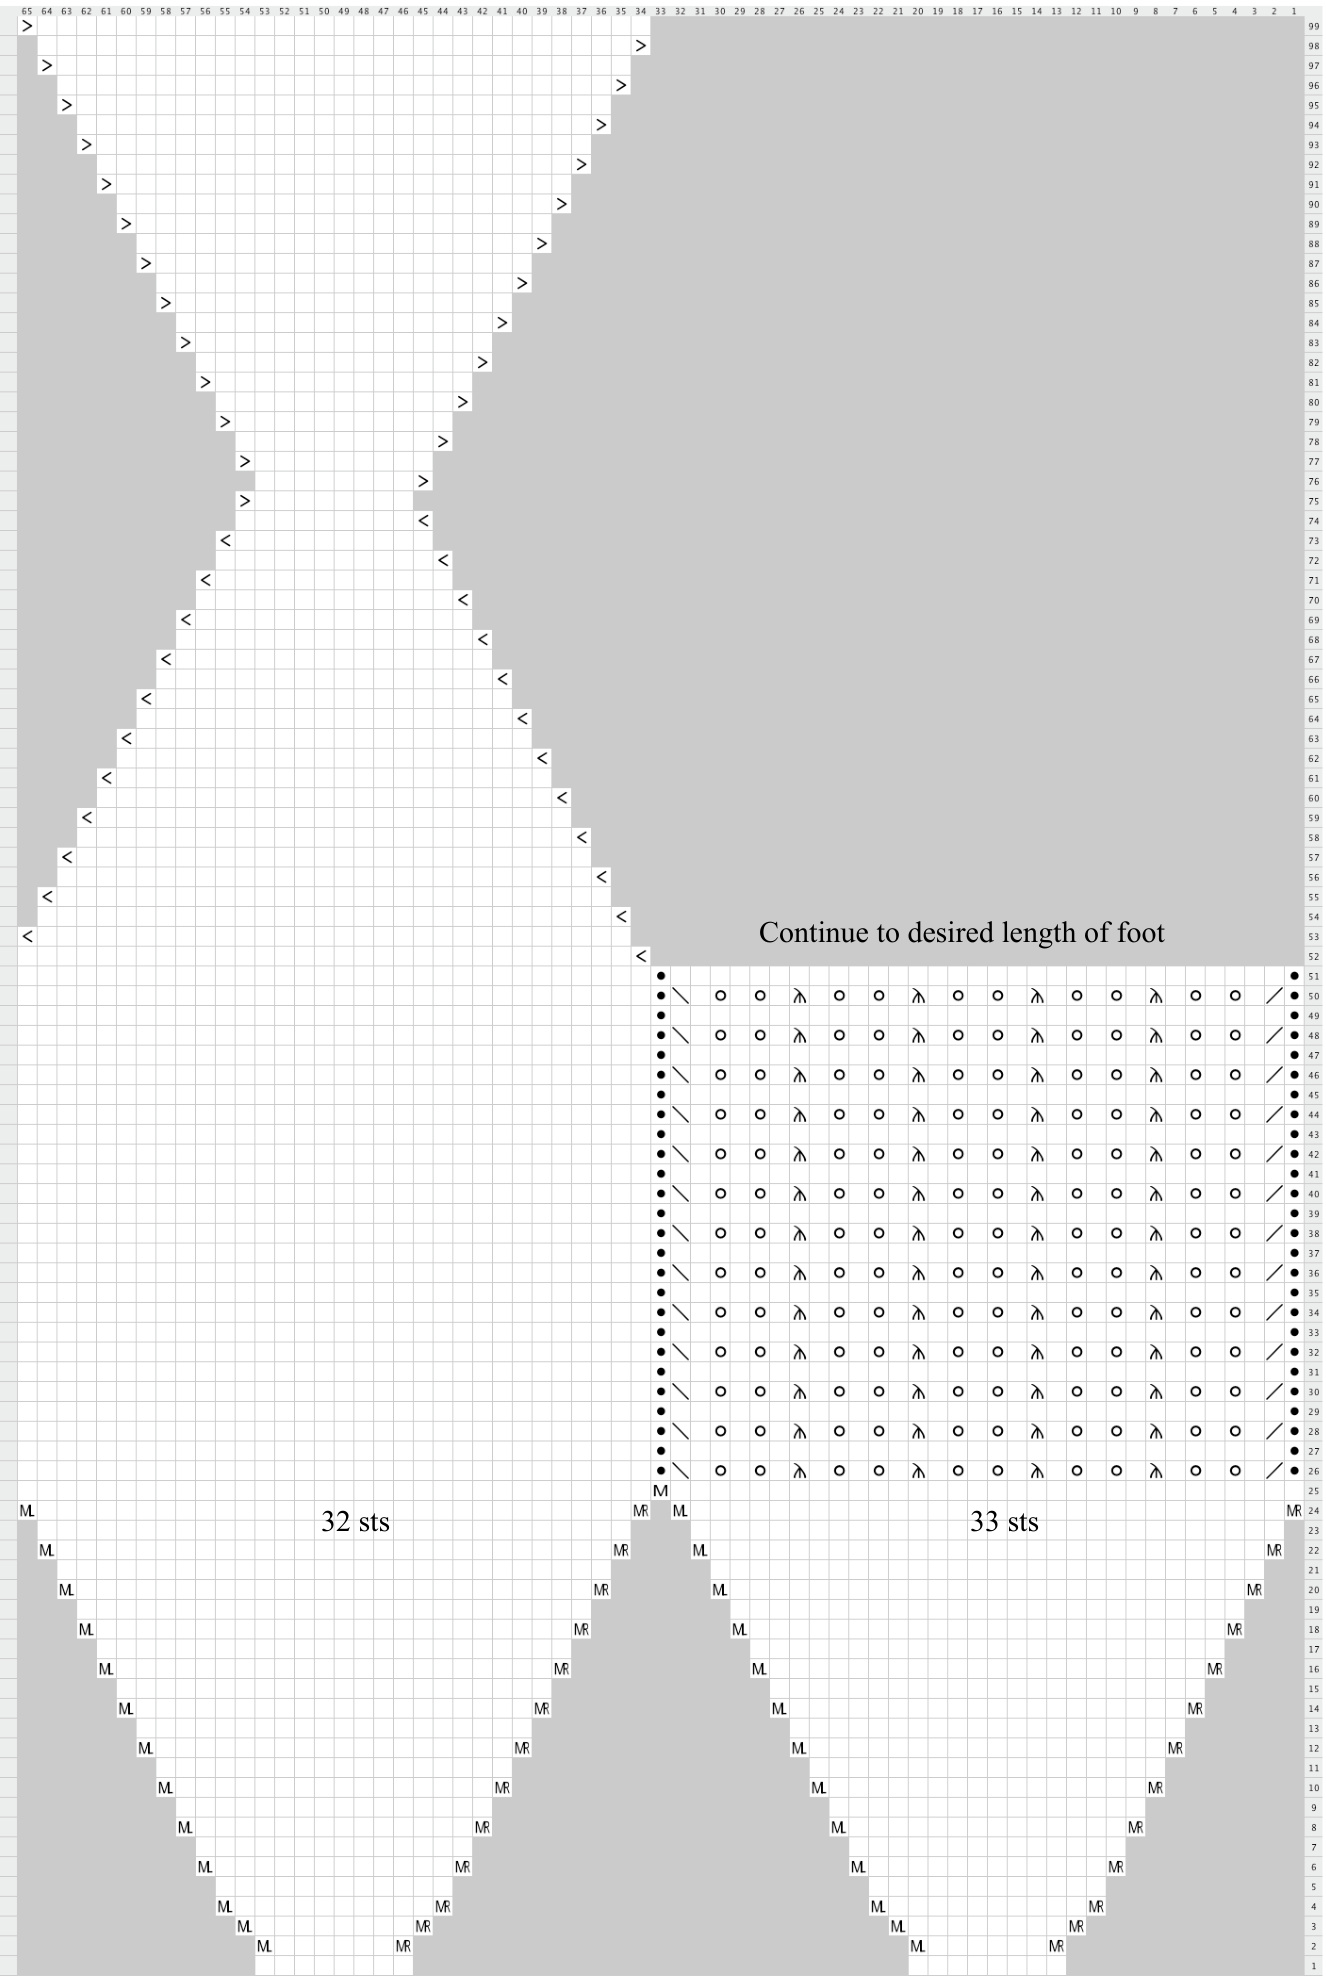
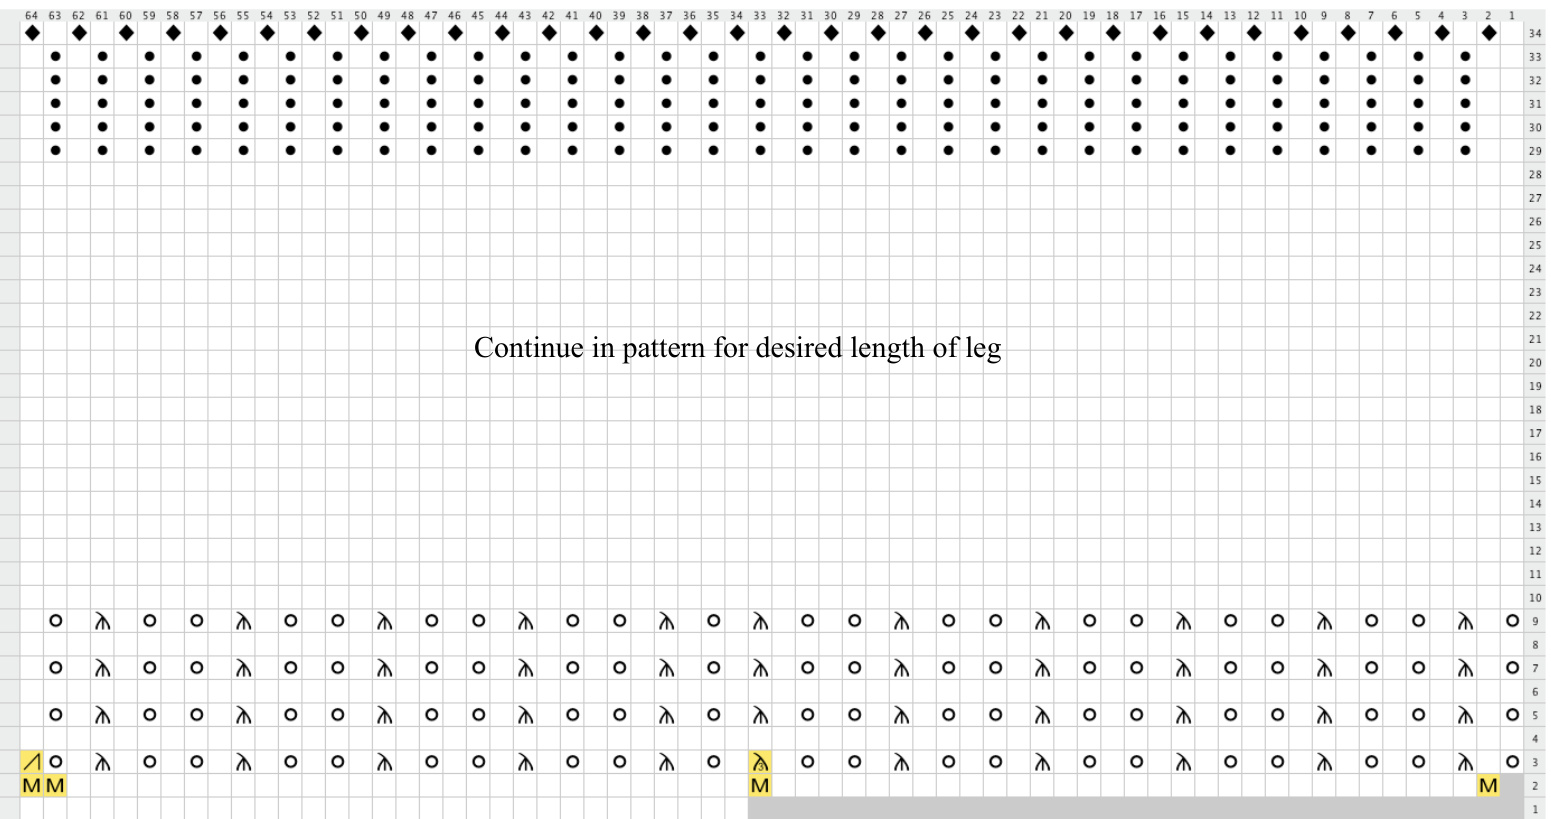
CHART 2: Leg
Note: The optional lifted increases and their corresponding decreases are shown in yellow on this chart. They are only required if you want to close up gaps at corner of heel.