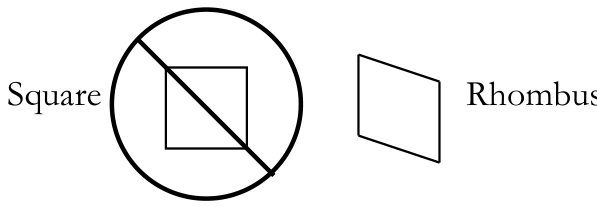
Before we begin, let me dispel any misconceptions. You are not knitting a square. It's more like a rhombus. If that really bugs you, and you want a perfect square, this is not the pattern for you. Or at least you'llhave to do lots of math with your titch vs. row gauge to figure out how to adust the increases and decreases. That being said, Pm including instructions on how to block the heck out of this sucker and get it pretty close to square.
Yarn: ${\sim}5\,$ balls Nashua Creative Focus Worsted - Natural ${\sim}5\,$ balls Nashua Creative Focus Worsted - Espresso (I got 6 of each, lost a bunch of the Espresso in some early experimenting, and ended up needing some of the $6^{\mathrm{th}}$ ball of Espresso, but none of the $6^{\mathrm{th}}$ ball of Natural, so you decide.) Gauge: 4.5 st &8 rows per inch in stockinete after blocking (so you may get a slightly smaller gauge before blocking) Finished size: about $4.5^{\circ}\mathrm{~x~}4.5^{\circ}$ Needles: 1 size 8 circular needle (very long, to accommodate the widest part of the square) 1 cable needle 1 blunt darning needle
Notes:
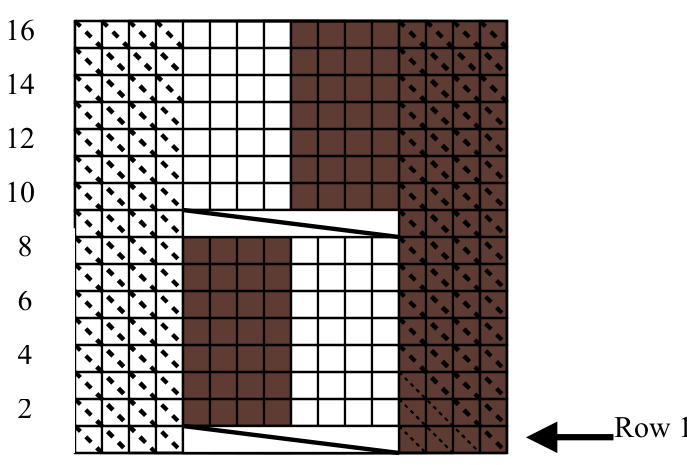
When changing colors, \*always\* twist colors once around each other or it will cause a hole. When the colors on the cable are opposite those on the rest of the afghan (the first 8 rows of the pattern below), you will need to carry the other yarn behind. I recommend catching the unused yarn in each stitch behind the knitting rather than leting it float. The 4-stitch floats are just too likely to get caught on something. I also recommend twisting in one direction for 4 stitches, then (un)twisting in the other direction for 4 stitches so you can leave the other color behind as you finish the row and start the next. This yarn is prone to grabbing onto itself. In the beginning and end of the blanket, when you are twisting them around each other often, you may want to use smaller bobbins of each yarn to keep them from getting hopelessly snarled. Trust me on this one. You can do your increases and decreases any old way you want. I didn't bother with making the two sides match precisely, and the result was a fairly nice edge that looked slightly different on each side. You could also move the increases in a few stitches in from the side to make a more decorative border, especially with YOs for increases, but keep in mind you'd have to do 2 decreases each row to keep the YOs up on the decrease half. (on center 16 sts; over 16 rows) Row 1 (RS): P4 in MC, sl4 to cable needle and hold in front, K4 in CC, K4 in MC from needle, P4 in CC Row 2: K4 in CC, P4 in MC, P4 in CC, K4 in MC Row 3: P4 in MC, K4 in CC, K4 in MC, P4 in CC Row 4, 6, & 8: (as Row 2) Row 5 & 7: (as Row 3) Row 9: P4 in MC, sl4 to cable needle and hold in front, K4 in MC, K4 in CC from needle, P4 in CC Row 10: K4 in CC, P4 in CC, P4 in MC, K4 in MC Row 11: P4 in MC, K4 in MC, K4 in CC, P4 in CC Row 12, 14, &16: (as Row 10) Row 13 & 15: (as Row 11)
Cable Chart
K on RS, P on WS, in CC K on RS, P on WS, in MC P on RS, K on WS, in CC P on RS, K on WS, in MC
Pattern
CO 2 MC stitches, then CO 2 CC stitches (4 sts) Row 1: P2 in CC, P1 in MC, K1FB (5 sts) Row 2: K3 in MC, K1 in CC, K1FB (6 sts) Row 3: P3 in CC, P2 in MC, K1FB (7 sts) Row 4: K4 in MC, K2 in CC, K1FB (8 sts) Row 5: P4 in CC, P3 in MC, K1FB (9 sts) Row 6: P1 & K4 in MC, K3 in CC, K1FB (10 sts) Row 7: K1 & P4 in CC, P4 in MC, K1FB (11 sts) Row 8: P1 & K4 in MC, K4 & P1 in CC, K1FB (12 sts) Row 9: K2 & P4 in CC, P4 & K1 in MC, K1FB (13 sts) Row 10: P3 & K4 in MC, K4 & P2 in CC, K1FB (14 sts) Row 11: K3 & P4 in CC, P4 & K2 in MC, K1FB (15 sts) Continue with Cable pattern and increases. All sts outside of pattern should be K on RS and $\mathrm{P}$ On WS and the last st of every row should be K1FB. So, in general, on the increase half: RS rows look like: K to cable, do cable pattern over 16 sts, K to last st, K1FB WS rows look like: P to cable, do cable pattern over 16 sts, P to last st, K1FB The row \*after\* you have created the $250^{\mathrm{th}}$ stitch, begin decreasing by K2tog. In general, on the decrease half: RS rows look like: K to cable, do cable pattern over 16 sts, K to last 2 sts, K2tog WS rows look like: P to cable, do cable pattern over 16 sts, P to last 2 sts, K2tog Okay, fair warning. I fudged it here a bit. I didn't bother too much with the math of the thing, so I didn't precisely figure out how the decreases and the cable pattern intersect at the end. That being said, it turned out right, with the cable repeat hitting row 9 just as the decreases hit the edge of the cable pattern purls. Once this happens, stop the cable patern, keep decreasing, just working the appropriate colors until you have 4 stitches. BO 2 sts with appropriate color, then B0 2 sts with other appropriate color. Ifyou want to change the sie of the blanket (increasing or decreasing the widest point), see my math at the bottom for reference Weave in ends. See that you do not have a square. Decide whether: 1) it's fine with you as it is. Then wash/soak gently and block without too much worry. Careful when lifting it from the tub - heavy and stretchy! 2) you really want to get this as close to square as possible Then follow blocking instructions below:
Blocking
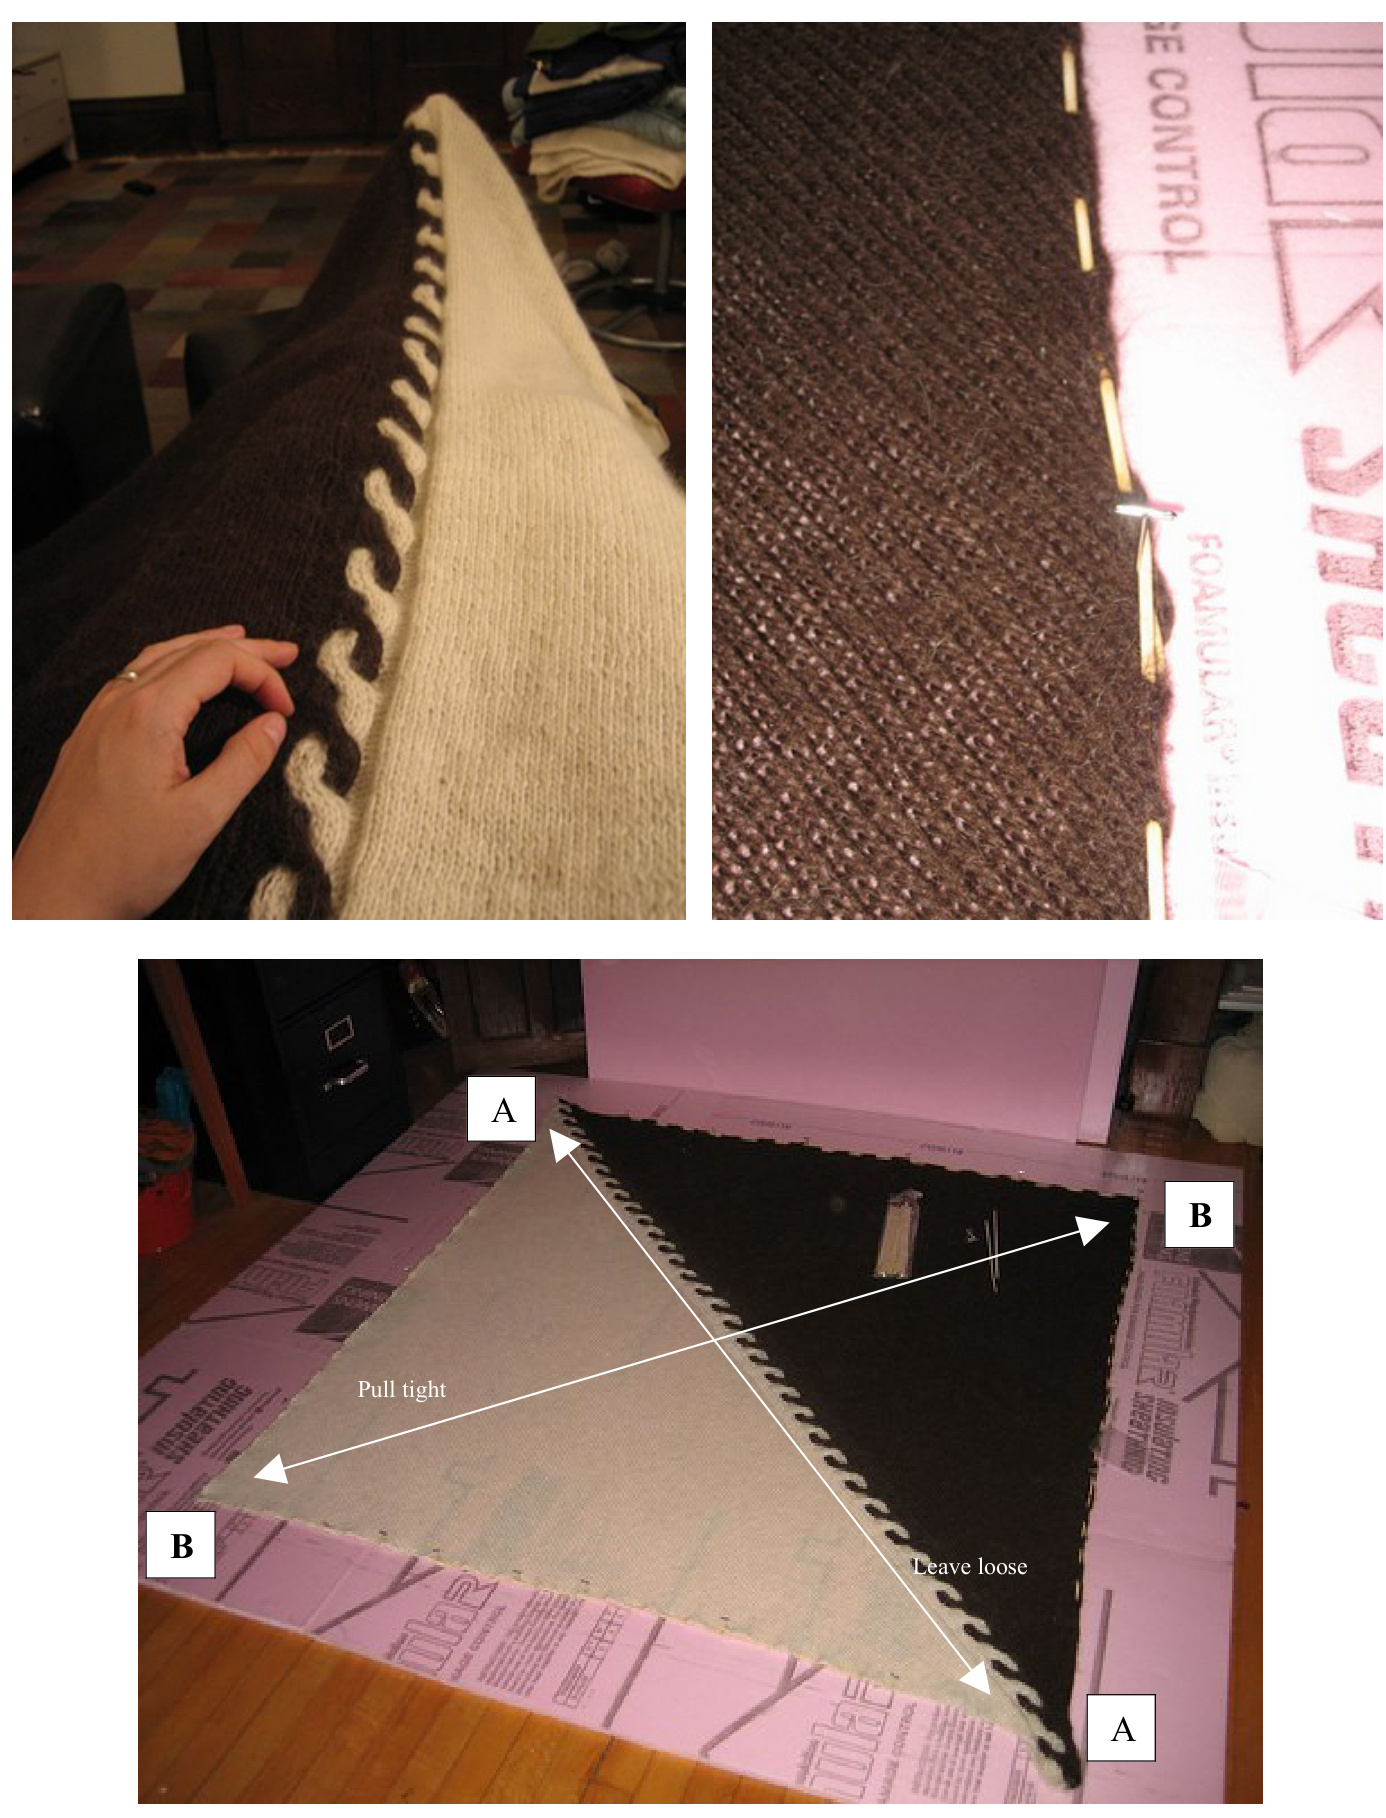
1) Procure: several dozen large T-pins 2 packages of smooth bamboo skewers (pay a little more to get ones without burrs or splinters) 2 sheets extruded foam insulation - these are about $\mathbb{S}8$ /piece at the big home supply stores. Ask the guys there which ones are OK for indoor use. Don't tellthem what it's for. You can also have the guys in the wood department cut it if you know the dimensions you'll need based on your blanket. You can also use a utility knife and do it yourself, but it's trickier, and getting it cut by the pros is fre. 2)Do your normal wash/soak routine, eing especiallycareful when lifting it out f the tub, sinc it's heavy and stretchy now. 3) Place on towels, rollup, and squeeze gently to get water out. Again, gentle is the name of the game. Rough comes later. 4) Remove from towels, place on insulation that has been arranged to give you 2-3 feet of space around the perimeter of the blanket. 5) Measure diagonally along cable from corner to corner (A, below), then perpendicularly between the other two corners (B, below). Pin (A) corners in place without pulling. Pin the (B) corners the same distance apart as the (A) corners are, which will take some pulling. The trick here is to make sure that the result will be close to square, rather than a different rhombus than the one you have. Use the edges of the foam (which should be straight) and measure from each side to each corner. Each pair of corners on a side should be the same distance from that edge. With me? If you've done it right, you should have 4 pinned corners that make a square. The edges will be curved between the pins, caused by pulling the (B) corners away from each other. 6) Now you need to deal with the curved sides. To fix this, I wove the skewers through each edge, and placed each against two or three pins that extended in a straight line towards the other corner. Start with the area where the tension is greatest (the B corners) and work out towards the looser areas (the A corners). If all of this is too weird to understand, look at the photos I've attached below. Notice that I didn't bother skewering the (A) corners because I don't need to pullthat area tight at all. 7) Leave to dry totally - a few days. Then, remove pins and skewers, lightly steam the edges to remove any waviness from the skewers being threaded through, and you're set! Also, if you have recycling in your town, you can just place the foam insulation in the recycle bin (cut down, of course).
If you have questions or comments, send a PM to wirledpeas on Ravelry. C 2008, Kate Hiester, All Rights Reserved. No sales of pattern or items made from pattern without written permission of author.


