Big Basin Socks
Copyright 2008 by Rebecca A [spockie on Ravelry]
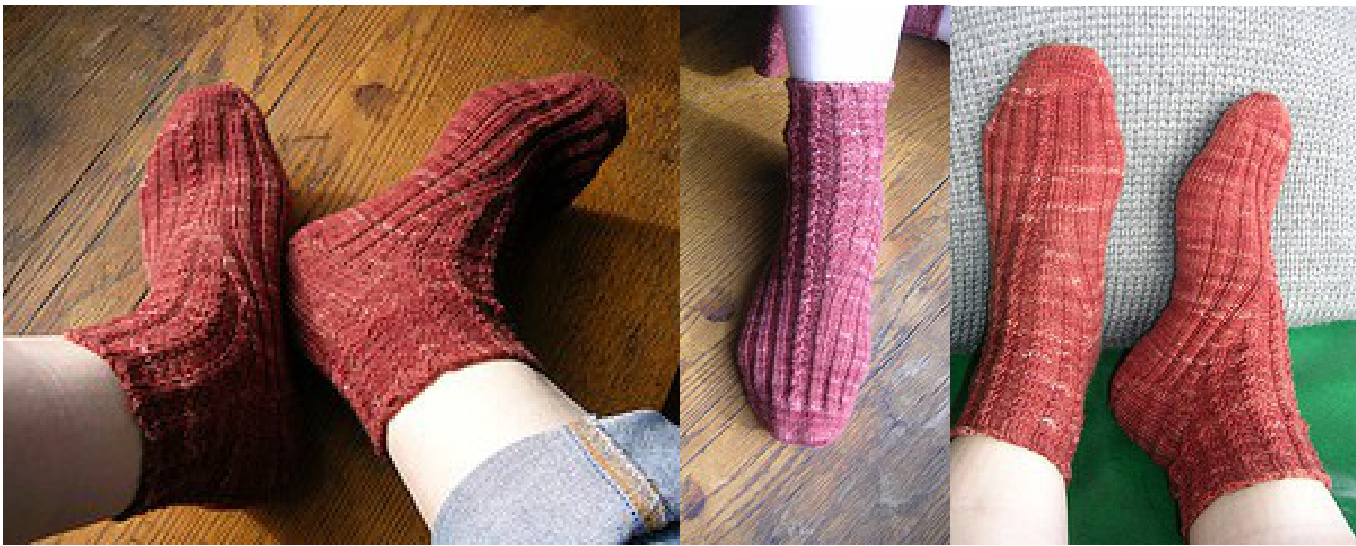
This sock is worked from the toe up on two circular needles. The architecture of the sock is based on techniques in Cat Bordhi's book "New Pathways for Sock Knitters". If you love knitting socks and like to try new techniques, I highly recommend you buy this book. You will be able to complete this sock design without the book, but you may find that the book will be useful. The book provides very good explanations and diagrams, as well as the charts that are needed if you want to customize the socks to your own measurements. I lived in Northern California for 17 years, then moved away several years ago. In February 2007, I visited my good friend Evanne in San Francisco and she took me to Big Basin State Park in the Santa Cruz Mountains. The entire time that I lived in California, I had never heard of this park, but it is a very nice park filled with beautiful redwoods. In October I bought this yarn and started working on this sock design. When I finished the first sock, I realized that the combination of the color and the stitch pattern reminded me of the redwood trees at Big Basin. The foot of the sock is worked in K2, P2 rib, with the center rib knit in Baby Cable Rib pattern. The gusset increases are made on either side of the center Baby Cable Rib, also in the Baby Cable Rib pattern. The back of the heel is worked in K2, P2 rib until the top of the heel, when the pattern changes to Baby Cable Rib to join with the instep, with the cuff of the sock knit in Baby Cable Rib.
Size:
Women's US size 7 {10}
Yarn Requirements:
100 g fingering weight yarn - I used Claudia Handpaints fingering in Taupe, which is more of a cedar brown color. Claudia Handpaints comes in 50 gram skeins. One sock knit to size 7 used approx. 32 grams of yarn, but I like to knit shorter cuffs. 100 grams should be enough to knit an average size pair of socks. You may choose solid color or multi-color yarn.
Big Basin Socks
Copyright 2008 by Rebecca A [spockie on Ravelry]
Tools:
Two circular needles, size 1 US (2.25 mm), or size required to get gauge. You may choose to use DPN's, but the pattern is written for two circulars. Stitch markers (optional) Stitch holders (optional) Darning needle
Gauge:
8.5 stitches per inch (2.5cm) and 12 rows per inch (2.5cm) knit in stockinette in the round. Please note that your gauge may be different on a swatch worked back and forth, so be sure to work gauge swatch in the round.
Definitions:
K Knit P Purl K2tog Knit two together, inserting the right hand needle from left to right through the next two knit stitches BCX Baby Cable Rib Cross - see pattern below. BCR Work in established Baby Cable Rib - this will either be K2 or BCX, depending on which row of the 4 row Baby Cable Rib pattern you are on. PM Place Marker pw Purlwise S1 Slip one stitch onto right needle LHN Left hand needle RHN Right hand needle [xx] xx equals the directions for one pattern repeat, the square brackets are the beginning and ending of the pattern repeat, repeat the stitches in these brackets as many times as directed. {yy} yy equals directions specific to US size 10 ¥ Repeat the directions between the brackets until the end of the row, or until otherwise directed. The following directions are very well explained with helpful diagrams in the book "New Pathways for Sock Knitters" by Cat Bordhi. If you need help with these techniques, I recommend consulting the book. LLinc Leaning Left Increase - looking at the stitch that you just knit onto the right hand needle, locate the stitch 2 rows down (if the stitch on the needle is the daughter, the stitch below it is the mother, and the stitch below that is the grandmother - you want the grandmother stitch). Insert your left needle into the grandmother stitch and knit into the left leg of the stitch. The book doesn't mention this, but I prefer twisting the grandmother stitch when making this increase.
Big Basin Socks
Copyright 2008 by Rebecca A [spockie on Ravelry]
LRinc
Leaning Right Increase - looking at the stitch that you are about to knit on the left hand needle, locate the stitch below it (the mother stitch). Using your right needle, lift the right leg of the mother stitch, place on left needle and then knit into the front leg of this stitch. Again, the book doesn't mention this, but I prefer twisting this stitch as well. Try it both ways and decide which way works best for you.
W&T
Wrap & Turn - For a knit stitch, bring yarn between the needles to the front. Slip next stitch knitwise. Move yarn between the needles to the back. Slide the wrapped stitch from the right needle back to the left needle, and turn work to the purl side. - For a purl stitch, bring yarn between the needles to the back. Slip next stitch. Move yarn between the needles to the front, then slide the wrapped stitch from the right needle back to the left needle, and turn work to the knit side.
cW
For knit stitches: with the knit side of the work facing you, lift the wrap up and over the left side of the stitch it is wrapped around, so that it is sitting on the needle behind the original stitch, knit both the stitch and the wrap together. For purl stitches: with the purl side of the work facing you, lift the wrap from the knit side, up and over the left side of the stitch it is wrapped around. Purl both the stitch and the wrap together.
Baby Cable Rib Pattern:
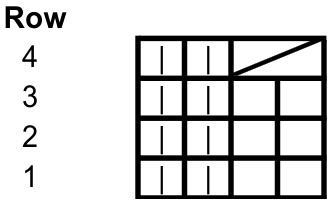
This pattern stitch can be found in Barbara G. Walker's "A Treasury of Knitting Patterns" on page 40 and also in Charlene Schurch's "Sensational Knitted Socks" on page 37. Both books include a photo of the stitch pattern knitted up and Charlene's book includes a chart. Row1: [K2,P2]\* Row 2 and 3: Same as Row 1 Row4: [BCX, P2]\* BCX = Baby Cable Rib Cross - K2tog without removing the stitches from the left hand needle, knit the right hand stitch again, then slip both stitches from the left hand needle. Repeat these four rows.
Big Basin Socks
Copyright 2008 by Rebecca A [spockie on Ravelry] Baby Cable Rib Chart: Key Knit Purl Baby Cable Rib Cross
Begin Toe:
Cast on 12 stitches using Judy's Magic Cast-on. This cast-on can be found at: http://www.knitty.com/ISSUEspring06/FEATmagiccaston.html There are also very good instructions with helpful diagrams for this cast-on on page 22 of “New Pathways for Sock Knitters". See appendix for alternative toe-up toes. With the needle that is attached to the working end of the yarn, work 5 rows of stockinette as follows: Rows 1, 3, 5: [K]\* Rows 2, 4:[P]\* The other needle will hold the cast-on stitches. You will now have a thin rectangle of 12 stitches by 5 rows. Turn work clockwise a quarter turn, and pick up 2 stitches on the short side, with the needle you used to work the toe rows, then pick up two stitches with the second needle. Turn work clockwise a quarter turn and knit across the 12 stitches, place marker. Turn work clockwise a quarter turn and pick up 2 stitches on the second short side without switching needles. Switch needles and pick up 2 more stiches, place marker and knit 14. You should now have 16 stitches on each circular as follows: 2 stitches from a short side, 12 stitches from a long side, then 2 stitches from the other short side (total 16 stitches).
Toe Increase Rounds:
Row 1: K2, LRinc, K until 2 stitches remain, LLinc, K2 Row2: [K]\* Repeat these two rows until you have a 28 {30} stitches on each circular, for a total of 56 {60} stitches.
Big Basin Socks
Copyright 2008 by Rebecca A [spockie on Ravelry]
Toe notes:
·I was unable to use Judy's Magic Cast-on with DPN's although I believe it is possible. If you are knitting with DPN's and have trouble with this cast on, feel free to use any other toe up cast on you choose. If you want to substitute a different toe up cast on or different toe, please go ahead, making sure that you have 56 stitches when you have completed the toe. ·Alternative toes can be found in the appendix at the end of this pattern.
Work Foot of Sock:
You should have 28 {30} stitches on each of two circular needles. One needle will be referred to as the sole needle (for bottom of foot) and the other needle will be referred to as the instep needle (for top of foot). Until further directed, all rows for the sole needle are worked using the knit stitch. For the instep needle work in pattern as follows: Size 7 instructions only: Row 1 - 3: P1, [K2, P2] six times, K2, P1 Row4: P1, [K2, P2] three times, BCX, [P2, K2] three times, P1 {Size 10 instructions only: Row 1 - 3: P2, [K2, P2] six times, K2, P2 Row4: P2, [K2, P2] three times, BCX, [P2, K2] three times, P2} Repeat these rows until the sock measures 4.5 {5} inches (11.25 {12.5} cm) from the tip of the toe.
Increasing for Gusset:
As Cat explains in her book, the increases that allow the sock to fit over the heel/ankle part of the foot can be placed in any part of the sock. The increases need to occur at a rate of 2 stitches every three rows, but do not have to be made symmetrically. This sock pattern has the increases placed symmetrically on each side of the central 6 stitches of the sock. The Baby Cable Rib pattern is a 4 row repeat, but the increases occur every three rows. You may find it helpful to use a row counter (maybe two) or scratch paper to keep track of the rows. You may also find it useful to use markers to mark where the increases should go, however, I found the markers to be in the way. There will be three K2, P2 ribs on either side of the increases, so I found that the markers weren't really necessary. Note that sometimes the Baby Cable Rib cross will occur on the increase row.
Big Basin Socks
Copyright 2008 by Rebecca A [spockie on Ravelry]
Work increases as follows:
Size 7 instructions only: Row 1: P1, [K2,P2] two times, K2, LLinc, P2, BCR, P2, LRinc, K2, [P2, K2] two times, P1 - note - both the LLinc and the LRinc should be KNIT stitches. {Size 10 instructions only: Row 1: P2, [K2,P2] two times, K2, LLinc, P2, BCR, P2, LRinc, K2, [P2, K2] two times, P2 - note - both the LLinc and the LRinc should be KNIT stitches. Rows 2 & 3: Knit into K stitches, purl into P stitches, and cross the central Baby Cable Rib when needed. Row 4: P2, [K2,P2] two times, K2, LLinc, K1, P2, BCR, P2, K1, LRinc, K2, [P2, K2] two times, P2 - note - both the LLinc and the LRinc should be KNIT stitches. Rows 5 & 6: Knit into K stitches, purl into P stitches, and cross the central Baby Cable Rib when needed. Row 7: P2, [K2,P2] two times, K2, LLinc, K2, P2, BCR, P2, K2, LRinc, K2, [P2, K2] two times, P2 - note - both the LLinc and the LRinc should be PURL stitches.} NOTE: You now have the start of two new Baby Cable Ribs between the K2, P2 ribs that run on the sides of the instep. These two new Baby Cable Ribs are on either side of the center Baby Cable Rib. Starting with the next row, each time that you cross the center Baby Cable Rib, you will also cross these two new BabyCableRibs. Both size 7 and 10: Rows 8 & 9: Knit into K stitches, purl into P stitches, and cross the three central Baby Cable Ribs when needed. Size 7 only: Row10: P1 [K2, p2] two times, K2, LLinc, P1, [BCR, P2] two times, BCR, P1, LRinc, K2, [P2, K2] two times, P1 - note - both the LLinc and the LRinc should be PURL stitches.
Big Basin Socks
Copyright 2008 by Rebecca A [spockie on Ravelry] {Size 10 only: Row10: P2 [K2, p2] two times, K2, LLinc, P1, [BCR, P2] two times, BCR, P1, LRinc, K2, [P2, K2] two times, P2 - note - both the LLinc and the LRinc should be PURL stitches.} Both size 7 and 10: Rows 11 & 12: Knit into K stitches, purl into P stitches, and cross the Baby Cable Ribs when needed. Continue increasing as described above, remembering to cross the Baby Cable Ribs every 4 rows. As the sock grows, it will appear as though the Baby Cable Ribs are growing out of the K2, P2 ribs on the sides of the foot. Continue increasing until you have a total of 28 {30} increase stitches (14 {15} increase rows). After you have completed the 14th {15th} increase row, work one more row in pattern across both the sole and instep needles, then knit across the sole needle a second time and stop. Read through the heel instructions before you proceed to make sure you understand all the steps.
Heel Instructions:
Before you start the heel, look at the sock. You should have 28 {30} stitches on the sole needle and 56 {60} stitches on the instep needle. Of these 56 {60} instep stitches, the 14 {15} on the far right and the 14 {15} on the far left are now referred to as the wing stitches and the central 28 {30} stitches are the instep stitches. You are now going to work in the established pattern one set-up row in preparation for the heel turn. During this round, you are going to increase the wing stitches by 4 additional stitches on each side, for a total of 18 {19} wing stitches on the right, 28 {30} instep stitches in the center, and 18 {19} wing stitches on the left.
Set-up Row for Instep:
When working the increases in this section, the increase stitch should be a knit stitch unless it is between 2 purl stitches, in which case the increase should be a purl stitch. Size 7 Instructions Only: First set of wing stitches: P1, K2, LRinc, P2, K1, LRinc, K1, P2, LRinc, K3, LRinc, K1, P1, PM, Central 28 Instep stitches: P1, [BCR, P2] six times, BCR, P1, PM Second set of wing stitches: P1, K1, LLinc, K3, LLinc, P2, K1, LLinc, K1, P2, LLinc, K2, P1
Big Basin Socks
Copyright 2008 by Rebecca A [spockie on Ravelry] {Size 10 Instructions Only: First set of wing stitches: P2, K2, LRinc, P2, K1, LRinc, K1, P2, LRinc, K3, LRinc, K1, P1, PM, Central 30 Instep stitches: P2, [BCR, P2] six times, BCR, P2, PM Second set of wing stitches: P1, K1, LLinc, K3, LLinc, P2, K1, LLinc, K1, P2, LLinc, K2, P2} Do not knit across sole needle yet. You should now have 64 {68} stitches on the instep needle - 18 {19} wing stitches, marker, 28 {30} instep stitches, marker, 18 {19} wing stitches - and 28 {30} stitches on the sole needle. You will now be working the heel turn on the sole needle only. You should be at the start of the sole needle with the knit side of the sole facing you.
Heel Turn:
Row 1: K26 {28}, W&T Row 2: P24 {26}, W&T Row 3: K23 {25}, W&T Row 4: P22 {24}, W&T Row 5: K21 {23}, W&T Row 6: P20 {22}, W&T Row 7: K19 {21}, W&T Row 8: P18 {20}, W&T Row 9: K17 {19}, W&T Row 10: P16 {18}, W&T Row 11: K15 {17}, W&T Row 12: P14 {16}, W&T Row 13: K13 {15}, W&T Row 14: P12 {14}, W&T Row 15: K11 {13}, W&T Row 16: P10 {12}, W&T Size 7 Instructions Only: Row17: K until 1st wrapped stitch, [CW] 7 times, slip the last wrapped stitch as if to knit on to the right needle, slip the next stitch (the last stitch on the needle) as if to knit onto the right needle. Slip both of these back to the left needle and lift the wrap of the last wrapped stitch up and over the last wrapped stitch - there are now three stitches left, the last wrapped stitch, it's wrap and the last stitch on the needle, knit all three of these stitches together. Turn work. Row 18: S1, P until 1st wrapped stitch on the purl side. [CW] 7 times, lift the wrap as for CW, then purl together the stitch that was wrapped, the wrap and the last stitch on the needle. You should now have 26 stitches on the sole needle for size 7.
Big Basin Socks
Copyright 2008 by Rebecca A [spockie on Ravelry] {Size 10 Instructions Only: Row 17: K11, W&T Row 18: P10, W&T Row 19: K until 1st wrapped stitch, [CW] 8 times, slip the last wrapped stitch as if to knit on to the right needle, slip the next stitch (the last stitch on the needle) as if to knit onto the right needle. Slip both of these back to the left needle and lift the wrap of the last wrapped stitch up and over the last wrapped stitch - there are now three stitches left, the last wrapped stitch, it's wrap and the last stitch on the needle, knit all three of these stitches together. Turn work. Row 20: S1, P until 1st wrapped stitch on the purl side. [CW] 8 times, lift the wrap as for CW, then purl together the stitch that was wrapped, the wrap and the last stitch on the needle. You should now have 28 stitches on the sole needle for size 10.} There is no row 19 or 20 for size 7.
Preparation for Working the Heel:
Slide the sole circular needle so that the 26 {28} sole stitches are on the cable part of the needle. Using the left end of the circular needle, slide the 18 {19} wing stitches from the instep needle onto the sole needle, remove the marker. Then, using the right end of the circular needle, slide the 18 {19} wing stitches from the other side of the instep needle onto the sole needle. Hold the work so the knit side of the sole is facing you. You will now have 28 {30} stitches on the instep needle and 62 {66} stitches on the sole needle. However, you will notice that the working end of the yarn is between the 18 {19} wing stitches on the right side of the sole needle and the central 26 {28} sole stitches. Slide the needle to the left so that the right side wing stitches are on the left end of the circular needle - transfer these 18 {19} stitches to the right end of the circular needle. It will look like you have just finished working the 18 {19} right side wing stitches and are about to work across the sole stitches. The sole needle and sole stitches will now be referred to as the heel needle and heel stitches.
Work the Heel:
Size 7 Instructions Only: Row1: S1, K1, [P2, K2] 5 times, P2, K1, SSK,turn Row2: S1, P1, [K2, P2] 5 times, K2, P1, P2tog, turn} {Size 10 Instructions Only: Row 1: S1, P2, [K2, P2] 6 times, SSK ,turn Row2: S1, K2, [P2, K2] 6 times, P2tog, turn}
Big Basin Socks
Copyright 2008 by Rebecca A [spockie on Ravelry] Repeat these rows until there are 28 {30} stitches on the heel needle. With the right side of the work facing you, you should have on your heel needle: one slipped purl {knit} stitch on the right, 26 {28} heel stitches worked in K2, P2 ribbing, and one slipped purl {knit} stitch on the left. Knit into the K stitches and purl into the P stitches until you come to the last purl {knit} stitch on the left. You will be purling {knitting} this stitch, however, after working the heel, this stitch may be loose and purling {knitting} into it may result in a gap. To prevent a gap, pick up the yarn between the last stitch on the right needle and the purl {knit} stitch on the left needle. Twist this yarn and place on the left needle, to the right of the purl {knit} stitch, to make a new stitch. Purl {knit} these two stitches together. You should now have 28 {30} stitches on the heel needle and 28 {30} stitches on the instep needle, for a total of 56 {60} stitches.
Work the Leg:
Starting with the instep needle, start knitting in the round in the Baby Cable Rib pattern. You will need to take a look at the instep needle to determine which row of the Baby Cable Rib pattern you are on, so that you can resume crossing the Baby Cable Ribs every 4th row. First row only - when you get to the heel needle on the first row, you may find that the 1st stitch is loose - to prevent a gap, pick up the yarn between the last stitch on the instep needle and the first stitch on the heel needle, twist the yarn and place on the heel needle to make a new stitch, then purl {knit} the first two stitches together. As you work the leg, begin working the heel needle stitches in the Baby Cable Rib pattern. You will first cross the heel needle Baby Cable Ribs on the same row as the next crossings on the instep needle. Continue to work the leg of the sock in Baby Cable Rib pattern until the leg is 1 inch (2.5cm) shorter than your desired finished length. At this point stop crossing the Baby Cable Ribs and work the last inch (2.5cm) in K2, P2 ribbing.
Binding Off:
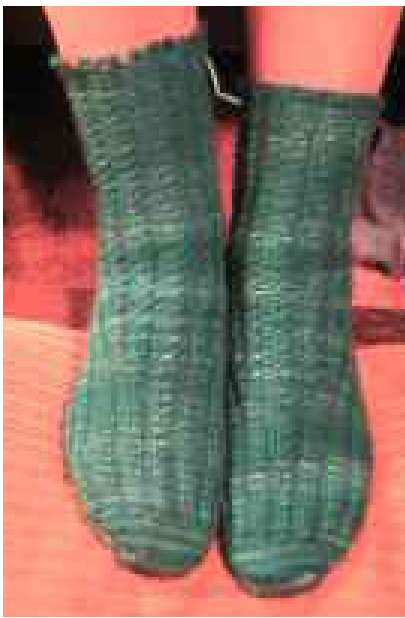
Bind off with any stretchy bind-off you choose. I like the Knit Two, Purl Two bind off from the Vogue Encyclopedia of Knitting. Two stretchy bind-offs can be found at: http://www.socknitters.com/toe-up/lessonsix.htm. Finish socks by weaving in ends. See appendix for alternative picot bind off. If you choose this bind off, you may want to do the bind off on row 2 or 3 of the Baby Cable Rib pattern, instead of the final 1 inch (2.5 cm) of K2, P2 ribbing. This bind off may suggest tree tops.
Big Basin Socks
Copyright 2008 by Rebecca A [spockie on Ravelry] In the photo below, the sock on the left was finished with the picot bind off and the sock on the right was finished with a regular bind off.
APPENDIX
Alternative Toe-up Toes: You can use any toe-up method you choose, as long as you end up with a total of 56 stitches when you have finished the toe. Here are a couple of alternative toe-up patterns: Short Row Toe for Toe Up Socks, by Mary Moran (Page down to find it) http://www.socknitters.com/lessons/toes.htm Toe from Springtime in Paris Sock Pattern (Page 2) http://tinyurl.com/yqo7a9 Square Toe Cast On (Lesson 1) http://www.socknitters.com/toe-up/index.htm
Alternative Heel Rows for Reinforced Heel Stitch:
I really like the way the heel in the pattern fits. I chose the K2, P2 ribbing for the heel because it works well with the Baby Cable Rib pattern and I didn't want to have cable crosses in the shoe portion of the sock. The ribbing makes the heel hug the foot. However, if you want a reinforced heel, feel free to substitute any reinforced heel stitch you choose in the following two rows: Row1: S1, [alternative heel stitch (24 {26} stitches)] SSK, turn Row2: S1, [alternative heel stitch (24 {26} stitches)] P2tog, turn
Big Basin Socks
Copyright 2008 by Rebecca A [spockie on Ravelry]
Modifying the Fit of the Sock:
This sock is meant to fit snugly. If you wish to modify the pattern by increasing the number of stitches, make sure to increase in multiples of 4. You will need to adjust the instep pattern so that the Baby Cable Rib is the central 2 stitches on the needle. If the total number of stitches is a multiple of 8, the center two stitches on the heel should be purls, otherwise, they should be knits - this ensures that the ribs on the heel will match up with the ribs on the instep after the heel is finished.
Suggestions for Working 2 Socks on 2 Circulars:
When working the heel turn work the first socks heel turn until you have finished row 17 (all the stitches have been worked), then do the heel turn for the second sock. As you are doing row 18 slip the stitches from the instep needle (or stitch holder) to the sole needle. {Rows 19 & 20 for size 10} When rearranging the stitches to work the heel, use stitch holders to hold the wingstitches. You may also want to decrease the wing stitches on the second sock (right after the last heel turn row) before doing the last heel turn row of the first sock. Or you can do the heel turn and decrease the wing stitches on sock one, stopping at the end of the last knit row, then do the heel turn and decrease the wing stitches for sock two, then do the last row of the wing stitch decrease on sock one.
Picot Bind-off by Lucy Neatby:
A decorative edge which in addition increases the elasticity of the edge. Bind off 2 sts as usual, return the remaining st on the RHN pw to the LHN. Into this slipped stitch \*\* insert the RHN as if to knit, knit and draw a new loop of yarn through this stitch and place the resulting loop onto the LHN \*\*\*. [One extra stitch has now been created.] Into the outermost stitch on the LHN, repeat from \*\* to \*\*\*, three times more [four new stitches created in totall. Bind off 6 sts as usual.) Repeat around the edge until all the sts have been bound off. In other words; Bind Off 2sts. Cast On 4ts, Bind Off 6sts. This will produce 4 bound off stitches for every picot along the edge. The distance between picots and the height of the picots can both be adjusted to suit your taste.
Note:
Permission was obtained from Cat Bordhi and Lucy Neatby to use the sock architecture and picot bind off in this pattern.


