Wee Westie and Wee Scottie dogs
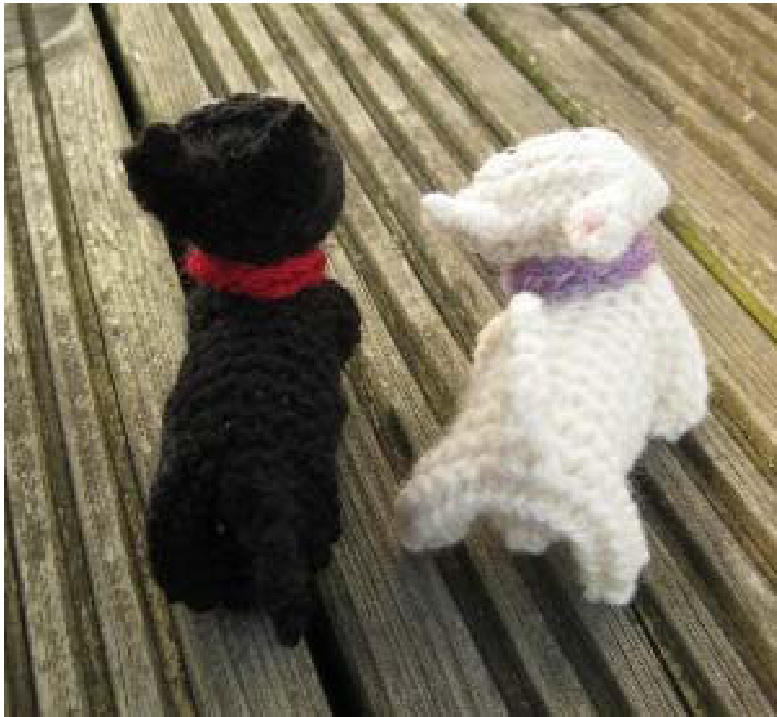
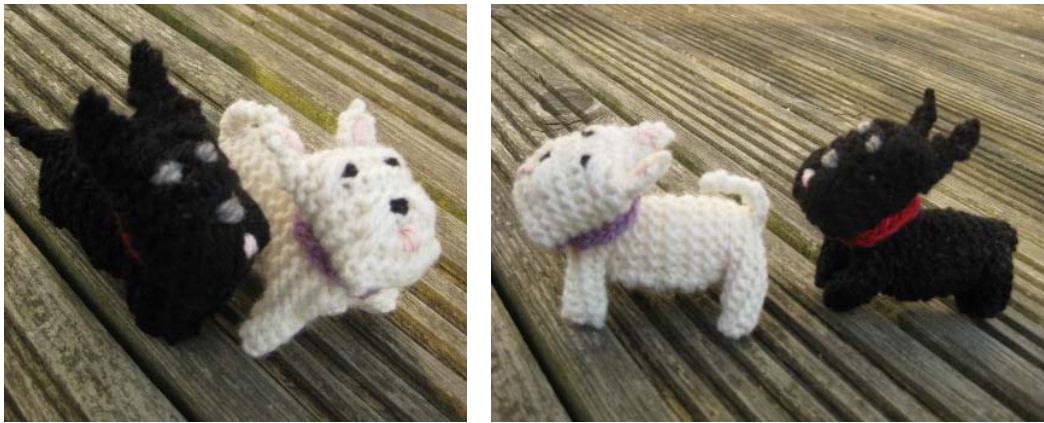
This knitting pattern is for two small knitted dogs, a West Highland Terrier (Westie) and a Scottish Terrier (Scottie). They are pocket sized pooches, standing approximately 9 cm high. The pattern is worked in garter stitch (knit stitches only), knitted flat on two needles, in pieces. There is some sewing up at the end to assemble the dog, and the features are embroidered in yarn.
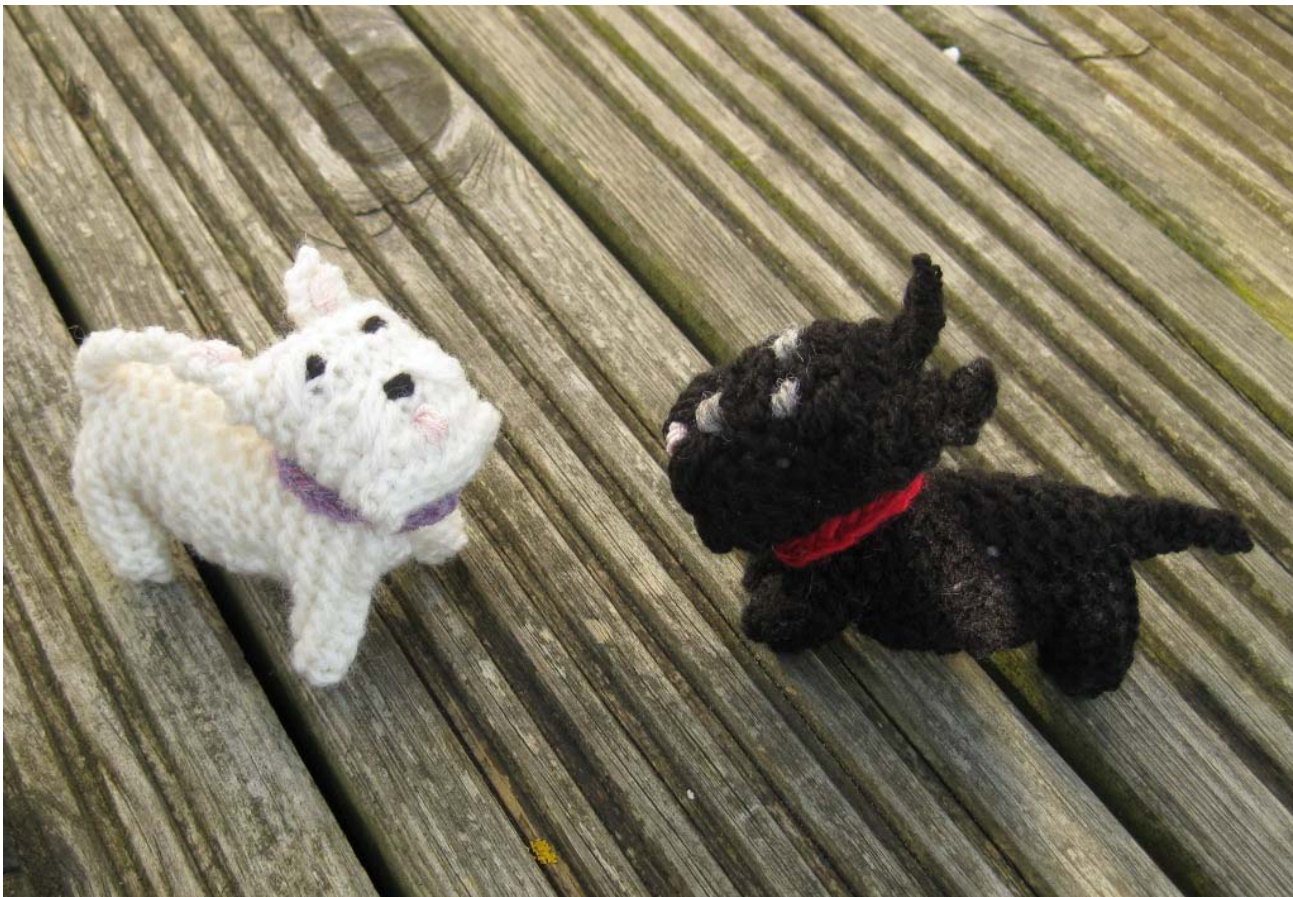
The pattern for this adorable pair was designed and created in Scotland, the natural habitat for these two cheeky doggies!
Copyright @ Ellen Kapusniak 2012 For my hand-knitted gift shop, more knitting patterns and knitting blog please visit: www.knittipoliti.com
What you need
Notions
Straight needles: Size 3.25 mm 2 double-pointed needles: Size 3 mm, for making the i-cord collar. Tapestry needle for sewing up and adding the embroidered features. Small amount of polyester toy filling
Yarns
All yarns used are DK (double knitting) weight yarns, any brand will do.
For Wee Westie:
Main Colour: Approximately 15g white or cream Small scraps of black and pink for the features, small amount of purple for the collar.
For Wee Scottie:
Main Colour: Approximately 15g black Small scraps of grey and pink for the features, small amount of red for the collar.
Abbreviations for stitches used
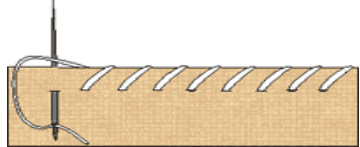
k=knit kfb = knit into the front and back of the same stitch (to make an increase) k2tog =knit two together sl1 =sliponestitch psso = pass slipped stitch over Oversew = sewing each stitch over the join of the two pieces as shown below (but you may use any stitch you prefer)
This design is free-gauge, tension is not critical, assuming the yarn weight and needle size indicated are used. Note: The pattern is almost identical for both dogs, so use the main colour for the dog you are making and follow the instructions below. The pattern only varies for the head of each dog, so when you get to the head instructions do take care to select the right head for your chosen dog! Copyright Ellen Kapusniak 2012 For my hand-knitted gift shop, more knitting patterns and knitting blog please visit: www.knittipoliti.com
PATTERN
Upper Body (make one)
Cast on 20 stitches in your main colour, using 3.25 mm straight pins. Row 1: knit to end Row 2: kfb, knit to last stitch, kfb (22 stitches) Row 3: knit to end Row 4: kfb, knit to last stitch, kfb (24 stitches) Row 5: knit to end Row 6: k2tog, knit to last two stitches, k2tog (22 stitches) Row 7: knit to end Row 8: k2tog, knit to last two stitches, K2tog (20 stitches) Row 9: knit to end Row 10: Bind off first 4 stitches, k 12, Bind off remaining stitches and break off yarn (12 stitches remaining on needle) Shape body
Reattach yarn at the start of the next row and continue as follows
Rows 11, 12, 13, 14: knit to end Row 15: kfb, knit to last stitch, kfb (14 stitches) Rows 16, 17, 18: knit to end Row 19: k2tog, knit to last two stitches, k2tog (12 stitches) Rows 20, 21: knit to end Shape front legs Row 22: Cast on 4 stitches at start of row, knit to end of row (16 stitches) Row 23: Cast on 4 stitches at start of row, knit to end of row (20 stitches) Row 24: kfb, knit to last stitch, kfb (22 stitches) Row 25: knit to end Row 26: Kfb, knit to last stitch, kfb (24 stitches) Row 27: knit to end Row 28: k2tog, knit to last two stitches, k2tog (22 stitches) Row 29: knit to end Row 30: k2tog, knit to last two stitches, k2tog (20 stitches) Row 31: knit to end Bind off all stitches Copyright ? Ellen Kapusniak 2012 For my hand-knitted gift shop, more knitting patterns and knitting blog please visit: www.knittipoliti.com
Lower body (make one)
Cast on 6 stitches Rows 1-4: knit to end Row 5: kfb, knit to last stitch, kfb (8 stitches) Rows 6-16: knit to end Row 17: k2tog, knit to last 2 stitches, k2tog (6 stitches) Rows 18-21: knit to end Bind off all stitches. Head (make one) NOTE: The pattern for both dogs is the same apart from the head so please select and follow the instructions for your chosen dog in this section. Westie head Cast on 20 stitches in main colour using 3.25 mm straight needles Rows 1-10: knit to end Row 11: kfb, knit to last stitch, Kfb (22 stitches) Rows 12, 13, 14: knit to end Bind off all stitches Scottie head Cast on 18 stitches in main colour using 3.25 mm straight needles. Rows 1-14: knit to end Row 15: kfb, knit to last stitch, kfb (20 stitches) Row 16: knit to end Bind off all stitches Note: Now continue from below for both dogs Ears (Make two) Cast on 3 stitches in main colour using 3.25 mm needles Rows 1-3: knit to end Row 4: sl 1, k2tog, psso Bind off the last stitch Copyright ? Ellen Kapusniak 2012 For my hand-knitted gift shop, more knitting patterns and knitting blog please visit: www.knittipoliti.com
Tail (Make one)
Cast on 4 stitches in main colour using 3.25 mm needles Rows 1-4: knit to end Row 5: k2tog twice (2 stitches) Rows 6-8: knit to end Bind off the two stitches
Collar (make one)
The collar is made with an I-cord.
To make I-cord:
Cast on two stitches in the collar colour (purple for Westie, red for Scottie) using two 3.25 mm double-pointed needles. Knit the first row. At the end of the row do not turn the work, but slide the stitches along to the other end of the needle and then knit the next row from that end. Continue in this way for each row until your I-cord measures 9 cm then bind off the two stitches. You now have all the knitted parts you need for your dog; this is how they will look.
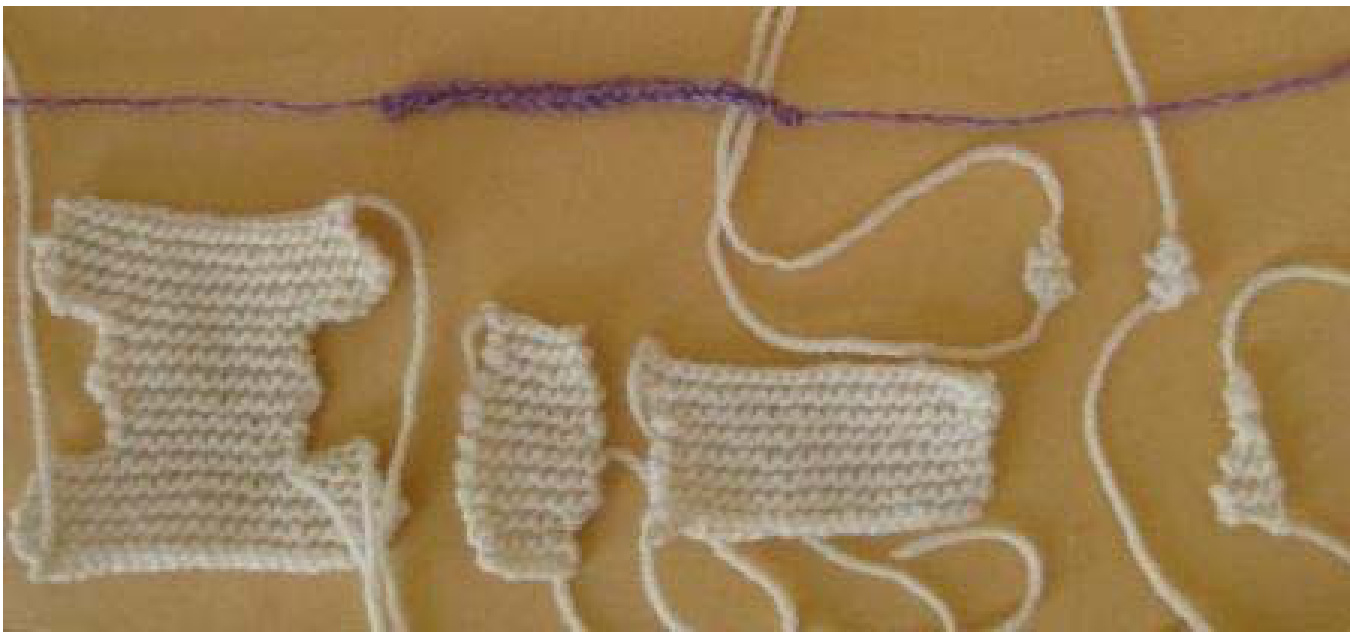
Copyright @ Ellen Kapusniak 2012 For my hand-knitted gift shop, more knitting patterns and knitting blog please visit: www.knittipoliti.com
MAKING UP AND FINISHING
Main body and legs
All of the body stitching is done with the right sides of the work facing out, there is no turning inside out. Stitching up is by oversewing the edges using the main colour of your dog. Make up body and legs: To sew up legs, pull the edges of each leg inwards towards each other and sew the edges together starting from the top of the leg and finishing at the feet (1), tucking the little point at the end towards the inside leg of the dog and sewing to the leg (2). Do the same for all 4 legs (3).
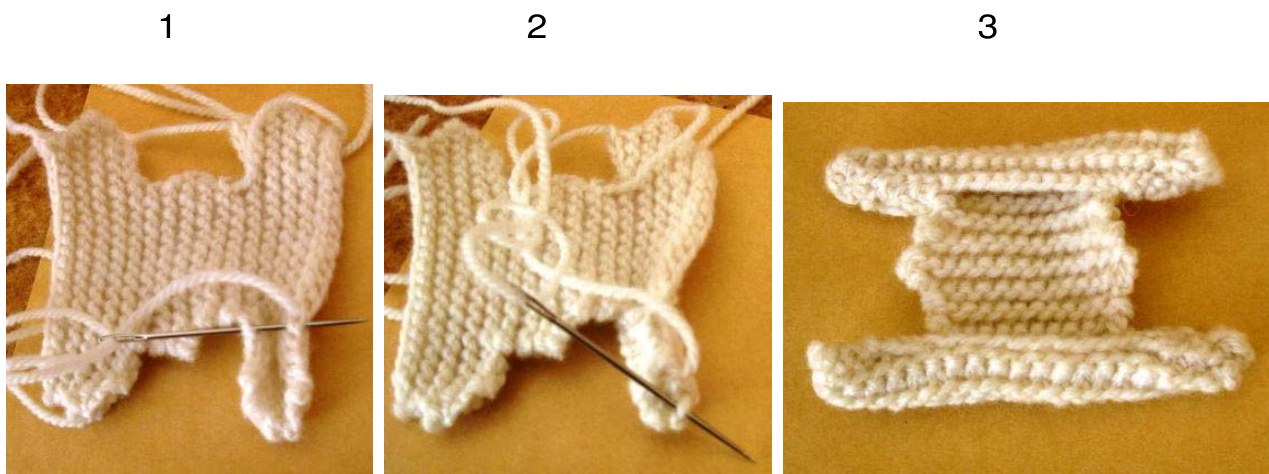
Next, stitch the lower and upper body parts together at the long edges on each side of the dog, at the space between legs on each long edge.
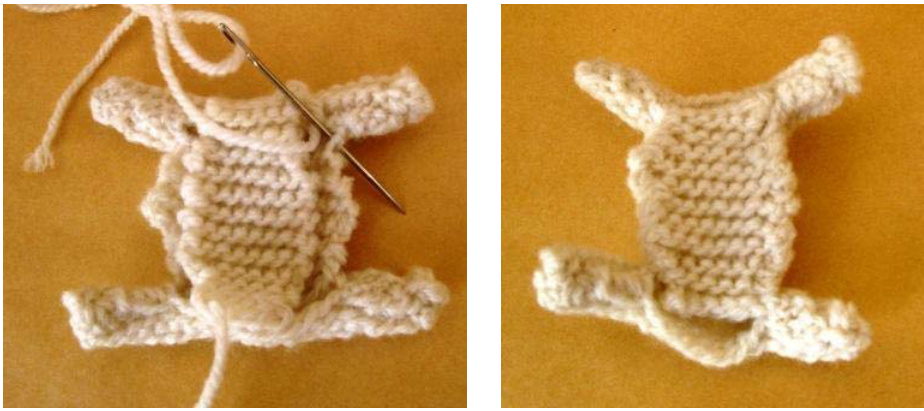
Copyright @ Ellen Kapusniak 2012 For my hand-knitted gift shop, more knitting patterns and knitting blog please visit: www.knittipoliti.com Then sew one of the short ends up, closing the entire hole with a vertical seam and leave the other end open so you can stuff your dog. Fill with toy filling.
For the final end of the dog, sew the underside piece of the body only with a vertical seam as above, then close the remainder of the hole to the upper with a horizontal seam. This will make the back legs stand a little wider apart than the front legs. Now you have the body assembled.
The legs are left apart for the Westie, but for Scottie sew leg pairs together at the feet with a few stitches (to make the dog look more compact).
Head assembly and embroidery
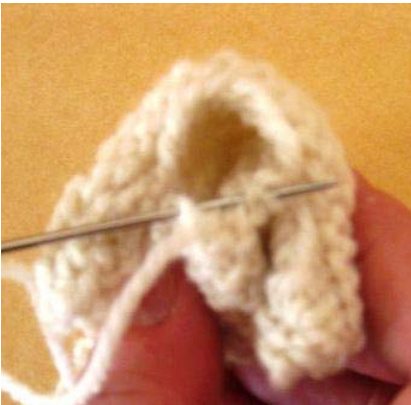
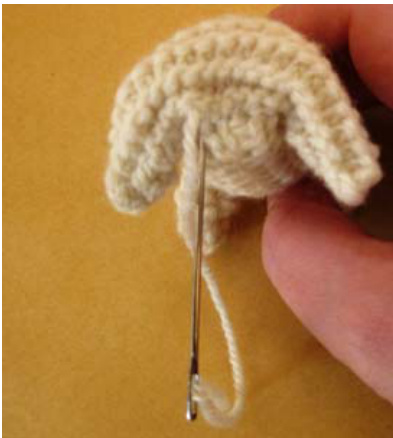
Fold the two edges of the head towards the centre back of the head piece and sew those two edges together.
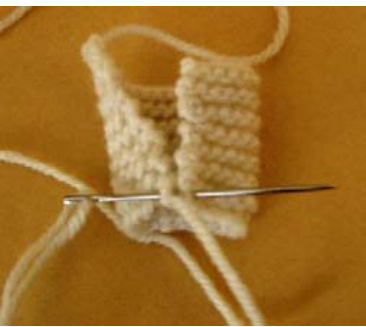
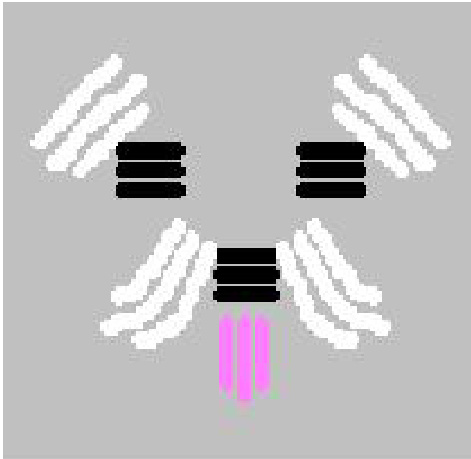
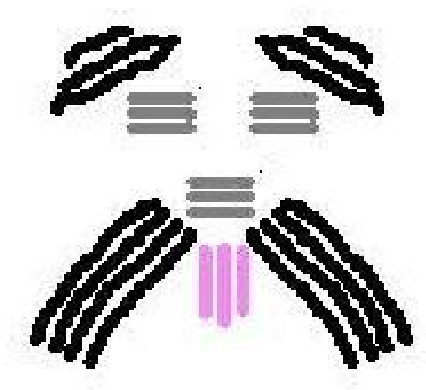
Copyright @ Ellen Kapusniak 2012 For my hand-knitted gift shop, more knitting patterns and knitting blog please visit: www.knittipoliti.com Then sew up the bottom of the head. Leave the top of the head open for stuffing, stuff with toy filling and then sew up the top of the head. One end is very slightly wider than the other. The wider end is the top of the head. Embroider the features on the head, it is better to do this when the head is made up and stuffed so you can control where the features are and don't end up with a distorted face. You can wrap or tie your yarn around your starting point, leaving a long tail that you can thread through the work and snip off whendone. For the eyes and nose wrap the yarn around a stitch a few times, for the eyebrows, muzzle and tongue use a few long stitches using the colours as shown in the diagrams. Diagrams for placement of long stitches and colours for face embroidery Westie Face Scottie Face
Ears
For the Westie, stitch 2 or 3 long stitches of pink into the centre of the ears, for the Scottie the ears are not embroidered. Sew the ears to the head. Weave in any loose ends.
Tail
Sew the long edges of the tail together, then stitch the tail in place at the back of the dog. Weave in any loose ends. Bend the tail over the back for Westie, and arrange it sticking out straight for Scottie. Copyright @ Ellen Kapusniak 2012 For my hand-knitted gift shop, more knitting patterns and knitting blog please visit: www.knittipoliti.com
Attach collar
Finish the collar, by weaving in one of your tails and then threading the other tail through the tapestry needle. Wrap the collar around the neck of your dog then sew it together around the neck using the tail thread and tie off. Sew the loose end of yarn through the collar and snip off once you're done.
Your dog is now complete!