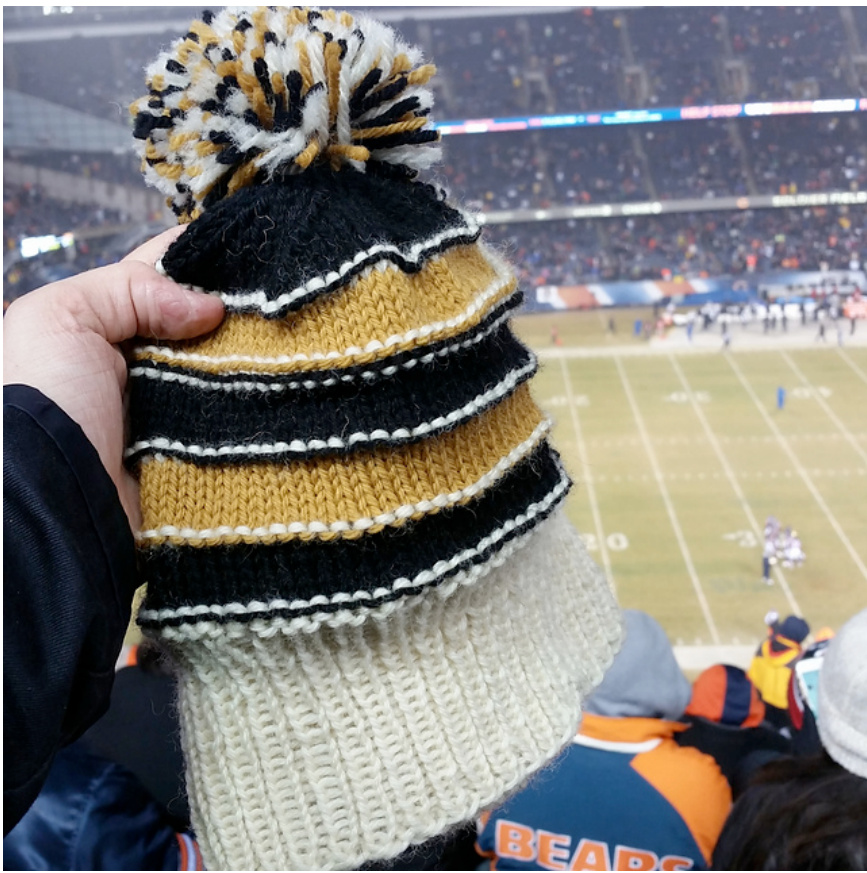
Striped Hat-- for team spirit or the color lover in you!
The hat I did knit versus the hat I meant to knit... The first pattern is the hat that I actually knit, exactly as I did it (mistakes and all). The second pattern is the one I meant to knit, if I had had more time. I had 5 hours to design and knit this hat, because I wanted to wear it to the football game that happened to be that night, so I made a judgment call and made some design changes so I'd be able to finish before the game. As it was, I knit the bulk of this in the car on the way to the game (3 hours because of trafffic!). Do you need a quick gift? This hat can be made in 5 hours! The slightly longer version would probably take 7 hours. Gauge: 5 stitches and 6 rows per inch. Size: Adult large (easily modifiable, just make the body stitch count a multiple of 9 and cast on with ten less stitches than that) US 8 needles/ 5.0 mm needles (double pointed or circulars, whichever you like) Yarn used: Cascade 220 in Black and Sunflower; Lion brand fisherman's wool in Aran. You should use your favorite worsted weight yarn. I used wool because I wanted it to be nice and cozy, but you could also use acrylic blends. Blocking isn't extremely important for this hat. Yardage requirements— Hat 1: gold 35 yards, black 55 yards, white 62 yards. Hat 2 would probably use double the white, but approximately the same black and gold. HAT 1: The hat I knit (5 hour time crunch) With White: Cast on 80 stitches using an elastic cast-on method. Join for work in the round. I chose a long tail cast on using one needle size larger (Us 9/5.5 mm). This creates a clean edge that still has enough stretch. Other options include Slip knot cast on, alternating longtail, Tillybuddy's Very Stretchy, etc. I have a nice book called “Cast on, Bind off' by Leslie Ann Bestor that includes many step-by-step techniques for casting on and binding off! There are likely tutorials online available for stretchy cast-ons. (K1, P1) ribbing for 4 inches (24 rows) On the next round, increase to 90 stitches, evenly. Every 8th stitch, Knit front and back of the stitch. Tutorial on increases: http://www.knitty.com/ISSUEwinter09/FEATwin09TT.php \*Switch to Color 1 (black), P all on first round of stripe, then K all for 5 rounds (total of 6 rows to create a 1-inch stripe). K all one round with White Switch to Color 2 (gold): P all on first round, then K all for 5 rounds. K all one round white\* Repeat from \* to \* until you have 8 inches from cast-on edge (for me, this was in the middle of a black stripe) Keeping the same color (in my case, black), knit the crown's decreases as such: Rnd 1: \*K 8, K2tog\* Repeat to end of round Rnd 2: \*K7, K2tog\* Repeat to end of round Rnd 3: \*K6, K2tog\* Repeat to end of round Rnd 4: \*K5, K2tog\* Repeat to end of round Rnd 5: \*K4, K2tog\* Repeat to end of round Rnd 6: \*K3, K2tog\* Repeat to end of round Rnd 7: \*K2, K2tog\* Repeat to end of round Rnd 8: \*K1, K2tog\* Repeat to end of round Rnd 9: \*K2tog\* Repeat to end of round Cut yarn and weave through the last nine stitches, pulling tight and weaving in yarn tail on the inside of the hat. Pompom: using all three colors, make a pompom with your preferred method. Then attach it to the top of the hat! My method of making a pompom is essentially to wrap the yarn around a credit-card sized object, then tie a longer length of yarn around the middle (securely!), then cut the loops open and trim the yarn so the pompom is nice and round. Attaching a pompom: http://youtu.be/CvZpLWk9eeg Weave in all ends, making sure that your color changes are woven well so that holes don't develop where your switched yarn. Block the hat if you used a natural fiber. If you used acrylic, you're done.
Hat 2: The Hat I would have knit if I had more time
The modifications are as such-- Cuff— 8 Inches (48 rounds) of K1 P1 ribbing in white. This is so there is enough for a very generous fold-over cuff on the hat Crown Decreases (begin 12 inches from cast-on edge) This decrease method is less steep than the one on hat 1. Rnd 1: \*K 8, K2tog\* Repeat to end of round Rnd 2: K all Rnd 3: \*K7, K2tog\* Repeat to end of round Rnd 4: K all Rnd 5: \*K6, K2tog\* Repeat to end of round Rnd 6: K all Rnd 7: \*K5, K2tog\* Repeat to end of round Rnd 8: K all Rnd 9: \*K4, K2tog\* Repeat to end of round Rnd 10: K all Rnd 11: \*K3, K2tog\* Repeat to end of round Rnd 12: K all Rnd 13: \*K2, K2tog\* Repeat to end of round Rnd 14: K all Rnd 15: \*K1, K2tog\* Repeat to end of round Rnd 16: K all Rnd 17: \*K2tog\* Repeat to end of round Rnd 18: K all This is my first pattern that I've written to share with people, so I hope I've written it well enough @ If you have any questions/ comments, please feel free to message me. Where you can find me: Ravelry— user: flannelcat Knits-withallthecolorsofthewind.tumblr.com I intended this pattern for the knitter's personal use and would please ask that you do not sell it, especially with any NFL team colors, as they generally frown on that sort of brand copyright infringement.


